Team-BHP > Team-BHP Reviews > Long-Term Ownership Reviews
Register New Topics New Posts Top Thanked Team-BHP FAQ


Reply
  Search this Thread
227,627 views
Old 8th April 2009, 11:40   #151
BHPian
 
Join Date: Aug 2008
Location: Hyderabad
Posts: 62
Thanked: 2 Times

Quote:
Originally Posted by condor View Post
@Nityanand, I did TD the Fiesta, but just some normal city driving conditions. That short TD was enough to convince me that the Fiesta, though much better than the Ikon, needed a bigger heart. The 1.4 TDCi is a mismatch for the heavier Fiesta. The sound damping etc of the Fiesta is much much better than the Ikon's.

Btw, I'm yet to reach this Ikon's top-speed !
@Condor, thanks for the info. I am sure Ikon will have higher top end speed than the Fiesta as its 144kgs lesser !!! Let me know the top speed once you do it

Btw, While i finalized my Fiesta 1.6S i was also thinking about the 1.4 FiestaTDCI basic model as they are closely priced. I am happy about the 1.6S decision
nityanand.s.s is offline  
Old 10th April 2009, 13:11   #152
BHPian
 
Proxima's Avatar
 
Join Date: Jul 2006
Location: Chennai
Posts: 910
Thanked: 301 Times

Tanked up 3 times on my Ikon and I got 17.4, 16.5 and 19.2 kmpl. The 16.5 was because of many short (<2km) trips I think. A/C on about 80% of the time, switched on and off when I return late at night. No problems with the car. Have not revved her to more than 2.5k RPM. Once a week for 30 seconds to 3k RPM as suggested by Condor and the manual.

If the car returns 19.2 kmpl in the city, then it costs me 1.7Rs per km. Wow.
Proxima is online now  
Old 11th April 2009, 19:07   #153
Distinguished - BHPian
 
condor's Avatar
 
Join Date: Jun 2006
Location: Speed-brkr City
Posts: 15,864
Thanked: 16,014 Times

Quote:
Proxima : If the car returns 19.2 kmpl in the city, then it costs me 1.7Rs per km. Wow.
With a FE like that, who needs a Nano ?! And to hell with the rick's.


HORN Replacement : help required
Guys, how do I replace the horns ?
* Do I need a relay since there is only 1 stock horn & I want to swap that for a pair.
* Can I run the two off the same pair of wires ? (The TDCi's engine bay is so crowded, it's hard to trace any wires in there)
* Where is the relay of the stock horn, and what's the rating of that ?

Had tried at the A.S.S during servicing & another place, both refused.
condor is offline  
Old 11th April 2009, 21:58   #154
Senior - BHPian
 
vnabhi's Avatar
 
Join Date: May 2007
Location: DC -> DC
Posts: 5,958
Thanked: 2,393 Times

Quote:
Originally Posted by 2theMax View Post
Yup it does go off, but don't know when and the logic behind it.
Yes, it happens in the Fiesta too. I remember reading about it somewhere in the manual.

The only logic, IMO, is that it allows a curious neighbour to peep and see how much you have travelled
vnabhi is offline  
Old 12th April 2009, 14:04   #155
Distinguished - BHPian
 
condor's Avatar
 
Join Date: Jun 2006
Location: Speed-brkr City
Posts: 15,864
Thanked: 16,014 Times
Horns : the relay hunt

Opened the wires to the horn, trying to trace the wires backwards, but the wire ended up in a conduit with other wires.

Dont see too many relay/fuse boxes. One that I did is this :
Duratorq-in' with Josh: Ford Ikon TDCi * 4 years 7 months/43,941 km & Letting Go :(-relaybox1.jpg

It's mounted around the middle (width-wise), on the firewall. No markings except the rating.

Any idea what these relays control ?

Trying to find a point from where I can run off the wires to the replacement horns I am trying put in.
condor is offline  
Old 13th April 2009, 14:42   #156
Team-BHP Support
 
Jaggu's Avatar
 
Join Date: May 2004
Location: Bangalore
Posts: 20,215
Thanked: 15,906 Times

Quote:
Originally Posted by condor View Post
Opened the wires to the horn, trying to trace the wires backwards, but the wire ended up in a conduit with other wires.

Dont see too many relay/fuse boxes. One that I did is this :
Attachment 124187

It's mounted around the middle (width-wise), on the firewall. No markings except the rating.

Any idea what these relays control ?

Trying to find a point from where I can run off the wires to the replacement horns I am trying put in.
Seems like relays for headlight, ac etc. I dont remember iKON having relays for horns, though older cars came with twin horns which were mounted side by side. Did you check this fuse/relay box cap, that will have some description, inside or outside.

If you want to add relay you will have to do minor chop job of wires and fit the new wiring along with relays. In my case tapped the wire from the horn switch, which was then wired through a changeover switch, one for OE wiring horn, and one to the relay of the new circuit. Exact point of tap was underneath the steering column.
Jaggu is online now  
Old 13th April 2009, 16:38   #157
Distinguished - BHPian
 
condor's Avatar
 
Join Date: Jun 2006
Location: Speed-brkr City
Posts: 15,864
Thanked: 16,014 Times

@Jaggu, thanks ! Where did you get this done ? I may have to take this route esp because of the response that I have been getting for this.
condor is offline  
Old 13th April 2009, 17:16   #158
Team-BHP Support
 
Jaggu's Avatar
 
Join Date: May 2004
Location: Bangalore
Posts: 20,215
Thanked: 15,906 Times

I did it in a local garage in Kerala, i did the wiring myself and the mechs did the install of the horn near the engine bay, chasis side member, which has provisions/threads to bolt.
Jaggu is online now  
Old 1st May 2009, 17:34   #159
Distinguished - BHPian
 
condor's Avatar
 
Join Date: Jun 2006
Location: Speed-brkr City
Posts: 15,864
Thanked: 16,014 Times
Accessories - ICE & Seat Covers

An update that should have been done quite a while back, soon after the actual work was done ..

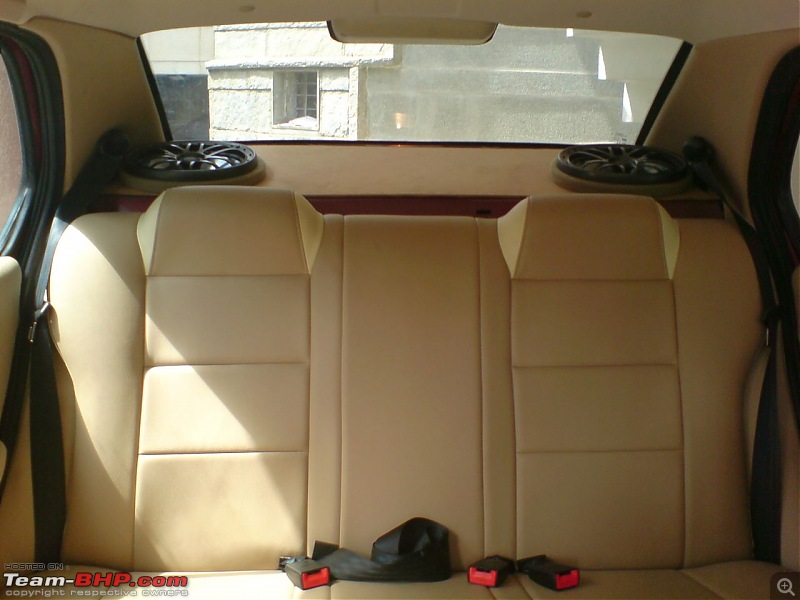
Had quite a time deciding on both these components. Finally ended up with Ovion Art-leather seat covers. Have retained the beige color combination, thus keeping the original color tones.

View from front:
Duratorq-in' with Josh: Ford Ikon TDCi * 4 years 7 months/43,941 km & Letting Go :(-seat-coversfront.jpg

The co-driver seat:
Duratorq-in' with Josh: Ford Ikon TDCi * 4 years 7 months/43,941 km & Letting Go :(-seat-cover-codrv.jpg

The rear seats:
Duratorq-in' with Josh: Ford Ikon TDCi * 4 years 7 months/43,941 km & Letting Go :(-seat-cover-rear1.jpg

Duratorq-in' with Josh: Ford Ikon TDCi * 4 years 7 months/43,941 km & Letting Go :(-rearside.jpg


Cost : approx 4.8k

And the samples, set against the door panels for comparison with the original interior colors:
Duratorq-in' with Josh: Ford Ikon TDCi * 4 years 7 months/43,941 km & Letting Go :(-ovion2.jpg


The ICE is simple : my 3 year old Alpine 9826 HU from the Sumo, paired to EFX components in the front & 6x9 ovals in the back. The original plan was to have the Kenwood 6039, but when I finally went in for the fitment, the unit was no longer available. Pio was the option in that range.. Picked the Kenwood 6539, which now does duty in the truck.

The 5.25" components in the front, supported by a thin custom-cut ring:
Duratorq-in' with Josh: Ford Ikon TDCi * 4 years 7 months/43,941 km & Letting Go :(-front-spkr1.jpg

Tried to get a audition of the different brands, but was in bits & pieces : JBL & Infinity at the JBL store, and some Panasonic at an outlet in Koramanagala. Satya had JBL 963's for comparison, but those 3-way speakers souned way too bright & a little treble /mid happy. The EFX's sound much better.

I guess I should have also checked out the Alpine's, but somehow didnt seem to find a place that could give me an audition.

No amp / sub-woofer.
HU cost approx 9.3k, and the EFX 6x9's were about 1k more than the JBL 963's. dont remember the exact costs.

While the set-up is working, the rear speakers are sitting on a 19mm + carpeted spacers. The plan was, and still is to use a custom-cut panel for use below the rear speakers, instead of the spacres. After patiently working on the panel, took it for fitting, only to find that the speakers need a thicker spacer. The cut-out in the metal for the rear speakers was too small, so the speakers have to be raised further higher.

That will be the next part of the accessorization. Till then, the rear parcel shelf is sitting bare, with the metal exposed.

Antenna has not been fitted in. Donot want to use the standard external antenna on the roof, and waiting for an internal antenna. Till then, a length of wire running on the carpet is doing antenna duty pretty well.

Last edited by condor : 1st May 2009 at 17:36.
condor is offline  
Old 1st May 2009, 18:11   #160
Distinguished - BHPian
 
condor's Avatar
 
Join Date: Jun 2006
Location: Speed-brkr City
Posts: 15,864
Thanked: 16,014 Times
DIY : Addictive !

And some more stuff that I have been working on .. the mud-flaps.

Check any car with stock mud-flaps, and the story is the same : short mud-flaps, that are more ornamental in nature. And hardly do the job that they are intended to do. The Sumo was no exception, and I had extened the front mud-flaps to effectively block the slush from splashing on to the side-step. It was but natural to try something similar on the Ikon.

Didnt do much ground work .. but found myself at Manipal motors for a set of the Sumo's mud-flaps. Rs 355 for a set of four, with the word " TATA " in bold. Not that it matterd. The trickier part was to get the lenghts & alignment right. Time & patience were going to be the key.

Had to get the wheels off to access the plastic panel. The flap is fixed to the stock lining with nuts & bolts. Need to get a horizontal strip of metal between the upper nut-bolts & the lower set also - this will make the flaps
sit better.
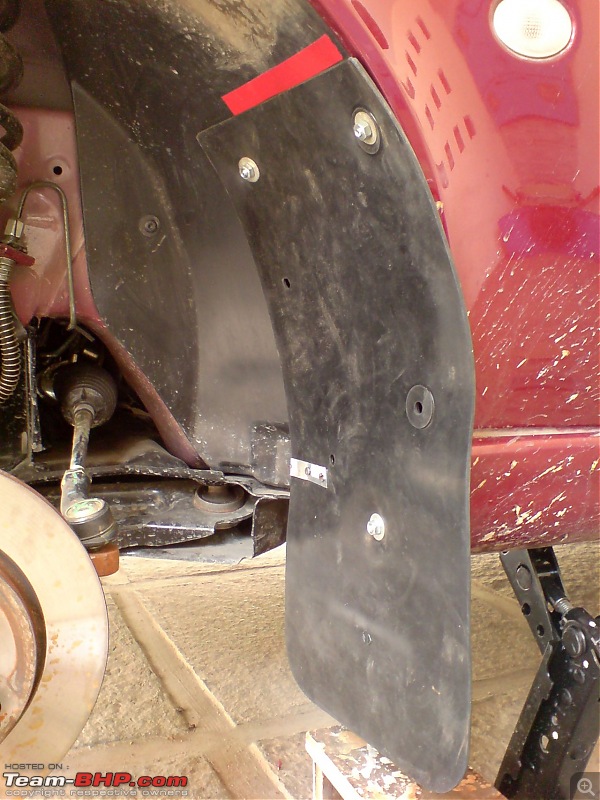
Duratorq-in' with Josh: Ford Ikon TDCi * 4 years 7 months/43,941 km & Letting Go :(-flap1.jpg

Duratorq-in' with Josh: Ford Ikon TDCi * 4 years 7 months/43,941 km & Letting Go :(-rear-right1.jpg

Additional support is in the form of the small metal strip on the lower, inner edge for the front flap, and upper inner edge for the rear flaps.

For the rear flap, there was a hook kind of project to which this has been fixed to. No drilling into the metal, though had to drill into the rear bumper to hold the flaps using those two pieces of metal strips.

The rear view, after fixing the flaps :
Duratorq-in' with Josh: Ford Ikon TDCi * 4 years 7 months/43,941 km & Letting Go :(-rear-view2.jpg

And the two sides:
Duratorq-in' with Josh: Ford Ikon TDCi * 4 years 7 months/43,941 km & Letting Go :(-flap2a.jpg

Duratorq-in' with Josh: Ford Ikon TDCi * 4 years 7 months/43,941 km & Letting Go :(-left-side.jpg

Cost of flaps : Rs 355/- for the four. Other sundry items like nuts-&-bolts were about 20/-. Got those strips from Satya .. left-overs from Auto-cop installations. But the time was where it took much more than I expected .. two sunday's. May be much faster if I had access to a hoist / hydraulic lifts like in the garages.

And was it worth the effort ? Well, you decide ..

The splashing, after a lght rain :
Duratorq-in' with Josh: Ford Ikon TDCi * 4 years 7 months/43,941 km & Letting Go :(-front-splash2.jpg

That was without the flaps, and is not very different with the OE mud-flaps.

And with the flaps :
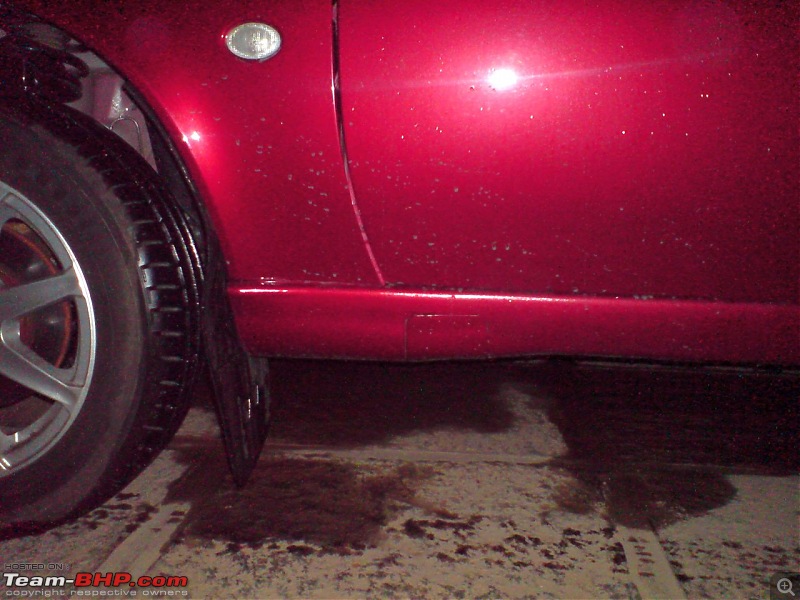
Duratorq-in' with Josh: Ford Ikon TDCi * 4 years 7 months/43,941 km & Letting Go :(-good.jpg


One thing that needs to be done to make this complete is the metal strips for the front flaps. Found that the flaps 'flap' at high speeds - when I am at 110+. Saw that during the last airport trip about a month back. Unless I do that, the flaps may tear away at the support points where I have drilled holes for the bolts.

I just dont understand : how much would it cost the manufacturers to extend the mud-flaps by 2-3 inches ? Definitely not a bomb. But those 2-3 inches of extra plastic can make such a big difference in how effective the flaps are.

All in all, a fairly good try & out come. Having done it all at home with just the basic tools like the stock jack (so when I am working on one wheel, only that wheel is raised). Was tricky to get a consistent height on all four flaps, and also to get all of them horizontal. While the four flaps may not be precisely aligned and you can even notice a slight inlcine in the rear flaps, it still looks good enough. And importantly, it Works !

Last edited by condor : 1st May 2009 at 18:14.
condor is offline  
Old 1st May 2009, 18:36   #161
Distinguished - BHPian
 
condor's Avatar
 
Join Date: Jun 2006
Location: Speed-brkr City
Posts: 15,864
Thanked: 16,014 Times
More DIY ..

Some thing asthetic this time.. unlike the functional additions I had been working on till now. Black stickers for the B-pillar.

Black stickers on the B-pillar give the car a different side-profile .. and lighter the car, the better. With the Reds, it doesnt stand out so much, but still makes a subtle difference. So decided to try it.

The sheets itself are not expensive : Rs 25/- per sq.ft. Sourcing the sticker sheets took some time, though. While I could have got it done for about a 150/- at the sticker-wala's, I was not happy with the way they scrimp on the sheets.

The first door : front left:
Duratorq-in' with Josh: Ford Ikon TDCi * 4 years 7 months/43,941 km & Letting Go :(-bpillar-lf.jpg

A close-up of the two sides: left & then the right side:
Duratorq-in' with Josh: Ford Ikon TDCi * 4 years 7 months/43,941 km & Letting Go :(-bpillar-left-3.jpg

Duratorq-in' with Josh: Ford Ikon TDCi * 4 years 7 months/43,941 km & Letting Go :(-bpillar-right.jpg


Require about 15" of the 2' wide sheet. Picked up about 8 sq ft of sheet, since there is something else I will be trying. But more about that later, as soon as I do it.

The side-view of the car, with the blackened B-Pillars:
Duratorq-in' with Josh: Ford Ikon TDCi * 4 years 7 months/43,941 km & Letting Go :(-side-profile-rt.jpg

Another pic:
Duratorq-in' with Josh: Ford Ikon TDCi * 4 years 7 months/43,941 km & Letting Go :(-f3qbpillar.jpg

And one for comparison:
Duratorq-in' with Josh: Ford Ikon TDCi * 4 years 7 months/43,941 km & Letting Go :(-original-f3q.jpg

Not a difficult thing to do. And much better doing it at home, since I have made sure that there's enough extra sticker extending below the beading of the window-glass. The corners were tricky, but finally got it right with the 4th door I did. I did get some air bubbles, but that's the easy part : just puncture the bubble with a needle, and rub the sticker to get a (near) flawless finish.


Edit:
Just realised : the car looks quite bland without the b-pillar stickers !

Last edited by condor : 1st May 2009 at 18:39.
condor is offline  
Old 1st May 2009, 18:50   #162
BHPian
 
unni.ak's Avatar
 
Join Date: May 2007
Location: Bangalore
Posts: 777
Thanked: 84 Times

Great DIYs there. Maybe you should also consider doing something for the doors. Looks too bland now.
unni.ak is offline  
Old 1st May 2009, 19:11   #163
Senior - BHPian
 
greenhorn's Avatar
 
Join Date: Apr 2007
Location: KL-01
Posts: 7,745
Thanked: 4,397 Times

try blackening the bar that runs across the grille , and holds the number plate , like in the 1.6S
greenhorn is offline  
Old 1st May 2009, 19:17   #164
Senior - BHPian
 
Amartya's Avatar
 
Join Date: Mar 2008
Location: Evanston
Posts: 1,748
Thanked: 736 Times
Fantastic D.I.Y.

+1 to that.
Quote:
Originally Posted by unni.ak View Post
Great DIYs there. Maybe you should also consider doing something for the doors. Looks too bland now.
Fantastic D.I.Y, the blackened B-pillars really look good. However, I think that the side rubbing strips that were there in the earlier iKon broke up the monotony of the sides (a friend of mine disagrees with me on this, says this looks neater).

If those are too expensive, the first generation Indica had a similar side rubbing strip, it was inexpensive and looked good too. i'll try to dig up a picture of what I am talking about.

Anyway, the recently drove the car and came away mighty impressed. It's fantastic value for money. Not sure why people are going for the butt-ugly swift dezire.
Amartya is offline  
Old 1st May 2009, 22:21   #165
Team-BHP Support
 
benbsb29's Avatar
 
Join Date: Nov 2006
Location: Brisbane
Posts: 9,968
Thanked: 13,218 Times

Quote:
Originally Posted by unni.ak View Post
Great DIYs there. Maybe you should also consider doing something for the doors. Looks too bland now.
Quote:
Originally Posted by Amartya View Post
Fantastic D.I.Y, the blackened B-pillars really look good. However, I think that the side rubbing strips that were there in the earlier iKon broke up the monotony of the sides (a friend of mine disagrees with me on this, says this looks neater).
I suggested he use the normal Ikon side stips, and get them painted body color, like how they come on the Fiesta. Condor still isnt convinced, even though i sent him PSed images with this suggestion.

Quote:
Originally Posted by greenhorn View Post
try blackening the bar that runs across the grille , and holds the number plate , like in the 1.6S
Go through his post again, and you can see there is something he's planning. Lets wait and watch.

Parwath, seems like you forgot to wash the car before taking some of the pics. :P

Last edited by benbsb29 : 1st May 2009 at 22:22.
benbsb29 is offline  
Reply

Most Viewed


Copyright ©2000 - 2024, Team-BHP.com
Proudly powered by E2E Networks