Team-BHP > Technical Stuff > DIY - Do it yourself
Register New Topics New Posts Top Thanked Team-BHP FAQ


Reply
  Search this Thread
1,050,453 views
Old 19th March 2017, 15:27   #1486
BHPian
 
Join Date: Oct 2007
Location: Bangalore
Posts: 593
Thanked: 1,129 Times

Quote:
Originally Posted by arunphilip View Post
For removing screws with worn out or sheared off heads, one option is a screw extractor, like the following (LINK):

The extractor is made from very hard metal, so it can grip the screw/bolt it is fitted into.

You'd first have to drill a suitably-sized hole with a drill, then screw in this extractor, and then turn the extractor (maybe with an impact driver, or just elbow grease) to remove the extractor and the screw.

The interesting thing is that the screw threads on an extractor go the other way (i.e. left turns tighten it) - this is to ensure that turning it to the left does not unscrew the extractor from the screw, but instead transfers that turning action to the problematic screw itself.
I had purchased this one to extract one of the stuck screws. The issue I found is that the rear of the tool is square. I couldn't find any adapter to fit it to my Impact driver or Wrench. Elbow grease did not work in my case. Do you how I can attach this to my impact tools?
I have a Milwaukee M12 1/4" hex drive impact driver and a Dewalt 899 1/2" drive impact wrench.
Holyghost is offline   (1) Thanks
Old 19th March 2017, 19:19   #1487
BHPian
 
Join Date: Nov 2013
Location: Bir-Billing, HP
Posts: 478
Thanked: 895 Times

Quote:
Originally Posted by Holyghost View Post
I had purchased this one to extract one of the stuck screws. The issue I found is that the rear of the tool is square. I couldn't find any adapter to fit it to my Impact driver or Wrench. Elbow grease did not work in my case. Do you how I can attach this to my impact tools?
I have a Milwaukee M12 1/4" hex drive impact driver and a Dewalt 899 1/2" drive impact wrench.
You need a tap holder from a tap and die set. It would be much better to remove the bolt manually using the T shaped holder as the power from a power tool might end up destroying the screw instead of removing it safely.
rdst_1 is offline   (2) Thanks
Old 21st March 2017, 14:15   #1488
BHPian
 
ilangop's Avatar
 
Join Date: Jul 2008
Location: Chennai
Posts: 992
Thanked: 903 Times
A handy pipe-bender and Baby carrier for my bicycle

I and my better half used to bicycle together until our daughter was under 2 years of age. We had a handle bar mounted baby carrier on which she was seated and I rode the bicycle. As she had outgrown the baby carrier, I had to think of something else, a baby seat for bicycle. Though such stuff are available online, they are heftily priced (like many times expensive than my bicycle itself). Hence I decided to take the plunge and make use of the 1/2 inch pipe bender that I had at home. Prepared a design by bench-marking one of the online options. Bought about 12 feet of the 1/2 inch pipe from the scrap yard. Did the cuttings and bending myself and only welding was outsourced. Was happy to have made good use of the pipe bender. With painting and some cushion work, the seat will be ready for installation
Attached Thumbnails
Tools for a DIYer-img_20170318_174600.jpg  

Tools for a DIYer-img_20170319_115446.jpg  

Tools for a DIYer-img_20170319_134059.jpg  

ilangop is offline   (9) Thanks
Old 21st March 2017, 16:52   #1489
Distinguished - BHPian
 
Thad E Ginathom's Avatar
 
Join Date: Jun 2007
Location: Chennai
Posts: 11,008
Thanked: 26,456 Times
Re: A handy pipe-bender and Baby carrier for my bicycle

Quote:
Originally Posted by ilangop View Post
... ... ... Hence I decided to take the plunge and make use of the 1/2 inch pipe bender that I had at home. ... ... ...
That is fantastic. What pipe material? Copper? Have tried that myself for some plumbing in London, and, even with the pipe-bender long-handle leverage, it is still hard work. And measuring and marking out the pipe for the curves is quite a skill. Luckily I had a stronger friend, who did some amazing multi-dimension multi-bend single pieces, mostly by eye! Very gifted.

Your child seat looks wonderful. A super accomplishment
Thad E Ginathom is offline   (2) Thanks
Old 21st March 2017, 18:37   #1490
Senior - BHPian
 
abhishek46's Avatar
 
Join Date: Oct 2010
Location: Bangalore
Posts: 1,813
Thanked: 5,864 Times
Re: A handy pipe-bender and Baby carrier for my bicycle

Quote:
Originally Posted by ilangop View Post
Hence I decided to take the plunge and make use of the 1/2 inch pipe bender that I had at home. Prepared a design by bench-marking one of the online options. Bought about 12 feet of the 1/2 inch pipe from the scrap yard. Did the cuttings and bending myself and only welding was outsourced. Was happy to have made good use of the pipe bender. With painting and some cushion work, the seat will be ready for installation
Thats great, and looks neat.

However, i strongly suggest to fill up the gaps between the tubes with thinner tubes, near the spoke wheels.
In my childhood days, when i was of 3 years age, I had the misfortune of getting my foot inserted into the spoke of a bicycle, when i was riding pillion behind my grandfather.
Those scars on my foot exists till date.
abhishek46 is offline   (5) Thanks
Old 22nd March 2017, 08:51   #1491
BHPian
 
ilangop's Avatar
 
Join Date: Jul 2008
Location: Chennai
Posts: 992
Thanked: 903 Times
Re: Tools for a DIYer

Quote:
Originally Posted by Thad E Ginathom View Post
That is fantastic. What pipe material? Copper? Have tried that myself for some plumbing in London, and, even with the pipe-bender long-handle leverage, it is still hard work. And measuring and marking out the pipe for the curves is quite a skill. Luckily I had a stronger friend, who did some amazing multi-dimension multi-bend single pieces, mostly by eye! Very gifted.

Your child seat looks wonderful. A super accomplishment
Thank you very much.
Not Copper, mild steel only but don't know the exact grade. Bending was not that easy, needed some strength. So I believe the material is strong enough to take up the weight of a kid. School time geometry lessons came handy to get the dimensions "almost" right.

Quote:
Originally Posted by abhishek46 View Post
Thats great, and looks neat.

However, i strongly suggest to fill up the gaps between the tubes with thinner tubes, near the spoke wheels.
In my childhood days, when i was of 3 years age, I had the misfortune of getting my foot inserted into the spoke of a bicycle, when i was riding pillion behind my grandfather.
Those scars on my foot exists till date.
Sure, will incorporate a guard for the feet. Thanks for the comment.
Attaching here is a picture of a sprint rack I made for a friend's Vijai Super. The rack replaces the spare wheel bracket.
Attached Thumbnails
Tools for a DIYer-15062012214.jpg  

Tools for a DIYer-15062012216.jpg  


Last edited by navin : 30th March 2017 at 12:50. Reason: spelling
ilangop is offline   (3) Thanks
Old 22nd March 2017, 15:21   #1492
Distinguished - BHPian
 
Thad E Ginathom's Avatar
 
Join Date: Jun 2007
Location: Chennai
Posts: 11,008
Thanked: 26,456 Times
Re: Tools for a DIYer

Quote:
Originally Posted by ilangop View Post
Not Copper, mild steel only but don't know the exact grade. Bending was not that easy, needed some strength.
Goodness, yes. Even copper takes some strength. And you bent the steel without even any heat treatment! That requires some luck as well, that nothing breaks.
Quote:
School time geometry lessons came handy to get the dimensions "Almost" right.
In theory, I know how to do it. I used to make jewellery as a hobby, which mean getting dimensions for circles and ellipses right. But cutting the right length of metal and making a full circle, or even knowing what dimension of circle will "squash" to the required oval, and doing it is, is, I think, a lot easier than, say, making a rectangle with even curved corners, all of right dimensions.

Of course, the steel-work guys do this every day. For the rest of us, though: it's tough!

Awrsome work. Please have another
Thad E Ginathom is offline   (1) Thanks
Old 22nd March 2017, 16:11   #1493
Distinguished - BHPian
 
Red Liner's Avatar
 
Join Date: Aug 2006
Location: Bangalore
Posts: 5,209
Thanked: 18,044 Times
Re: Tools for a DIYer

Anybody here have good torque ratchet wrenches? How much does a good domestic one in India cost?
Red Liner is offline  
Old 27th March 2017, 00:49   #1494
BHPian
 
adrian's Avatar
 
Join Date: Sep 2009
Location: Trivandrum
Posts: 932
Thanked: 1,217 Times
Re: Tools for a DIYer

Quote:
Originally Posted by Thad E Ginathom View Post
Stupid question, but I've always wondered and never actually see one used. How do you use it? Does the chuck/bit rotate when you hit it?

What kind of tasks do you expect to use this for?
Sorry for the late reply. Mr.Jeroen has already explained the working principle and the use of the tool.
I decided to buy the tool after trying to remove the screws that held the cracked wing mirror in my car. The screws were torque like hell that they started to strip with ordinary screw drivers.

Just a heads up on the tool.

Always consider the material strength before thinking of using the impact driver. For eg:- Choosing an impact driver to loosen up a screw in an aluminium carburetor body would be disastrous.

Quote:
Originally Posted by Red Liner View Post
Anybody here have good torque ratchet wrenches? How much does a good domestic one in India cost?
I own a non ratcheting torque wrench from Torque Master Tools, which is of a decent quality. Ratcheting types costs some where between 3k to 5k depending on the torque range you choose from. They also have e-torque wrenches in their range. You may visit their website for more details.

http://www.torquemaster.in

It would be heartless of me if I don't add, that so far, I had enjoyed excellent after sales support from the company. They repaired my damaged torque wrench and send it back to me with a calibration certificate. All I had to spent was the courier charges of transporting the wrench to the company. The repair was done free of cost and the return transportation expenses were paid by the company.
Disclaimer : I am in no way connected to the company

Last edited by adrian : 27th March 2017 at 00:56. Reason: typo
adrian is offline   (2) Thanks
Old 27th March 2017, 01:00   #1495
Distinguished - BHPian
 
Thad E Ginathom's Avatar
 
Join Date: Jun 2007
Location: Chennai
Posts: 11,008
Thanked: 26,456 Times
Re: Tools for a DIYer

Quote:
Originally Posted by adrian View Post
Always consider the material strength before thinking of using the impact driver. For eg:- Choosing an impact driver to loosen up a screw in an aluminium carburetor body would be disastrous.
Obviously, from what I have said already, I have no experience but... maybe a light tap, rather than a thump from a hammer?
Thad E Ginathom is offline   (1) Thanks
Old 27th March 2017, 01:10   #1496
BHPian
 
adrian's Avatar
 
Join Date: Sep 2009
Location: Trivandrum
Posts: 932
Thanked: 1,217 Times
Re: Tools for a DIYer

Quote:
Originally Posted by Thad E Ginathom View Post
Obviously, from what I have said already, I have no experience but... maybe a light tap, rather than a thump from a hammer?
Well that makes two of us.
But I still believe that it would crack the carburetor body.
May be the experienced tool experts can help us with this.

Arizona Jim , Jeroen... anyone ?!!

Last edited by adrian : 27th March 2017 at 01:12.
adrian is offline  
Old 27th March 2017, 14:56   #1497
Distinguished - BHPian
 
Join Date: Oct 2012
Location: Delhi
Posts: 8,115
Thanked: 50,983 Times

Quote:
Originally Posted by adrian View Post
Well that makes two of us.
But I still believe that it would crack the carburetor body.
May be the experienced tool experts can help us with this.
?!!

You need to be a bit careful using these impact screw drivers. For them to work you have to be able to give it a good whack with a steel hammer. So be conscious about the materials you are working on. It has to be pretty solid. You don't want it to bend, dent or crack!

If there is any danger of that happening better resort to other means. E.g. The taps shown earlier.

Jeroen
Jeroen is offline   (2) Thanks
Old 30th March 2017, 12:45   #1498
Team-BHP Support
 
Rehaan's Avatar
 
Join Date: Feb 2004
Location: Bombay
Posts: 24,046
Thanked: 34,082 Times
Re: Tools for a DIYer

Quote:
Originally Posted by adrian View Post
Solid tool with unconditional life time warranty
Perhaps a bit off-topic, but I have to ask what the fine print is on the "Unconditional Lifetime Warranty", since it has two **s next to it
Rehaan is offline   (1) Thanks
Old 30th March 2017, 20:12   #1499
BHPian
 
adrian's Avatar
 
Join Date: Sep 2009
Location: Trivandrum
Posts: 932
Thanked: 1,217 Times
Re: Tools for a DIYer

Quote:
Originally Posted by Rehaan View Post
but I have to ask what the fine print is on the "Unconditional Lifetime Warranty", since it has two **s next to it
Actually there is nothing remarked in fine print any where in the cover or in the leaflet describing the tool.
adrian is offline  
Old 4th May 2017, 15:32   #1500
Distinguished - BHPian
 
Tejas@perioimpl's Avatar
 
Join Date: Sep 2008
Location: Bombay
Posts: 4,423
Thanked: 9,582 Times
Re: Tools for a DIYer

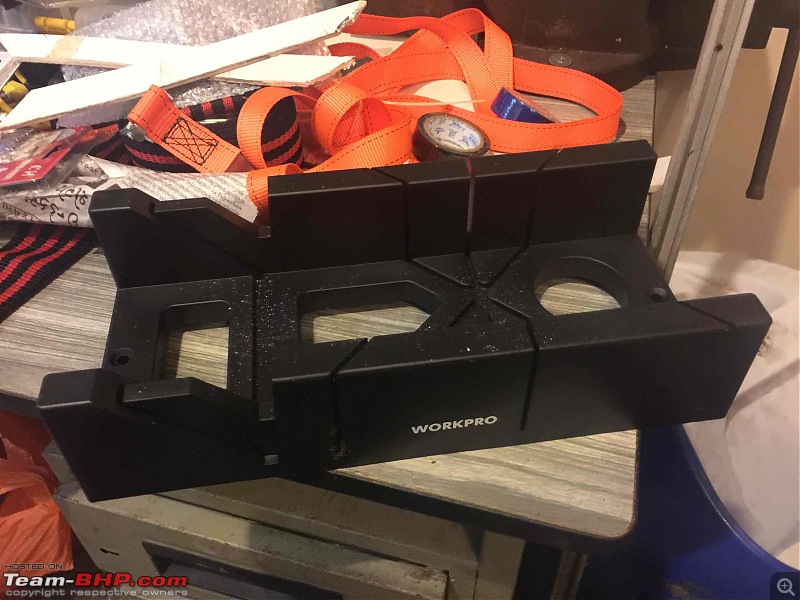
Finally the Mitre Box got delivered from Aliexpress.

Can't wait to start a new project to try it out.

Tools for a DIYer-img_0783.jpg

For those who don't know what it is:

https://en.wikipedia.org/wiki/Mitre_box
Tejas@perioimpl is offline   (2) Thanks
Reply

Most Viewed


Copyright ©2000 - 2024, Team-BHP.com
Proudly powered by E2E Networks