Team-BHP > Shifting gears > Gadgets, Computers & Software
Register New Topics New Posts Top Thanked Team-BHP FAQ


Reply
  Search this Thread
3,269,618 views
Old 13th December 2009, 21:40   #2491
Senior - BHPian
 
clevermax's Avatar
 
Join Date: Jun 2006
Location: Tvm/Amsterdam
Posts: 2,086
Thanked: 2,640 Times
Minolta Beercan 70-210 lens - I did the disassembly!!

Quote:
Originally Posted by clevermax View Post
Hi friends, romans & Lensmen,
The question is about this lens:
Attachment 186167
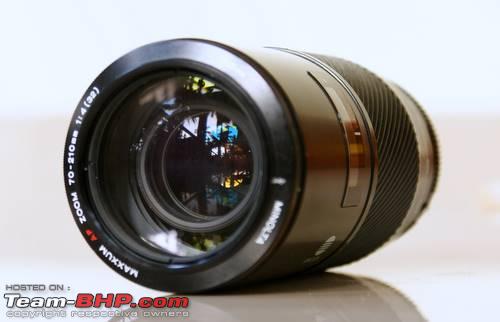
It is a Minolta Maxxum 70-210 F/4 lens.
Quote:
Originally Posted by janitha View Post
Never ever try to dissassemble a lens and clean it. Not because you cant do it but since the exact alignment will not be retained once you reassemble

it.....
Quote:
Originally Posted by clevermax View Post
So I have been going around camera repair shops / watch repair shops and now I have got all the tools & supporting equip. required to open the lens up.

Sadly, the pBase website which had detailed instructions and photographs on dismantling this lens, is down due to a database server crash. I plan to start the 'surgery' once this site is up. I need to save all the documentation and pictures to hard drive before I begin, who knows when this site is going to crash again.

These are the stuff I've got so far, for the lens repair.

1) Screw drivers of the required sizes (picked out of two sets of tool-kits)
2) Tweezers
3) Magnet & small containers to keep the screws & springs
4) Dust free room (Well, almost!)
5) Lint free paper
6) Permanent marker to mark the alignments, positions of mated parts before opening up.
7) Camera ready to take pictures on every step
8) Torch
9) Soldering iron, lead, flex
10) Toothpicks

I plan to buy a pair of white thin surgical gloves so that I don't leave any oily trace by accidentally touching the inner glass.

I am all excited to do this....
Quote:
Originally Posted by muni View Post
sounds like a landmark surgery is on the cards. I guess the surgeons themselves would be surprised at your meticulous planning.

I am looking forward for the surgery and pics of course.

Quote:
Originally Posted by aburagohain View Post
I would have loved to act the assistant for the job, cool thing to do.
Against the odds! Many people discouraged me from doing it myself....
At last, today I planned to open up my beloved Minolta Beercan 70-210 lens for the long pending fungus cleaning.

Here's the table setup. Not looking like a lab for precise operations I know.

The DSLR Thread-setup.jpg

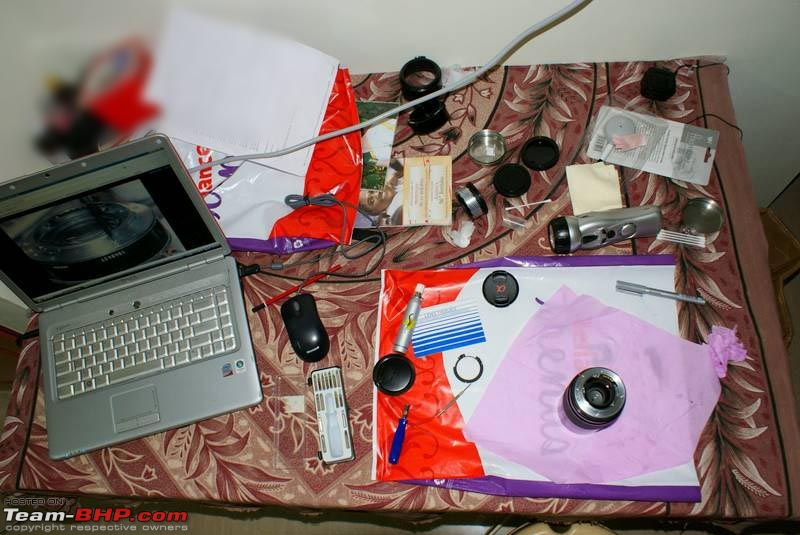
I've been documenting each and every step by taking pictures and also by marking mating parts for proper alignment when I put things back. I also had assistance from pBase site where the steps were explained in detail. I took many pictures, but here I am going to explain only the main steps during the dis-assembly with the supporting pictures.

So first off, I removed the front elements. It was easy but immediately after removing, I realized that putting it back with proper focus rotation (Infinity focus stop) will be a difficult thing. I reassembled this part immediately to see if I can do that. It was a success, then I disassembled it again. In between I took pictures with this lens to see if my focus stop is alright. (Do not confuse this with the term f-stop, this is the frontal element's rotation limits I'm talking about)

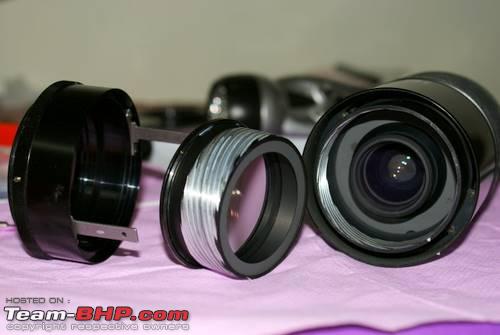
Frontal element removed:
The DSLR Thread-front1.jpg

The front element (pair of lenses attached to a cylinder with the helicoid in the outer body for the focusing rotation.

The inner side of the front element had some fungus, but the major deposit was seen deep down inside, and reaching there seemed to be an impossible task, but later I reached there too!

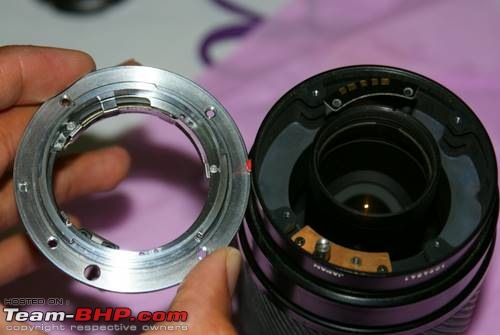
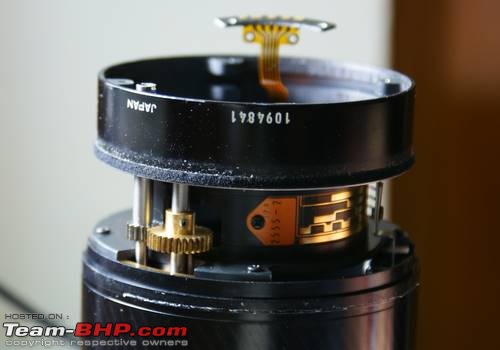
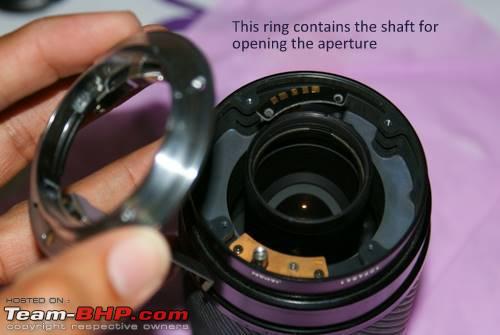
Then I started removing the rear trim rings, but initially the printed circuit board. The screws are very tiny.

The DSLR Thread-back1.jpg

Then removed the back lens mount by unscrewing four tiny screws.

The DSLR Thread-back2.jpg

The DSLR Thread-back3.jpg

Then came the easy part, removing the rear glass elements, it just un screwed counter clockwise to come out. It was just hand-tight.

The DSLR Thread-back4.jpg

The back element is a small cylinder with two glass pieces at either side.

The DSLR Thread-rear3.jpg

Whoa!! I found the nesting site of the fungus! (Picture the huge mother spider in its nesting site as you see in movies) It was on the inner side of this rear element as you can see:

The DSLR Thread-rear1.jpg

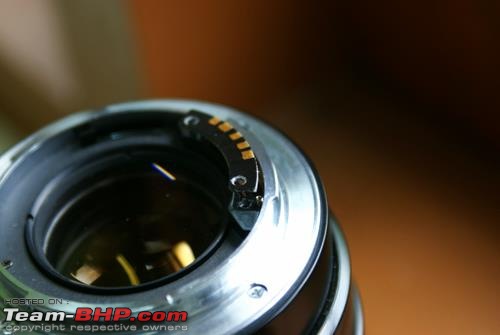
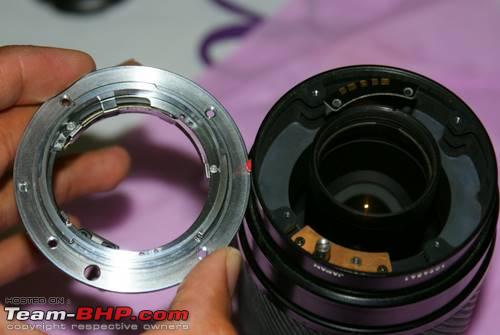
Now the aperture blades were visible and I could see some more fungus on the frontal element's inner side.

The DSLR Thread-aperture1.jpg

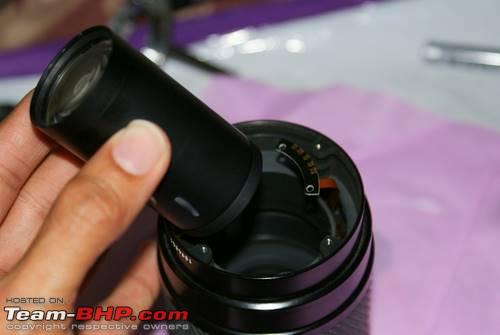
But cleaning that one would require more dismantling, so I proceeded. Now started removing the rear assembly completely.

The DSLR Thread-zoomcoder1.jpg

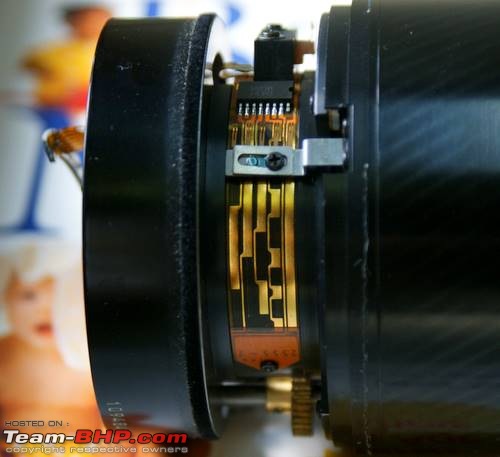
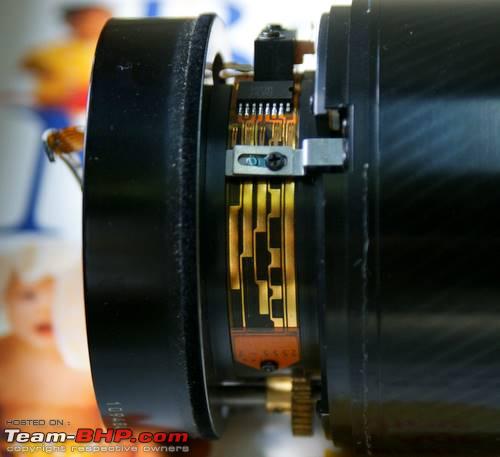
The picture above shows the zoom encoder - interesting for electronic folks like me.


Another view with the gears for the focusing of front element.

The DSLR Thread-zoomcoder2.jpg

Now removed the rear assembly fully.

The DSLR Thread-rear2.jpg

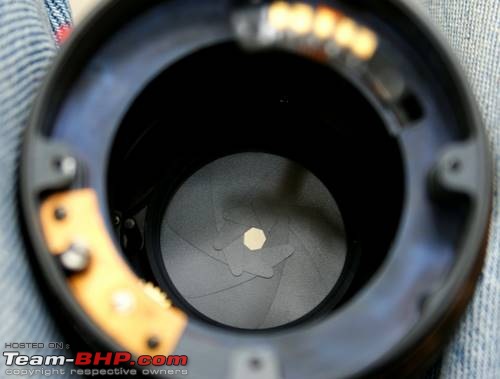
The aperture blades are clearly seen now. You can also see the shaft which is actuated for moving the aperture blades.

Name:  aperture2.JPG
Views: 2109
Size:  62.8 KB

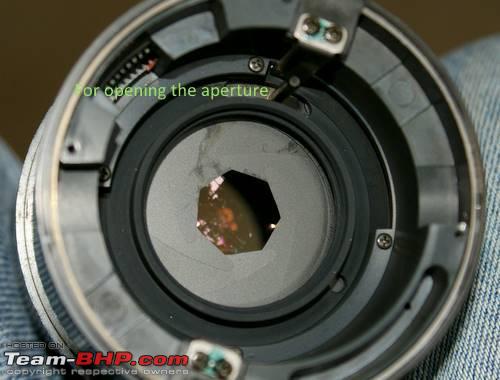
Now I opened up the aperture fully and i could easily reach the inner side of the front element. I cleaned the remaining part of fungus from there too.

Putting it all back together

This was the most difficult part, especially putting the rear lens mount with the aperture shaft, which needs to get alighed properly to the black plastic shaft which you see in the picture above. Putting back some tiny screws was a pain.

Finally, removed the rubber zoom ring, washed it in detergent, applied Armour-All on it, and it looked like new!

This is the lens after re-assembly. You can see some dust on the outer surface, I cleaned it after this picture was taken.

The DSLR Thread-final1.jpg

The DSLR Thread-final2.jpg

Now, the most thrilling part, I mounted the lens in my camera, and it worked!! It was a relief to hear the sound of autofocus happening for the first time after re-assembly.

Here are a couple of pics taken in very low light, with the cleaned lens. Sorry for the noise, it was taken in higher ISOs.

The DSLR Thread-dsc07057.jpg

The DSLR Thread-dsc07061.jpg

Autofocus: Perfect
Zoom: Perfect
Infinity focussing: Still to test
Picture sharpness: As before
Lens's structural integrity: As before

Moreover, no screws left out, no squeaking noises heard. I'm very happy with the results.

After reassembly, I took the lens to the car, started the engine, turned on the A/c for few minutes to de-humidify the interiors, and then kept it there inside, since I don't have a dry-box. I did this because there can be moisture trapped inside due to the dis-assembly. This will become dry quickly in dry air.

Last edited by clevermax : 13th December 2009 at 21:52.
clevermax is offline   (1) Thanks
Old 13th December 2009, 21:55   #2492
 
Cyrus43's Avatar
 
Join Date: Nov 2006
Location: London
Posts: 5,019
Thanked: 221 Times

Used a DSLR for the first time today to shoot the FCCCI rally. Had a Blast. Hope to buy one real soon. The cam I used was a D70S.
Cyrus43 is offline  
Old 13th December 2009, 22:00   #2493
BHPian
 
Join Date: Jan 2005
Location: Bangalore
Posts: 607
Thanked: 214 Times

Quote:
Originally Posted by clevermax View Post
Against the odds! Many people discouraged me from doing it myself....
At last, today I planned to open up my beloved Minolta Beercan 70-210 lens for the long pending fungus cleaning.

Hey, I hope you were not referring to me as I was quite thrilled and eager to see you do it and share the pics.

The operation is over and seems a job well done. Congrats.

The pics look sharp and hope the other tests go through without a hitch.

muni is offline  
Old 13th December 2009, 22:14   #2494
Senior - BHPian
 
clevermax's Avatar
 
Join Date: Jun 2006
Location: Tvm/Amsterdam
Posts: 2,086
Thanked: 2,640 Times

Quote:
Originally Posted by muni View Post
Hey, I hope you were not referring to me as I was quite thrilled and eager to see you do it and share the pics.
The operation is over and seems a job well done. Congrats.
The pics look sharp and hope the other tests go through without a hitch.
Thanks mate!

and I wasn't referring to your post, I talked many camera people and they all discouraged me. I went to a watch repair shop to buy a small screw driver to open the lens up, and I took the lens too. The sales guy appeared shocked when I told him that I am actually going to open the lens myself. He said it is unimaginable to him.
clevermax is offline  
Old 13th December 2009, 22:17   #2495
BHPian
 
Join Date: Feb 2009
Location: Kollam, Kerala
Posts: 368
Thanked: 2 Times

@clevermax Congratulations. You have done the near impossible especially since even professionals are known to mess up such works at least here in our "God's" own land!
janitha is offline  
Old 13th December 2009, 22:36   #2496
Senior - BHPian
 
clevermax's Avatar
 
Join Date: Jun 2006
Location: Tvm/Amsterdam
Posts: 2,086
Thanked: 2,640 Times

Quote:
Originally Posted by janitha View Post
@clevermax Congratulations. You have done the near impossible especially since even professionals are known to mess up such works at least here in our "God's" own land!
Thanks janitha, and I know it very well that the so called professionals can really mess things up. I didn't want to lose my lens like that to a pro, so I did it myself.

I called those guys up, and asked whether they have expertise in repairing old Minolta glasses. The person at the other end sounded too confident and he told me that lens make and specs doesn't matter, they will repair all lenses under the sun - that very moment I decided not to give my old lens to them no matter what.

Last edited by clevermax : 13th December 2009 at 22:39.
clevermax is offline  
Old 13th December 2009, 23:09   #2497
BHPian
 
Join Date: Mar 2008
Location: Melbourne
Posts: 27
Thanked: 0 Times

Quote:
Originally Posted by clevermax View Post
Against the odds! Many people discouraged me from doing it myself....

After reassembly, I took the lens to the car, started the engine, turned on the A/c for few minutes to de-humidify the interiors, and then kept it there inside, since I don't have a dry-box. I did this because there can be moisture trapped inside due to the dis-assembly. This will become dry quickly in dry air.
Nothing better than lens surgery


Quote:
Originally Posted by clevermax View Post
Thanks mate!

and I wasn't referring to your post, I talked many camera people and they all discouraged me. I went to a watch repair shop to buy a small screw driver to open the lens up, and I took the lens too. The sales guy appeared shocked when I told him that I am actually going to open the lens myself. He said it is unimaginable to him.
If i have learnt something from my own experience. Nothing is unimaginable in terms of photography. There is no such thing as too wide of too much reach and lenses work after being run over by 2 tonne cars and DSLR bodies work even at -150 degrees Celsius

Since you recently cleaned fungus. I would suggest get some high intensity Ultraviolet LEDs and bombard the lens with UV from both sides or just make sure it gets direct sunlight daily.

Usually i say if there is fungus for more than 6 months, throw the lens in the bin, this is worse for never lenses with Nano coatings. Fungus destroys these coatings and these are not repairable. But looks like your lens is saved.

The easiest and cheapest solution for making a Dry box is to simply Take a big shoe box and spray/paint it with lacquer spray to give it simple lamination. Once dry make few pouches out of old clean rags and put rice in them and put them in front of powerful light source to remove humidity. Once completely dry put these small bags in the shoe box and keep you lenses there. Rice absorbs moisture and helps controlling humidity. Also add few UV LEDs to the lid and it should keep fungus away.

Otherwise one can buy silica gel fairly cheaply or humidity absorbing reusable pads off ebay.


Quote:
Originally Posted by amitk26 View Post
The whole lengthy responses I wrote mean just one thing 60 FPS of HD or Digital is not same as 60 of NTSC or 50 of pal. The said dreamy / realism etc is due to information contained in each frame. Encoded information is much less in PAL or NTSC as it is in form of distinct number of scanned line.

As all of this discussion is irrelevant to DSLR and we are not converging on anything I will refrain from posting further on this.
PS : I still maintain that I am not questioning teh end result that somehow 24FPS gives film look but the reasons cited on the provided source are technically incorrect and with this I would like to conclude this conversation from my side.

If mods want they can create a new thread on Broadcasting / streaming / encoding standards and we can discuss further there.
Actually these conversations are relevant now to DSLR segment since red has announced the new specs number of times now for its DSMC and more and more DSLR's will be packed with faster fps (for shooting Video). Next Nikon flagship replacing D3 (not D3x or D3s) will have quite a big punch for shooting Video but there is some time before it will be arriving.

But the whole topic has been tangled and main confusion for everyone is for a simple reason which applies to rest of the world as well, SHOOTING/PLAYBACK analog vs SHOOTING/PLAYBACK digital vs different frame rates.

Point me out if i am wrong here.

Cheers
it_inspector is offline  
Old 14th December 2009, 01:54   #2498
BHPian
 
Torqueguru's Avatar
 
Join Date: Nov 2007
Location: Seattle
Posts: 277
Thanked: 165 Times

@ITinspector
"But the whole topic has been tangled and main confusion for everyone is for a simple reason which applies to rest of the world as well, SHOOTING/PLAYBACK analog vs SHOOTING/PLAYBACK digital vs different frame rates."

Spot on!

@Clevermax
Hehe, lens surgeon, that should be your new handle

Regards,
TG.
Torqueguru is offline  
Old 14th December 2009, 07:41   #2499
Senior - BHPian
 
Join Date: May 2005
Location: Location
Posts: 5,766
Thanked: 9,054 Times

Clevermax, congrats! You can be our local lens engineer

Quote:
Originally Posted by it_inspector View Post
I only use Hoya, BW and Singh-Ray filters. In my opinion Hoya has the most sturdy filters while BW and Singh-Ray are best in terms of quality.

Hoya makes a PRO1 Digital filter. Its no a UV filter but is a protector. I have same on pretty much all of my lenses and it only comes of when i am shooting directly into light source, like sunset/sunrise.

And since modern sensors are not that sensitive to UV light (Except few), a UV filter is not needed.

Cheers
Yes lens protection is what i'm looking for. But why do you take off the filter while shooting directly into the light source?

Will check out Hoya filters.

Thanks!

Quote:
Originally Posted by it_inspector View Post
Since you recently cleaned fungus. I would suggest get some high intensity Ultraviolet LEDs and bombard the lens with UV from both sides or just make sure it gets direct sunlight daily.

Usually i say if there is fungus for more than 6 months, throw the lens in the bin, this is worse for never lenses with Nano coatings. Fungus destroys these coatings and these are not repairable. But looks like your lens is saved.

The easiest and cheapest solution for making a Dry box is to simply Take a big shoe box and spray/paint it with lacquer spray to give it simple lamination. Once dry make few pouches out of old clean rags and put rice in them and put them in front of powerful light source to remove humidity. Once completely dry put these small bags in the shoe box and keep you lenses there. Rice absorbs moisture and helps controlling humidity. Also add few UV LEDs to the lid and it should keep fungus away.

Otherwise one can buy silica gel fairly cheaply or humidity absorbing reusable pads off ebay.
If we store the lens in the camera bag with couple of pouches of silica gel will it be enough to prevent fungus growth. Or is it necessary that a dry box be made with UV lighting? I live in a humid region.

Rice trick is cool!
Sankar is offline  
Old 14th December 2009, 09:24   #2500
BHPian
 
Join Date: Mar 2008
Location: Melbourne
Posts: 27
Thanked: 0 Times

Quote:
Originally Posted by Sankar View Post
Yes lens protection is what i'm looking for. But why do you take off the filter while shooting directly into the light source?

Will check out Hoya filters.

Thanks!
For lens protection Hoya Pro1D protection filter is good. If you can spend more then you can get the Hoya HD filters. HD stand for Hardened Glass, these are pretty much the strongest filter you can get.

BW and Singh-ray are definitely way better than Hoya (IMHO) but are also expensive.


Quote:
Originally Posted by Sankar View Post
If we store the lens in the camera bag with couple of pouches of silica gel will it be enough to prevent fungus growth. Or is it necessary that a dry box be made with UV lighting? I live in a humid region.

Rice trick is cool!
Look it all depends on the climate your in. For example in your in Cheerapunji, you better have a Dry box placed inside another dry box. For anywhere in Punjab its probably not needed. I don't know the climate where your located, so cannot comment.

Generally humidity is fine as long as its between 45-65%, if its more than 65% then you should pack up some silica gel. More than 75-80% better get a dry box unless you want fungus. Less than 40% you have risk of drying out seals and lubricants in the lens.

This is from film times, it still holds true for everything other than lens lubricants as lubricants have developed fair bit in last 10-15 years and don't dry our easily.

Cheers
it_inspector is offline  
Old 14th December 2009, 10:16   #2501
Senior - BHPian
 
clevermax's Avatar
 
Join Date: Jun 2006
Location: Tvm/Amsterdam
Posts: 2,086
Thanked: 2,640 Times

Quote:
Originally Posted by it_inspector View Post
The easiest and cheapest solution for making a Dry box is to simply Take a big shoe box and spray/paint it with lacquer spray to give it simple lamination. Once dry make few pouches out of old clean rags and put rice in them and put them in front of powerful light source to remove humidity. Once completely dry put these small bags in the shoe box and keep you lenses there. Rice absorbs moisture and helps controlling humidity. Also add few UV LEDs to the lid and it should keep fungus away.
@it_inspector: Yes, this is what I am going to make for the short term use, I was aware of the de-humidifying capabilities of rice already.. Anyway, many thanks for the details.

In my lens's case, little traces fungus was there for about 4 months, but recently it grew more. So I think my glasses are still fine. And, even if the body is infected, keeping the lens in a dry box will help preserving it for a long time. I am actually thinking about buying a food grade plastic box which is really air tight, and to keep the lenses in that with some moderate amount of dry silica gel sacks.
clevermax is offline  
Old 14th December 2009, 18:19   #2502
Senior - BHPian
 
ph03n!x's Avatar
 
Join Date: Jun 2008
Location: Coimbatore
Posts: 2,566
Thanked: 5,963 Times

Am having a Canon EOS T1i kit, an 8 GB card and a carry case shipped for $634.85 - its reaching my friend in UT today or tomorrow. Will be another week or two before someone brings it to me here in Philippines..

Am a novice in this, and am gonna start with this for a while- have read a whole bunch of posts in this thread. Very informative- thanks all!
ph03n!x is offline  
Old 14th December 2009, 18:28   #2503
Senior - BHPian
 
nitrous's Avatar
 
Join Date: May 2004
Location: UAE/Lon/Madras
Posts: 6,965
Thanked: 325 Times

^^ Got to try out Sathee46's T1i yesterday.
I'm sold on SLRs!
nitrous is offline  
Old 14th December 2009, 19:57   #2504
JLS
BHPian
 
JLS's Avatar
 
Join Date: Nov 2009
Location: Ahmedabad
Posts: 163
Thanked: 181 Times

Quote:
Originally Posted by Sankar View Post
Can anyone suggest a good quality 58mm UV filter? I plan to leave this attached to the lens at all times as protection. So a good quality filter which does not affect IQ is what i'd like to have.

How good is Canon UV filter?
In my opinion, filters, that too the cheap verity is best avoided.
With little care and presense of mind, you can avoid bumping/damaging your lens.
My finding is that filter degrades picture quality a lot. I was using UV filter on my 17-85 lens and PQ was ok, after I stopped using filter, both sharpness and colors improved a lot in my photos.

If you are prone to bumping, suggest to buy a proper hood and attach it in front of lens, less convinient but better photographically ( helps in avoiding stray light falling on lense and spoiling your photo also)

regards,

JLS
JLS is offline  
Old 14th December 2009, 20:10   #2505
BHPian
 
Join Date: Oct 2007
Location: Bangalore
Posts: 153
Thanked: 2 Times

Quote:
Originally Posted by clevermax View Post
Against the odds! Many people discouraged me from doing it myself....

Autofocus: Perfect
Zoom: Perfect
Infinity focussing: Still to test
Picture sharpness: As before
Lens's structural integrity: As before

Moreover, no screws left out, no squeaking noises heard. I'm very happy with the results.
Absolutely well done, thanks for sharing the photos and the fact that it can be done, I am happy for you and the results you got with the cleaned lens. Hope the infinity focus works out well too.

aburagohain is offline  
Reply

Most Viewed


Copyright ©2000 - 2024, Team-BHP.com
Proudly powered by E2E Networks