| |||||||

| Search Forums |
| Advanced Search |
| Go to Page... |
 |
| Search this Thread |  251,343 views |
 8th June 2018, 13:44
| #136 |
| Senior - BHPian | Re: 2018 Kawasaki Ninja 1000 - The Comprehensive Review Some more shots with the Panniers from different angles - This is shot with the Note 8 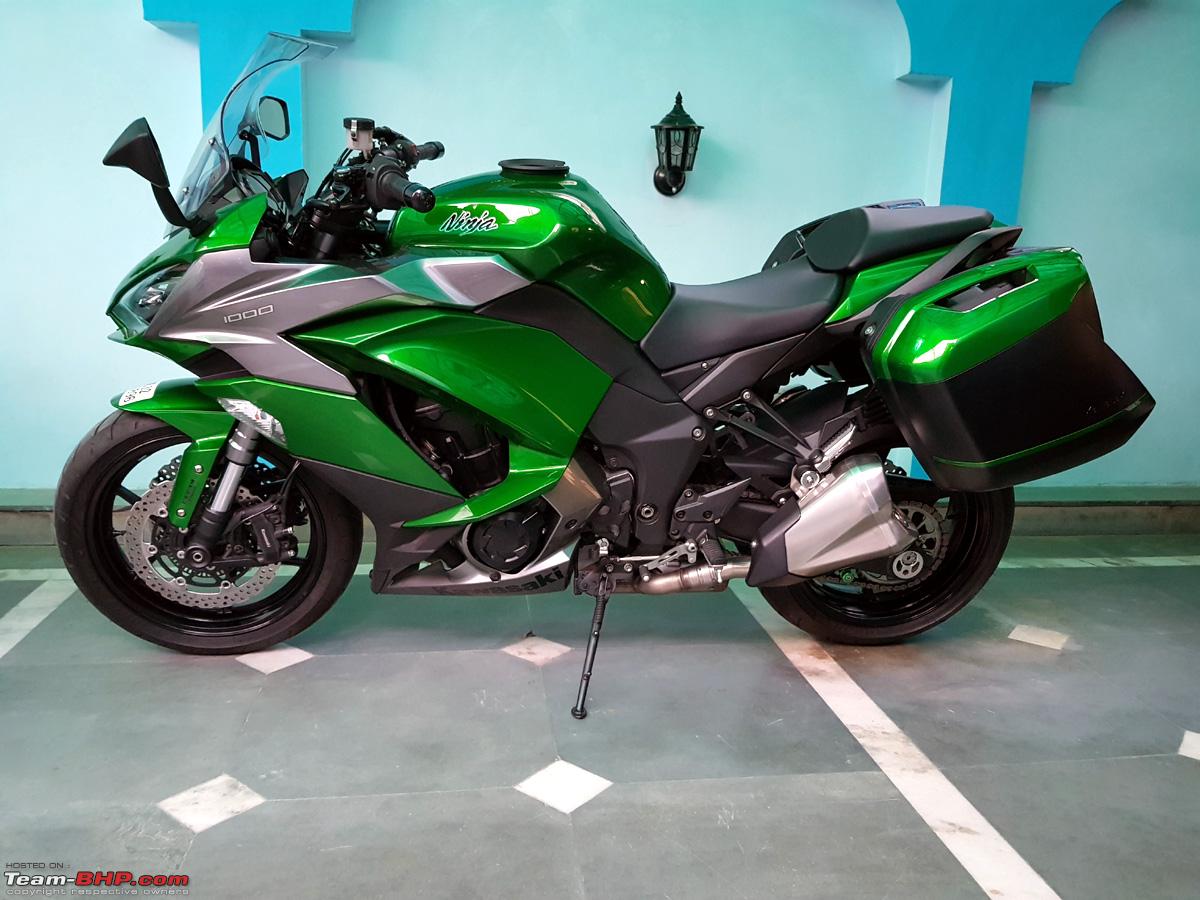 And this with Honor 10 with AI on... camera test also, lolz 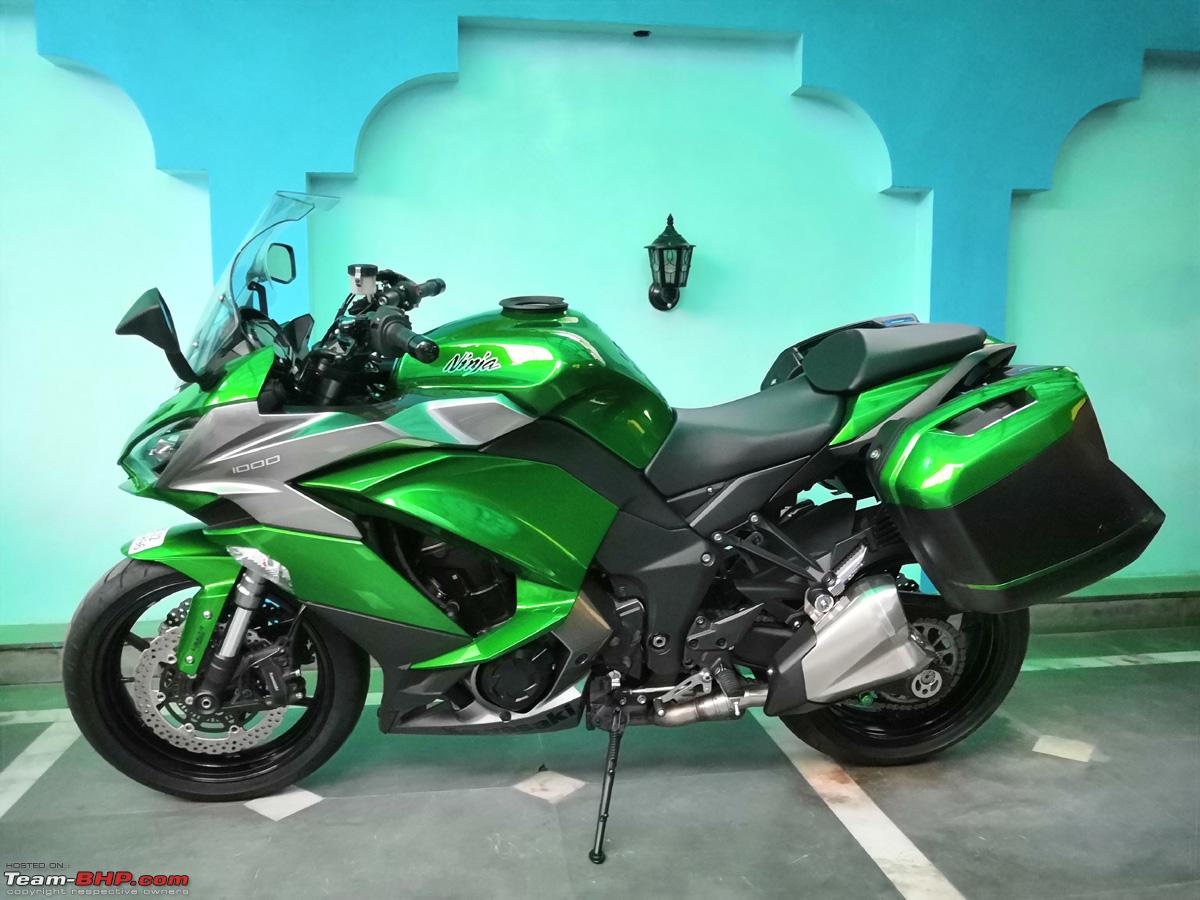 Fat Bottomed Girls, you make the rockin world go round... lolz Looks quite broad from this angle even though the width with the panniers is LESS than the width of those rear view mirrors extended at the front. And in this picture the rear view mirrors look very small, camera perspective you can say!  Change the perspective and you see a different picture. Now the Panniers are hardly visible from the front. 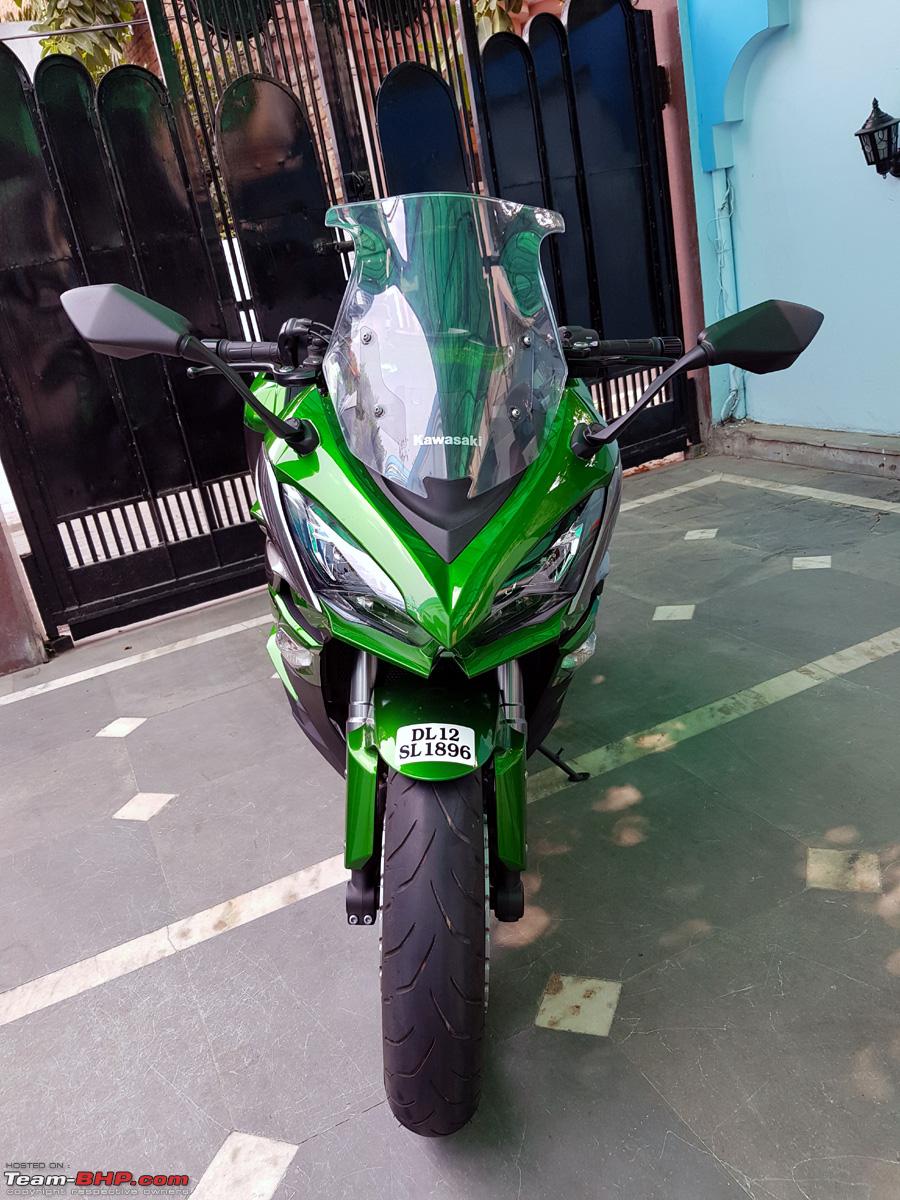 Another angle from the front. The Panniers are well within the width of the rear view mirrors. Though if you ride this 1000cc bike like a CD100 weaving through traffic, you will need to be careful with those panniers on.  View of both the bikes, with their saddle bags.  Here's a video of what all can be packed inside those two panniers, including a tent, sleeping bag, extra shoes, clothes, tyre inflator, axe etc. Here's a short video of touring with the panniers on the Ninja 1000 and how it actually looks on the road with the panniers, even though the one's shown in the video are an older model, but you will get the drift. Here are some 1920x1080 wallpaper shots, for anyone interested  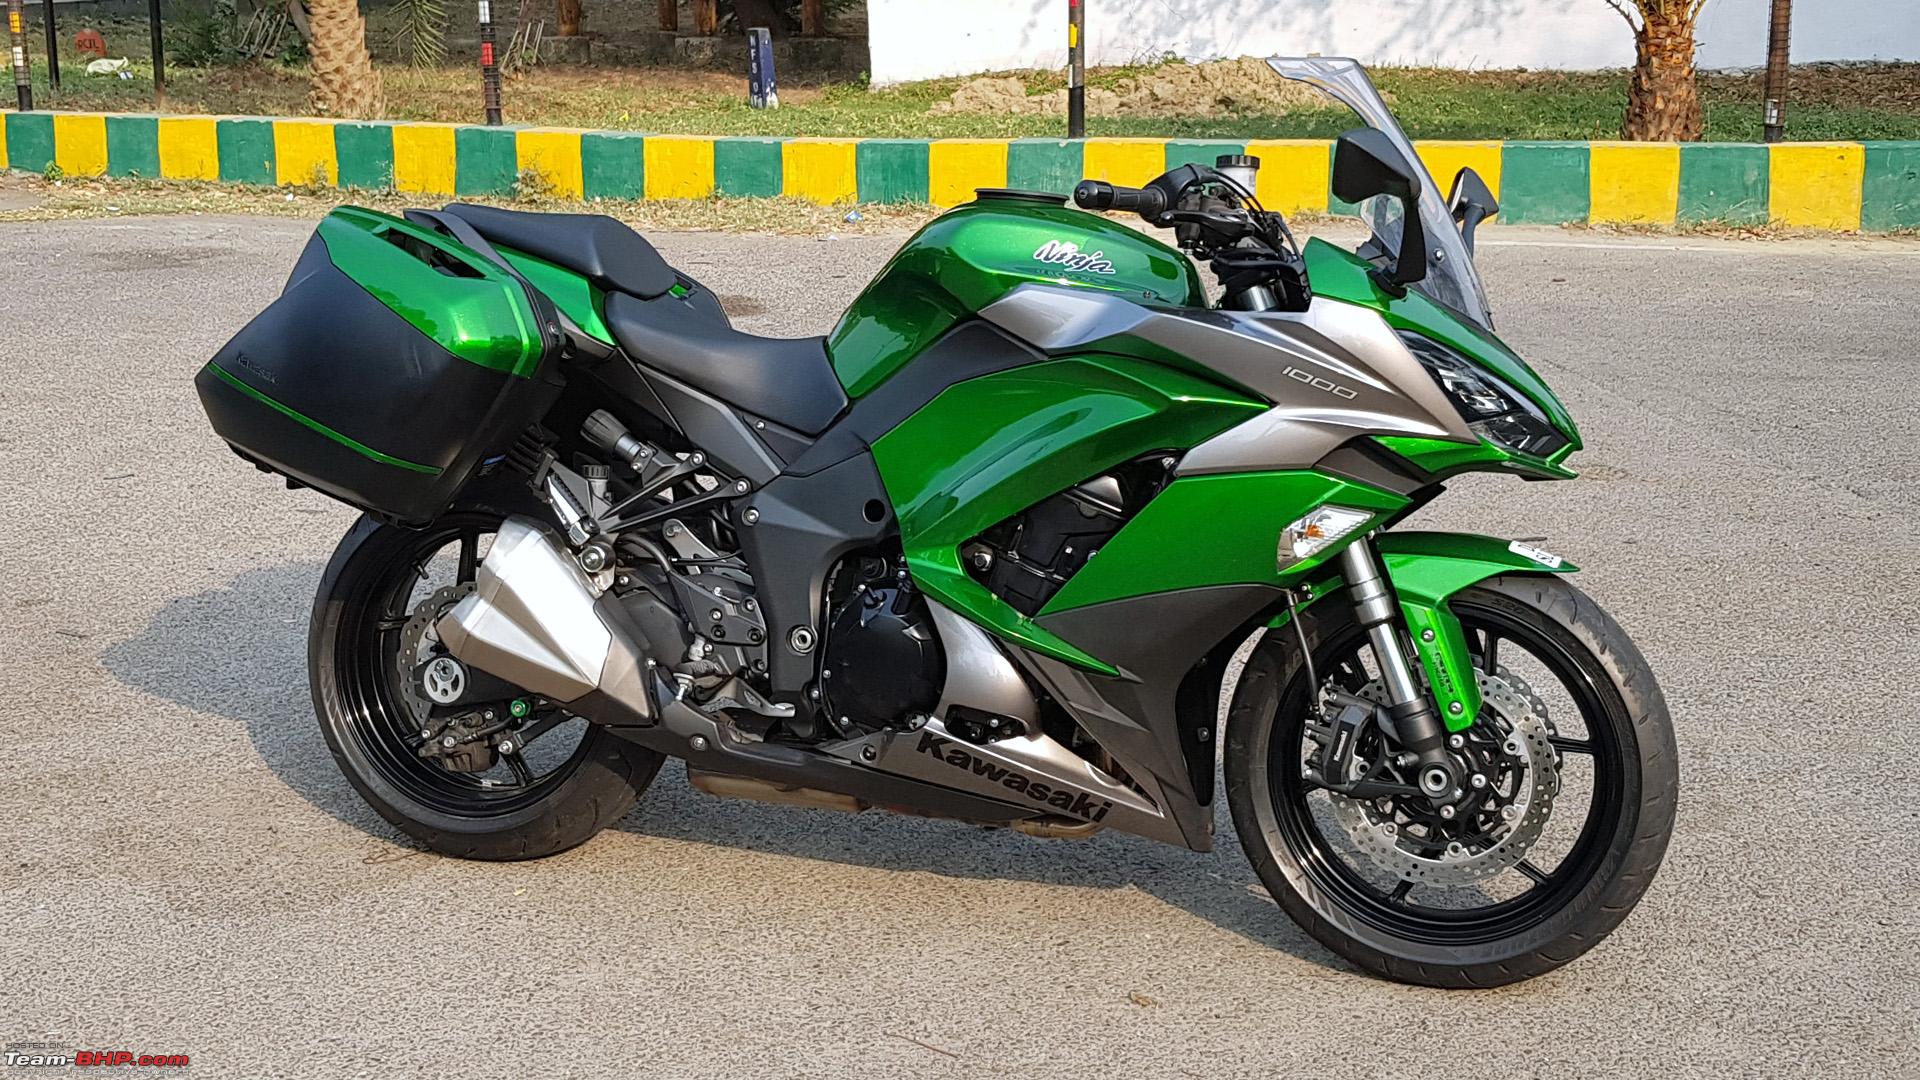 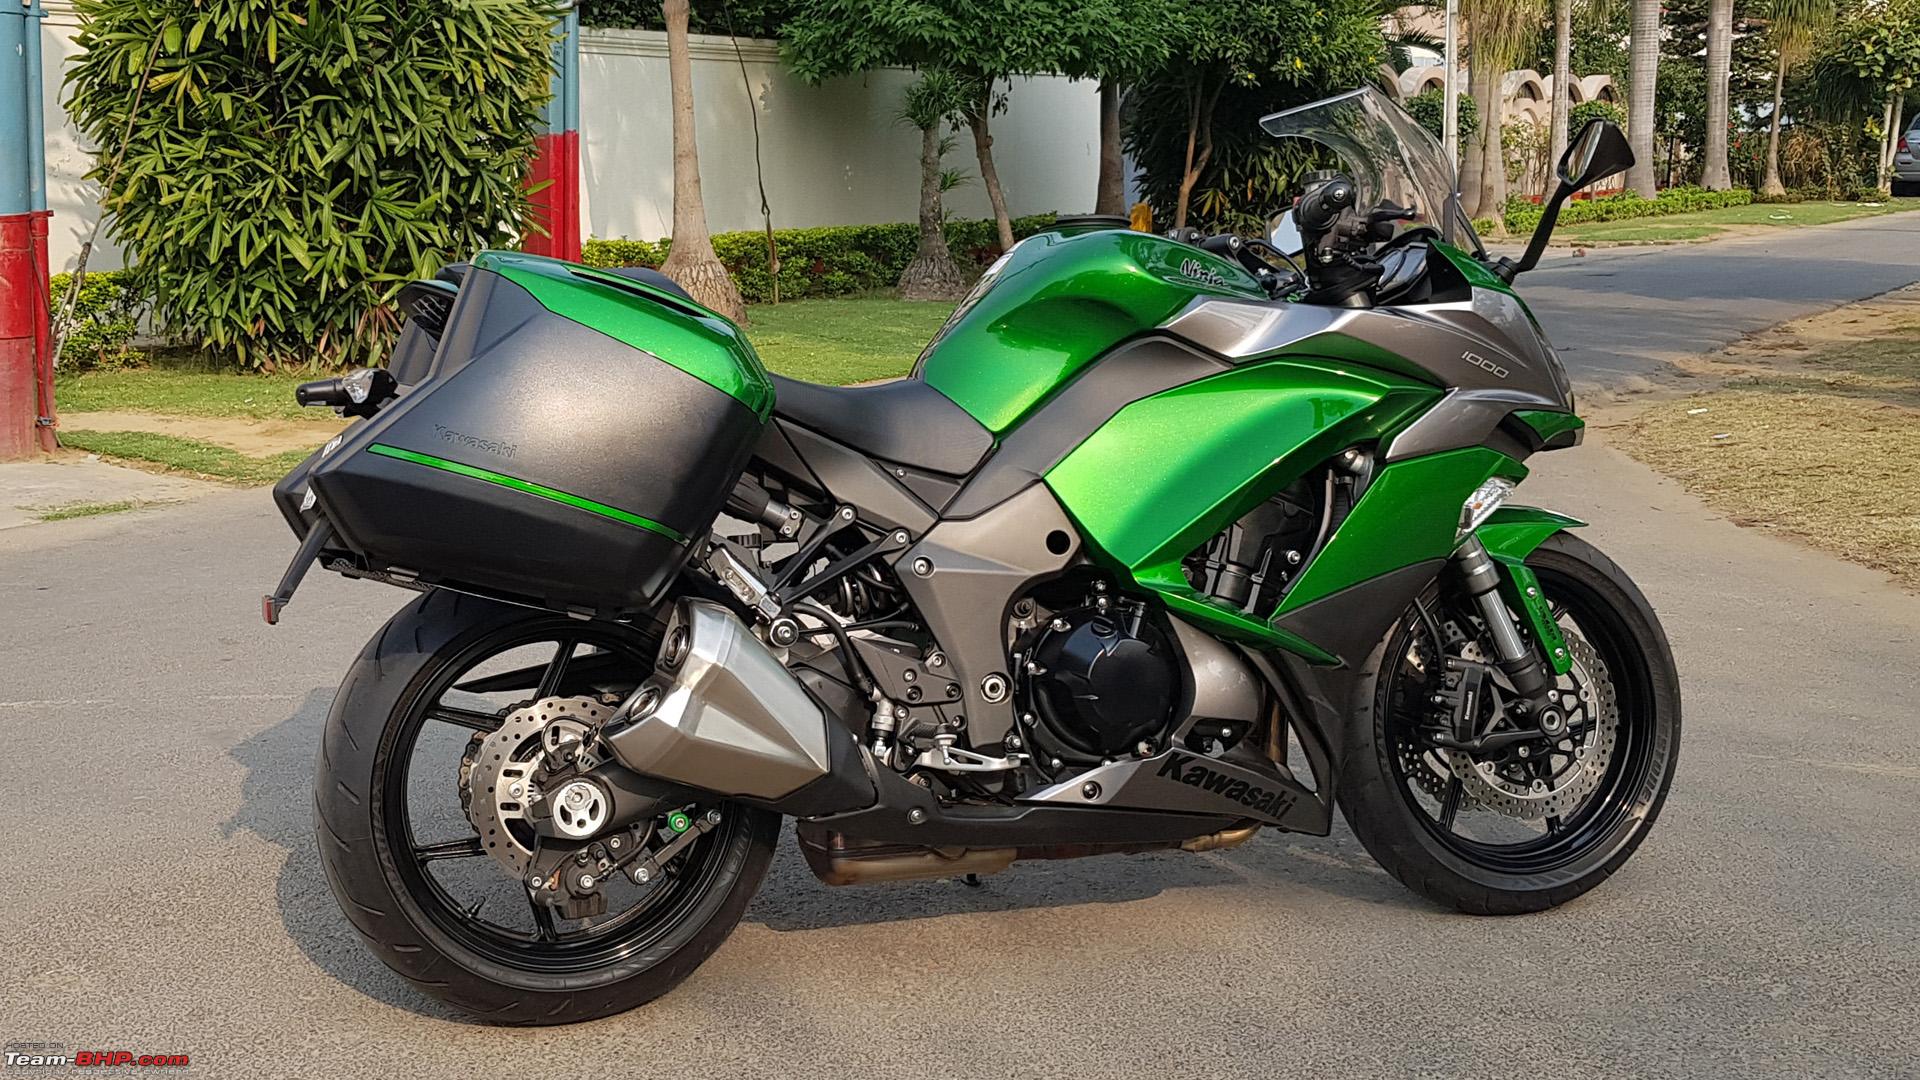 ------------------ Kawasaki India (IKM) also launched a official android app,IKM CONNECT, yesterday which I have downloaded and am using.  I found it to be quite useful. You just need to enter your mobile number and an OTP comes for verification. After verification, your Bike's registration number is automatically displayed, provided your dealer has entered correct information in the official IKM billing software. After selecting your bike's registration number all information about you and your bike is displayed like the Vehicle Information including date of purchase and chassis number, color, model, your personal profile including your email, phone and registration number, Service History and Records of all your registered bikes including type of service, date of service, dealer, odo reading, service engineer and cost of service paid. Your bike's service health according to your service history, Service Camps in your vicinity, schedule a service. Besides this it also gives details of all the bikes being currently sold in India. There's also a SOS and Hotline service inbuilt. You can also inquire about any spares that you need. It also displays the cost and all accessories available. Though I found the cost of accessories not matching with the current prices, which needs updation, but you get the general idea. Also any events to be held and news about Kawasaki India in general. So basically it's a nice endeavor by IKM. You can download the app here - https://play.google.com/store/apps/d...ikmconnect.app Cheers... Last edited by dkaile : 8th June 2018 at 13:52. |

|  (9)
Thanks (9)
Thanks
 |
| The following 9 BHPians Thank dkaile for this useful post: | anandpadhye, audioholic, Cyborg, hiren.mistry, irajput, neerajdan, Nilesh5417, sukiwa, v12 |
| |
|
8th June 2018, 16:08
| #137 |
| BHPian Join Date: Oct 2009 Location: New Delhi
Posts: 52
Thanked: 14 Times
| Wow ! What a terrific detailed writeup. Seems like you have been narrating a story all along. While I have been a member here for many years, however have been big time guilty of not contributing through my end. Hardly a day goes by when I do not visit TeamBHP. I used to own a RX135 in my younger days which I sold off a few years back. Buzzing in and around Delhi on the 135 was the most awesome of experiences. Since then, have been mostly into cars. All along, however my passion for motorcycling never really died down. I had gotten an Aprilia SR150 Race Edition last year for my wife which in-fact was possibly one of the firsts SRs race editions in Delhi post its launch. Got it on the day of the availability. Have always wanted to get a lovely set of two wheels throughout however my family has been against me getting a bike. Mum and Dad have safety concerns. It was quite difficult to make them agree for the Aprilia however they finally agreed as it was to be mostly used for local colony and sedate riding by my wife and brother. Your review has totally inspired me & opened up my old wounds of getting a decent bike. While I had earlier followed the Ninja 650 and have thought about getting one, your write up has made me seriously think about the 1000. Now, my work might take me to the United States in the near future. If that goes through, I am sure I will be spoilt for choice in the neighborhood. Once again, great write up with in-depth follow-ups from your end. Have learnt so many new things about the bike and the accessories that you have mentioned & installed. Have fun riding. Will be following up on the thread for more. On another note, I happen to have a question? While I understand that the 1000 may be bought for under 12 lacs, I need a suggestion in case one was to have a budget of 25. Would be looking for something in the sports category similar to the Ninja. Not limited to Kawasaki. Would be great if you can suggest a couple of choices which have similar characteristics to 1000 however with more BHP  Comfort has to be an important factor which in fact you have repeatedly mentioned in your thread and praised the 1000 for. I know that quite a few choices exist in the supersport category however I am looking for an answer from someone who is well averse with high end bikes. The bike is to be used for city and highways with no real off-roading as such. I would be looking at something other than cruisers and nakeds. Thanks ! Hope I am not highjacking your thread. Last edited by GTO : 9th June 2018 at 08:56. Reason: Merging back to back posts |
|
| (2)
Thanks
|
| The following 2 BHPians Thank wingsoffires for this useful post: | dkaile, mh09ad5578 |
|
8th June 2018, 18:05
| #138 | |
| Senior - BHPian | Re: 2018 Kawasaki Ninja 1000 - The Comprehensive Review Quote:
Cheers... | |
|
| (1)
Thanks
|

| The following BHPian Thanks dkaile for this useful post: | wingsoffires |
|
9th June 2018, 11:00
| #139 |
| Senior - BHPian | Re: 2018 Kawasaki Ninja 1000 - The Comprehensive Review Kawasaki Service Van Visit to Meerut/Mawana - 04-06-2018 Warning - Long Detailed Post/s ahead once again - Only for Enthusiasts I was thinking of getting all these accessories fitted and was planning to open up the fairings, one of the tricky jobs in the book, myself. And voila, I receive a call from Swapnil, the Service Manager at Aurum Kawasaki, that Kawasaki was planning to send it's Service Van FREE OF COST to Meerut and Mawana as a Customer Drive Initiative. The running cost of these vans including diesel cost is borne by Kawasaki India (IKM). The Customer is usually charged for any jobs done on his bike at the showroom/service center rates. Aurum, anyways, had to install my frame sliders free of cost. So I jumped on this opportunity to get all my other jobs done as well. Panniers fitting I had already completed myself. So the planned jobs, which involved opening up the fairing, were - PUIG Po Frame Sliders Install, K&N High Flow Air Filter Install, Bosch Symphony Horn Upgrade from the Windtones, Dual Power Cable Install, LED Indicator Bulbs Upgrade - Front and Back, LED compatible Flasher Relay change from a static 40W capacity one to a variable 0.6W~150W one, etc. So the long body Force Traveller reaches Meerut and sets shop outside my residence 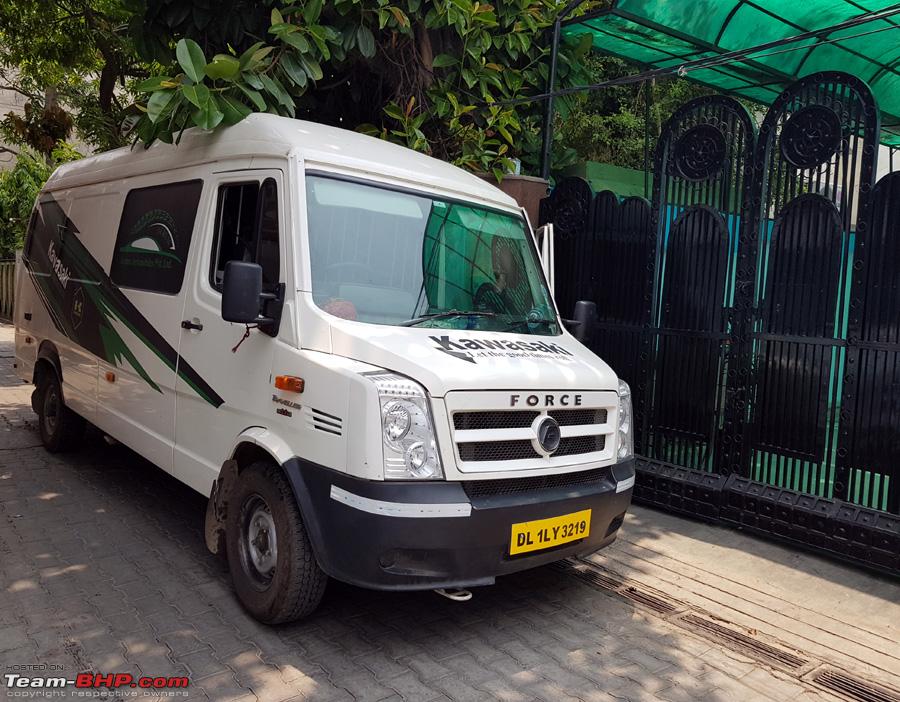 \ \The van is fully equipped with a dedicated tool set of workshop specs and space to even carry 1-2 bikes if needed  Yours truly with the Service Technician Mr. Ramdev and his assistant cum van driver 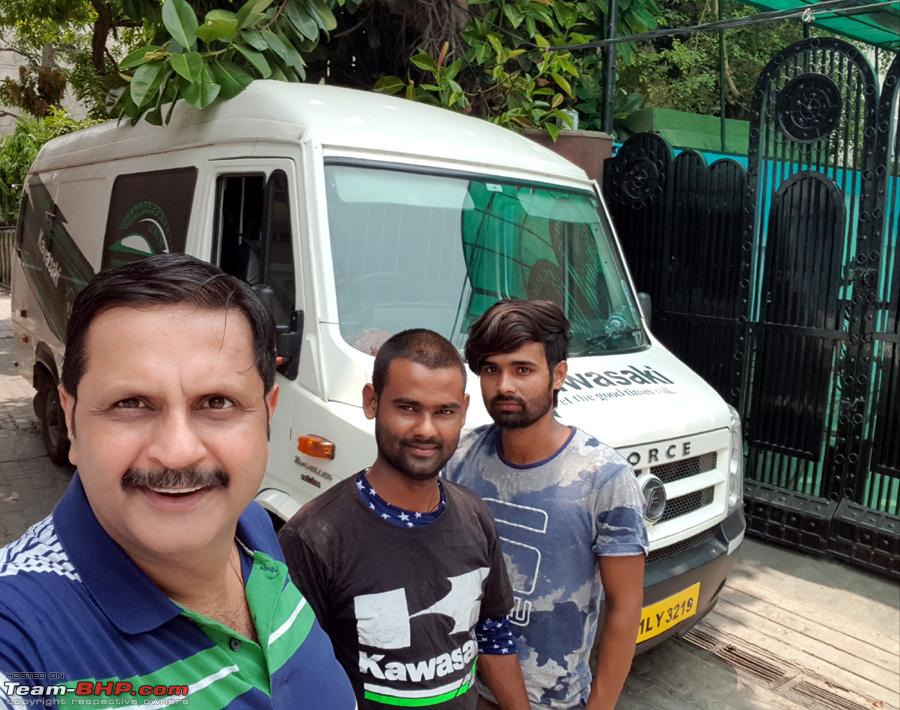 The first job is to remove both the seats and set them apart. Notice the soft cloth laid on the floor to carefully place all fairing parts to avoid any damage or scratches. 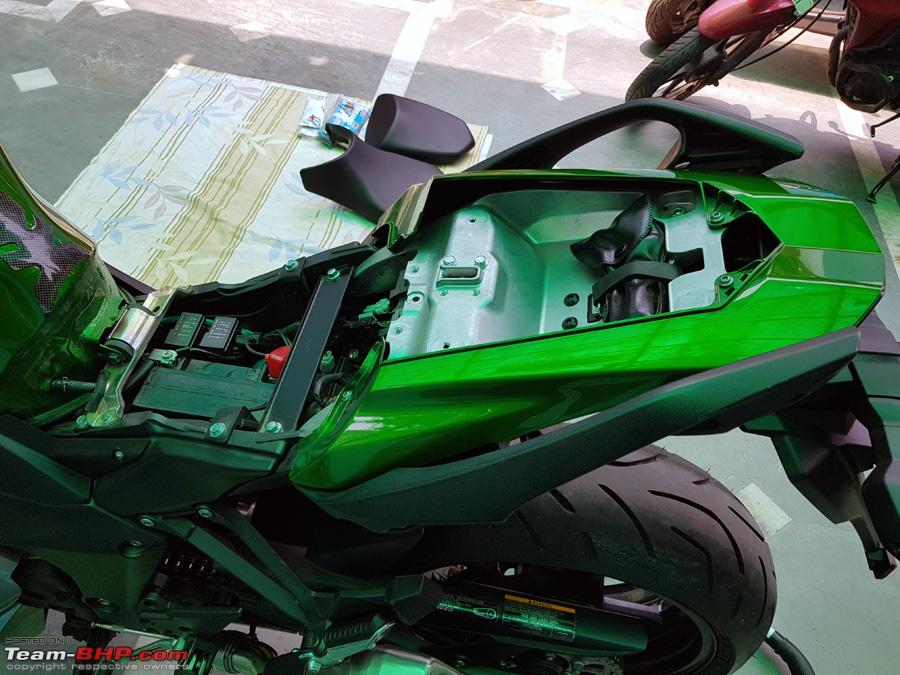 Now Opening of the Fairings is the main job today. Though the Technician said he was well versed with the procedure, I will lay down a few videos which helped - This PUIG Pro Installation video directly from the company was MOST helpful as it details the procedure exactly for our bike Also helped by this video by our fellow enthusiast and Ninja 1000 Owner Jonathan Long - So the first job is to remove the one middle fairing bolt and one plastic quick rivet from the middle fairing on the left side 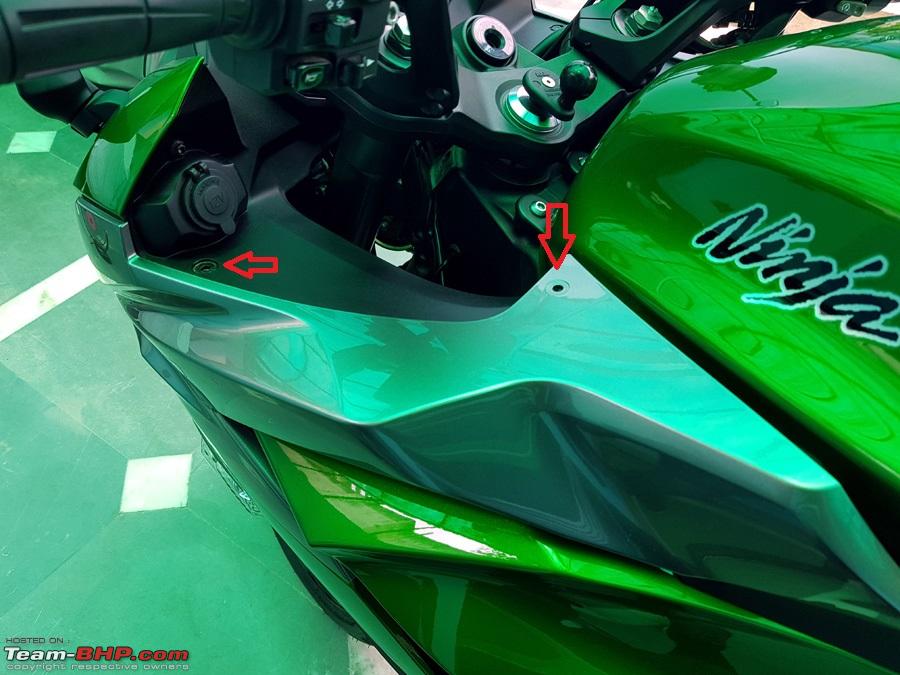 Then it is pulled back and then forward to release the projections, tabs and hooks as shown in the picture, and the middle fairing is off 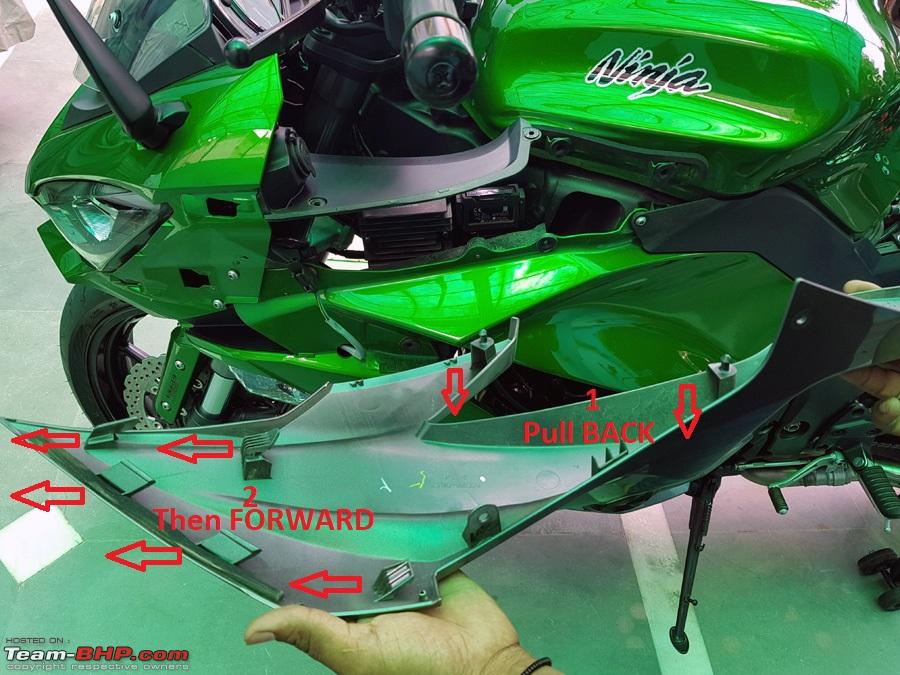 Next job is to remove the Side Cover on the left side by removing the 2 bolts, one at the back as shown and one at the front and then pull it outwards to clear the projections carefully. Special care has to be taken to remove this side cover as I have seen technicians crack this plastic cover if care is not taken. 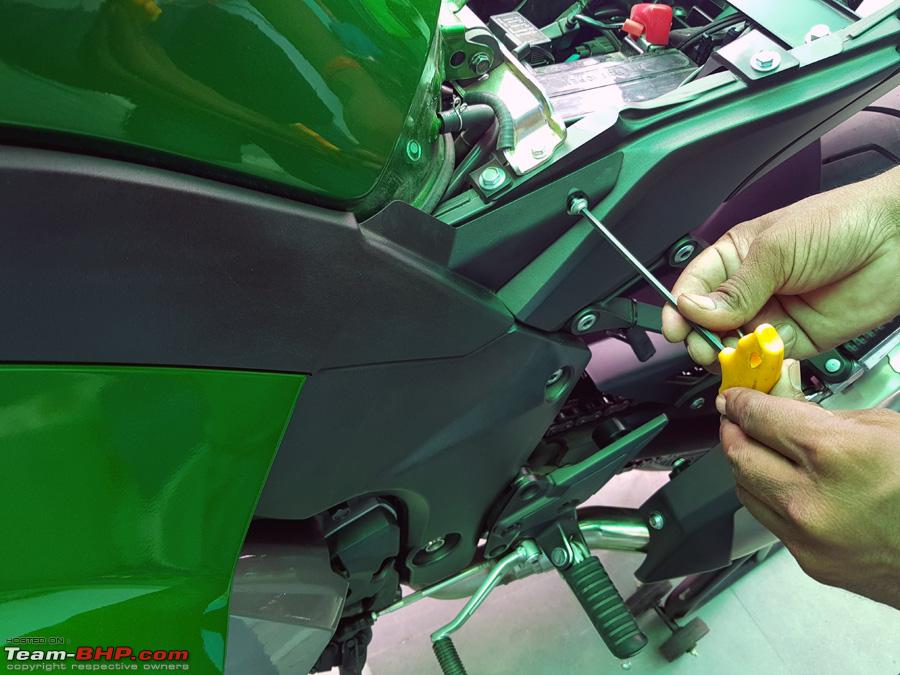 Next job is to remove the Lower Fairing on the left side. More detailed photos of the same during the re-installment process. Remove the 2 quick rivets from the inside side 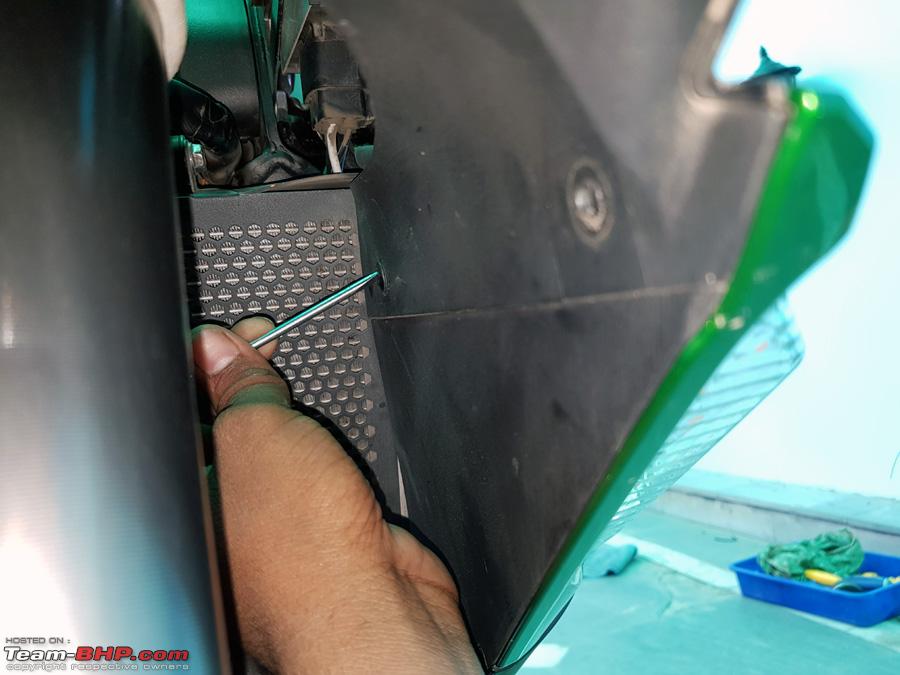 And also the two at the bottom 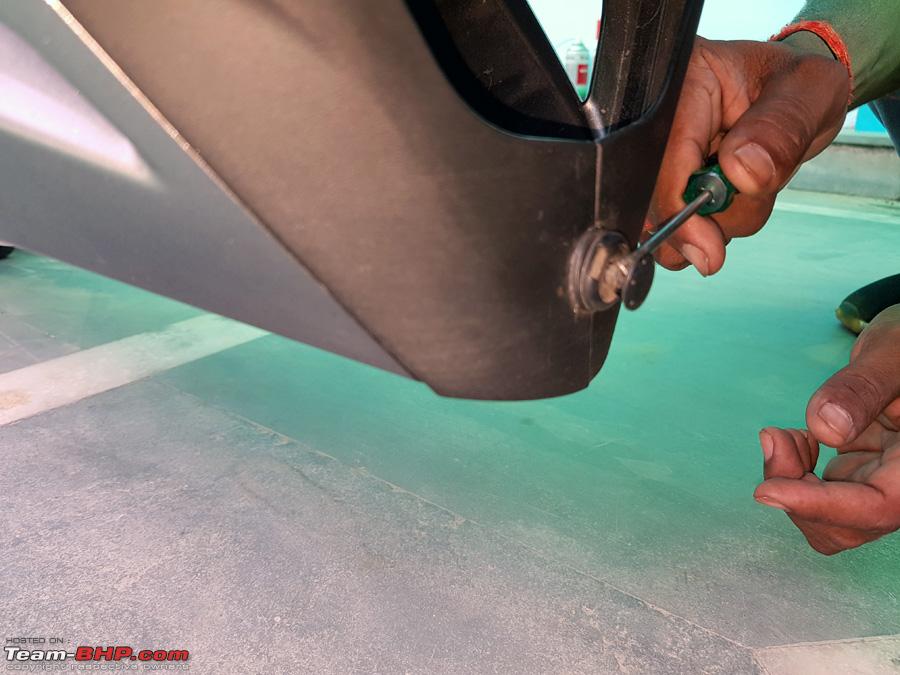 Then on the left side, disconnect the turn signal light connector as visible in the photo and also the Outside temperature sensor connector (behind the turn signal connector and not visible in the photo). Then there are 2 bolts at the bottom (on the left side fairing), two on the top front and one on the top rear. After removing these 5 bolts, the fairing is pushed outwards and then back to slide the fairing off.  The original Denso, Japan 40W static load flasher displayed here, which will be removed as with LED bulbs, it doesn't detect the load and it is engineered to think that a bulb has blown off, and starts to flash quickly to warn the rider. This has to be replaced by variable load Flasher which blinks constantly even at lower or higher loads. Something like this can be got from Custom Dynamics USA for 20$ here - https://www.customled.com/products/e...-flasher-relay or for a fraction of that cost from AliExpress from where I have got it (link already posted before). 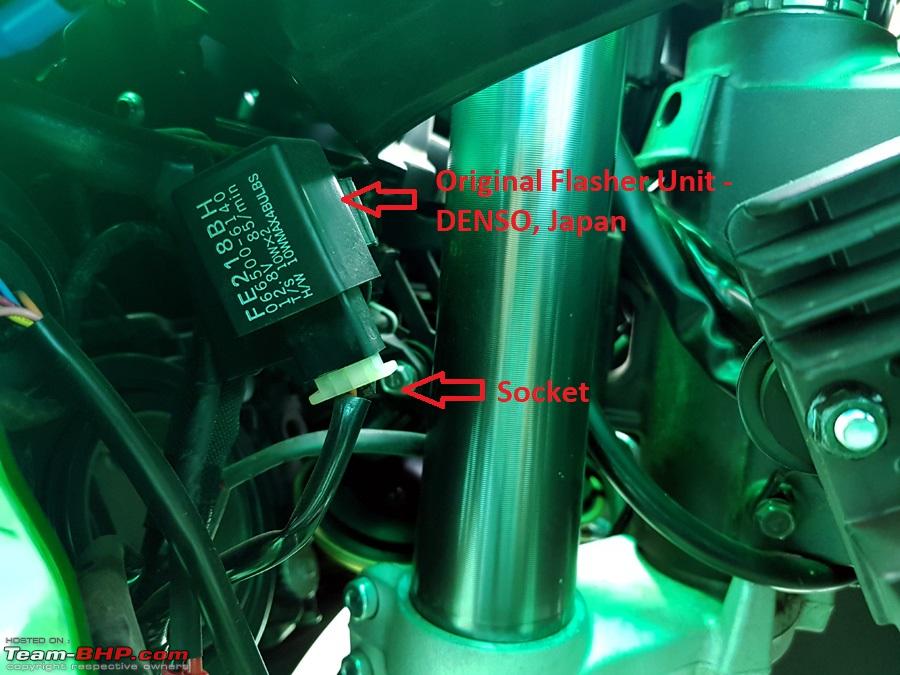 Left Side Fairing Removal is now complete  Another view of the left fairing removed  Right Side Fairing Removal starts with the middle fairing as done on the left side 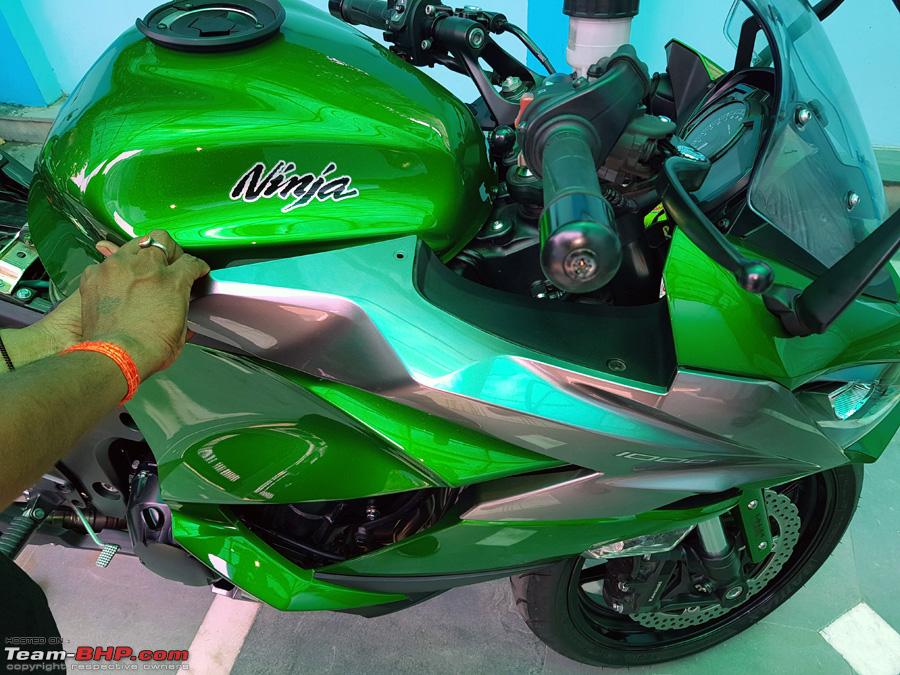 Right Side Lower Fairing also involves removing one of the lower metal plates near the exhausts, which the technician is now unbolting 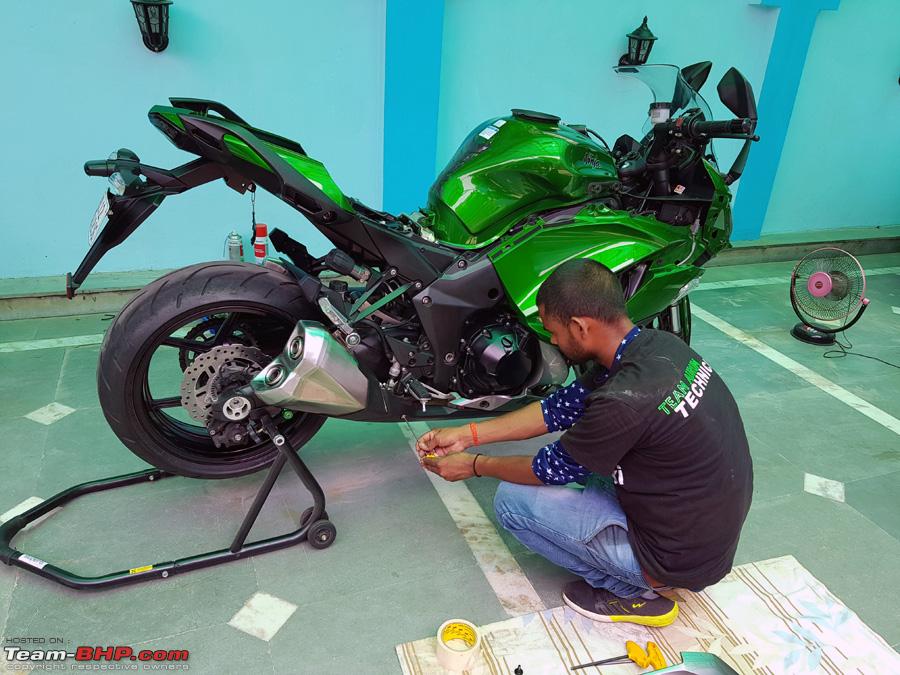 Right side middle fairing - right side indicator turn signal connector being removed 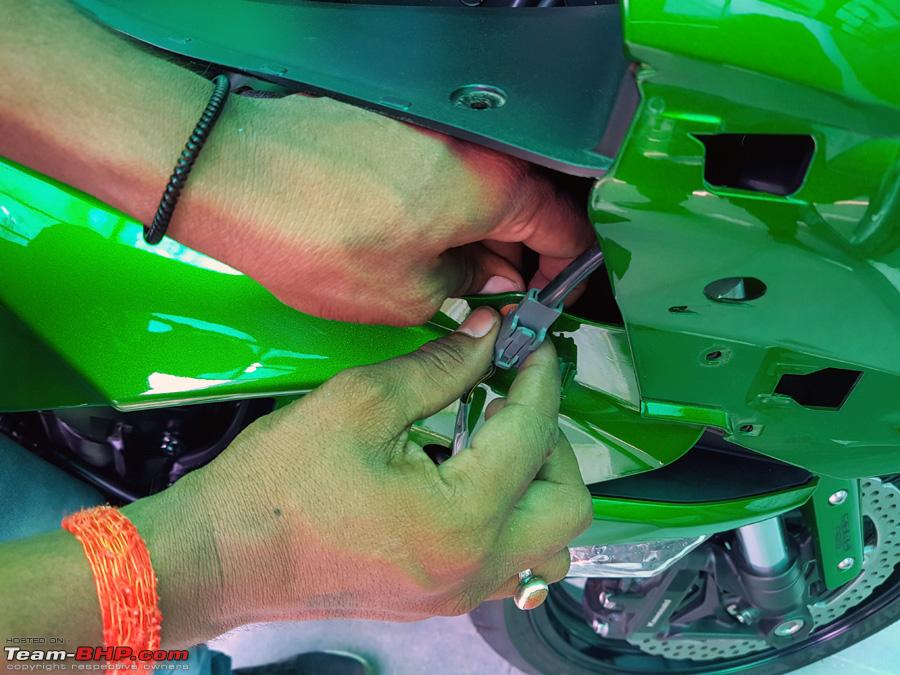 Right Side Fairing is now removed similar to the left side one. Notice the 3M Paper Tape attached to the exhaust mounting to avoid any scratches while removing the metal lower fairing part from the right side (only)  2 upper tank bolts are now being removed by the technician to access the air filter below the tank.  This video helped in accessing the Air Filter to install the K&N Air Filter The Tank just slides upwards after removing the 2 Tank bolts as marked by the position of the arrows in the picture 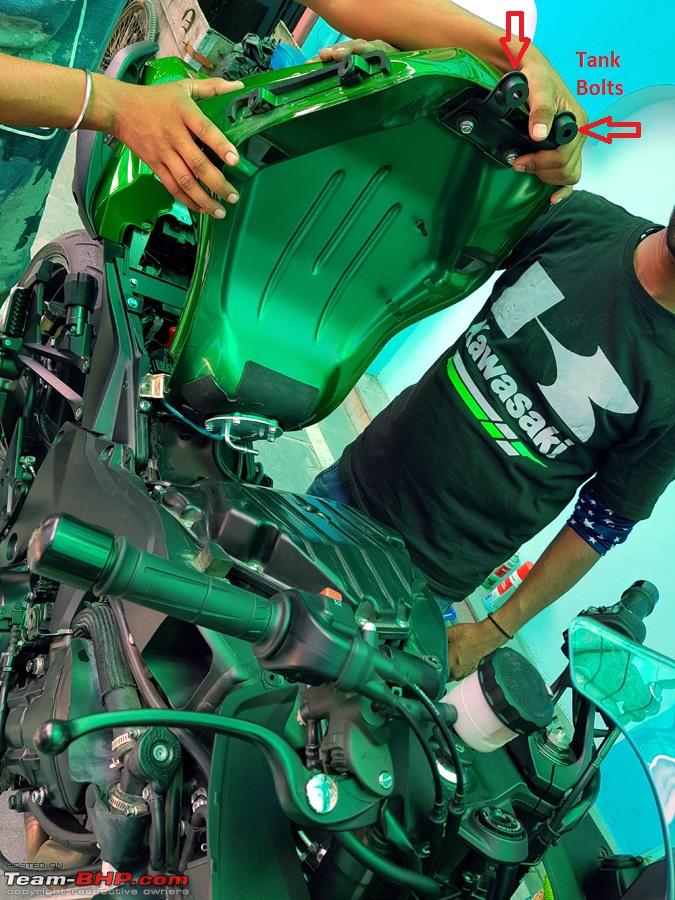 The overflow drain hose is also removed from it's clamps and socket to free the tank to slide upwards  The main fuel hose is also removed after sliding the red lock forward and sliding the fuel hose from the outlet pipe as shown in the picture. This also facilitates easy swinging up of the fuel tank. No fuel leaks as the fuel tank cap is closed.  The Air Filter Housing is revealed below the tank 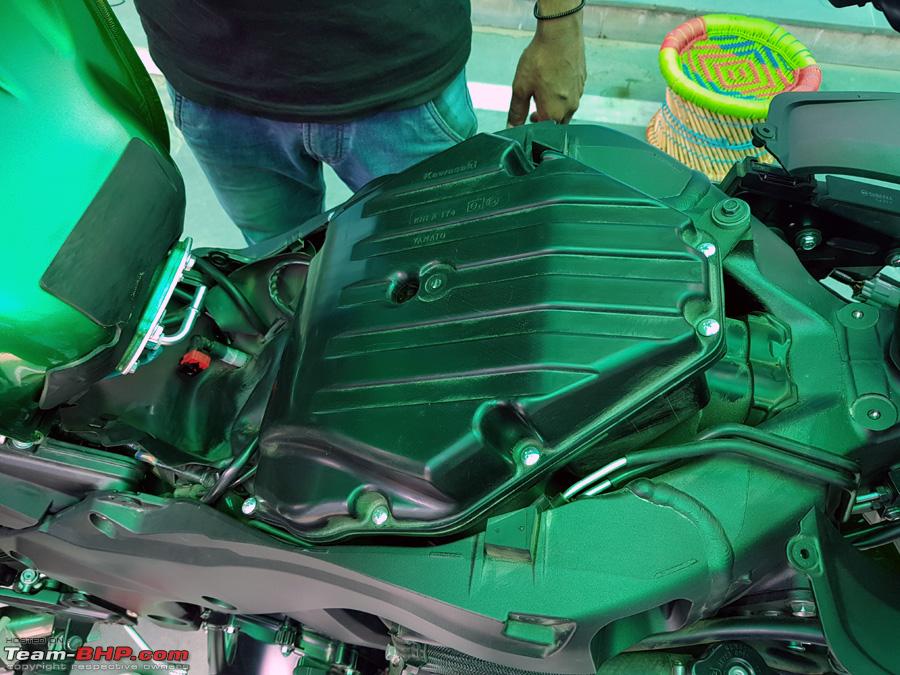 There are 11 bolts to be removed to access the air filter. The connector bracket (as marked by the arrow) is also slid upwards to detach from the air filter housing. 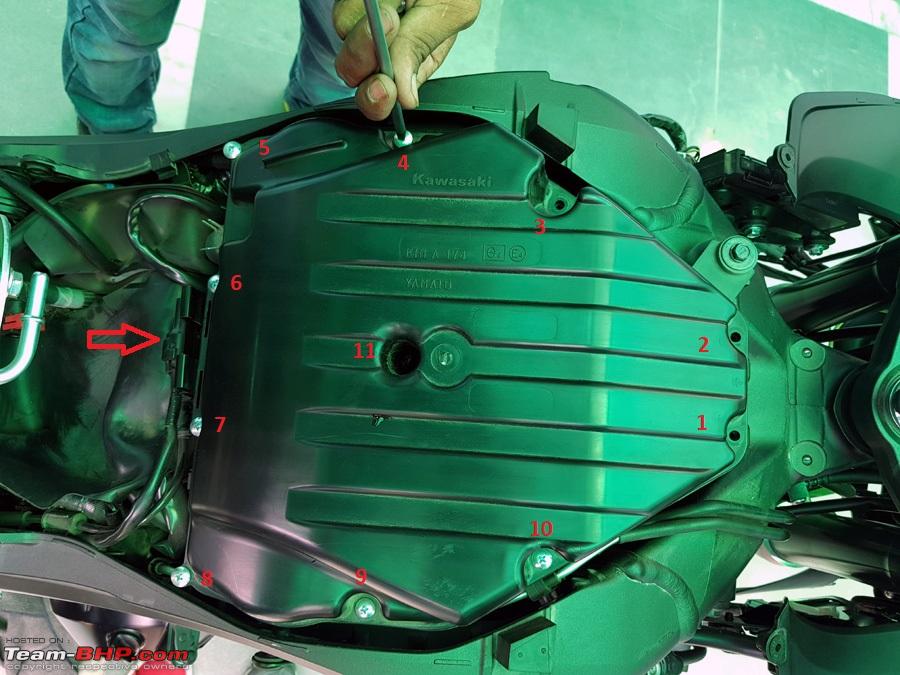 The last (11th) bolt is tricky and sits deep inside the housing as marked in the picture 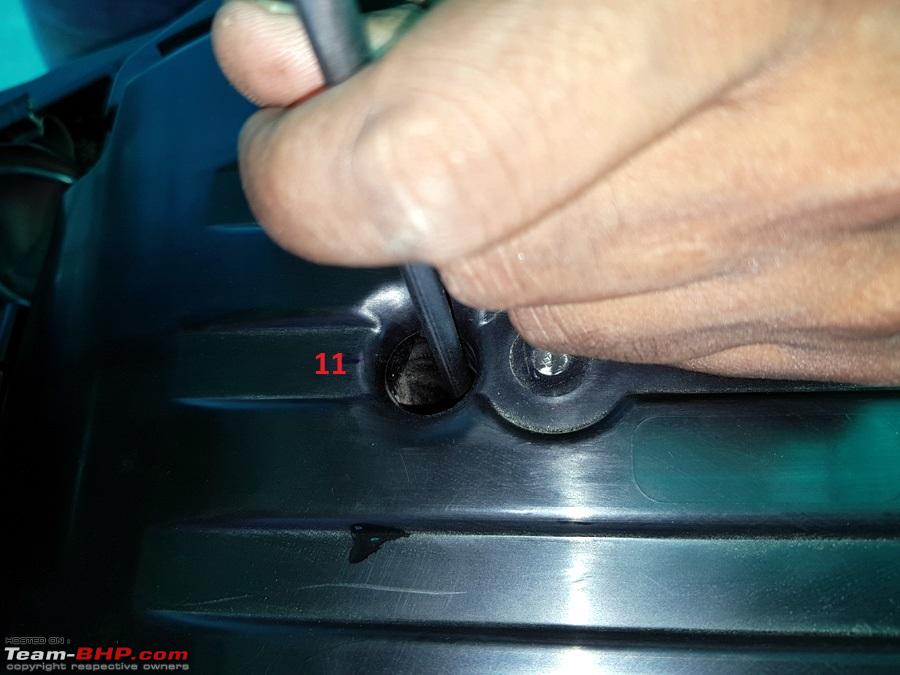 Now the Upper Air Cleaner Housing is free and is removed to reveal the air filter and the inlet valves  The beautiful 4 cylinder Inlet Valves of the Throttle Bodies. Warning - Take special care to cover them up with clean cloth so as to avoid anything going inside them. This will lead straight to engine damage. 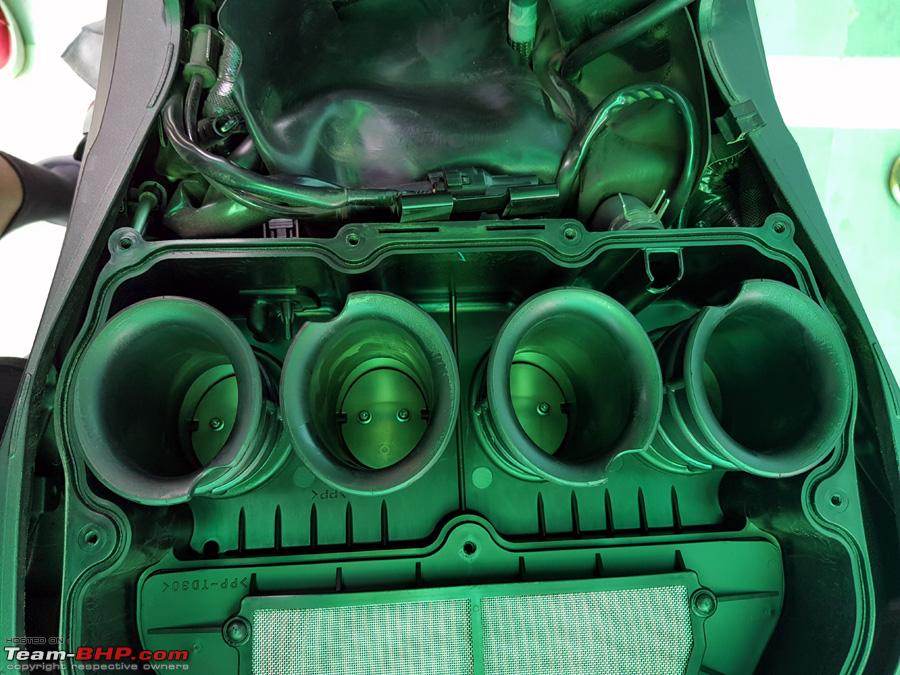 Top View of the Stock Air Filter (outlet side visible covered by metal mesh) and the throttle bodies 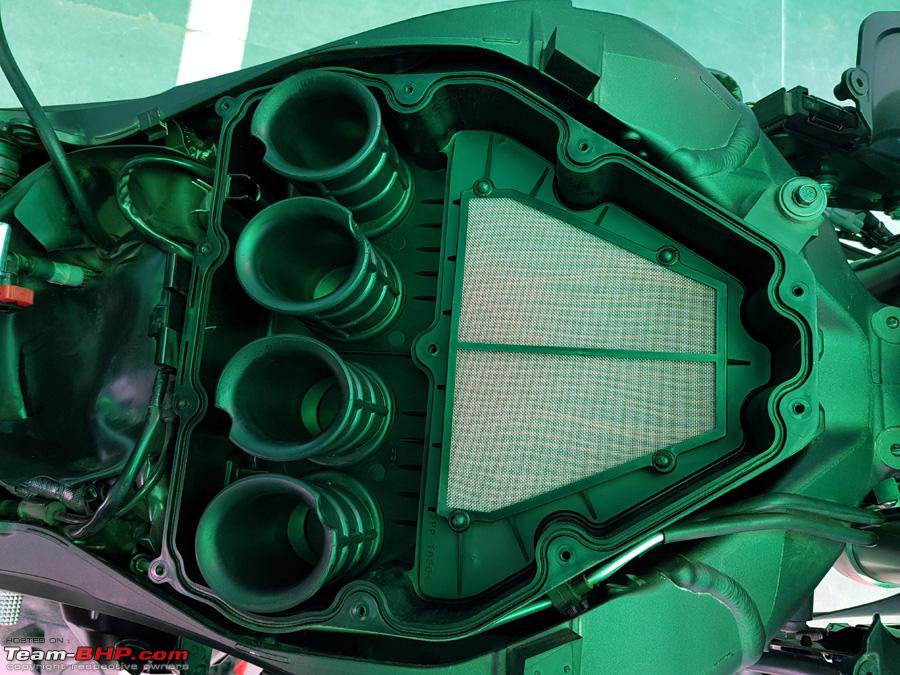 The Stock Air Filter View (inner side) from inlet side. Lots of debris is visible which is subsequently cleaned. As the rated life of this filter 12k kms, it still has a life of about 10k kms left in it. It is thoroughly cleaned and stored for emergency. Also note that even though it is a paper mesh filter, it is also red in color, and is hence oiled slightly to catch dirt better. 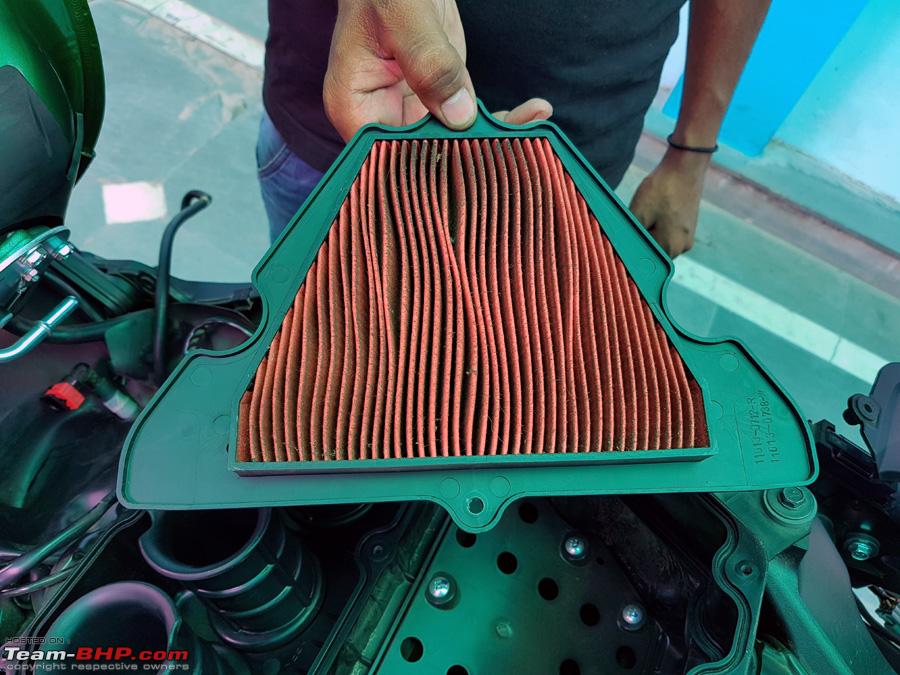 The air intake chamber is revealed where intake air is received from both the functional side (left and right) vents on the bike  The air intake chamber is thoroughly cleaned to make it ready to receive the K&N Filter  30 Photos limit reached. To be continued... Last edited by dkaile : 9th June 2018 at 11:07. |
|
| (11)
Thanks
|
| The following 11 BHPians Thank dkaile for this useful post: | anandpadhye, CrAzY dRiVeR, Cyborg, irajput, mh09ad5578, Nilesh5417, PM - B, Red Liner, unk9ja, v12, vaasu |
|
9th June 2018, 12:25
| #140 |
| Senior - BHPian | Re: 2018 Kawasaki Ninja 1000 - The Comprehensive Review Kawasaki Service Van Visit to Meerut/Mawana - 04-06-2018 cont... (2) So this is the K&N Filter (Model KA-1111) to be replaced in place of stock  K&N in place with the markings side (outflow side) on top  The Air Filter Housing cover is securely placed back as also is the connector bracket, as shown in the picture, placed back in it's slot  The Air Filter Housing Cover back in place 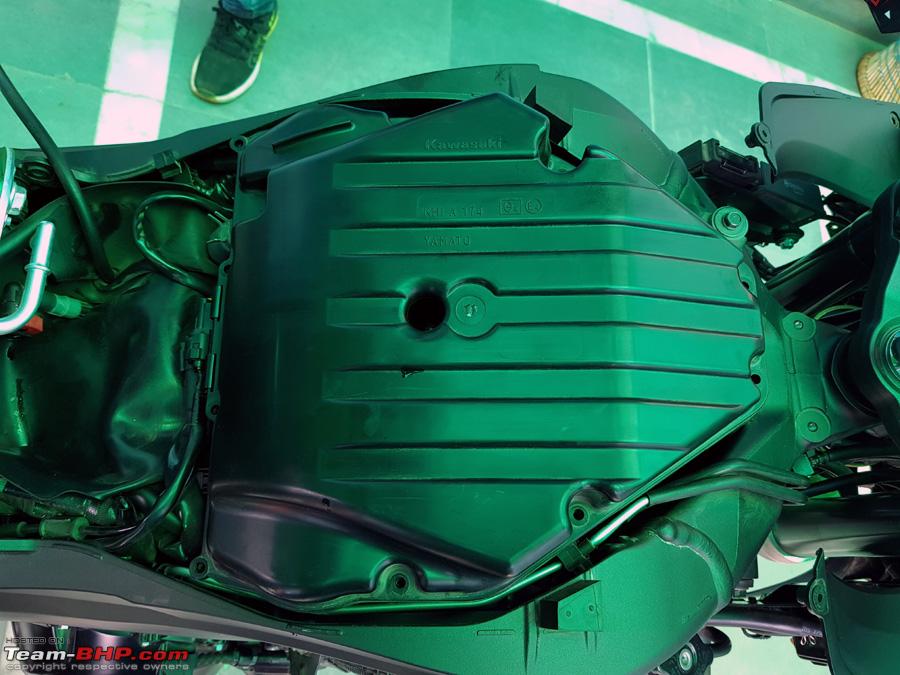 The Main Fuel Hose is slid back onto the fuel outlet pipe and locked (red clamp) back into place as depicted by the arrows  The overflow hose is clamped back into place  And the overflow hose is slid over the overflow pipe and locked into place  The slot for tightening back the 2 front tank bolts. The bolts are tightened back to complete this job.  K&N Filter Replacement is now complete PUIG Pro Frame Sliders Install starts. Both the sliders are put in their respective sides to assess how these are to be fitted. The Right Side Frame Slider 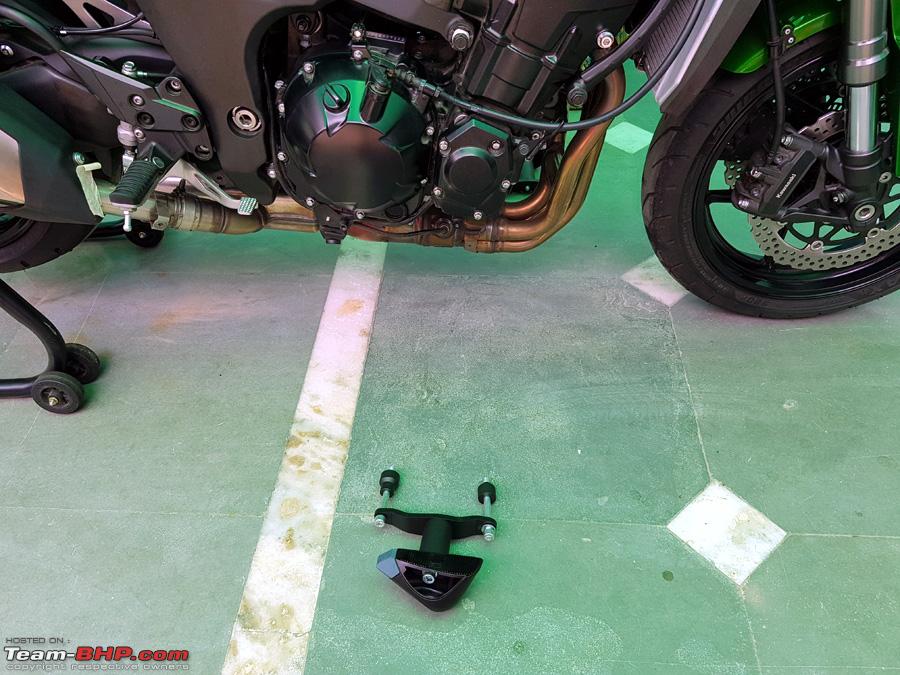 and the Left Side Frame Slider 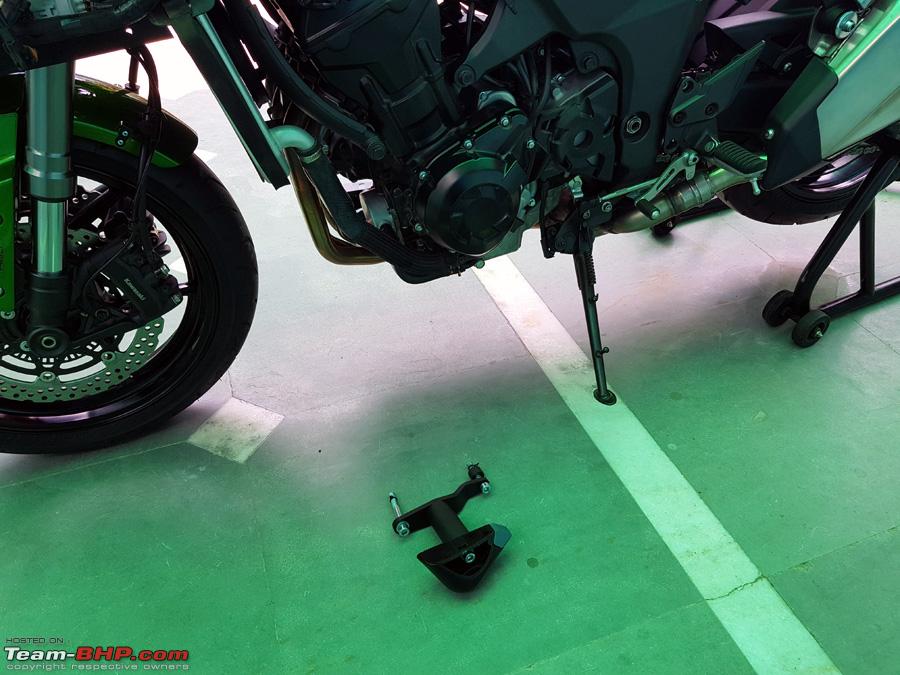 We start with the Left Slider and disassemble it. As these are engine mounting bolts, these need to be very properly tightened to the specified torques as mentioned in the Service Manual and also Loctite (243) Blue threadlocker is applied so that they don't come out loose in impact situations. And of course, the thread-locker is mine. They had forgotten to bring theirs... lolz  The 2 original engine mounting bolts are removed from the left side  And the bolts are tightened with a Torque Wrench (again mine) 45 Nm and 60 Nm as shown in the picture 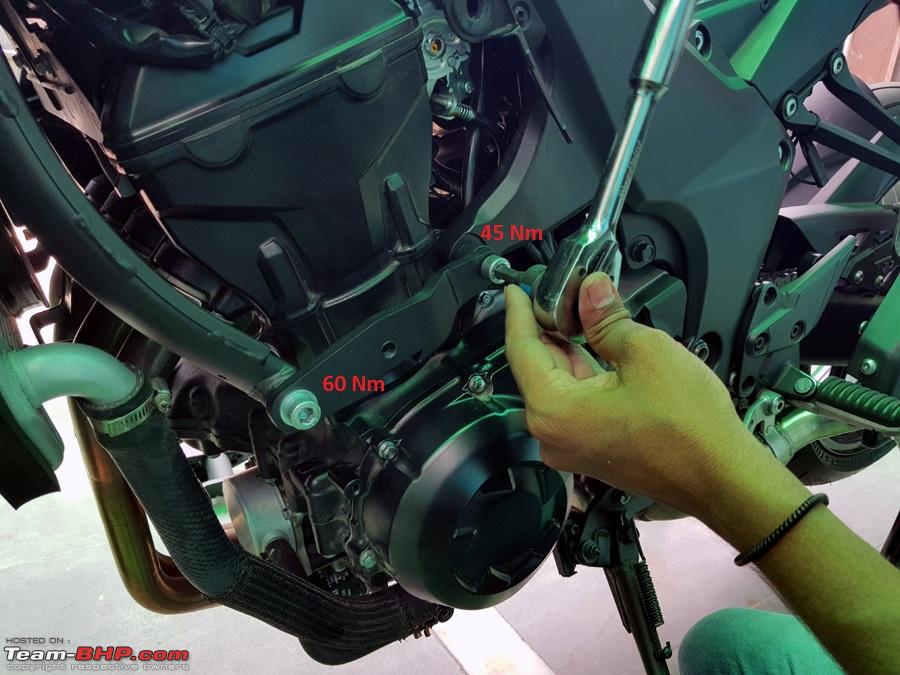 Time to move onto the Right Side Frame Slider. The engine housing bolts are loosened 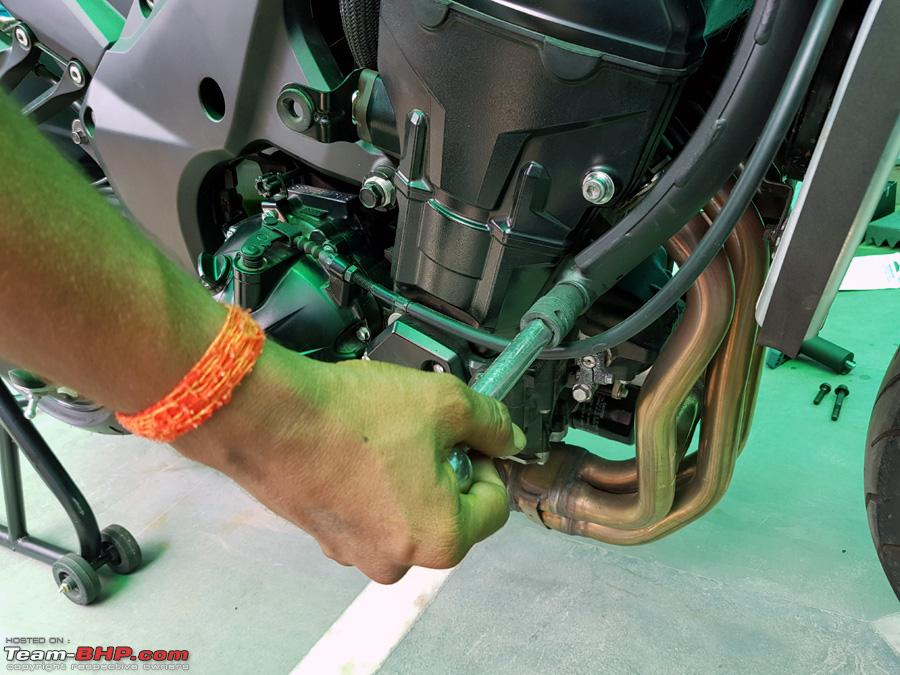 and removed. Note that they are slightly different from the left side bolts.  Also notice that backward engine bolt on the right side is mounted on a special chuck-nut (as marked with the arrow) which is used during engine removal from the bike.  Again the slider bolts are applied with thread locker on the right side bolts  And they are tightened to the specified torque (45 Nm and 60 Nm) as shown in the picture with torque wrench as we had done on the left side.  Rest of the job of Slider install is completed after the fairings are re-attached. ------------------ Now we move on to Changing the Flasher Relay. This video by Jonathan helped - This is the OE socket that is removed from the original flasher unit  And the new (upto) 150W Flasher Relay is attached to the same slot with the existing rubber mounting. No need to stick it with 3M tape as shown in that install video. This Completes the LED Flasher Relay Install as it's just a plug and play install  Time to move onto Changing the Front Indicator Bulbs to LED. The original bulb and it's socket removed from the fairing. Simple twist and pull job.  LED Indicator Bulb replaced in it's place. Refer to previous posts for it's sourcing link. 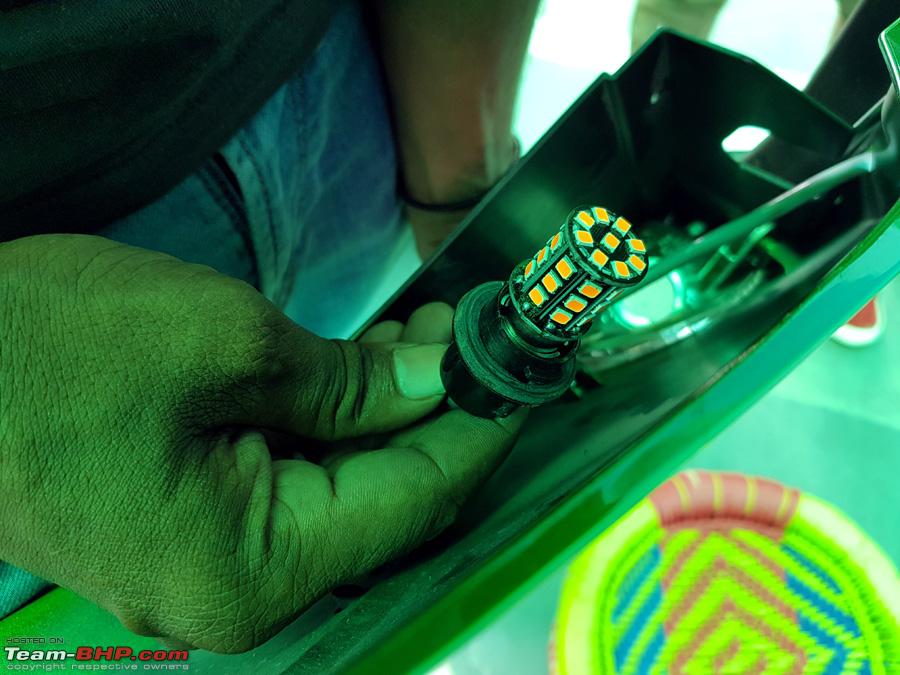 The LED and the original bulbs compared 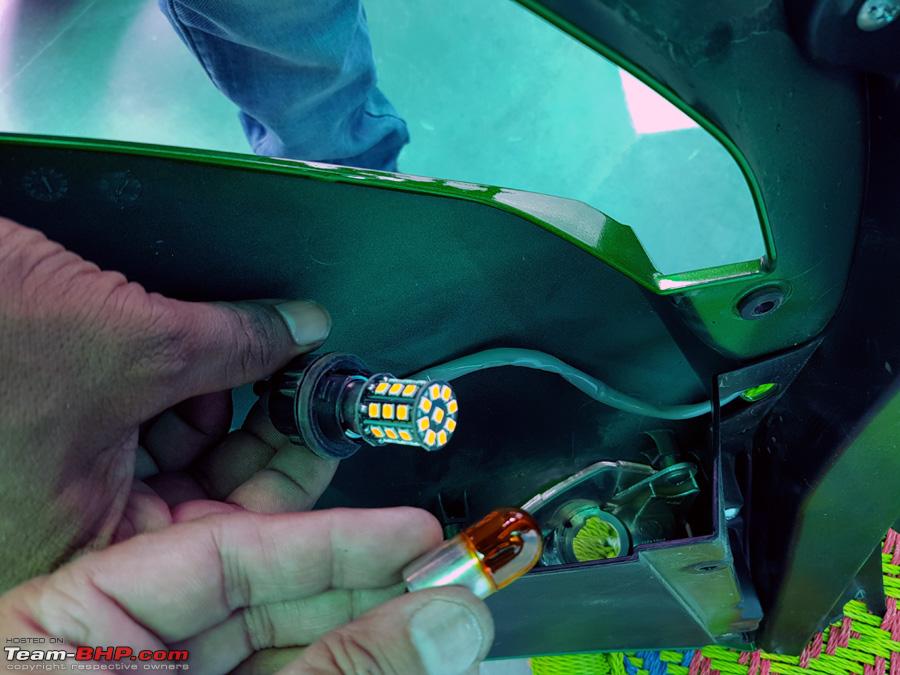 New Bosch Symphony Horn (only a single Low Tone one) is also subsequently replaced. More photos on that little later. Also a pictorial of what's going on inside the side left panel. The Outside Temperature Sensor on the left side, which was also disconnected earlier during fairing removal is also displayed here more clearly. 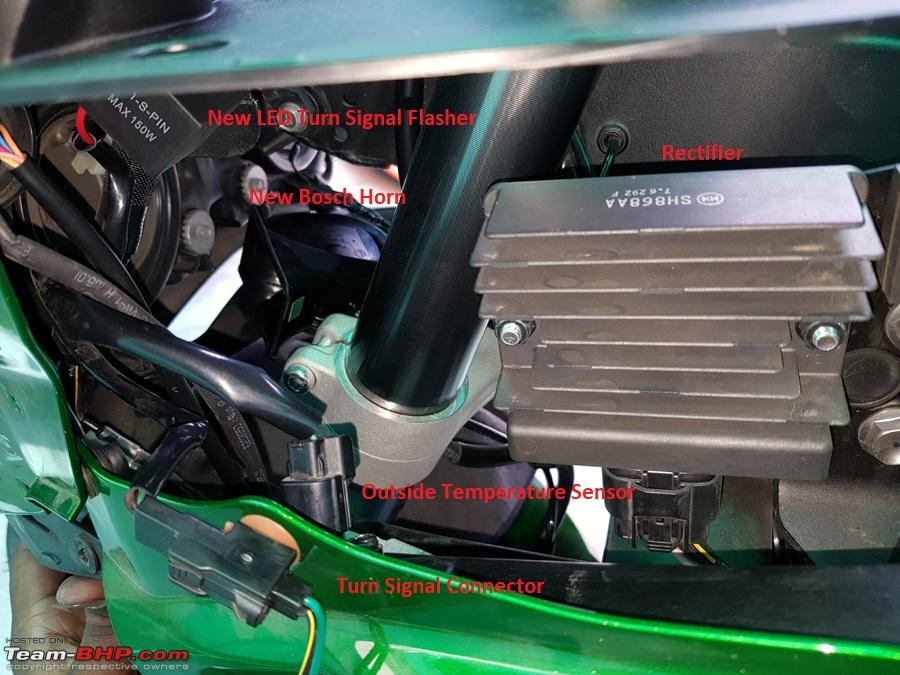 The left lower fairing now being reattached in reverse order of removal 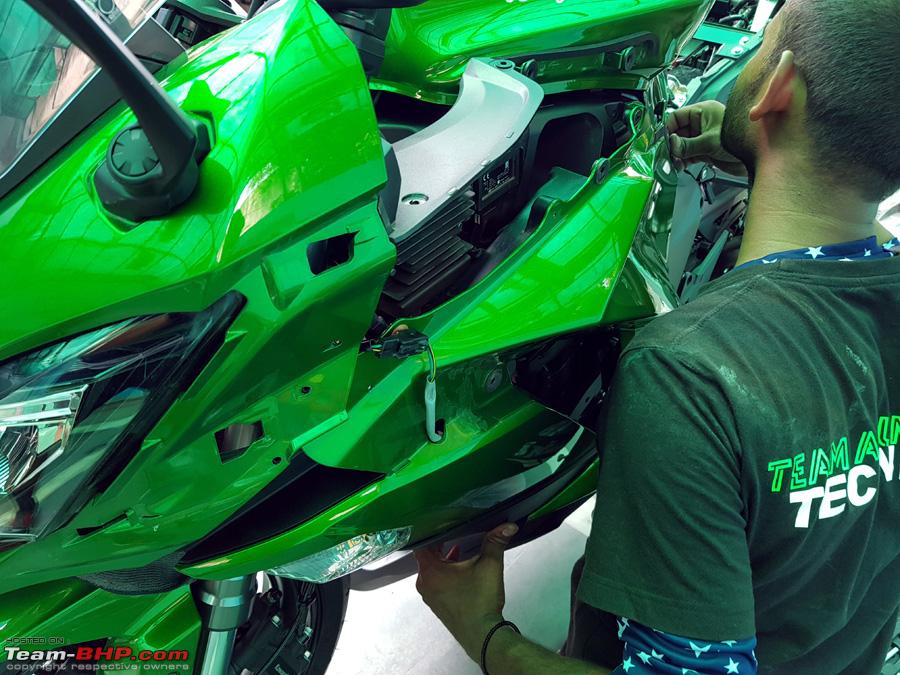 and the bolts being tightened 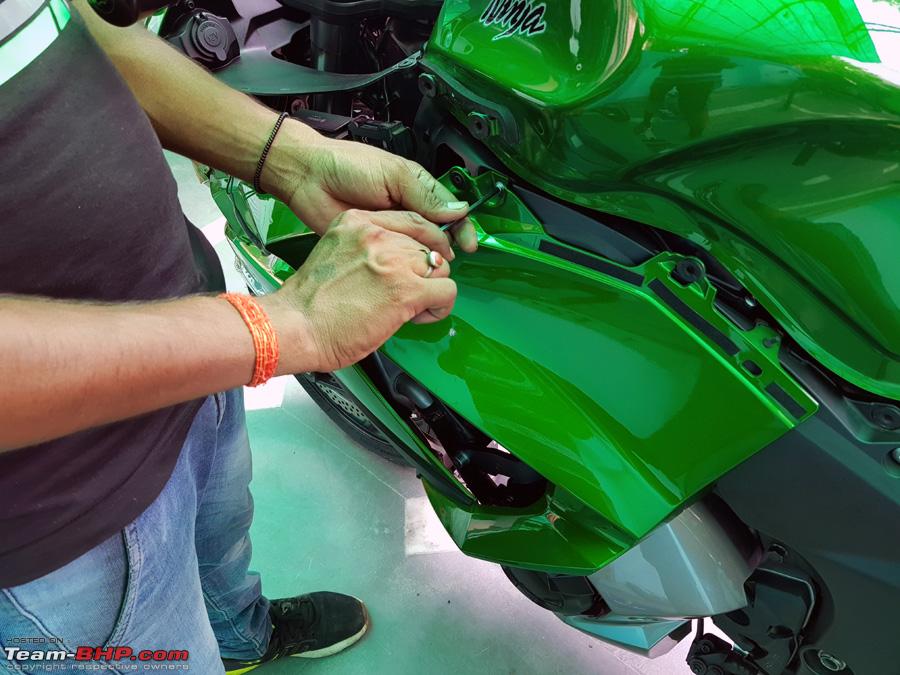 The 2 front bolts of the lower fairing being attached. Also visible is the Turn Signal Connector attached and also the Outside Temperature Sensor attached back. 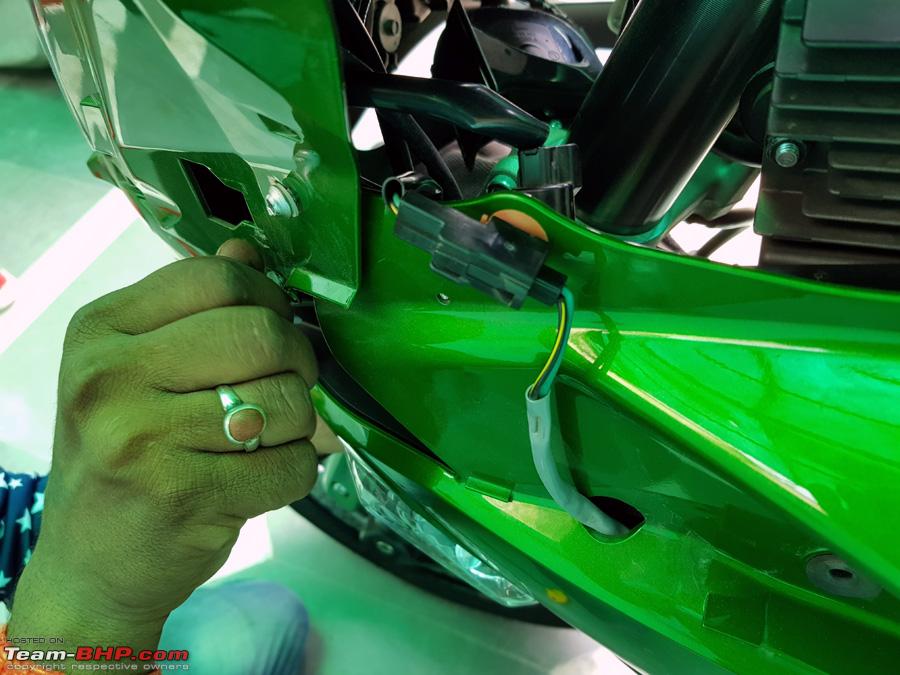 The LED Indicator Bulb sitting pretty in it's front housing. It is twice as bright as stock. Video posted later. 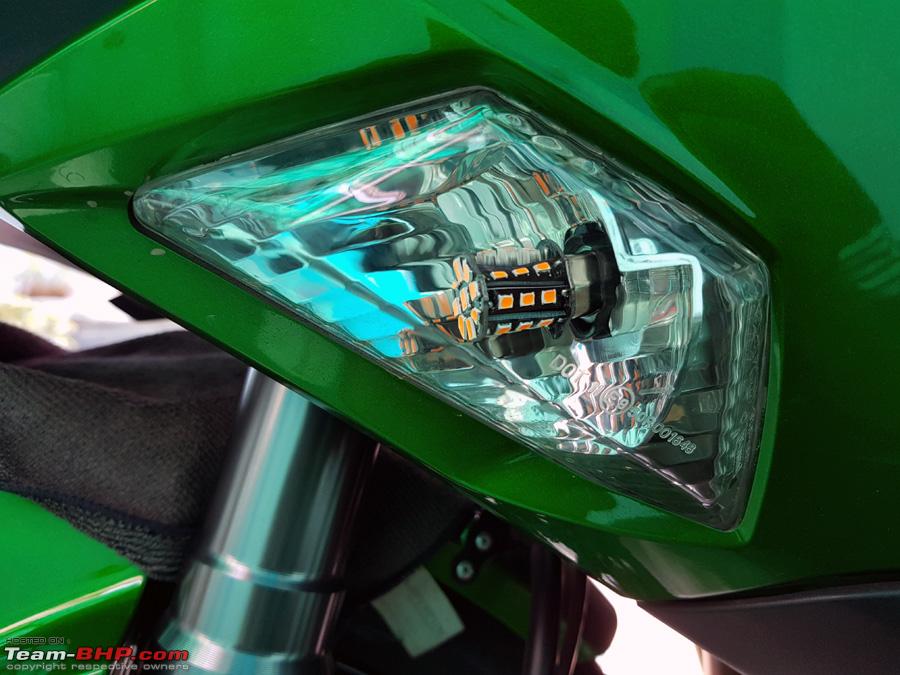 The Left Middle Fairing being reattached. 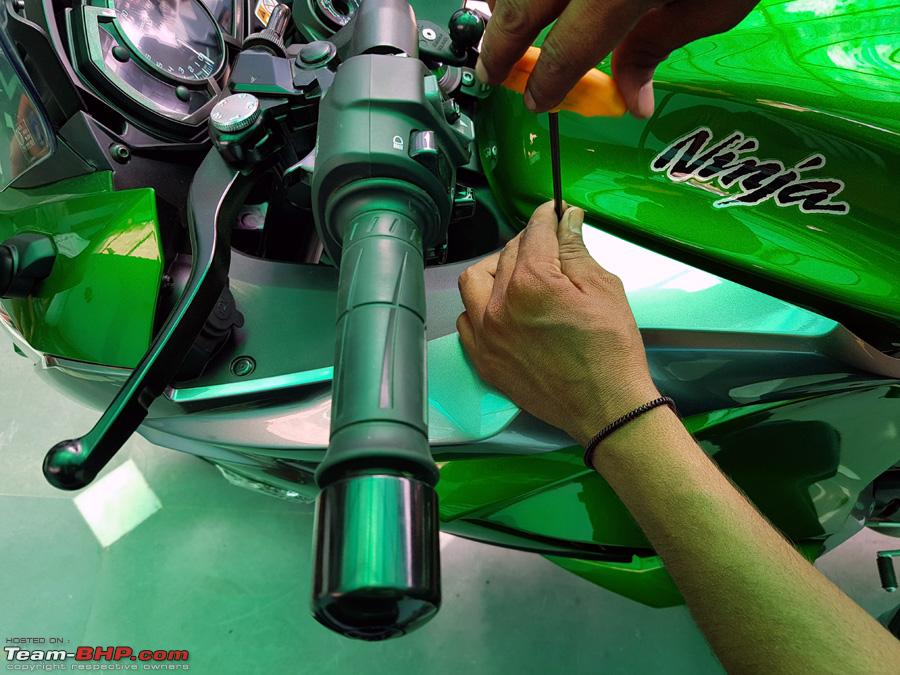 The Right Lower Fairing, now being refitted  30 Photos Limit reached per post. To be continued... Last edited by dkaile : 9th June 2018 at 12:32. |
|
| (9)
Thanks
|
| The following 9 BHPians Thank dkaile for this useful post: | anandpadhye, audioholic, Cyborg, irajput, PM - B, Red Liner, Turbanator, unk9ja, vaasu |
|
9th June 2018, 13:15
| #141 |
| Senior - BHPian | Re: 2018 Kawasaki Ninja 1000 - The Comprehensive Review Kawasaki Service Van Visit to Meerut/Mawana - 04-06-2018 cont... (3) In the meanwhile, the dual power accessory cable which I had fabricated was also installed to the 12V power socket in place of the previous one made for it. As the horn relay had now been removed after fitment of a single horn, the 2nd Electrical Auxiliary Connector was also now free. With the addition of this dual power cable, I now had 2 Aux connectors free for future upgrades. 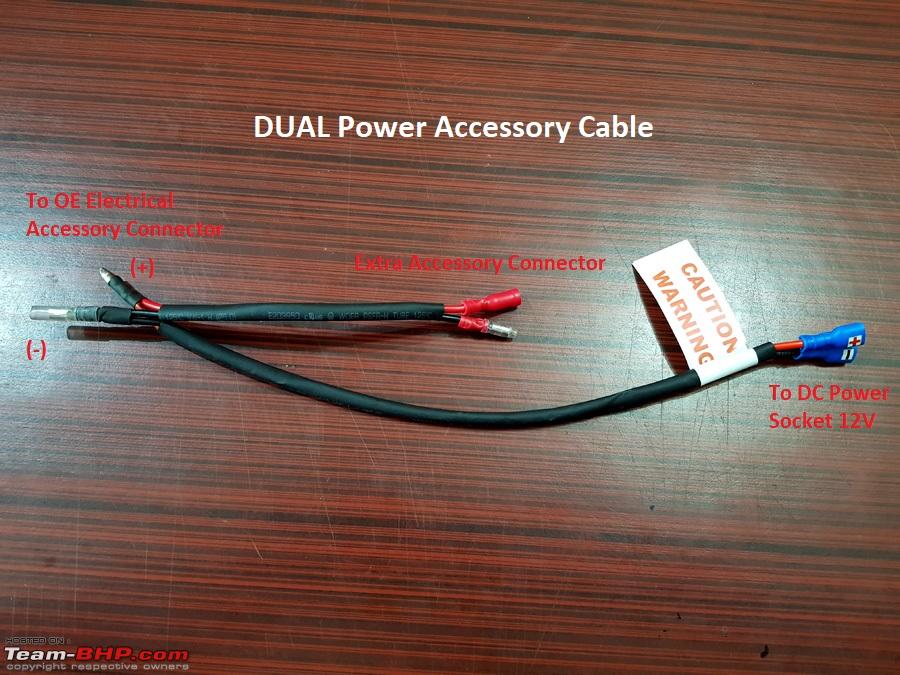 Right Side Lower Fairing re-fitment continues with the fitment of the 2 front fairing bolts and re-attachment of the right turn signal connector as shown in the photo  The Right side Side Cover being attached carefully  The Right Side Lower Fairing Bolts also being tightened carefully so as to not scratch the exhausts 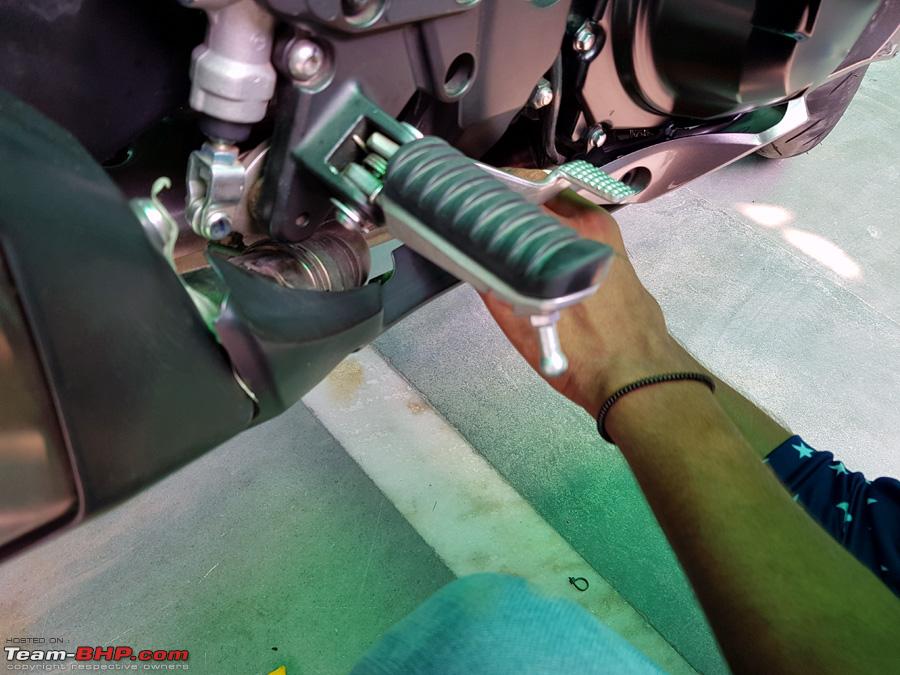 The 3M Paper Tape more clearly visible to prevent scratches 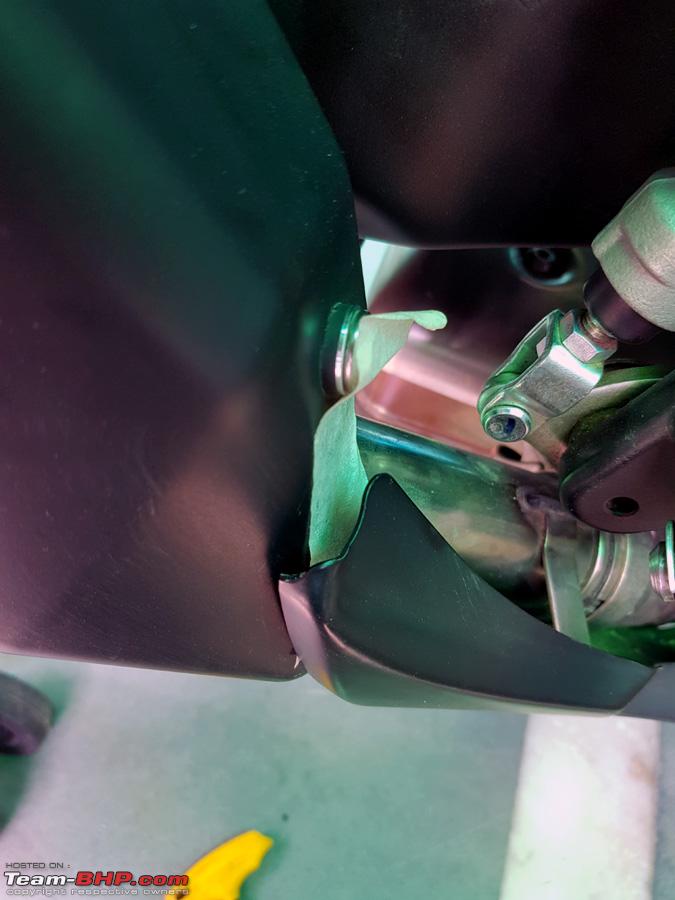 The Front Lower Fairing Bolt is tightened back into place. Notice the oil level window.  The 2 quick rivets on the lower front side joining both the left and right lower fairings are slotted back into place. Clearly marked in red in the photo. With this the Fairing Reinstall is now complete. 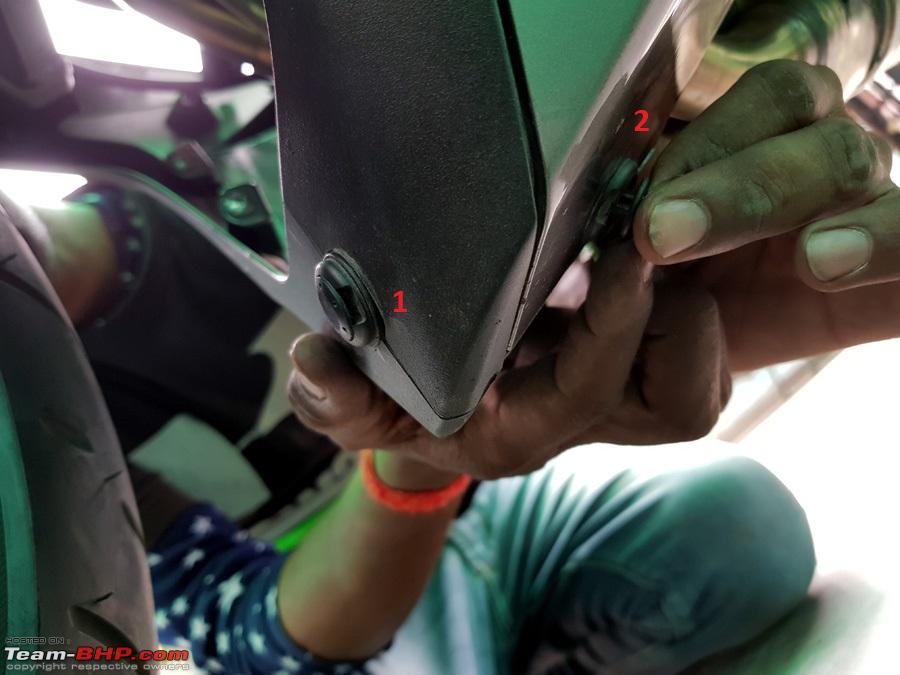 The Final Installation of the Frame Sliders Starts with application of threadlocker to the frame slider main PUG bolt on the left side. 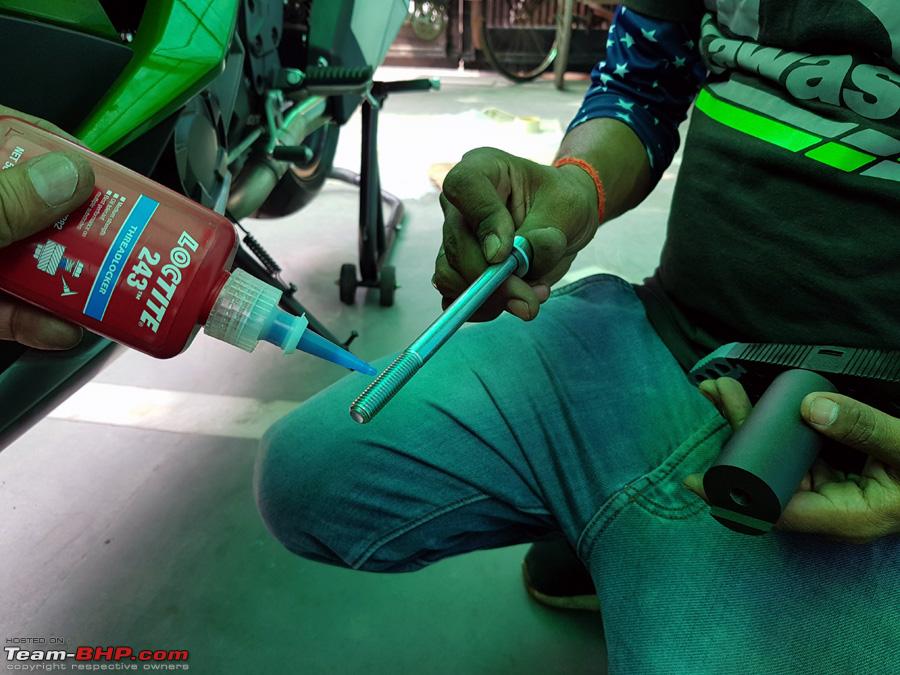 The left side PUG bolt is slotted in place and tightened to 50Nm with a Torque Wrench. This will take the impact in the unforeseen event of a fall. 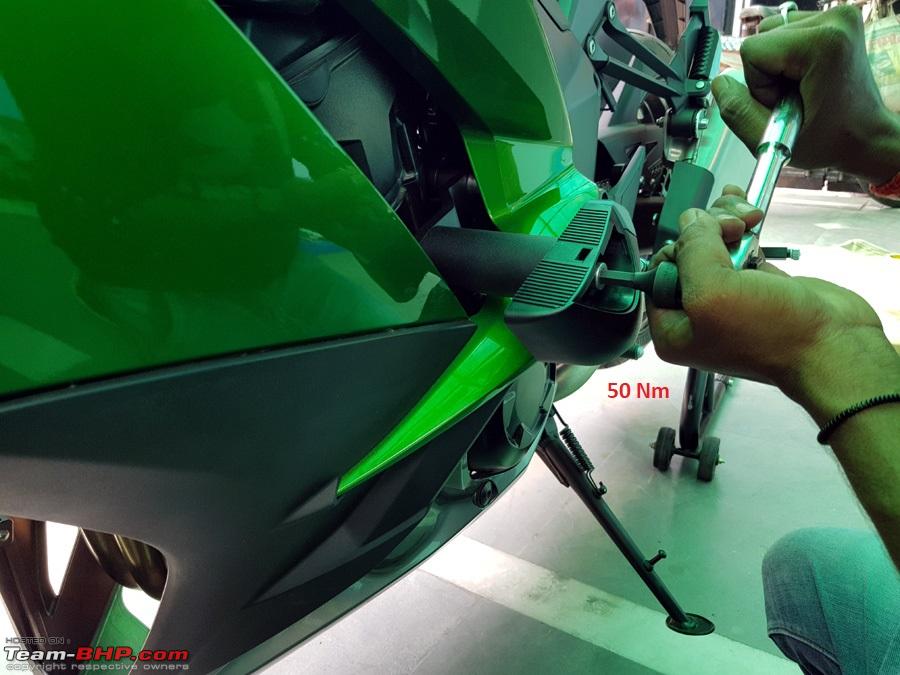 The Left Side Frame Slider install is now complete  Now we move onto the right side frame slider final installation with the application of threadlocker as done on the left side PUG bolt 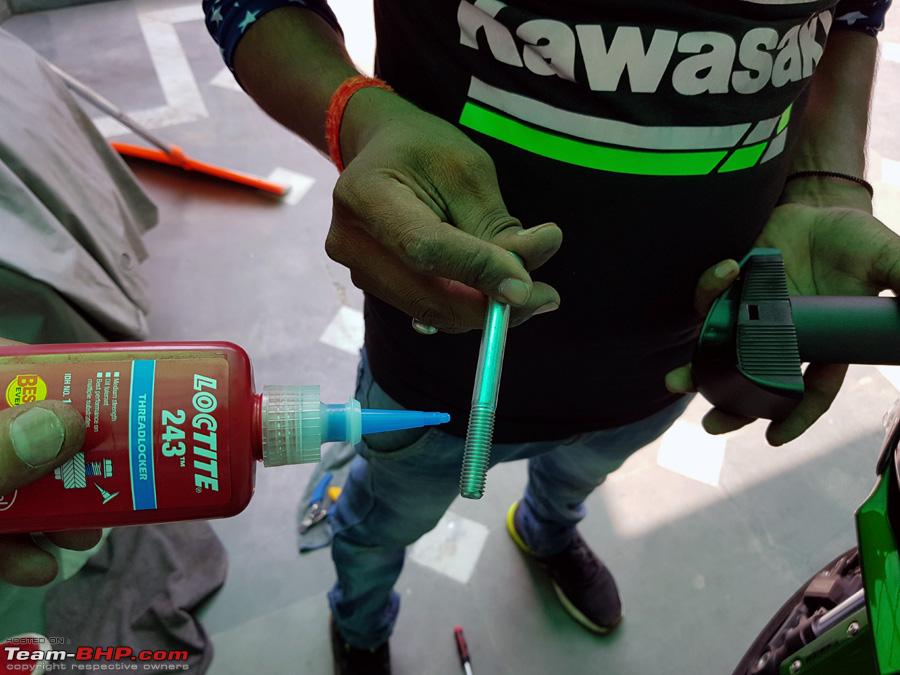 and tightening to 50Nm  and the Right Side frame slide install is now complete. This completes the PUIG Pro Frame Slider Install.  Now we move on to the Rear Indicator LED Bulb Install. The single screw on each of the rear indicators is removed. 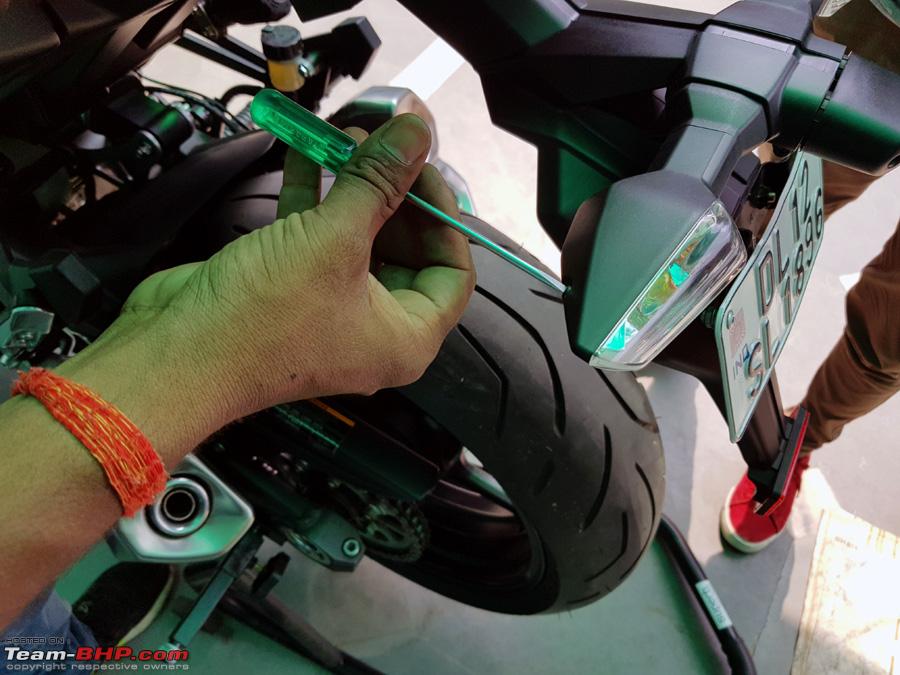 and the housing for the rear indicator bulb is slotted out 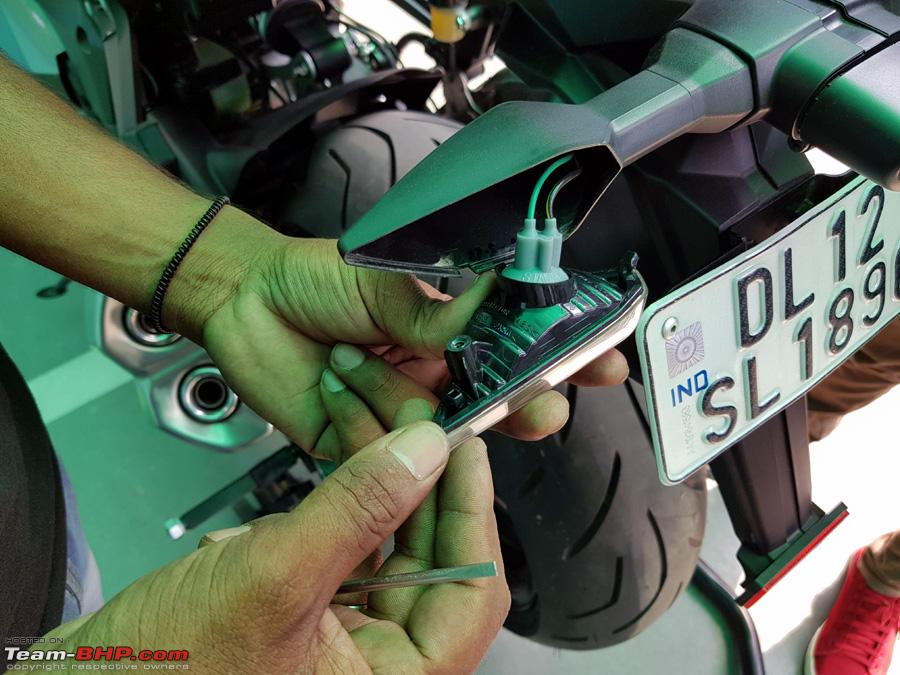 and the standard bulbs are replaced by these LED Bulbs on both the rear turn signals. The sourcing link for these bulbs has also been posted in previous posts. 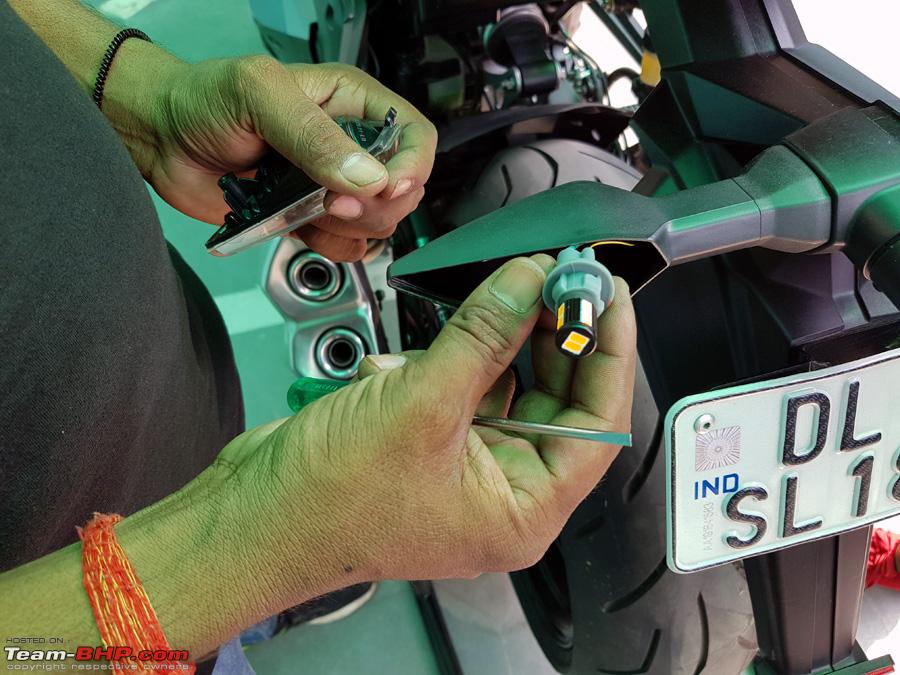 These are both the original front and rear turn signal bulbs 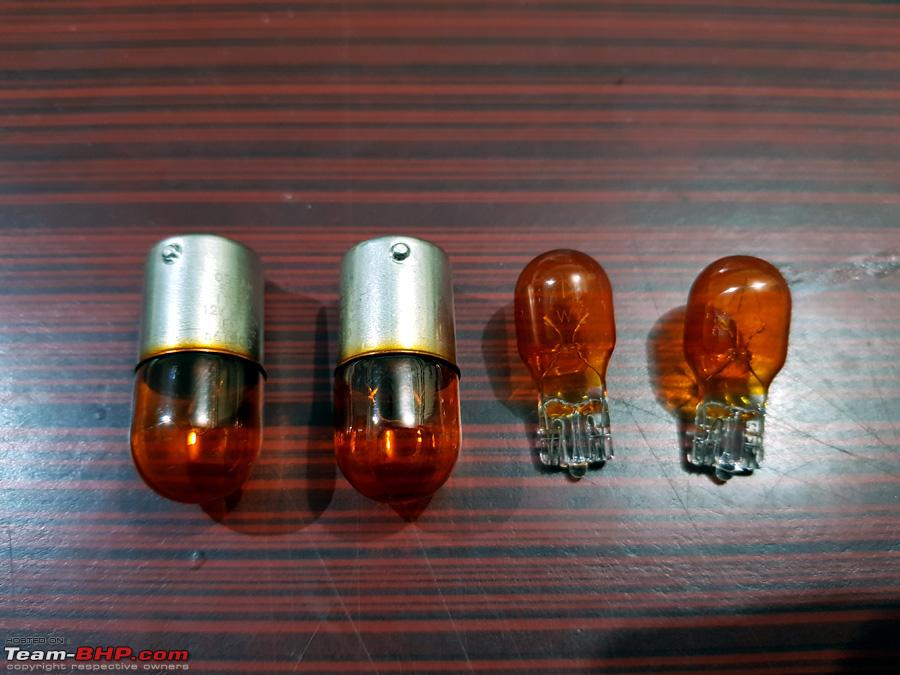 Here's a short video of the Turn Signal Indicator Lights with these LED bulbs installed. Please bear with the amateur video. But it is evidently clear as to their double brightness in the video. Also no more quick flashing after changing the relay. Here are all the original engine bolts and flasher relay removed from the bike  A closer view of the original Denso Flasher unit  Also received a spare oil filter (820 bucks) which I had asked for in case I need to do a oil change service myself 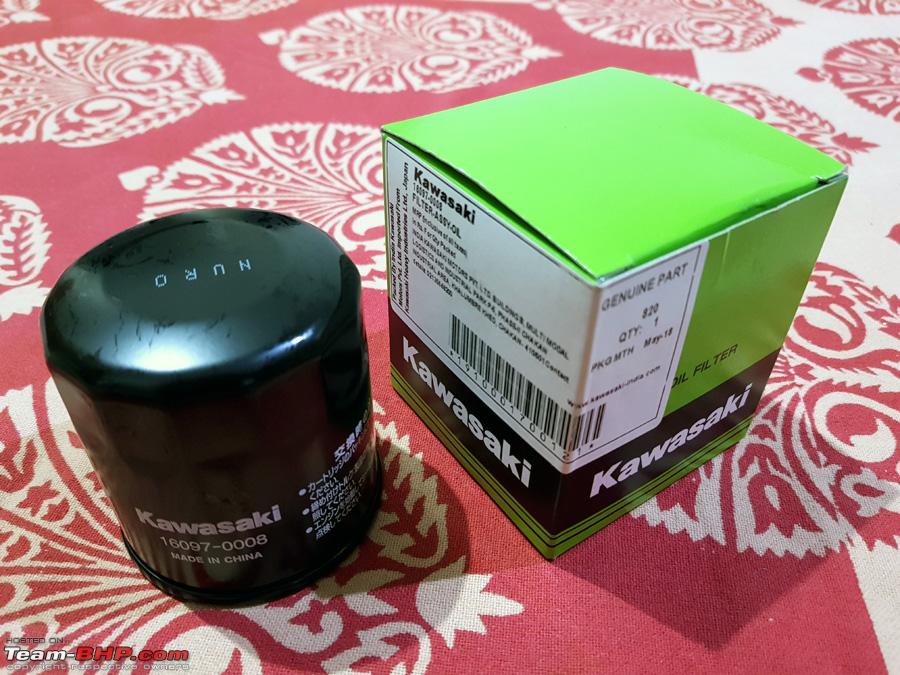 and 2 extra spare chain adjuster clamp bolts, whose head can wear off on constant loosening and tightening during chain adjustement that we undertake every 600-700 kms 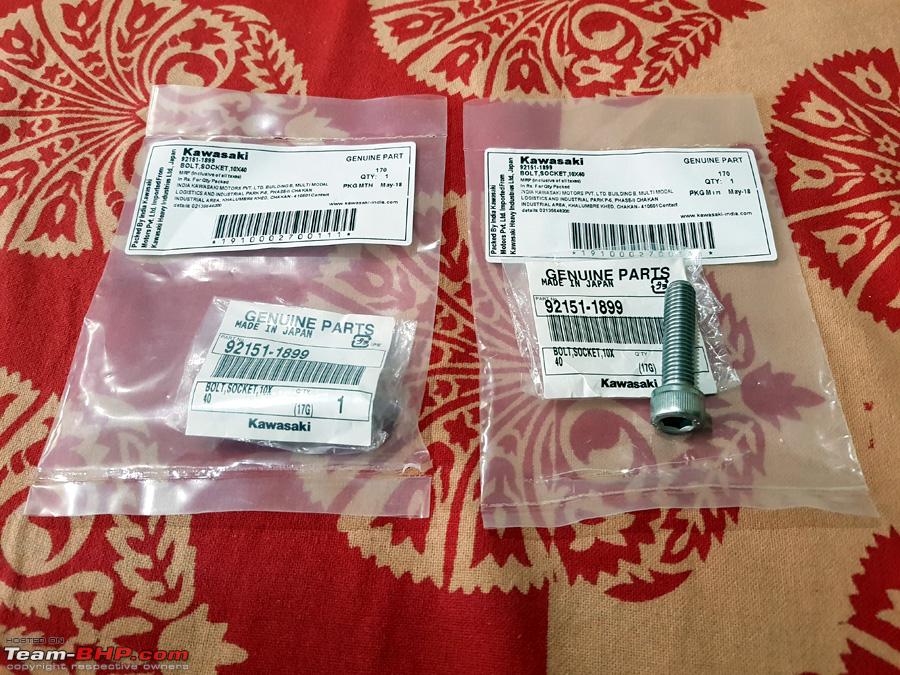 Also got some spare indicator wiring (used) for emergencies 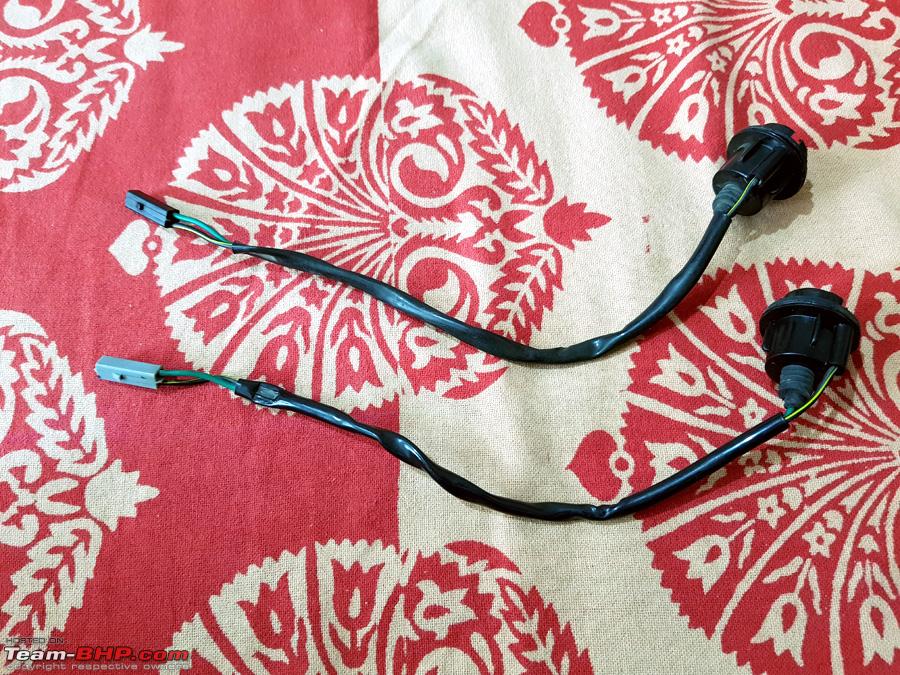 A clearer photo of how the single low tone Bosch Symphony Horn is now attached. View from the lower side  Another view from the top. Enough clearance on all sides. 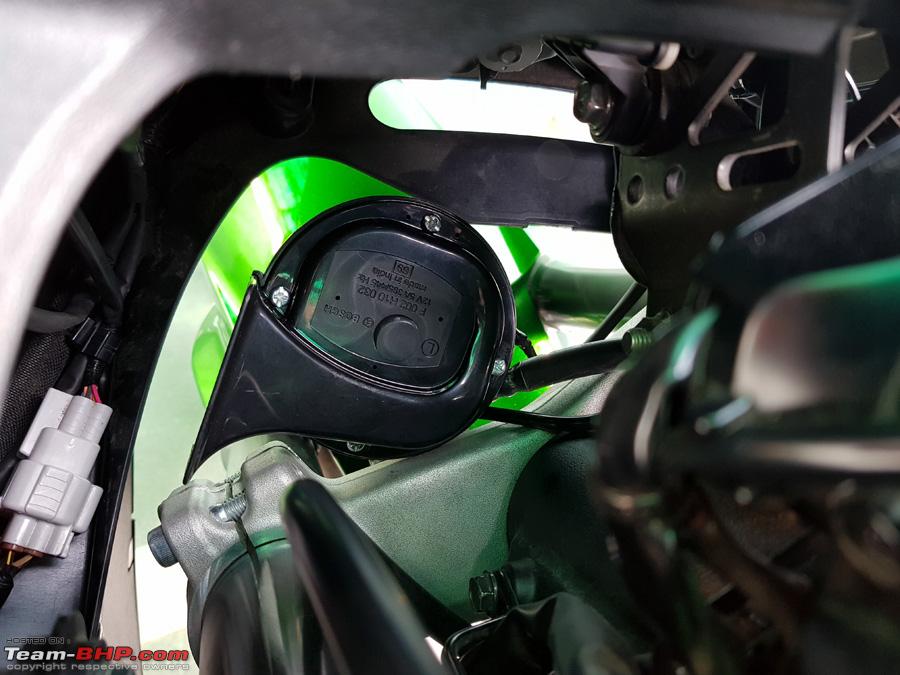 This is the spare one left (high tone) 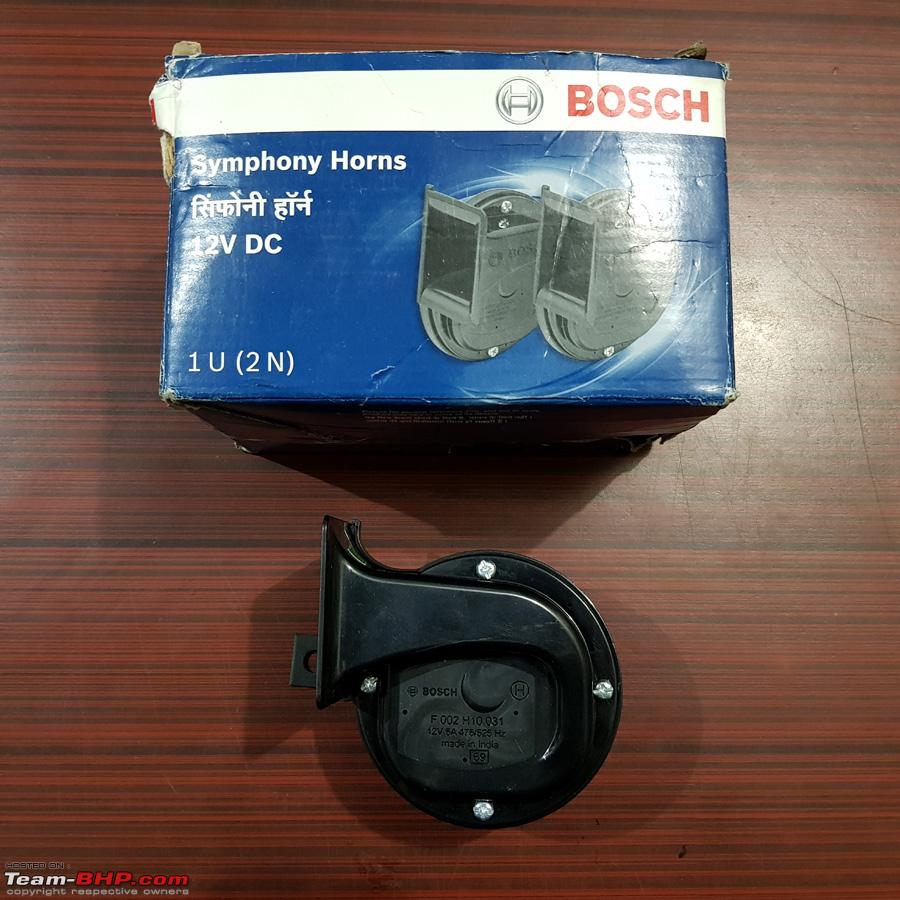 The MRP of the set is Rs. 692/- thought it is available on Amazon for around 400-450 bucks, maybe old stock. I got it around 600 bucks from a local shop.  This is how it sounds, with the bike started. The videos don't do justice to the sound. It is much more louder and sophisticated than the stock horn. 2nd video with the engine off. I like it immensely now... lolz The Van ready to head back home. Notice the shade they had setup  The bike with all it's jobs now complete  Had a long ride today. The K&N's certainly work and I can feel a surge in acceleration and also a change in the engine sound. Notice the Puig Pros, anyone? Lolz  Few more pictures of the LED Upgrade for the Licence Plate Light follows. This will complete the bike to have been Converted to FULL LED. A day well spent. Cheers... Last edited by dkaile : 9th June 2018 at 13:24. |
|
| (5)
Thanks
|
| The following 5 BHPians Thank dkaile for this useful post: | Cyborg, irajput, mh09ad5578, PM - B, unk9ja |
|
9th June 2018, 13:37
| #142 |
| Senior - BHPian | Re: 2018 Kawasaki Ninja 1000 - The Comprehensive Review LED Licence Plate Bulb Upgrade on 10-05-2018 I had already completed the LED bulb upgrade to the Licence Plate light on my own earlier on 10-05-2018. Posting those photos now. The licence plate light cover is removed with a single screw  to reveal the normal bulb inside. Here it is in switched off position  and now it is switched on. Notice the yellow light  The original bulb is removed and replaced with a normal T10 LED Bulb which I got for 30 bucks from my local shop. Here are both the bulbs compared 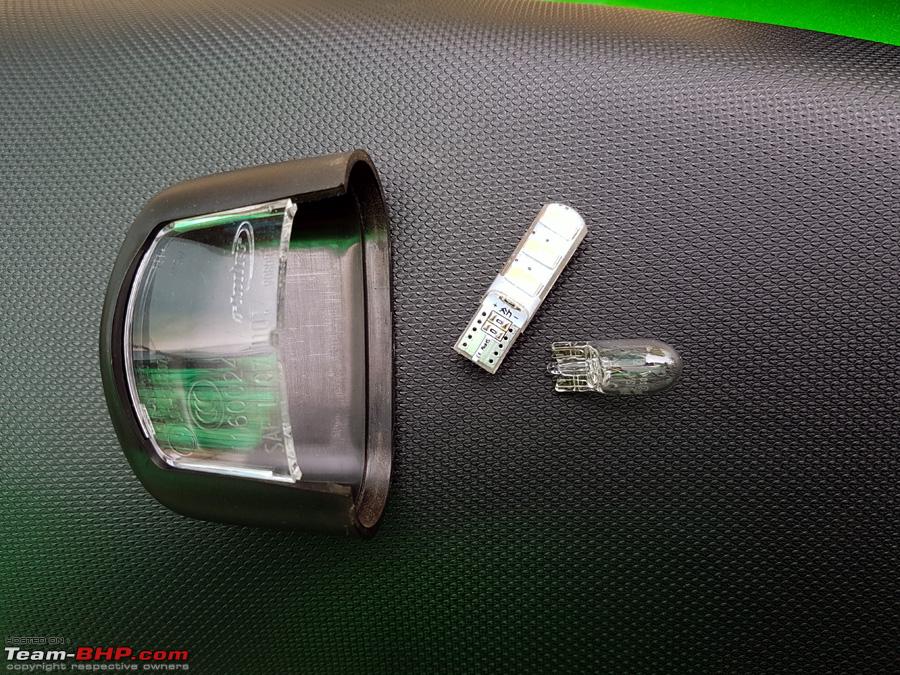 The LED Bulb attached. In off position  and now switched ON. At least twice as bright than the original, with minimal load 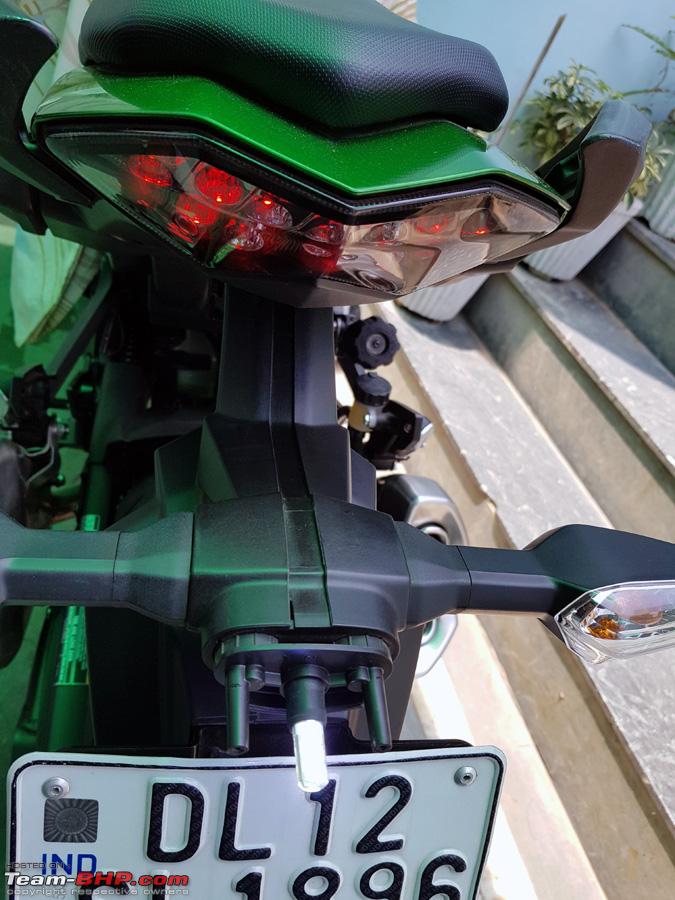 A closer view of the light with the housing attached  and finally how it looks in the night, when it is actually needed. Much much more brighter than stock and with pure white light. And all for 30 bucks! 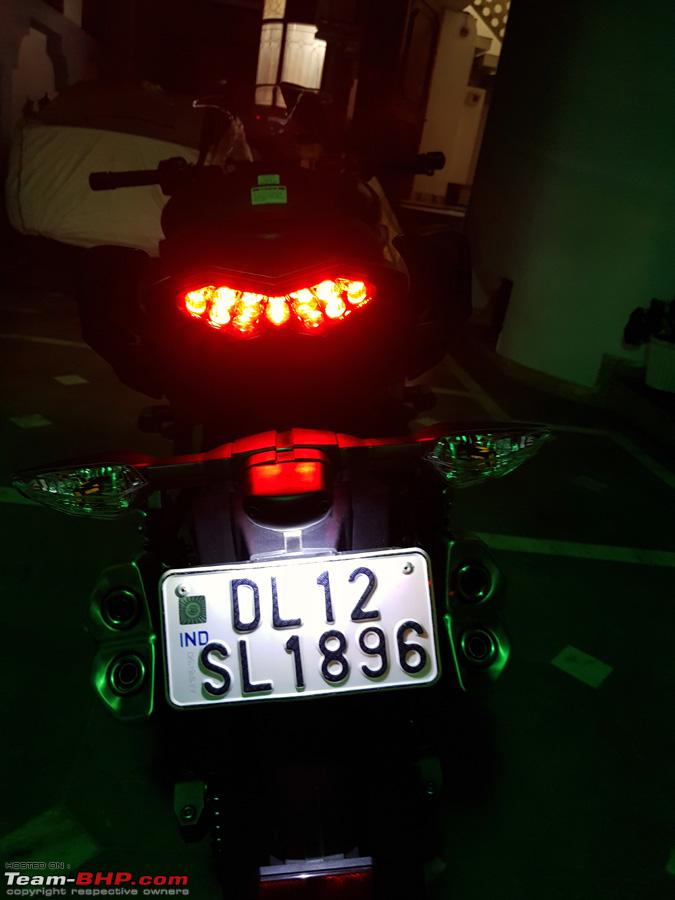 This completes the current upgrades and also converts the bike to FULL LED. Cheers for now... Last edited by dkaile : 9th June 2018 at 13:38. |
|
| (10)
Thanks
|
| The following 10 BHPians Thank dkaile for this useful post: | Arun Venugopal, Cyborg, driverace, hiren.mistry, irajput, mh09ad5578, Nicky, PM - B, unk9ja, vaasu |
|
9th June 2018, 15:37
| #143 |
| Distinguished - BHPian  | Re: 2018 Kawasaki Ninja 1000 - The Comprehensive Review Amazing thread Dkaile sir! I think this is one of the best ....sorry....THE BEST threads in this section. You DIY stuff not only helps N1000 owners but even us Versys owners. Most of the fittings (indicators, rear mudguards etc) are common between the Kawasaki models. I was planning to change the Versys indicators to the KTM ones , but looking at your thread - I feel just changing the bulbs should be more than enough. Thank you very much Dkaile Sir!! Impatiently waiting for your next DIY now. |
|
| (2)
Thanks
|
| The following 2 BHPians Thank v12 for this useful post: | dkaile, irajput |
|
9th June 2018, 17:48
| #144 | |
| BHPian | Re: 2018 Kawasaki Ninja 1000 - The Comprehensive Review Quote:
Your friend's bike, is the handle changed? If yes, can you please let me know if you know which one it is? Thanks in advance. | |
|
| (1)
Thanks
|
| The following BHPian Thanks killjoy for this useful post: | dkaile |
|
10th June 2018, 09:19
| #145 | |
| Senior - BHPian | Re: 2018 Kawasaki Ninja 1000 - The Comprehensive Review Quote:
 Cheers... Last edited by dkaile : 10th June 2018 at 09:40. | |
|
| (4)
Thanks
|
| The following 4 BHPians Thank dkaile for this useful post: | Cyborg, Haroon, killjoy, v12 |
|
11th June 2018, 13:50
| #146 |
| Senior - BHPian | Re: 2018 Kawasaki Ninja 1000 - The Comprehensive Review Short 100+kms Ride 11-06-2018 Did a short 100+ kms early Monday morning run to test the bike with the pillion and the panniers. Up at 0530 and ready to rock 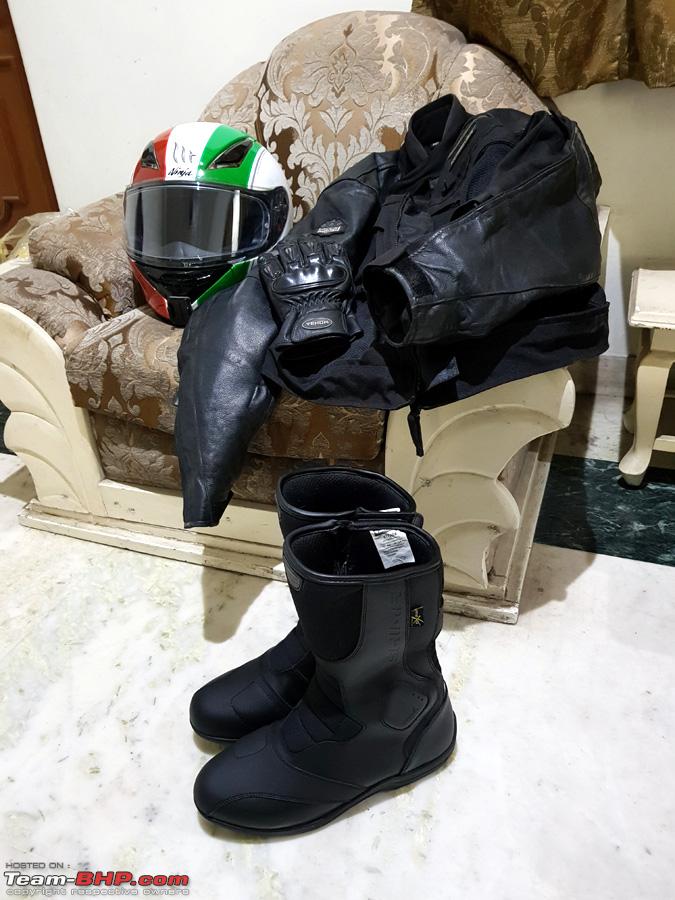 Our jaunt to one of our favorite breakfast places on the Dun Highway, which sadly seems to have shut down for good 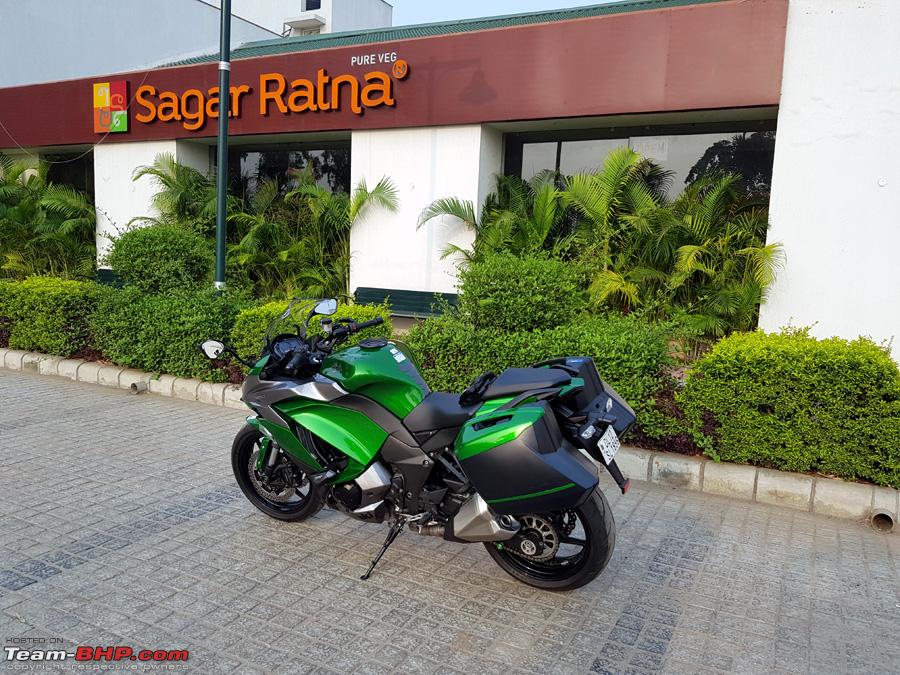 Pati, Patni aur Voh... lolz 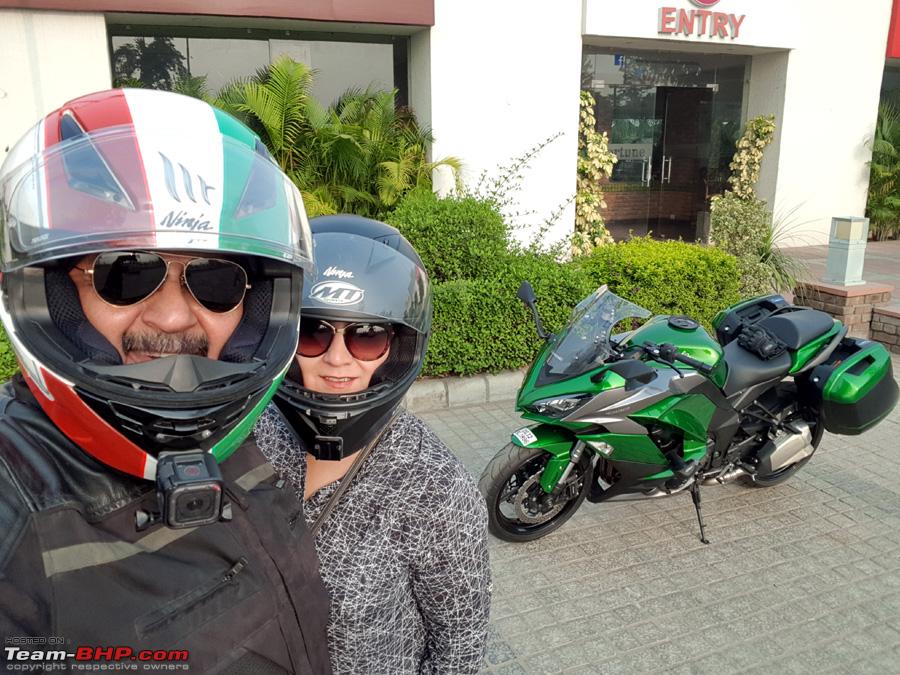 Back to another of our favorites. We do not disclose our personal top speeds for the day on Teambhp but I can safely mention that whatever I had read on the US forums is true and the bike behaved fantastically at it's upper performance band with the pillion and the panniers attached. The bike hardly breaks into a sweat before we run out of road due to heavy traffic on our Western UP highways. In fact this bike gets even more stable at high speeds with a pillion. That's the brilliance of this inline 4. 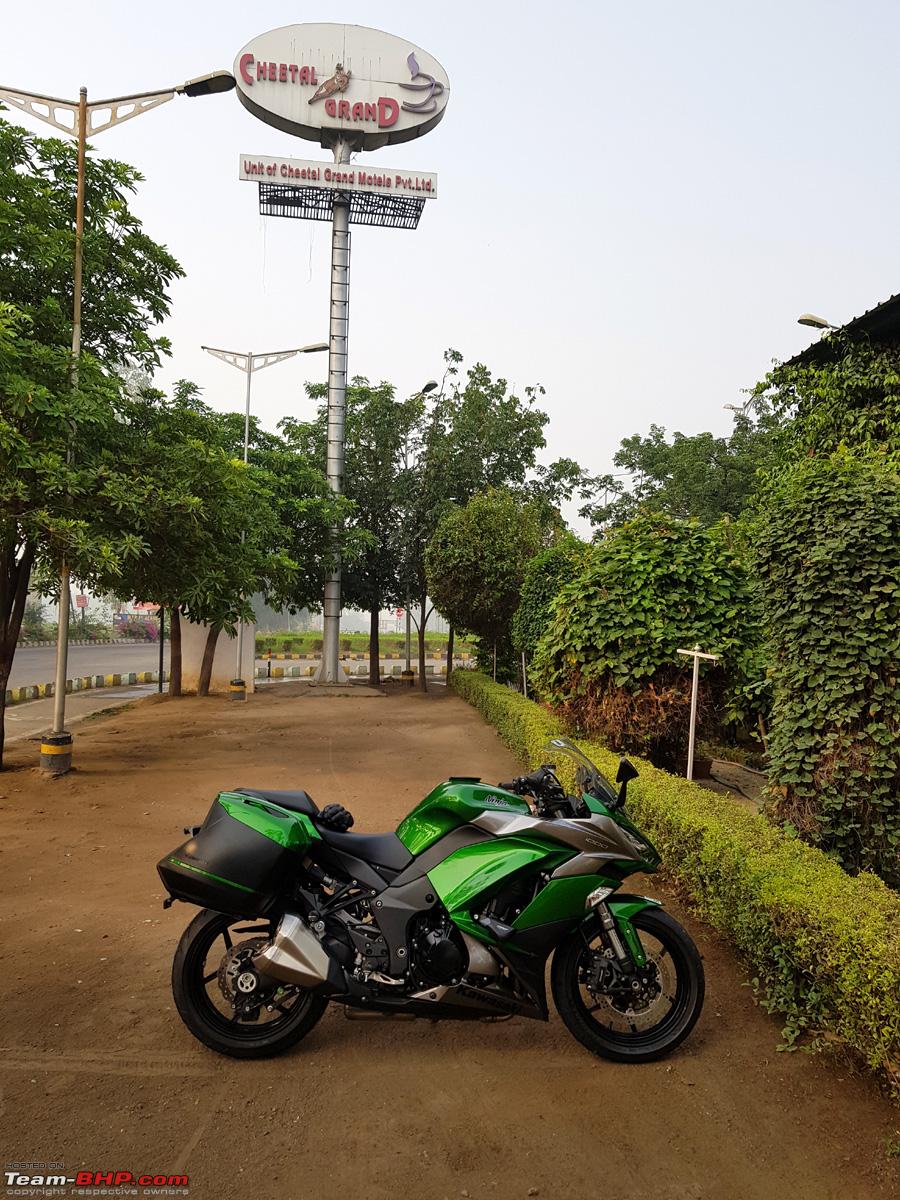 Yours truly. My smile tells it all... lolz  And the morning ain't complete without crispy hot Pakoras and adrak vali Chai  The more I am getting to know it's capabilities, the more I am falling in love. This one's a keeper. Ingenious engineering by Kawasaki. 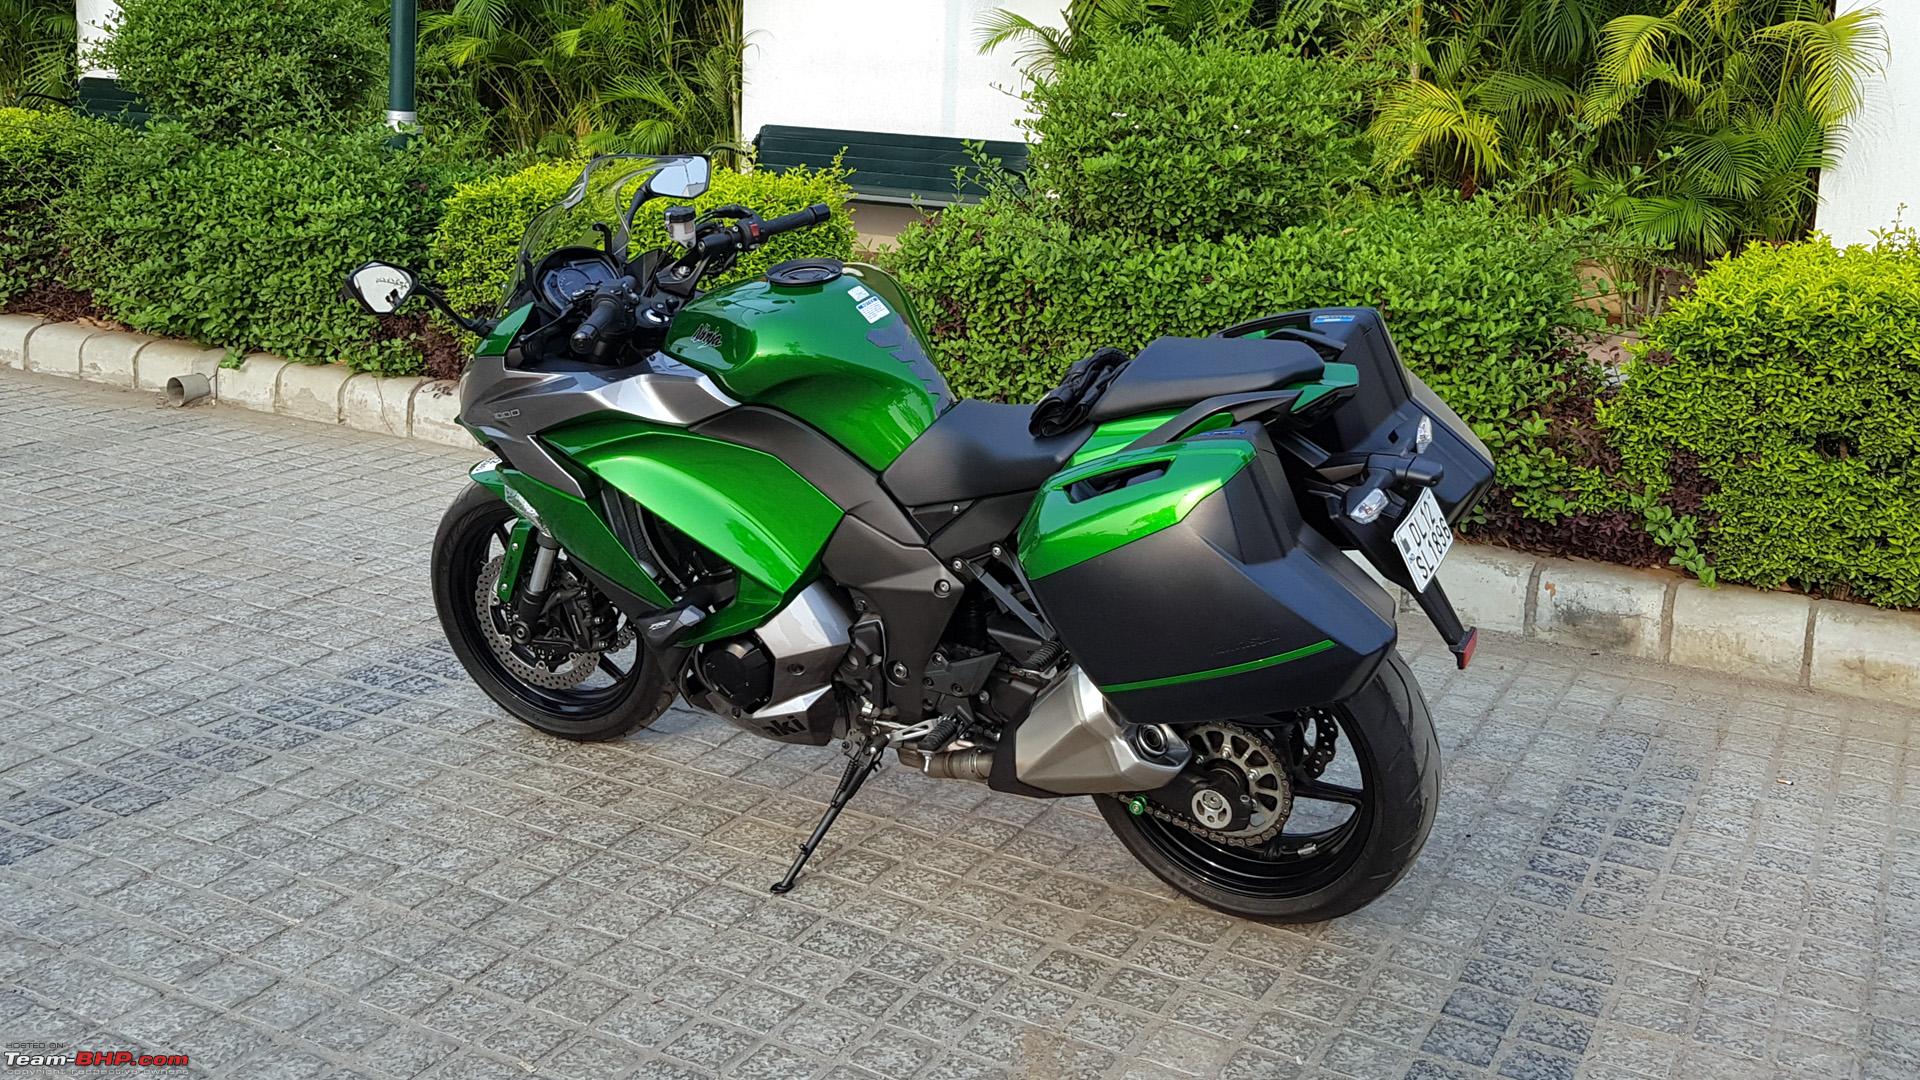 Cheers... Last edited by dkaile : 11th June 2018 at 13:52. |
|
| (13)
Thanks
|
| The following 13 BHPians Thank dkaile for this useful post: | ACM, anandpadhye, Cyborg, driverace, Haroon, hiren.mistry, irajput, MadRasTan4986, mh09ad5578, mobike008, PM - B, sukiwa, vaasu |
| |
|
13th June 2018, 14:41
| #147 |
| BHPian Join Date: Oct 2009 Location: New Delhi
Posts: 52
Thanked: 14 Times
| Re: 2018 Kawasaki Ninja 1000 - The Comprehensive Review Hello dkaile, One question. Any clue how much does the fuel economy drop with the pillion rider ? Also in general terms, how much percentage drop can be expected from any bike along with a pillion ? This would be useful to know in case of long touring on highways where Petrol pumps are in limited numbers. Thank You ! |
|
| ()
Thanks
|
|
13th June 2018, 15:29
| #148 | |
| Senior - BHPian | Quote:
Both conditions remaining the same and riding at highway speeds, the economy should not drop more than 1kmpl with a pillion. I am regularly seeing between 18-19 kmpl with my riding style, with or without pillion. With a 19L fuel tank that gives me a range of 300+ kms. I have seen people who have got 22-23 kmpl to 13-14 kmpl on either ends of the spectrum on this bike. Anyways, I hardly see any highways in India nowadays which does not have petrol bunks for 250-300 kms. This bike is not meant for remote Leh type terrains anyways. So that hardly should be your concern. Cheers... Last edited by dkaile : 13th June 2018 at 15:36. | |
|
| (3)
Thanks
|
| The following 3 BHPians Thank dkaile for this useful post: | anandpadhye, mh09ad5578, wingsoffires |
|
14th June 2018, 15:13
| #149 | |
| BHPian Join Date: Oct 2009 Location: New Delhi
Posts: 52
Thanked: 14 Times
| Re: 2018 Kawasaki Ninja 1000 - The Comprehensive Review Quote:
This is very useful information indeed. I have not exactly been into biking for the last few years and hence the question. I was under the impression that along with a pillion and even with a light wrist the drop in fuel efficiency could be much more. With regards to the long stretch of highways, what I had in mind was USA, Arizona & not India. While I do quite a bit highway driving in my cars here in North India, I might go to Arizona shortly for a while and was was thinking of doing some trips on a bike. Phoenix / Nevada / Las Vegas / LA etc. My riding will be along with a pillion. I am a bit concerned about the number of Gas Stations on the long stretch of highways in the desert region. I have made a shortlist about some of the bikes out of which I am planning to get one when in US. Ninja 1000 is one of them, however will be looking at pros & cons among all & will take a call on which one to get. Will open up a new thread for discussion on that. Enjoy  | |
|
| ()
Thanks
|
|
18th June 2018, 18:01
| #150 | |
| BHPian Join Date: Jun 2017 Location: Mumbai / Boston
Posts: 63
Thanked: 109 Times
| Re: 2018 Kawasaki Ninja 1000 - The Comprehensive Review Quote:
| |
|
| ()
Thanks
|
|