| |||||||

| Search Forums |
| Advanced Search |
| Go to Page... |
 |
| Search this Thread |  568,028 views |
 10th January 2021, 20:04
| #181 |
| BHPian Join Date: Dec 2019 Location: KL52
Posts: 519
Thanked: 3,648 Times
| Re: Review: My Yamaha R1 (WGP 50th Anniversary Edition) Managed to take a video of the idle issue I have been talking about in the last few posts. This was again after my weekly ride, I was supposed to wait for 5 mins after pulling up to my house and then record, but I forgot about it and this was taken some 15 mins or so later, you will notice the temp gauge reads 95degrees or so because of that as opposed to the usual 104-110 degrees on the road. Notice how on the 3rd attempt it manages to hold idle but it's noticeably below 1k rpm and slowly climbed to 1k. This is how it behaves only when the engine is hot and I try to crank the bike to life, but the weird part is cold starts are very clean and holds idle without any issues, and even when hot once I blip the throttle a few times and hold the rpm a bit higher for a few secs and then release the throttle it holds idle. Cheers Krishna Last edited by krishnaprasadgg : 10th January 2021 at 20:05. |

|  (7)
Thanks (7)
Thanks
 |
| The following 7 BHPians Thank krishnaprasadgg for this useful post: | Cyborg, deadlifts26, JTM, KarthikK, neil.jericho, SnS_12, Ultim8 |
| |
|
11th January 2021, 10:50
| #182 |
| Senior - BHPian | Re: Review: My Yamaha R1 (WGP 50th Anniversary Edition) Congratulations on completing one year with you beautiful looking R1  On my Busa when the OE battery was not holding the charge and when I jump started it the engine never maintained the rpm when revved or at idle as the battery was weak. No issues post the new battery. On my Busa when the OE battery was not holding the charge and when I jump started it the engine never maintained the rpm when revved or at idle as the battery was weak. No issues post the new battery.So, could it be a similar issue? Or could it be clogged injectors as the issue is post warming up and not during cold start? Get it fixed soon as idling below the factory recommended rpm will also affect the oil flow and lubrication of the internals. |

| (5)
Thanks
|
| The following 5 BHPians Thank SnS_12 for this useful post: | Divya Sharan, JTM, krishnaprasadgg, neil.jericho, Taha Mir |
|
11th January 2021, 11:11
| #183 | |
| Senior - BHPian | Re: Review: My Yamaha R1 (WGP 50th Anniversary Edition) Quote:
Last edited by man_of_steel : 11th January 2021 at 11:13. | |
|
| (2)
Thanks
|

| The following 2 BHPians Thank man_of_steel for this useful post: | krishnaprasadgg, neil.jericho |
|
11th January 2021, 11:28
| #184 | ||
| BHPian Join Date: Dec 2019 Location: KL52
Posts: 519
Thanked: 3,648 Times
| Re: Review: My Yamaha R1 (WGP 50th Anniversary Edition) Quote:
Quote:
Cheers Krishna Last edited by krishnaprasadgg : 11th January 2021 at 11:30. | ||
|
| (3)
Thanks
|
| The following 3 BHPians Thank krishnaprasadgg for this useful post: | JTM, neil.jericho, SnS_12 |
|
11th January 2021, 11:34
| #185 |
| Senior - BHPian | Re: Review: My Yamaha R1 (WGP 50th Anniversary Edition) Also, I am not sure if you're using regular fuel or High Octane. The problem with High Octane fuel in India is that the pumps which store them could be holding on to old stock (not enough sale) which degrades the fuel quality and mess us the injectors. |
|
| (3)
Thanks
|
| The following 3 BHPians Thank SnS_12 for this useful post: | JTM, krishnaprasadgg, neil.jericho |
|
11th January 2021, 11:37
| #186 | |
| BHPian Join Date: Dec 2019 Location: KL52
Posts: 519
Thanked: 3,648 Times
| Re: Review: My Yamaha R1 (WGP 50th Anniversary Edition) Quote:
But yeah, will post my findings after the TB Clean and Sync, and while at it I'll clean the injectors as well. Cheers Krishna | |
|
| (5)
Thanks
|
| The following 5 BHPians Thank krishnaprasadgg for this useful post: | InControl, JTM, KarthikK, neil.jericho, SnS_12 |
|
16th January 2021, 10:06
| #187 |
| BHPian | Re: Review: My Yamaha R1 (WGP 50th Anniversary Edition) Reading about your ownership experience with the YZF R1 has been the most interesting thing I have done since the beginning of this year  I myself have been living with a preloved 2012 FZ1 here in chennai and I can relate to a lot of your experiences. I would love to know how and from where you are able to purchase oe yamaha parts. I have been solely relying on bikebandits.com for my parts and due to the covid situation many service parts are unavailable owing to the logistical issues. I myself have been living with a preloved 2012 FZ1 here in chennai and I can relate to a lot of your experiences. I would love to know how and from where you are able to purchase oe yamaha parts. I have been solely relying on bikebandits.com for my parts and due to the covid situation many service parts are unavailable owing to the logistical issues. Talking about the engine heating on these litre bikes, what average temperatures do you see while cruising on highways... And how sensitive is this to the ambient temperatures of the day? Wishing you many more happy miles on your mean machine.  |
|
| (2)
Thanks
|
| The following 2 BHPians Thank baddy for this useful post: | JTM, krishnaprasadgg |
|
17th January 2021, 08:49
| #188 | |||
| BHPian Join Date: Dec 2019 Location: KL52
Posts: 519
Thanked: 3,648 Times
| Re: Review: My Yamaha R1 (WGP 50th Anniversary Edition) I had ordered a rear paddock stand from Grandpitstop & an OGIO magnetic tank-bag over the last week for use on the R1 and the Tiger and both had come in on Friday. GrandPitStop Dimantle-able rear paddock stand I had shortlisted their product because of the number of reviews they had on Amazon and even word of mouth I had heard. The guy who handles their Whatsapp account is also super helpful and prompt in replying, I had contacted him to get to know if the paddock will fit the R1 and the Tiger. So I ended up placing an order for their dismantle-able rear paddock stand. Build quality is good enough, Welds are clean and the powder coating on the material is good, though there are a few chips already on it from shipping I guess. 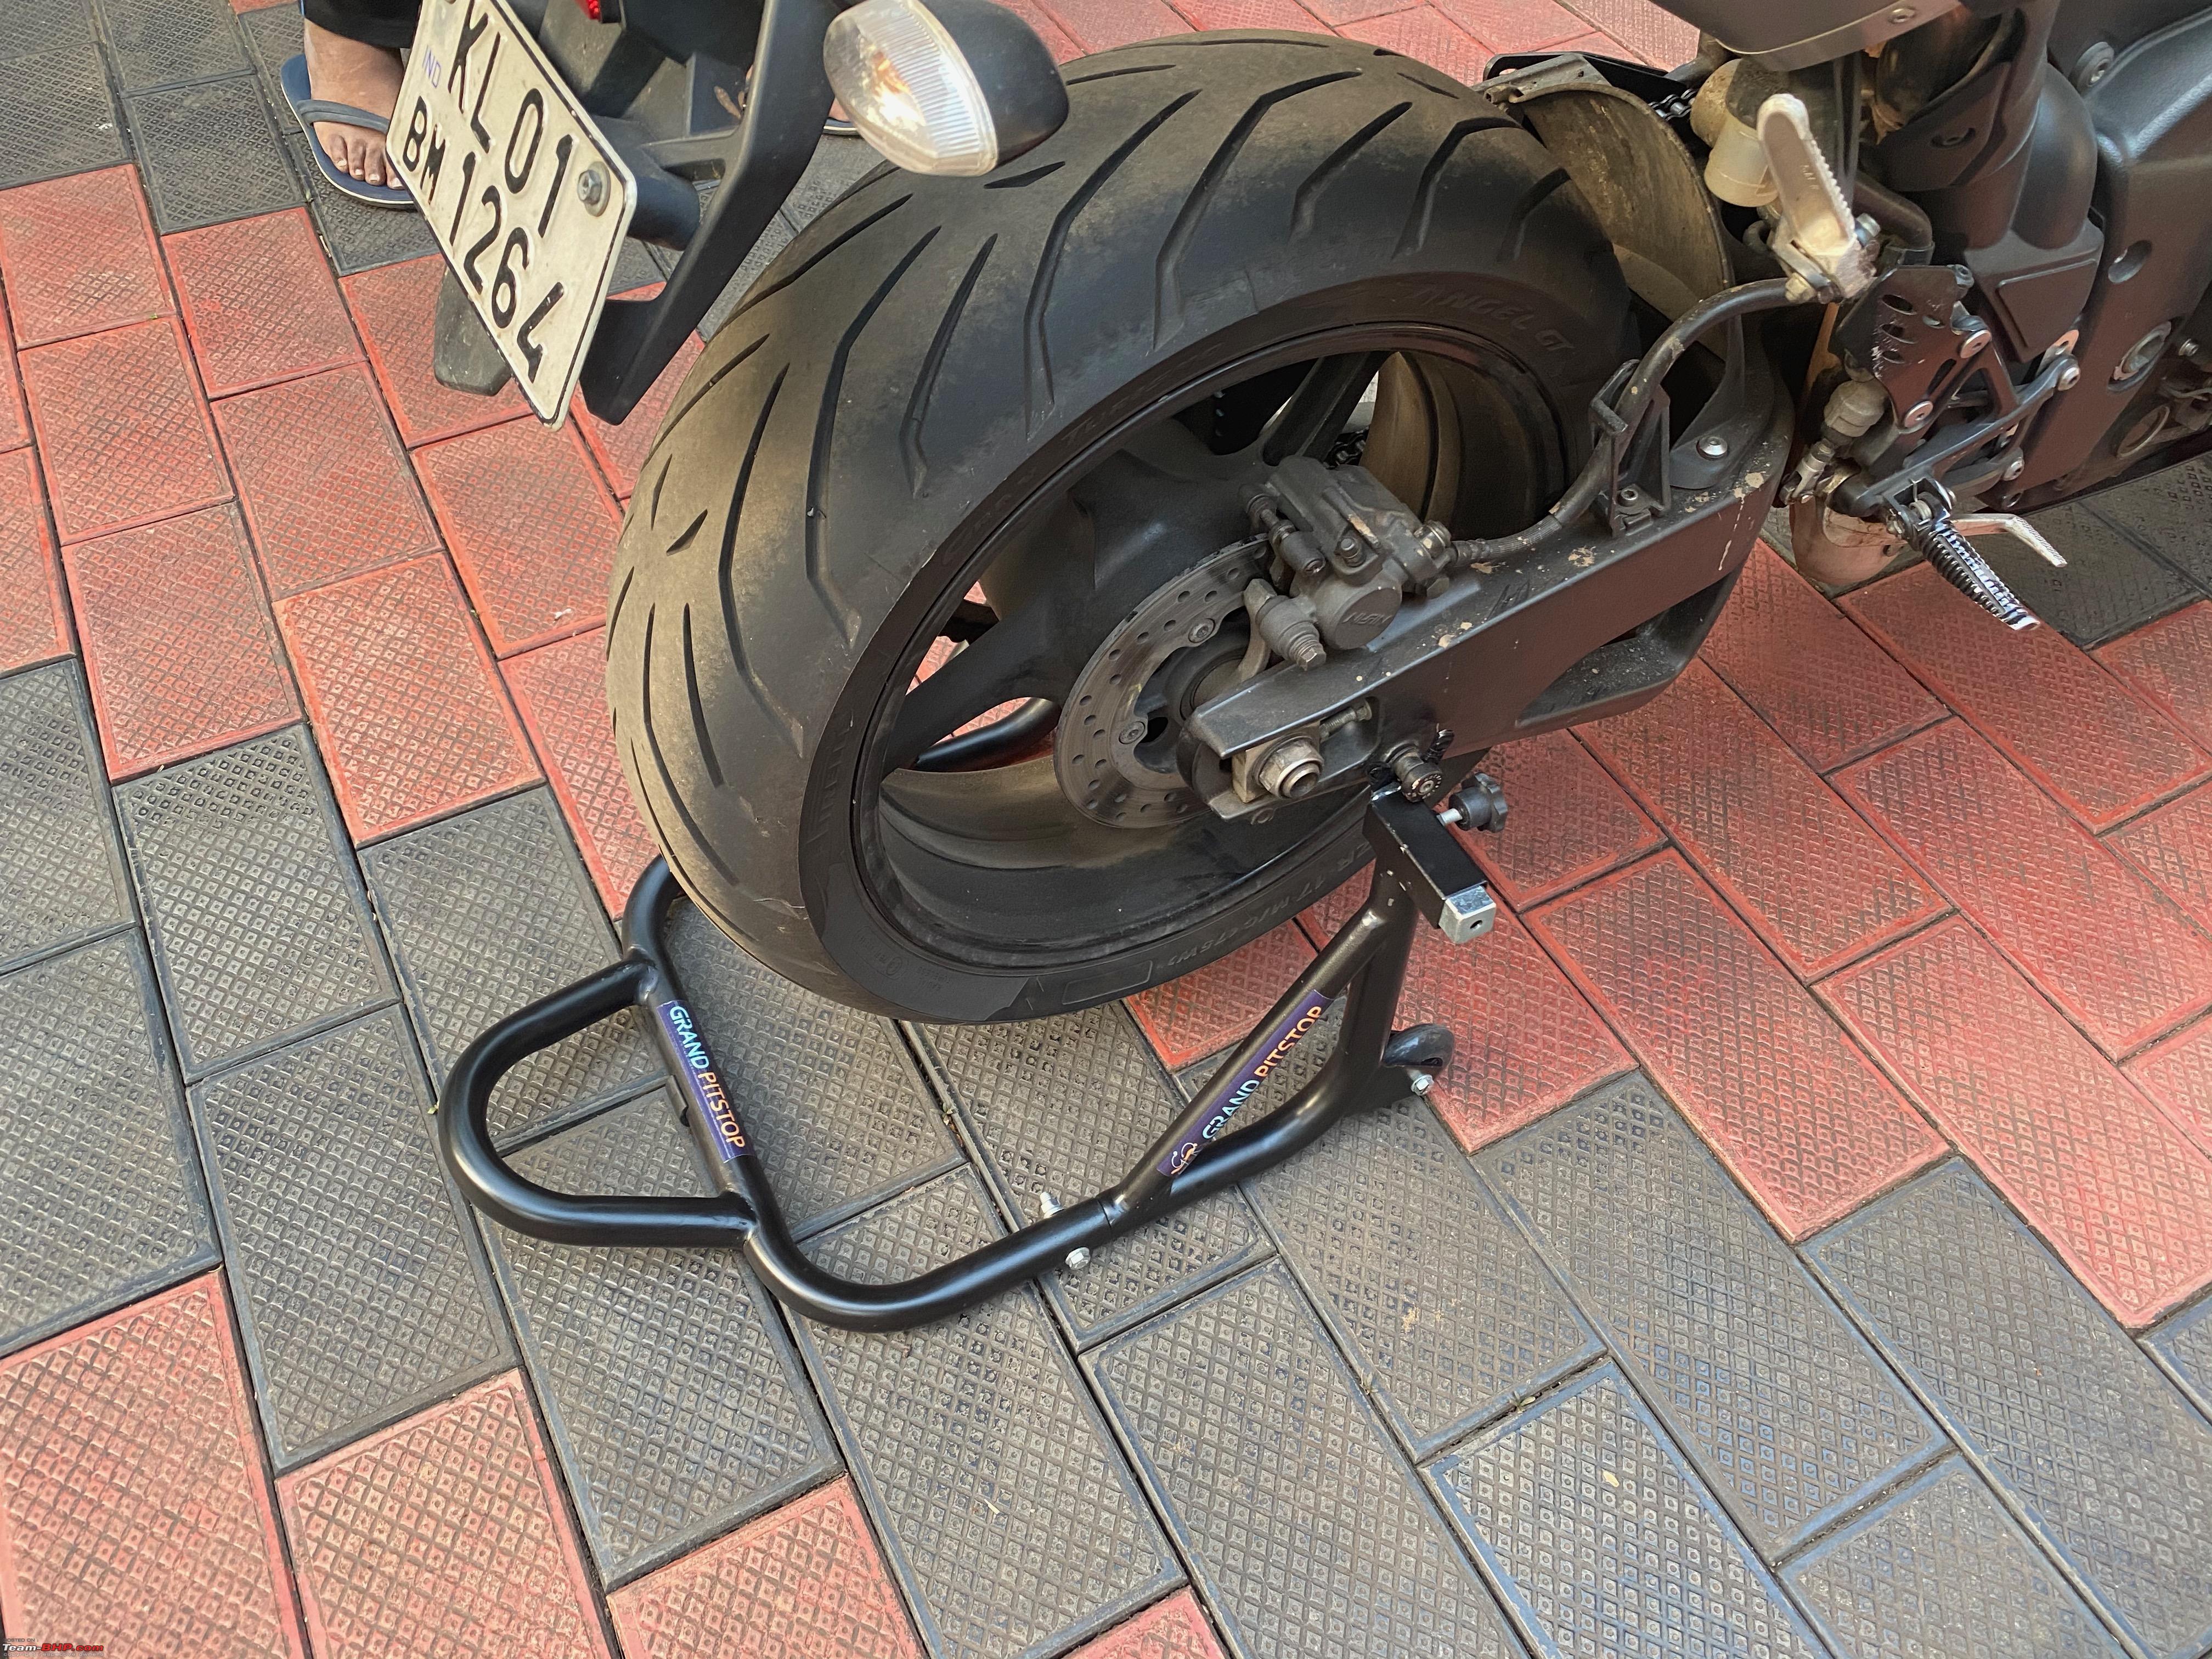 Initially, I had an issue with fitment, the hoisting hook that holds the spools was fouling on the swingarm of the R1, to which I just covered the metal part with a thick layer of insulation tape. But I later realized because it being a dismantle-able type there was a little play for an adjustment of the arms that jack the bike up, spent some 5 mins on the adjustment to where I needed and it fits perfectly now. Though the slider is on its widest adjustment point. 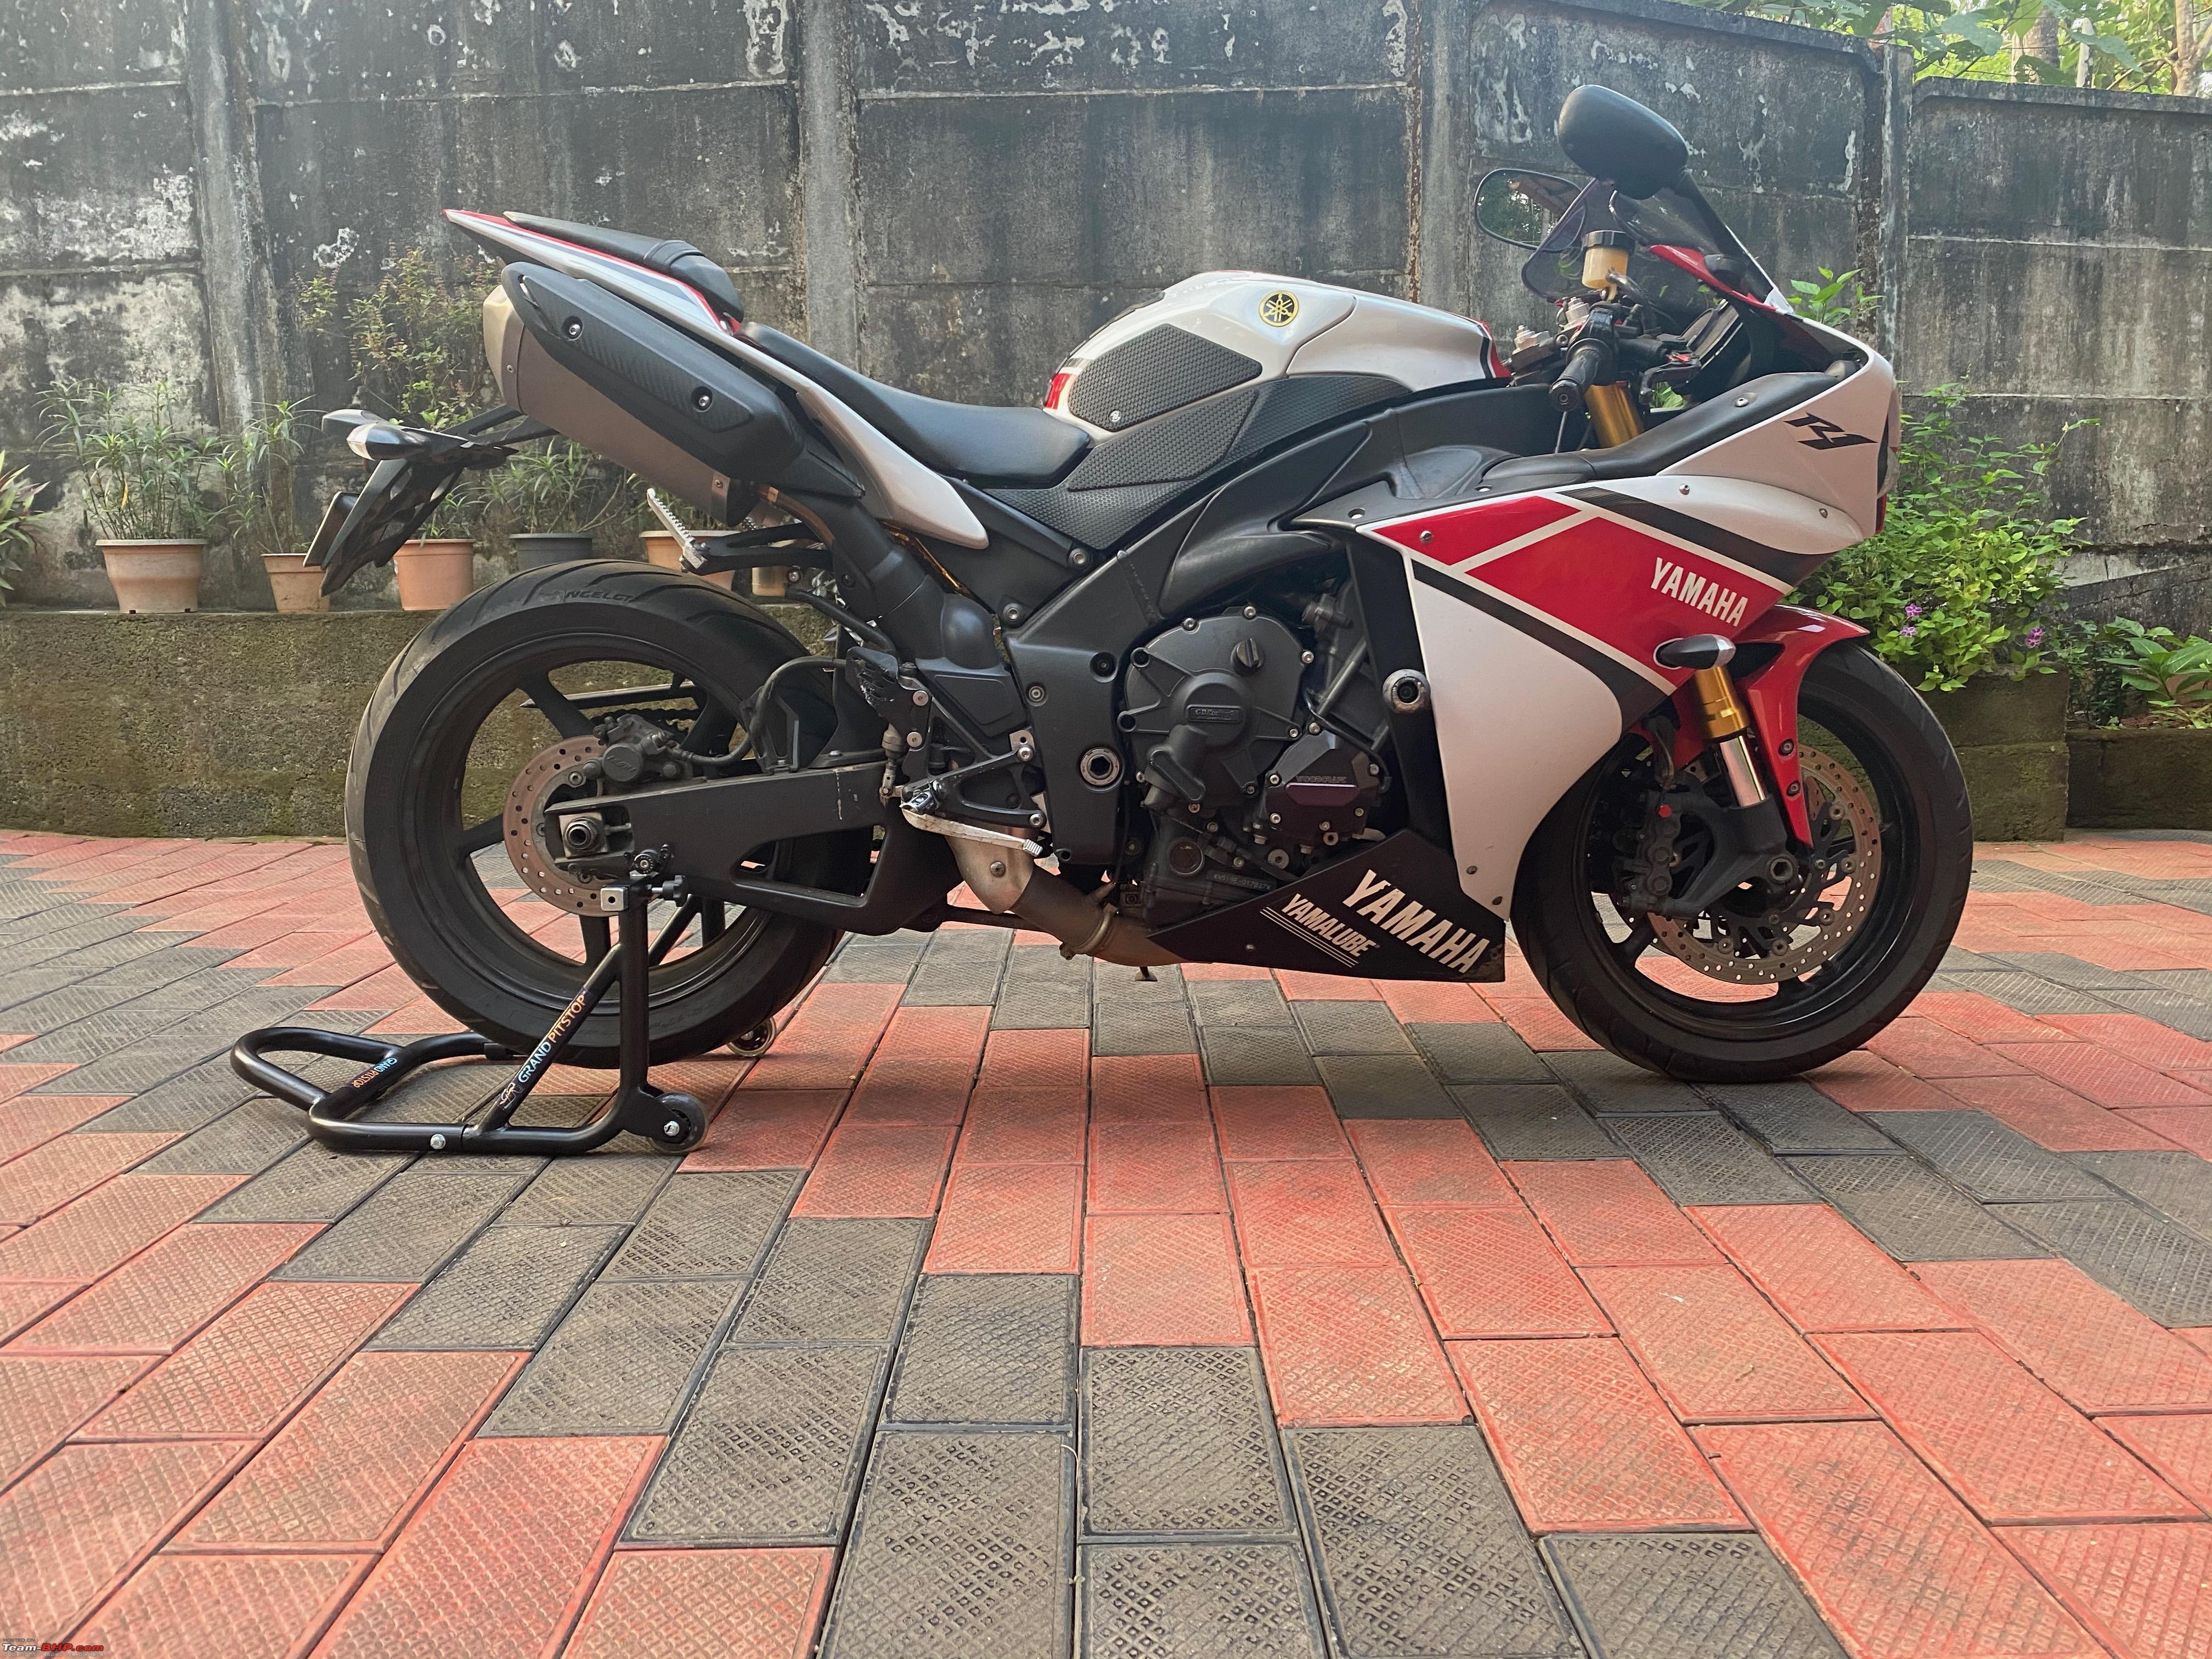 But I am happy with the purchase, once mounted it holds the bike perfectly solid and no wiggly rocking effects at all. Will use it for a few weeks and might get their front paddock stand as well. They are having a discount on both I think. 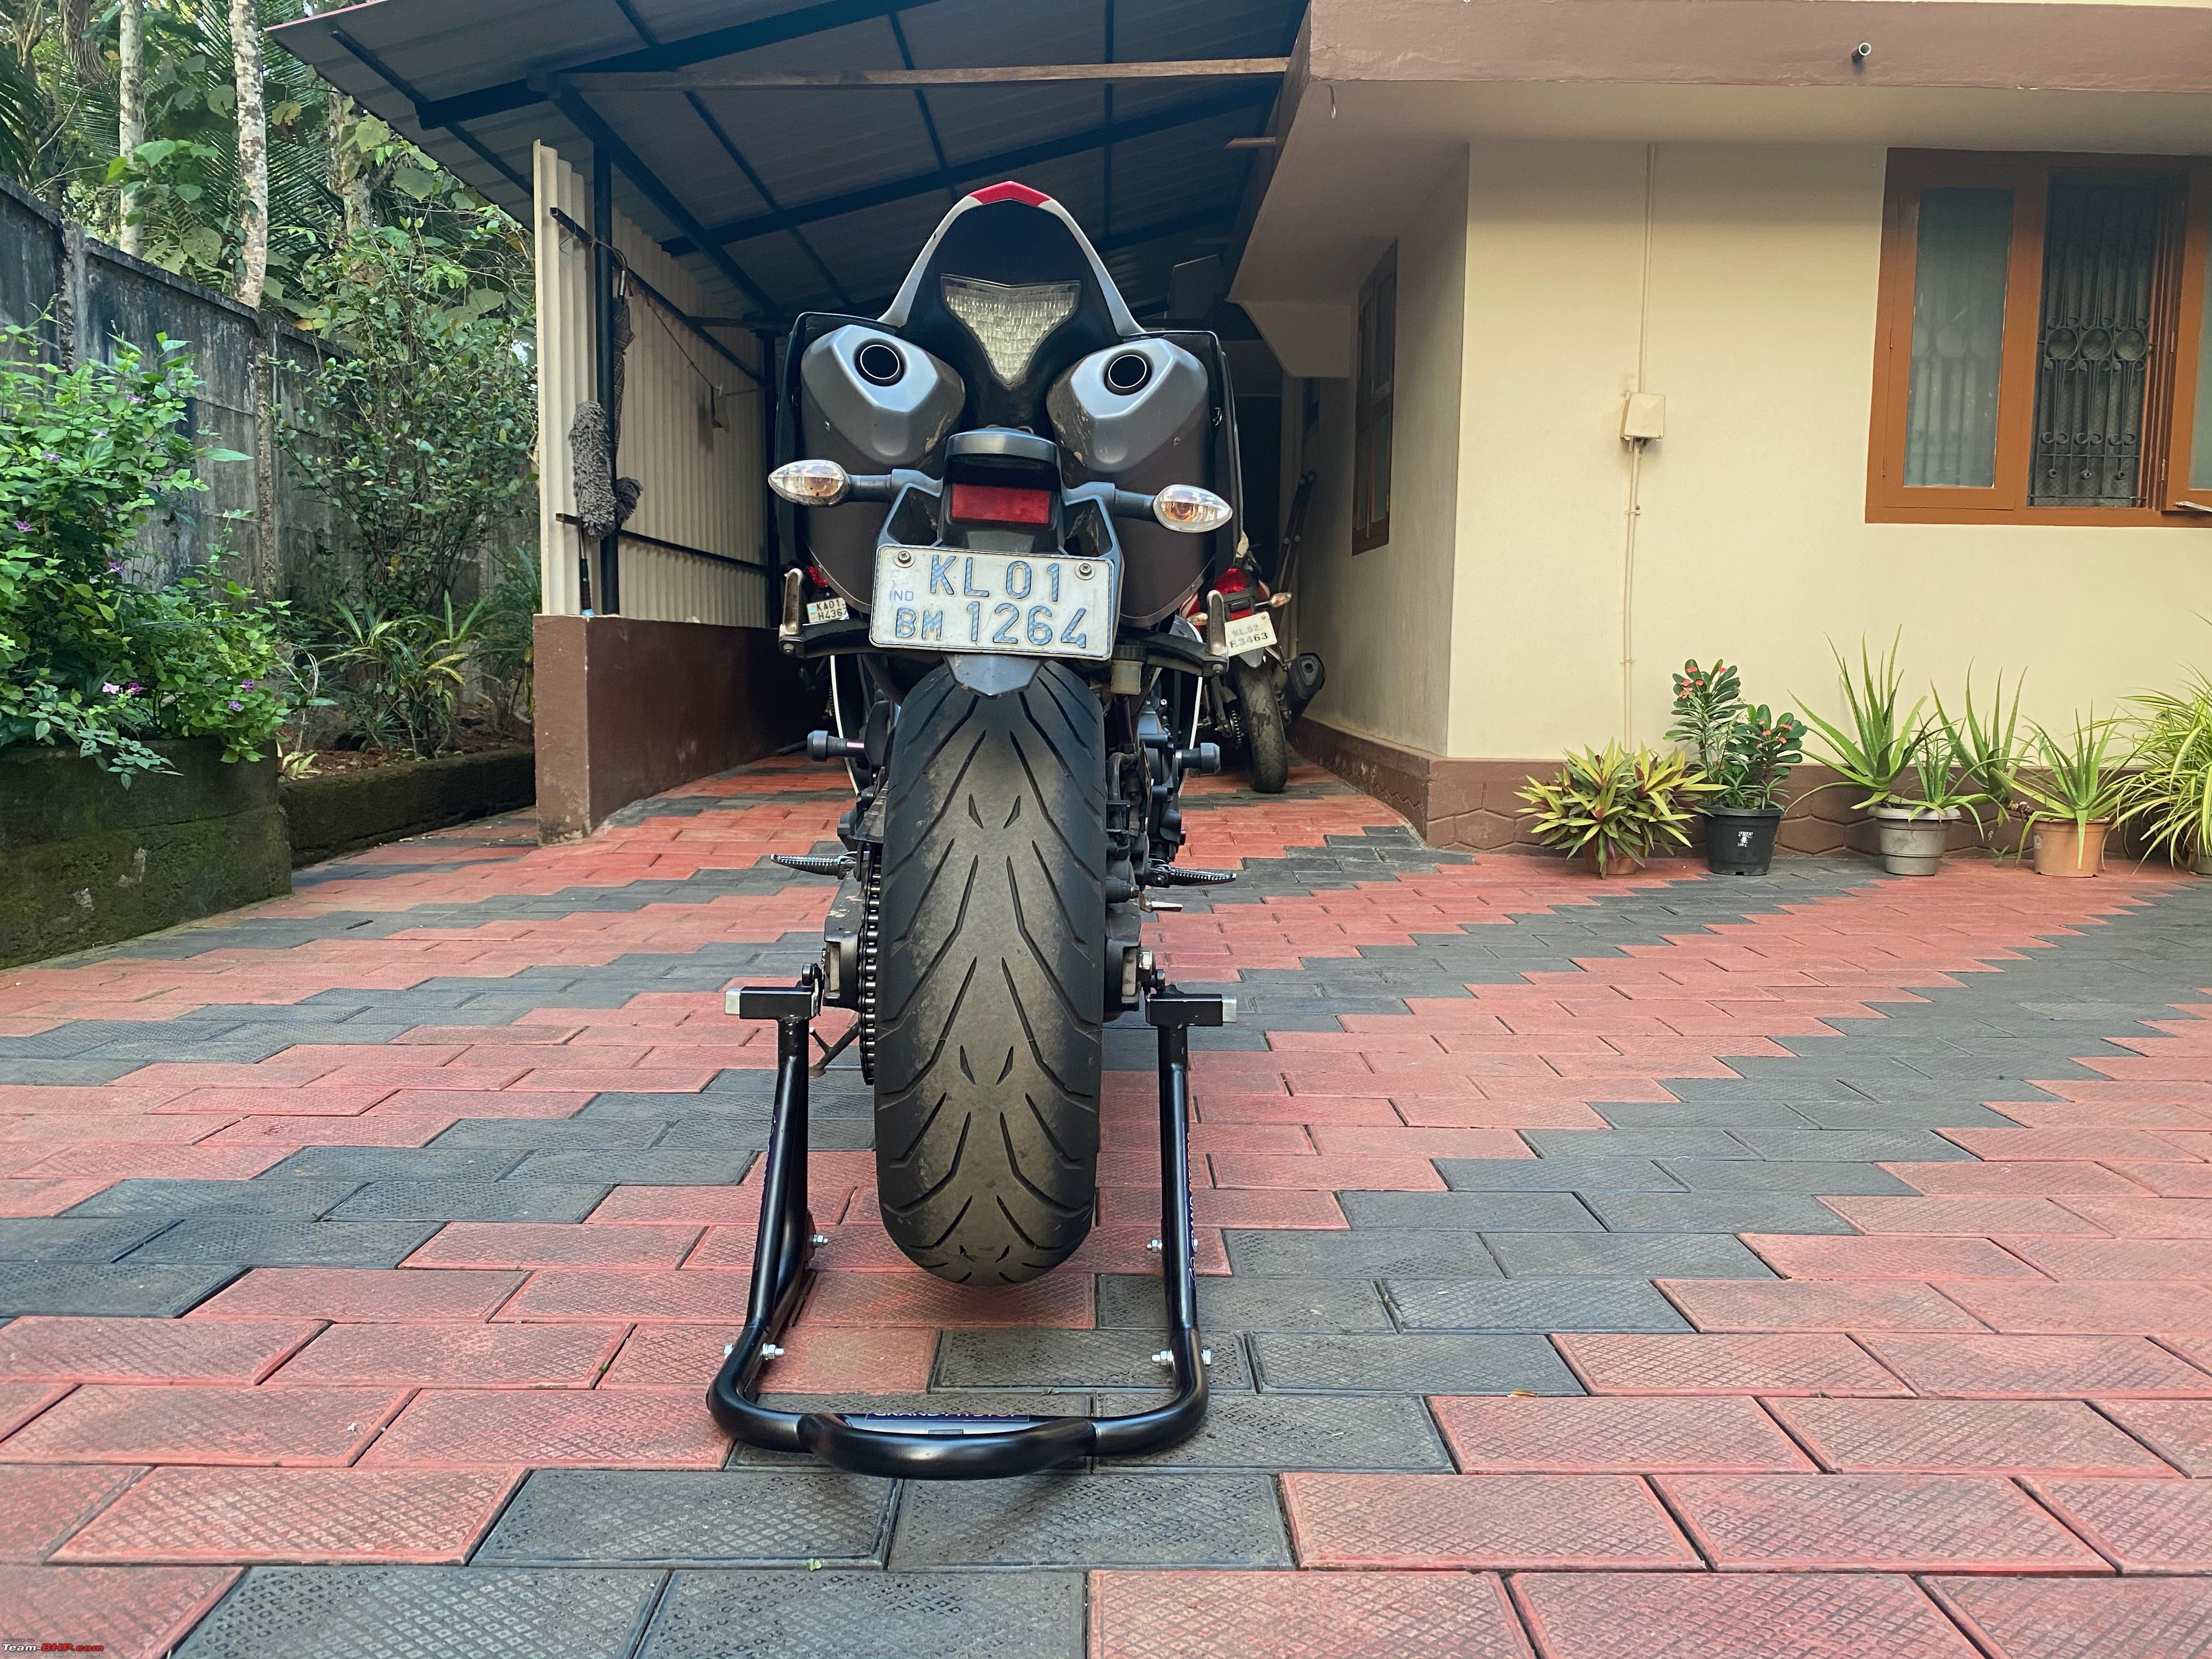 Link to the product I purchased is this. OGIO Black Large Supermini Tanker Bag Talk about oxymorons in the product name.  Look at that cute little guy. Ducati Factory Petrucci edition cap for scale :-P 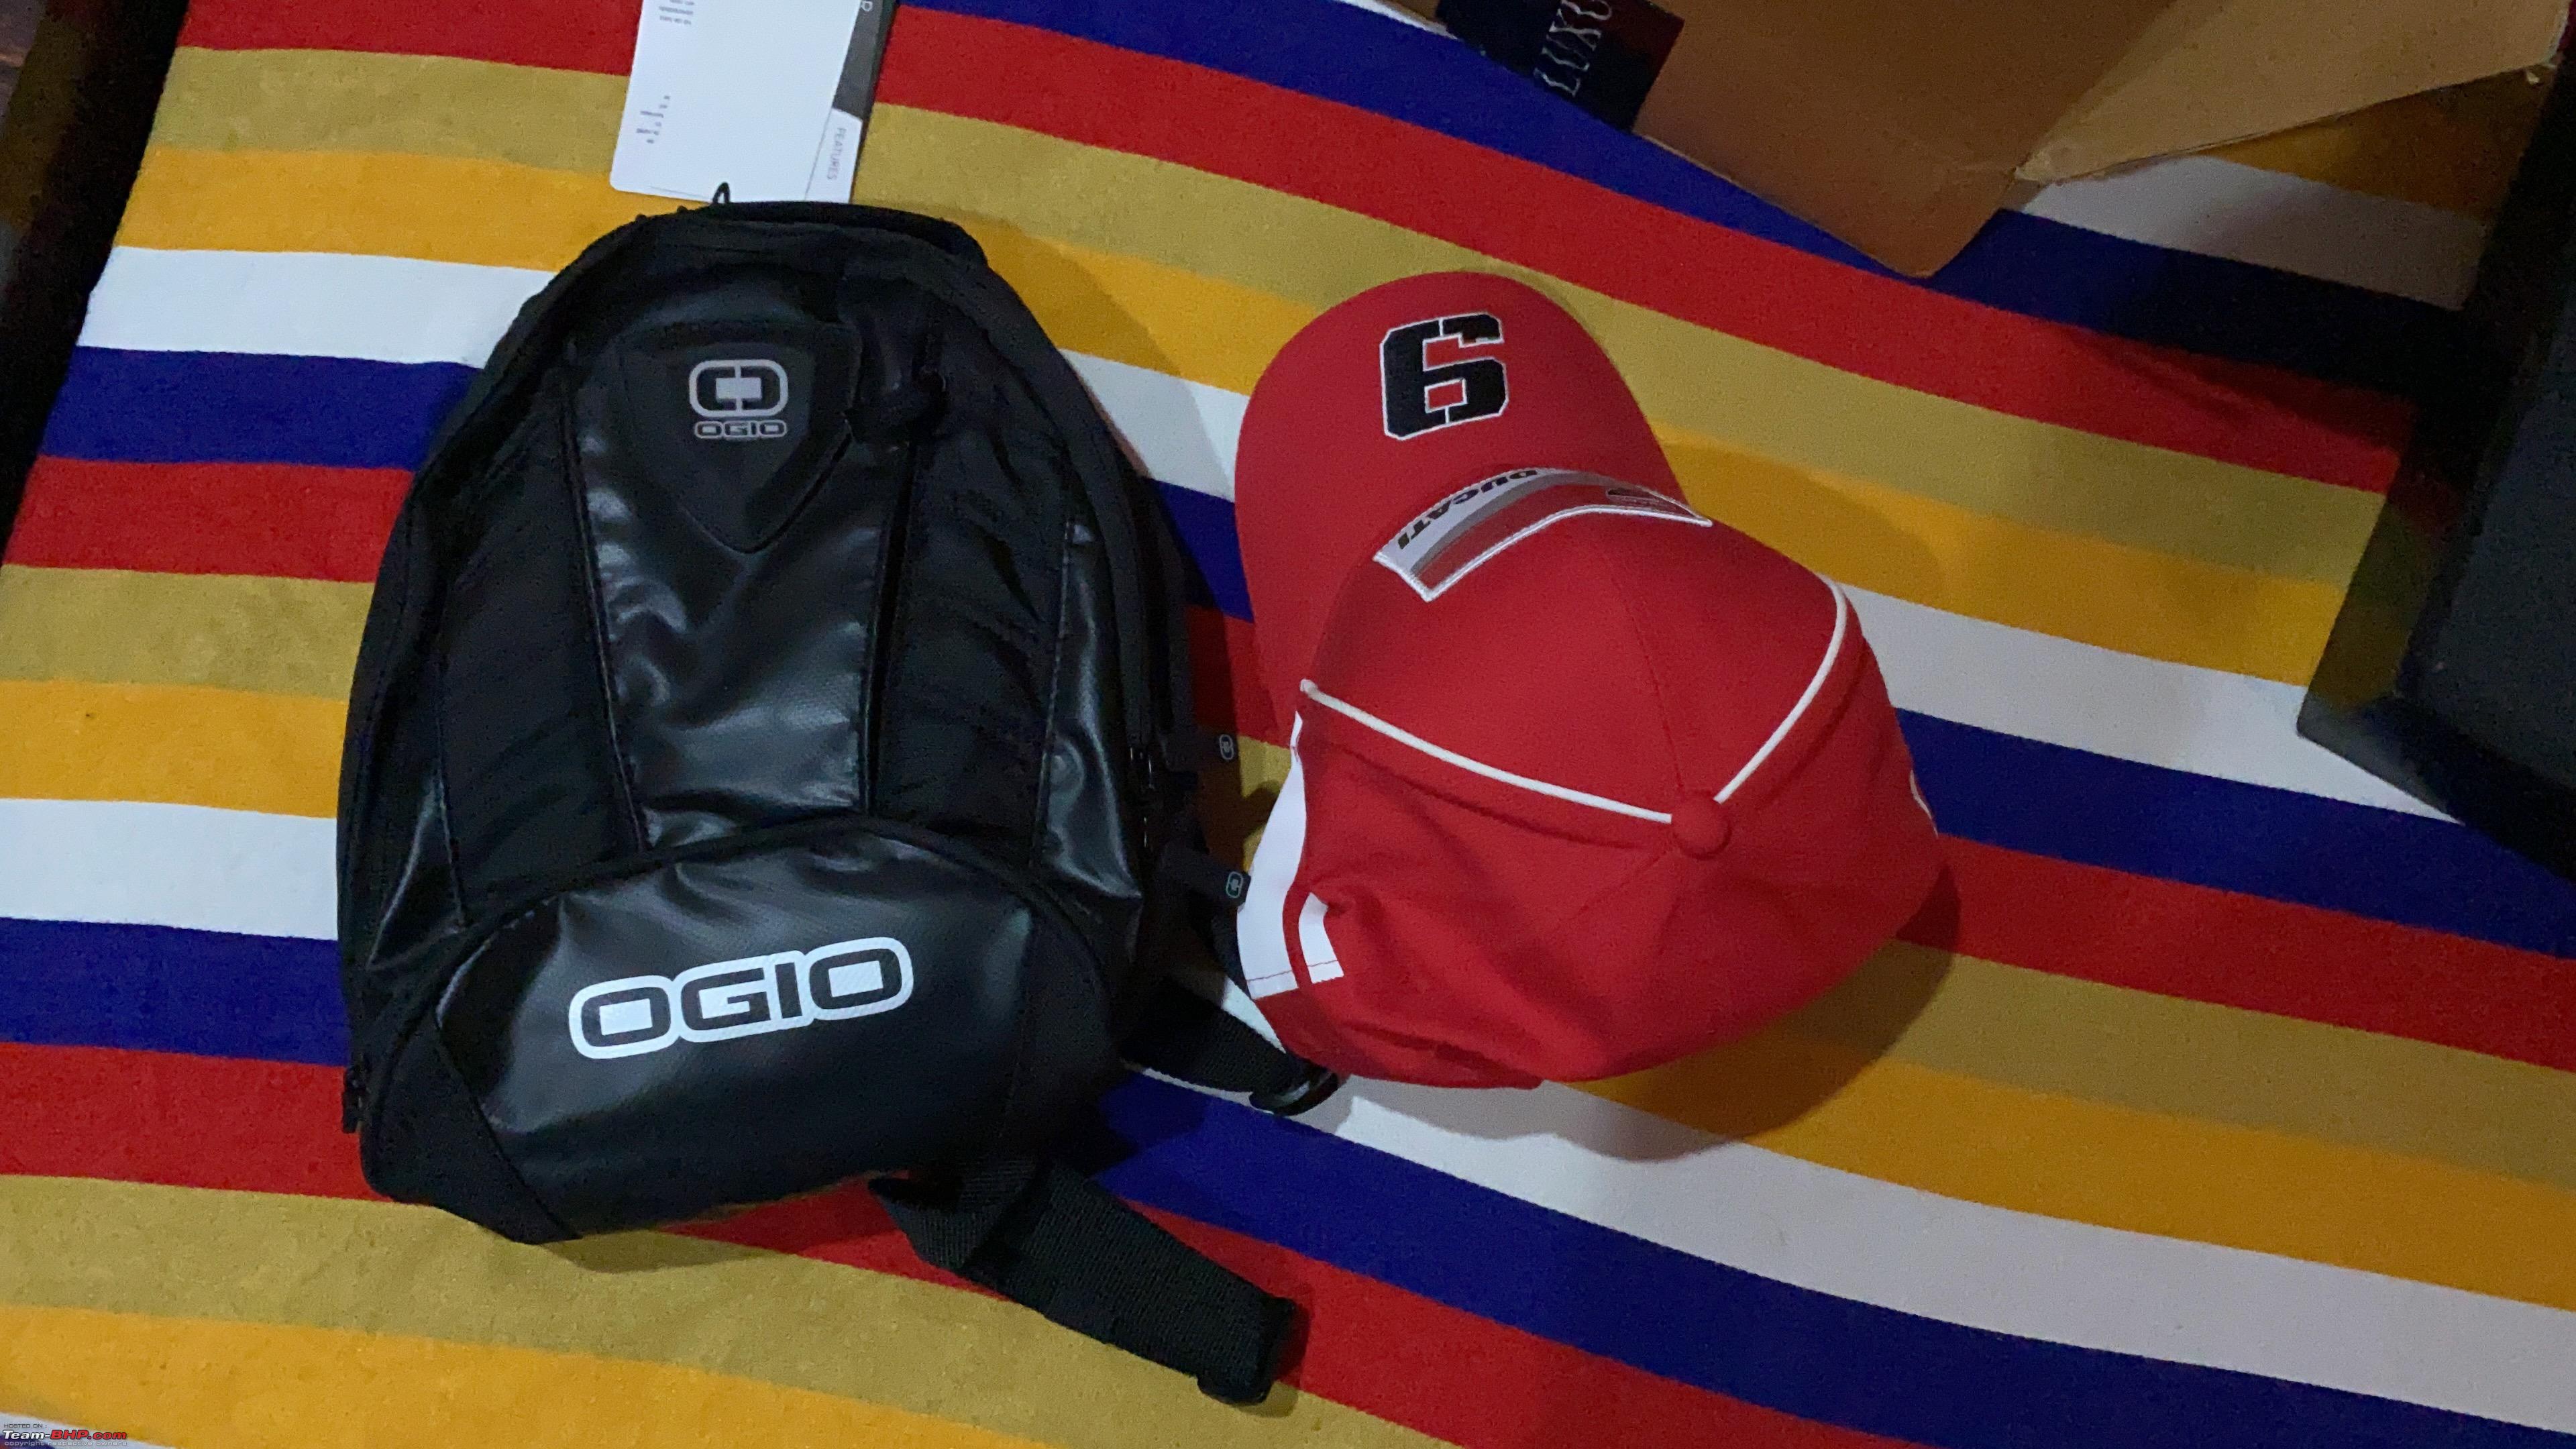 To start with, this thing is small, like really small & compact. Which I was expecting, but not this small, it's almost cute looking at this point. Just have a look at the size with a standard size hat for scale. Back Side showing the magnetic mounting points  Size for scale 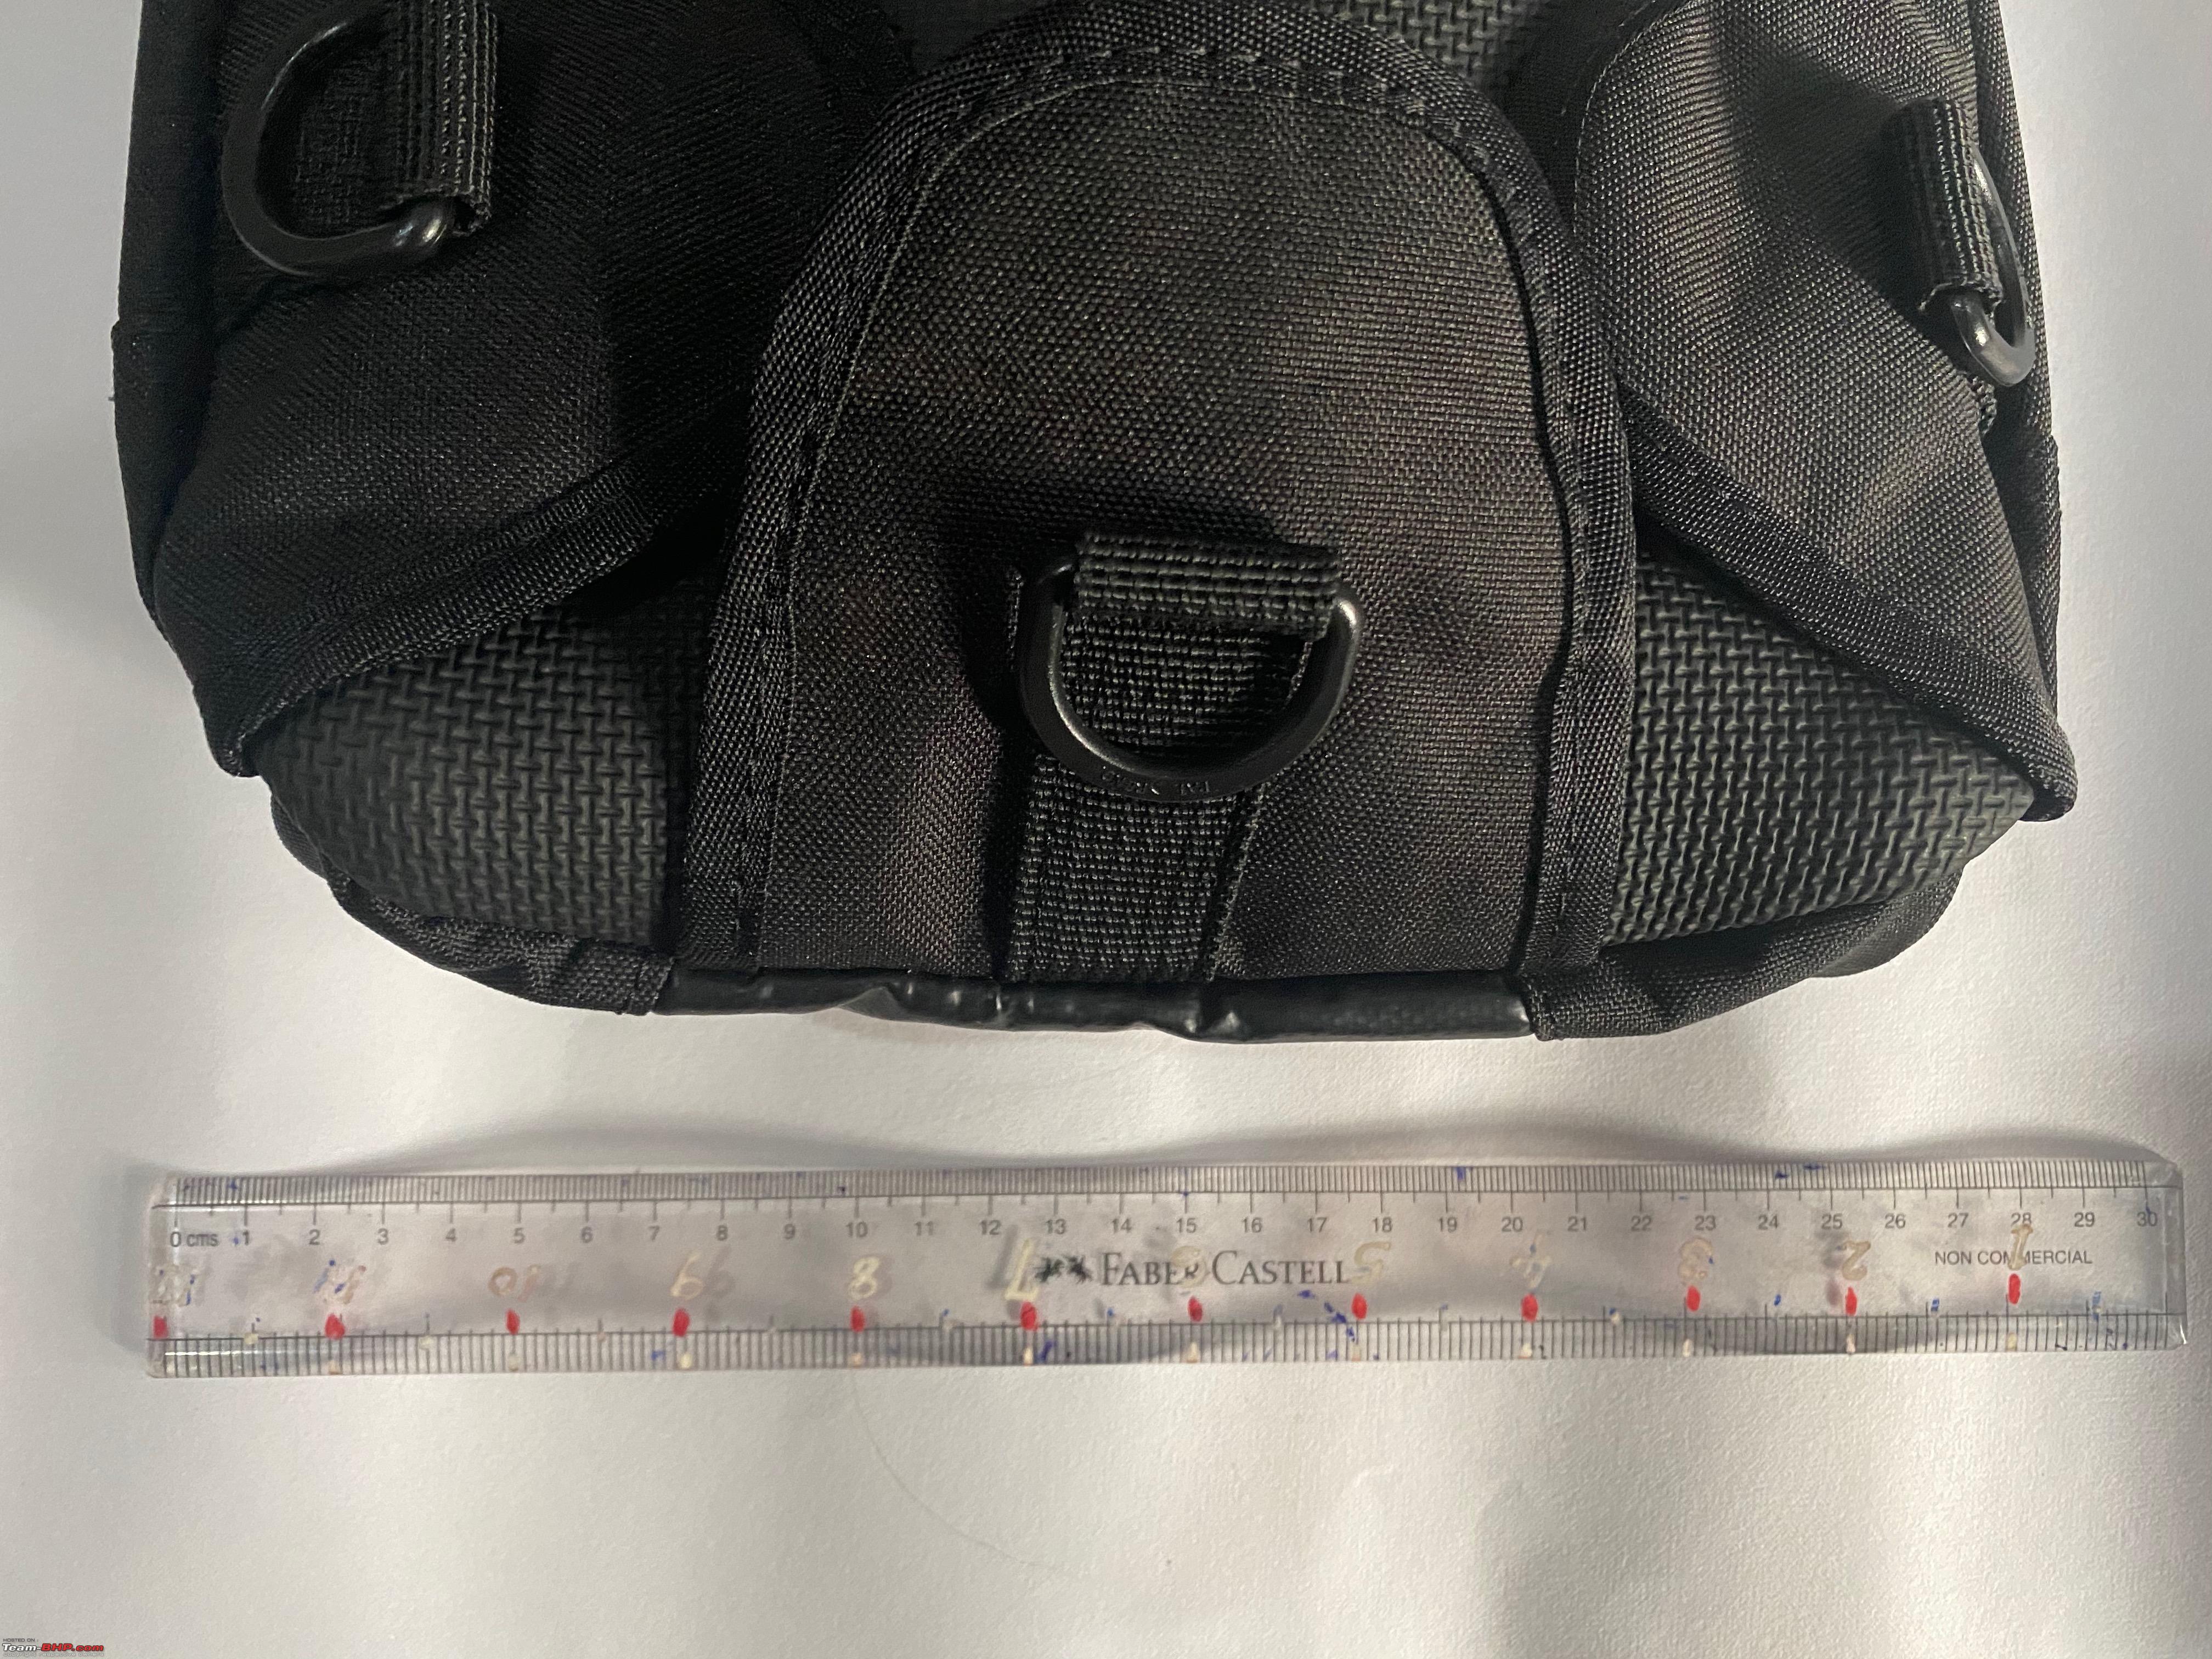  Luckily enough I got to try out the tank bag on the Tiger for a 400kms round trip as I had to go from Palakkad to Kottayam to have lunch with 2 friends of mine at a restaurant I really had been waiting to try.  Yeah, I guess 2020 has a good start with respect to bike rides, hope this momentum continues. Doesn't look too bad. 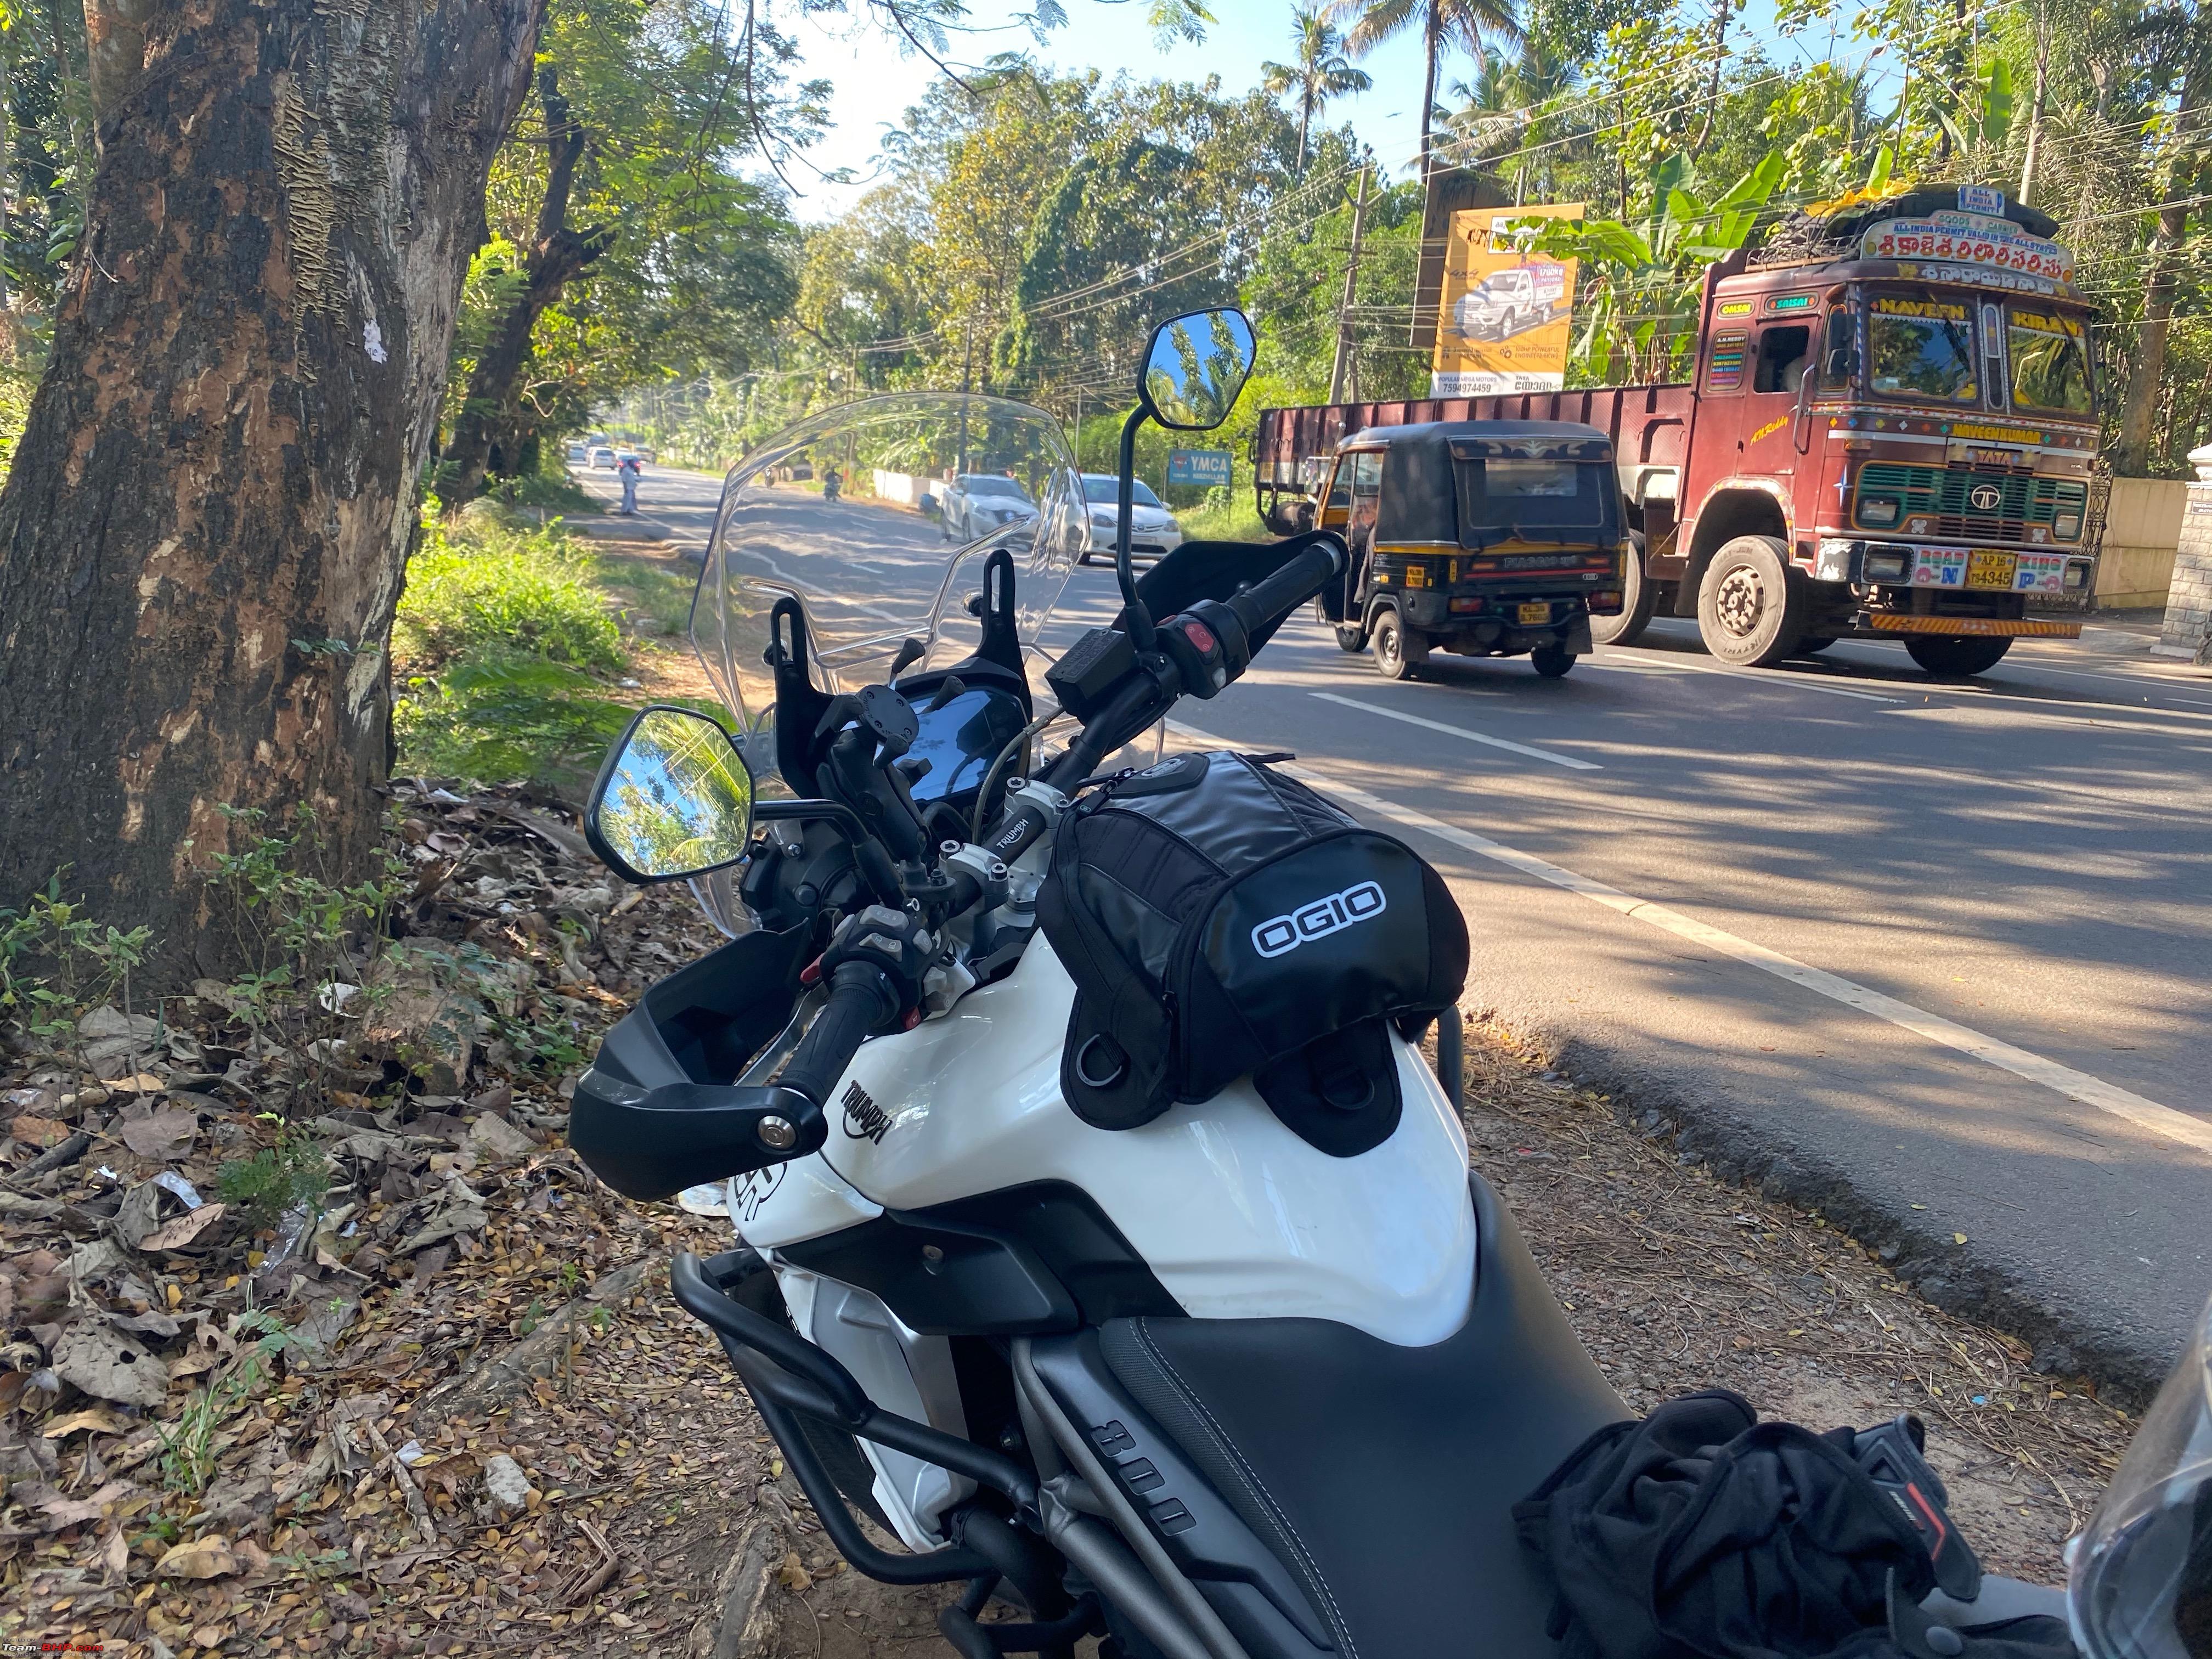 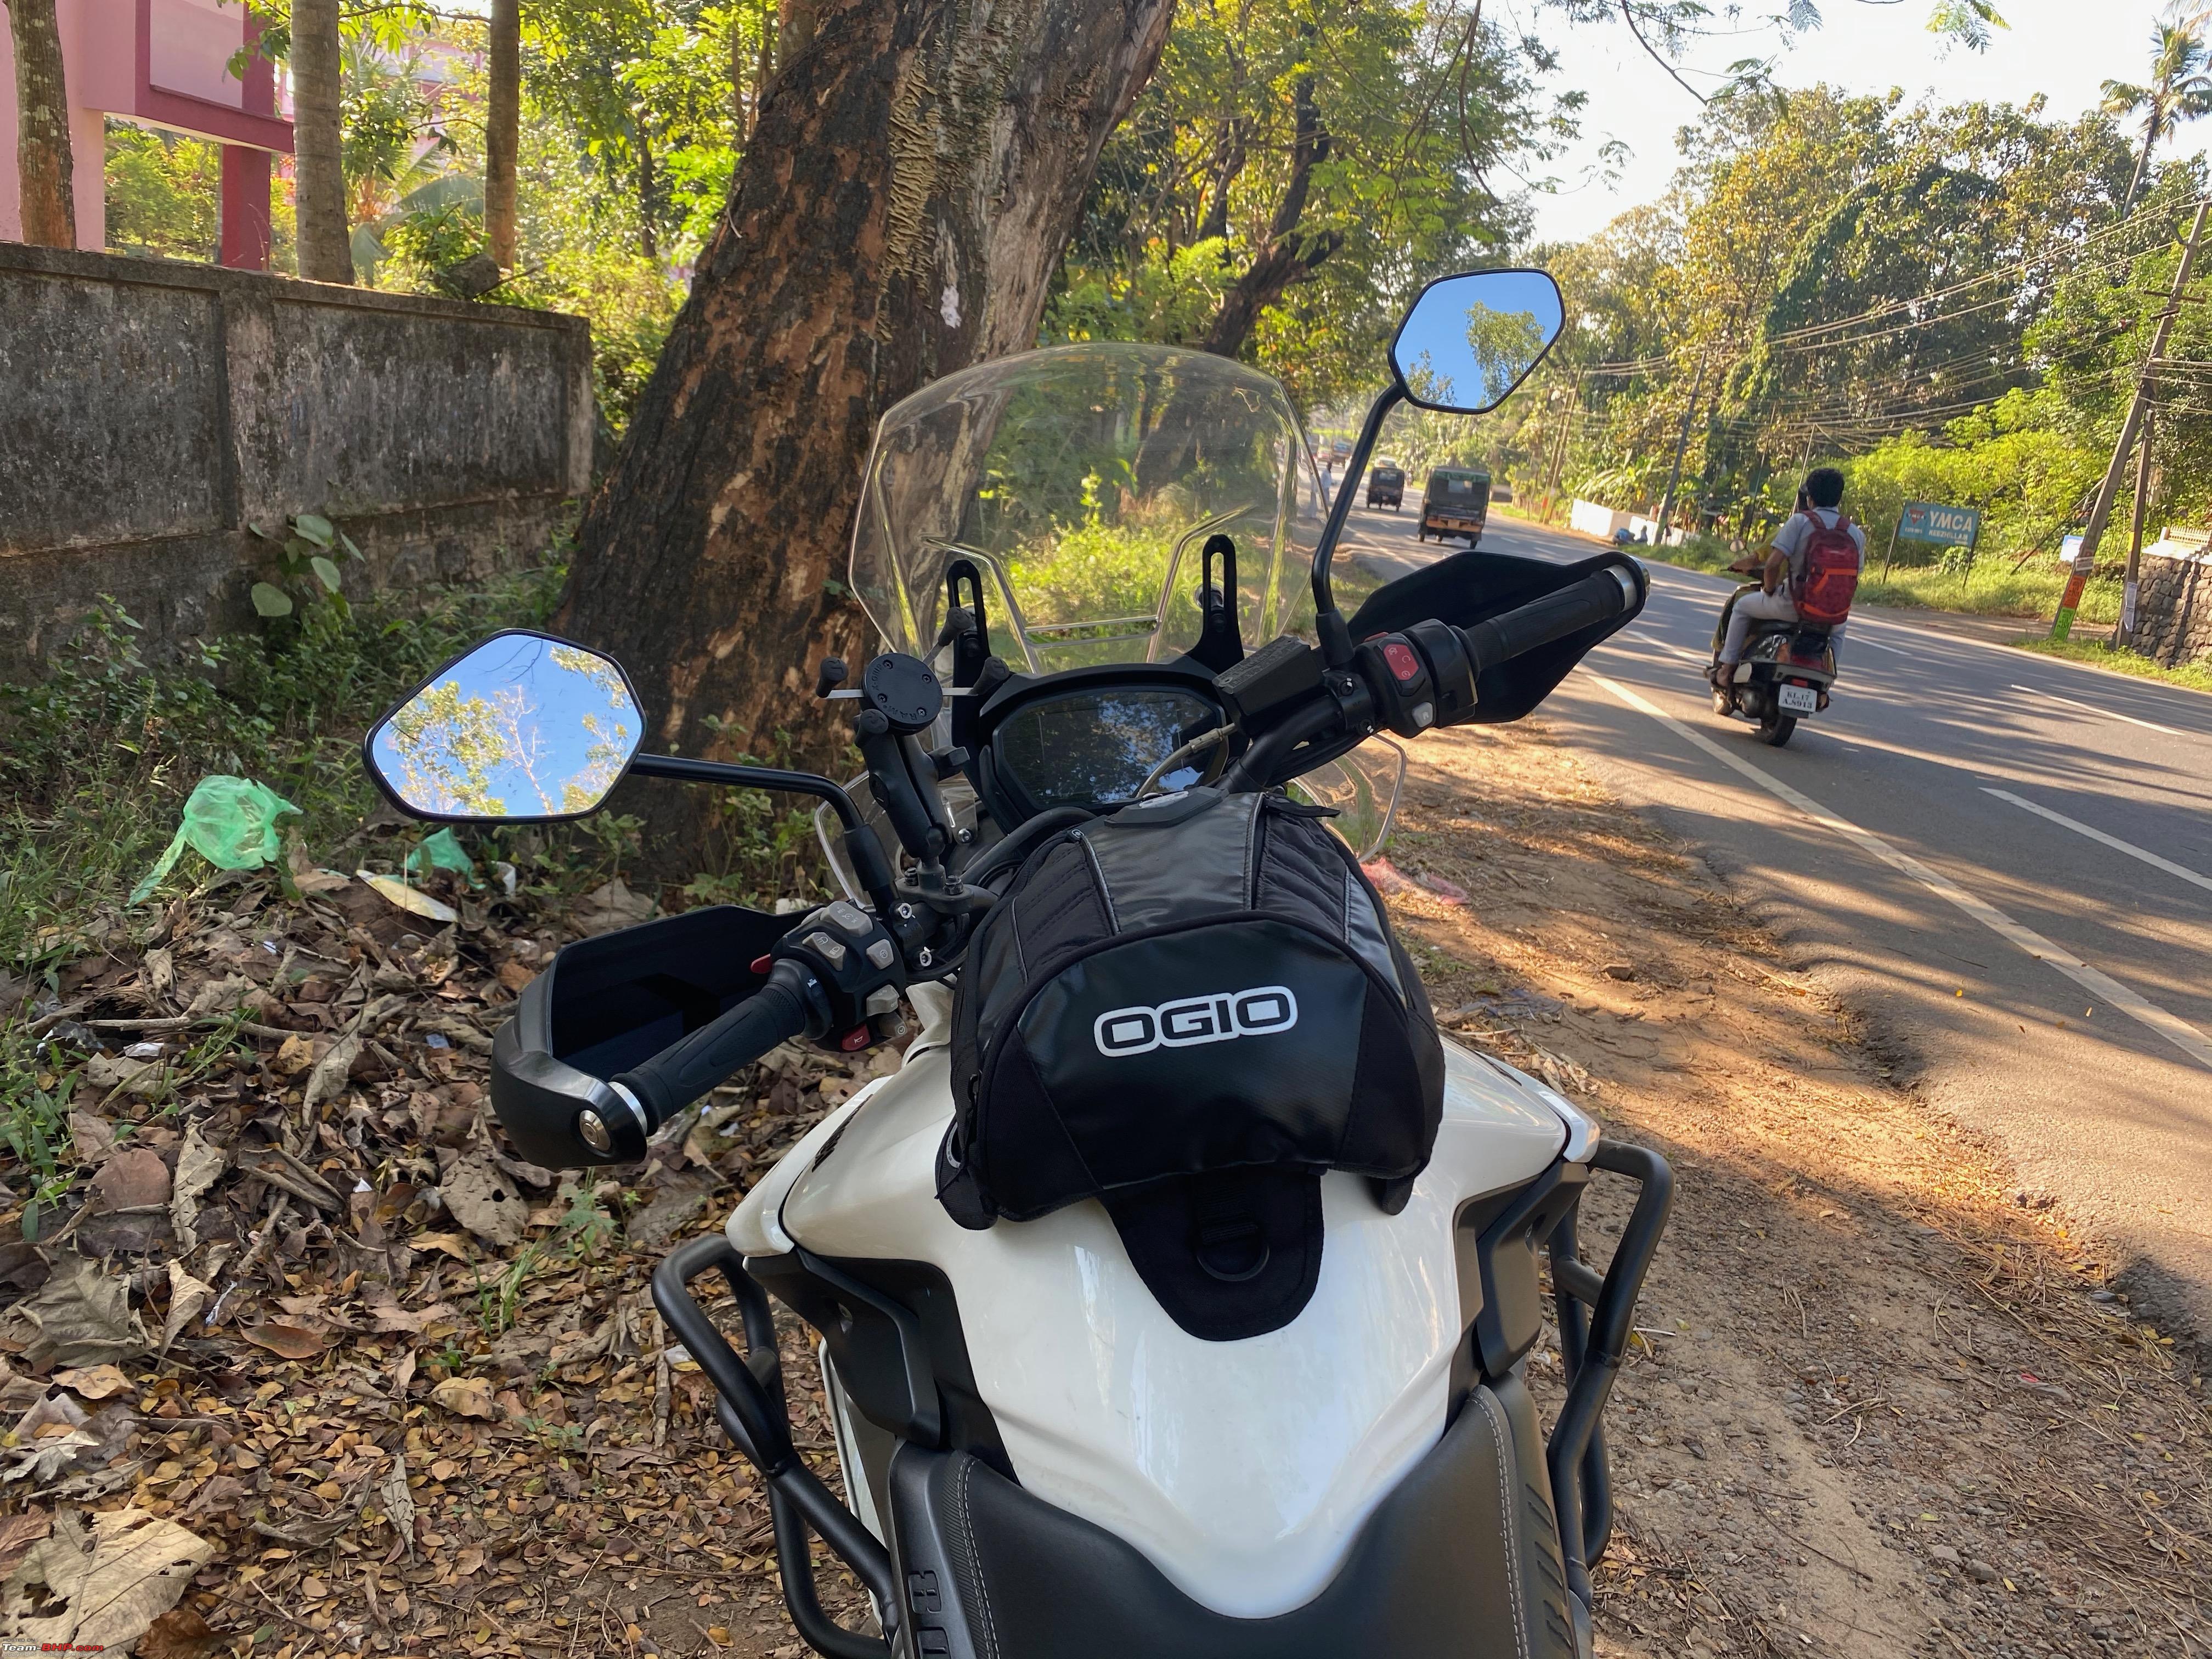 Stayed in its mounting place and did not move a bit unless I physically moved it, which adjust very easily as the magnetic hols is not too tough   So jokes apart, the bag is built well and with zippers and pouches are placed very intuitively. It fits a reasonable amount of stuff required for a ride(I am NOT talking about touring, this just won't work for that). For yesterday's ride, I was able to fit my bike documents, a hand sanitizer bottle, Mi tyre inflator, and a few other small items.  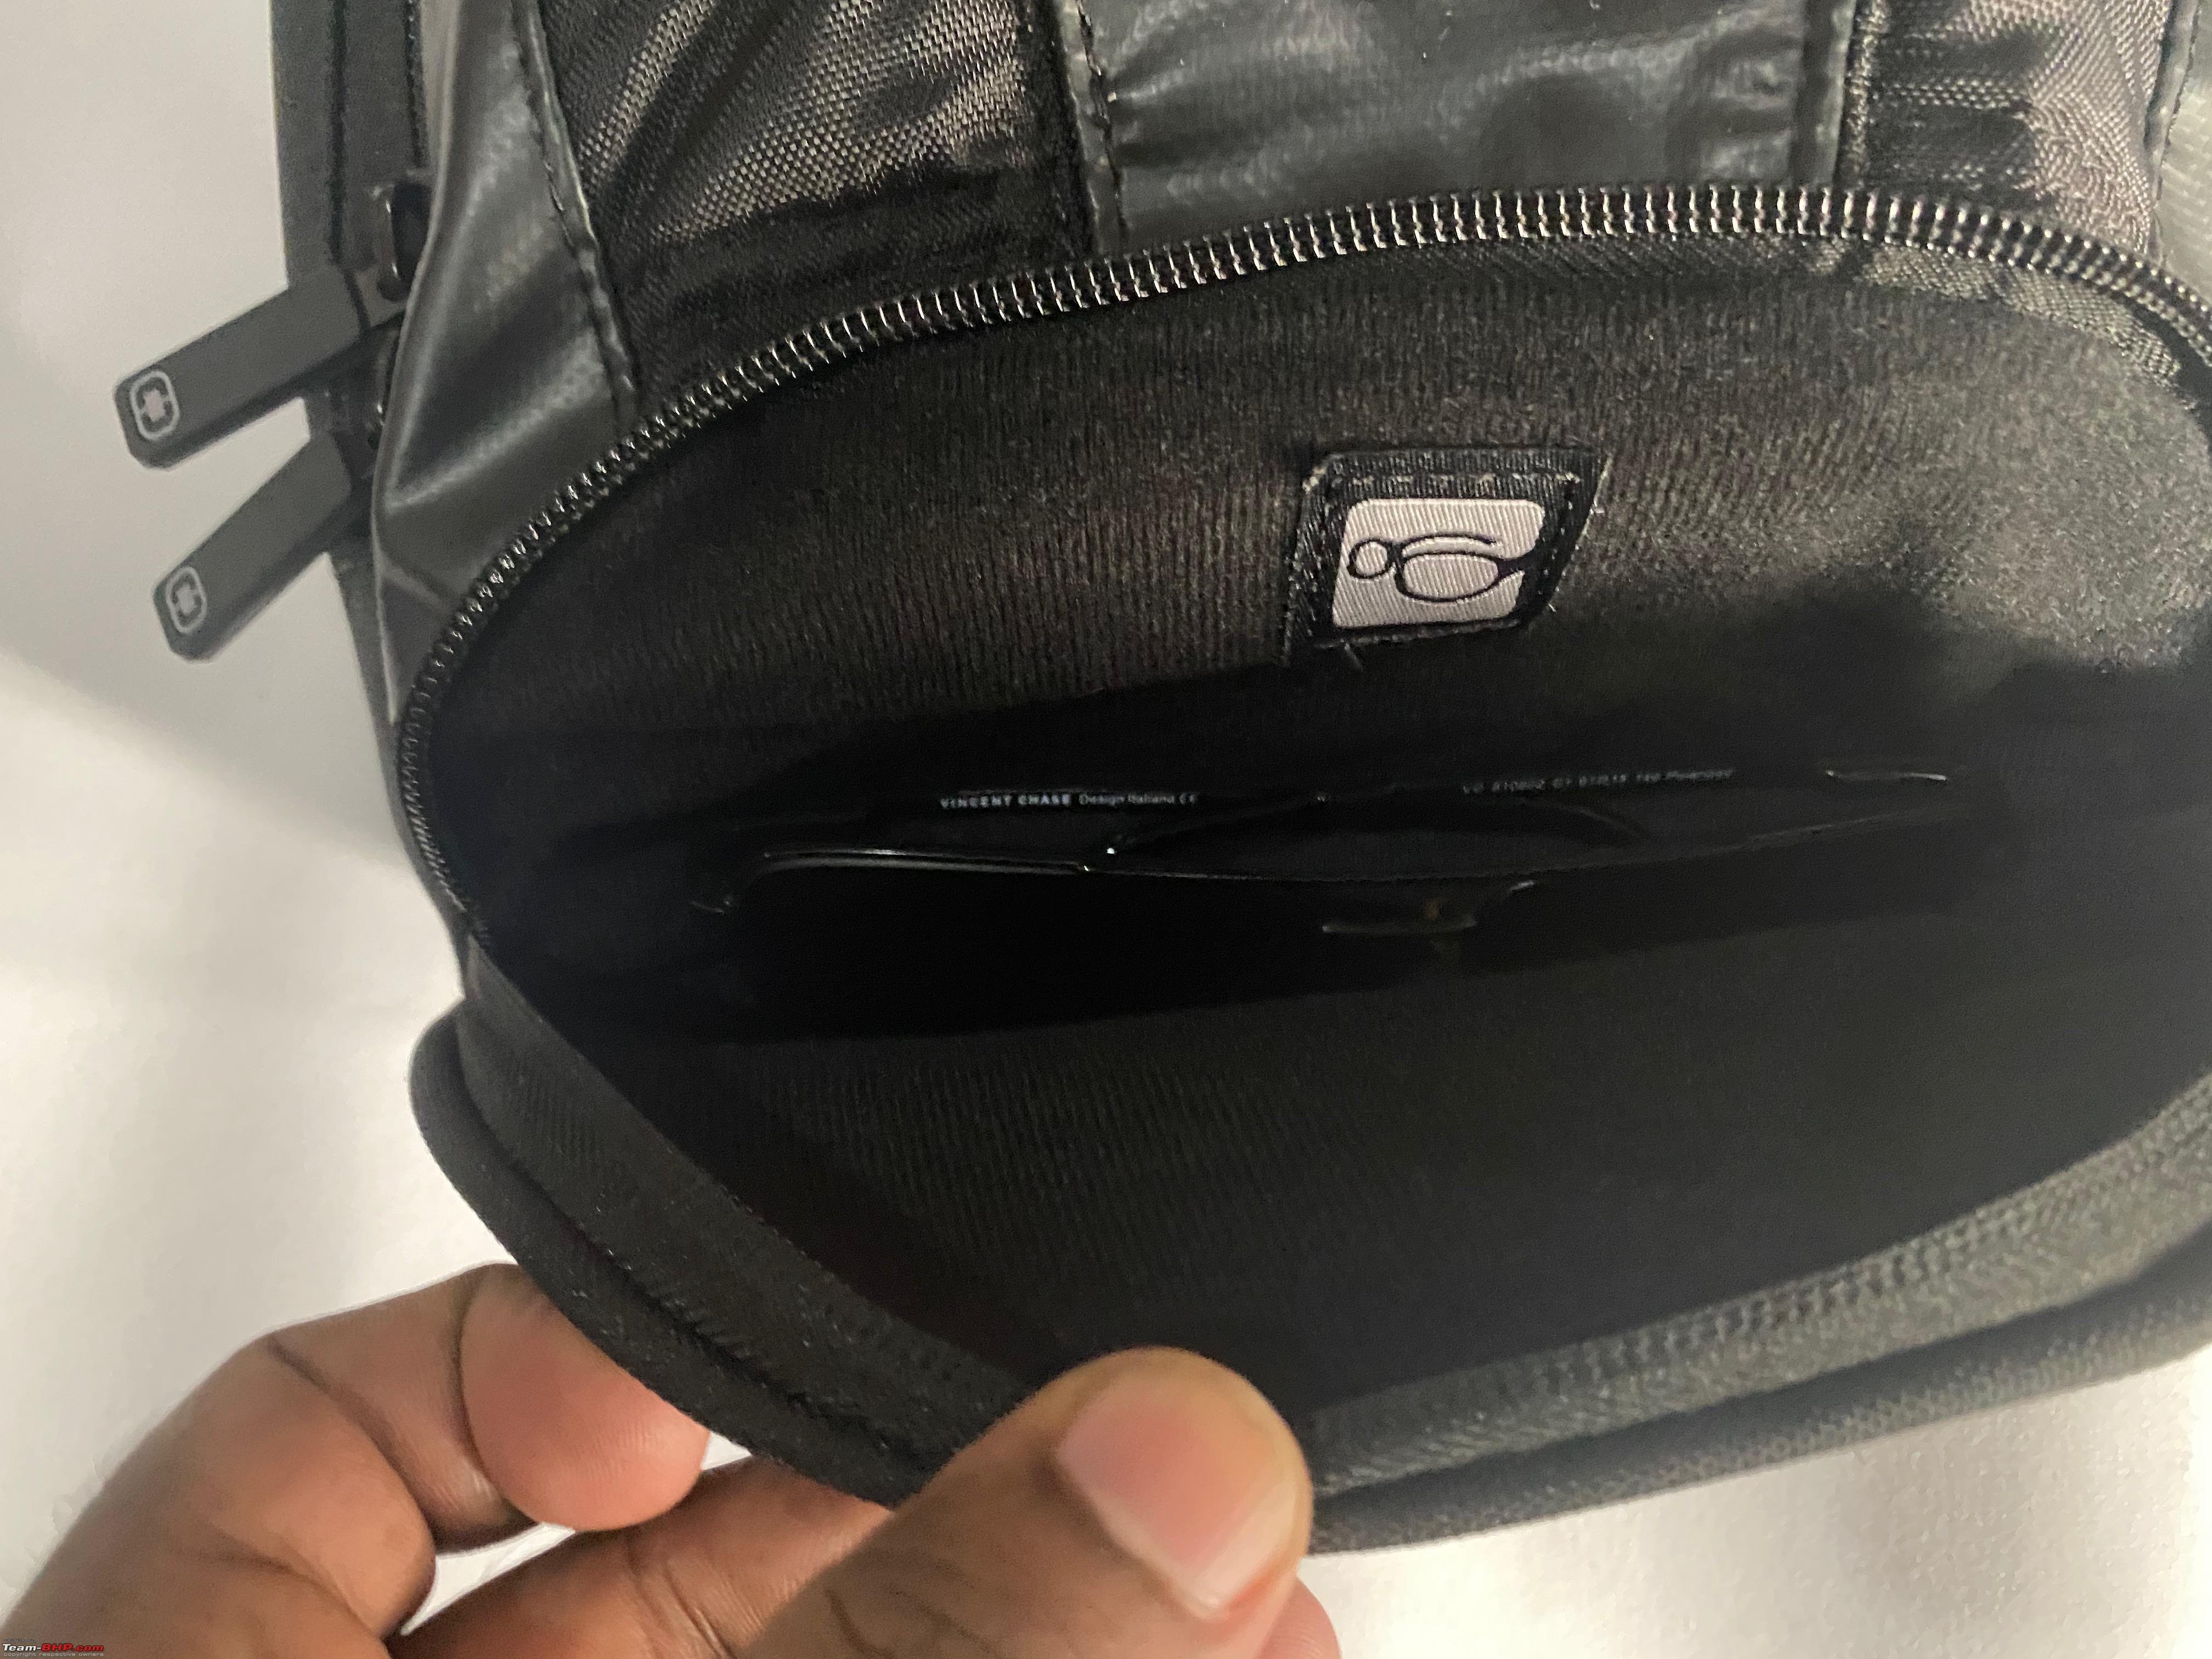 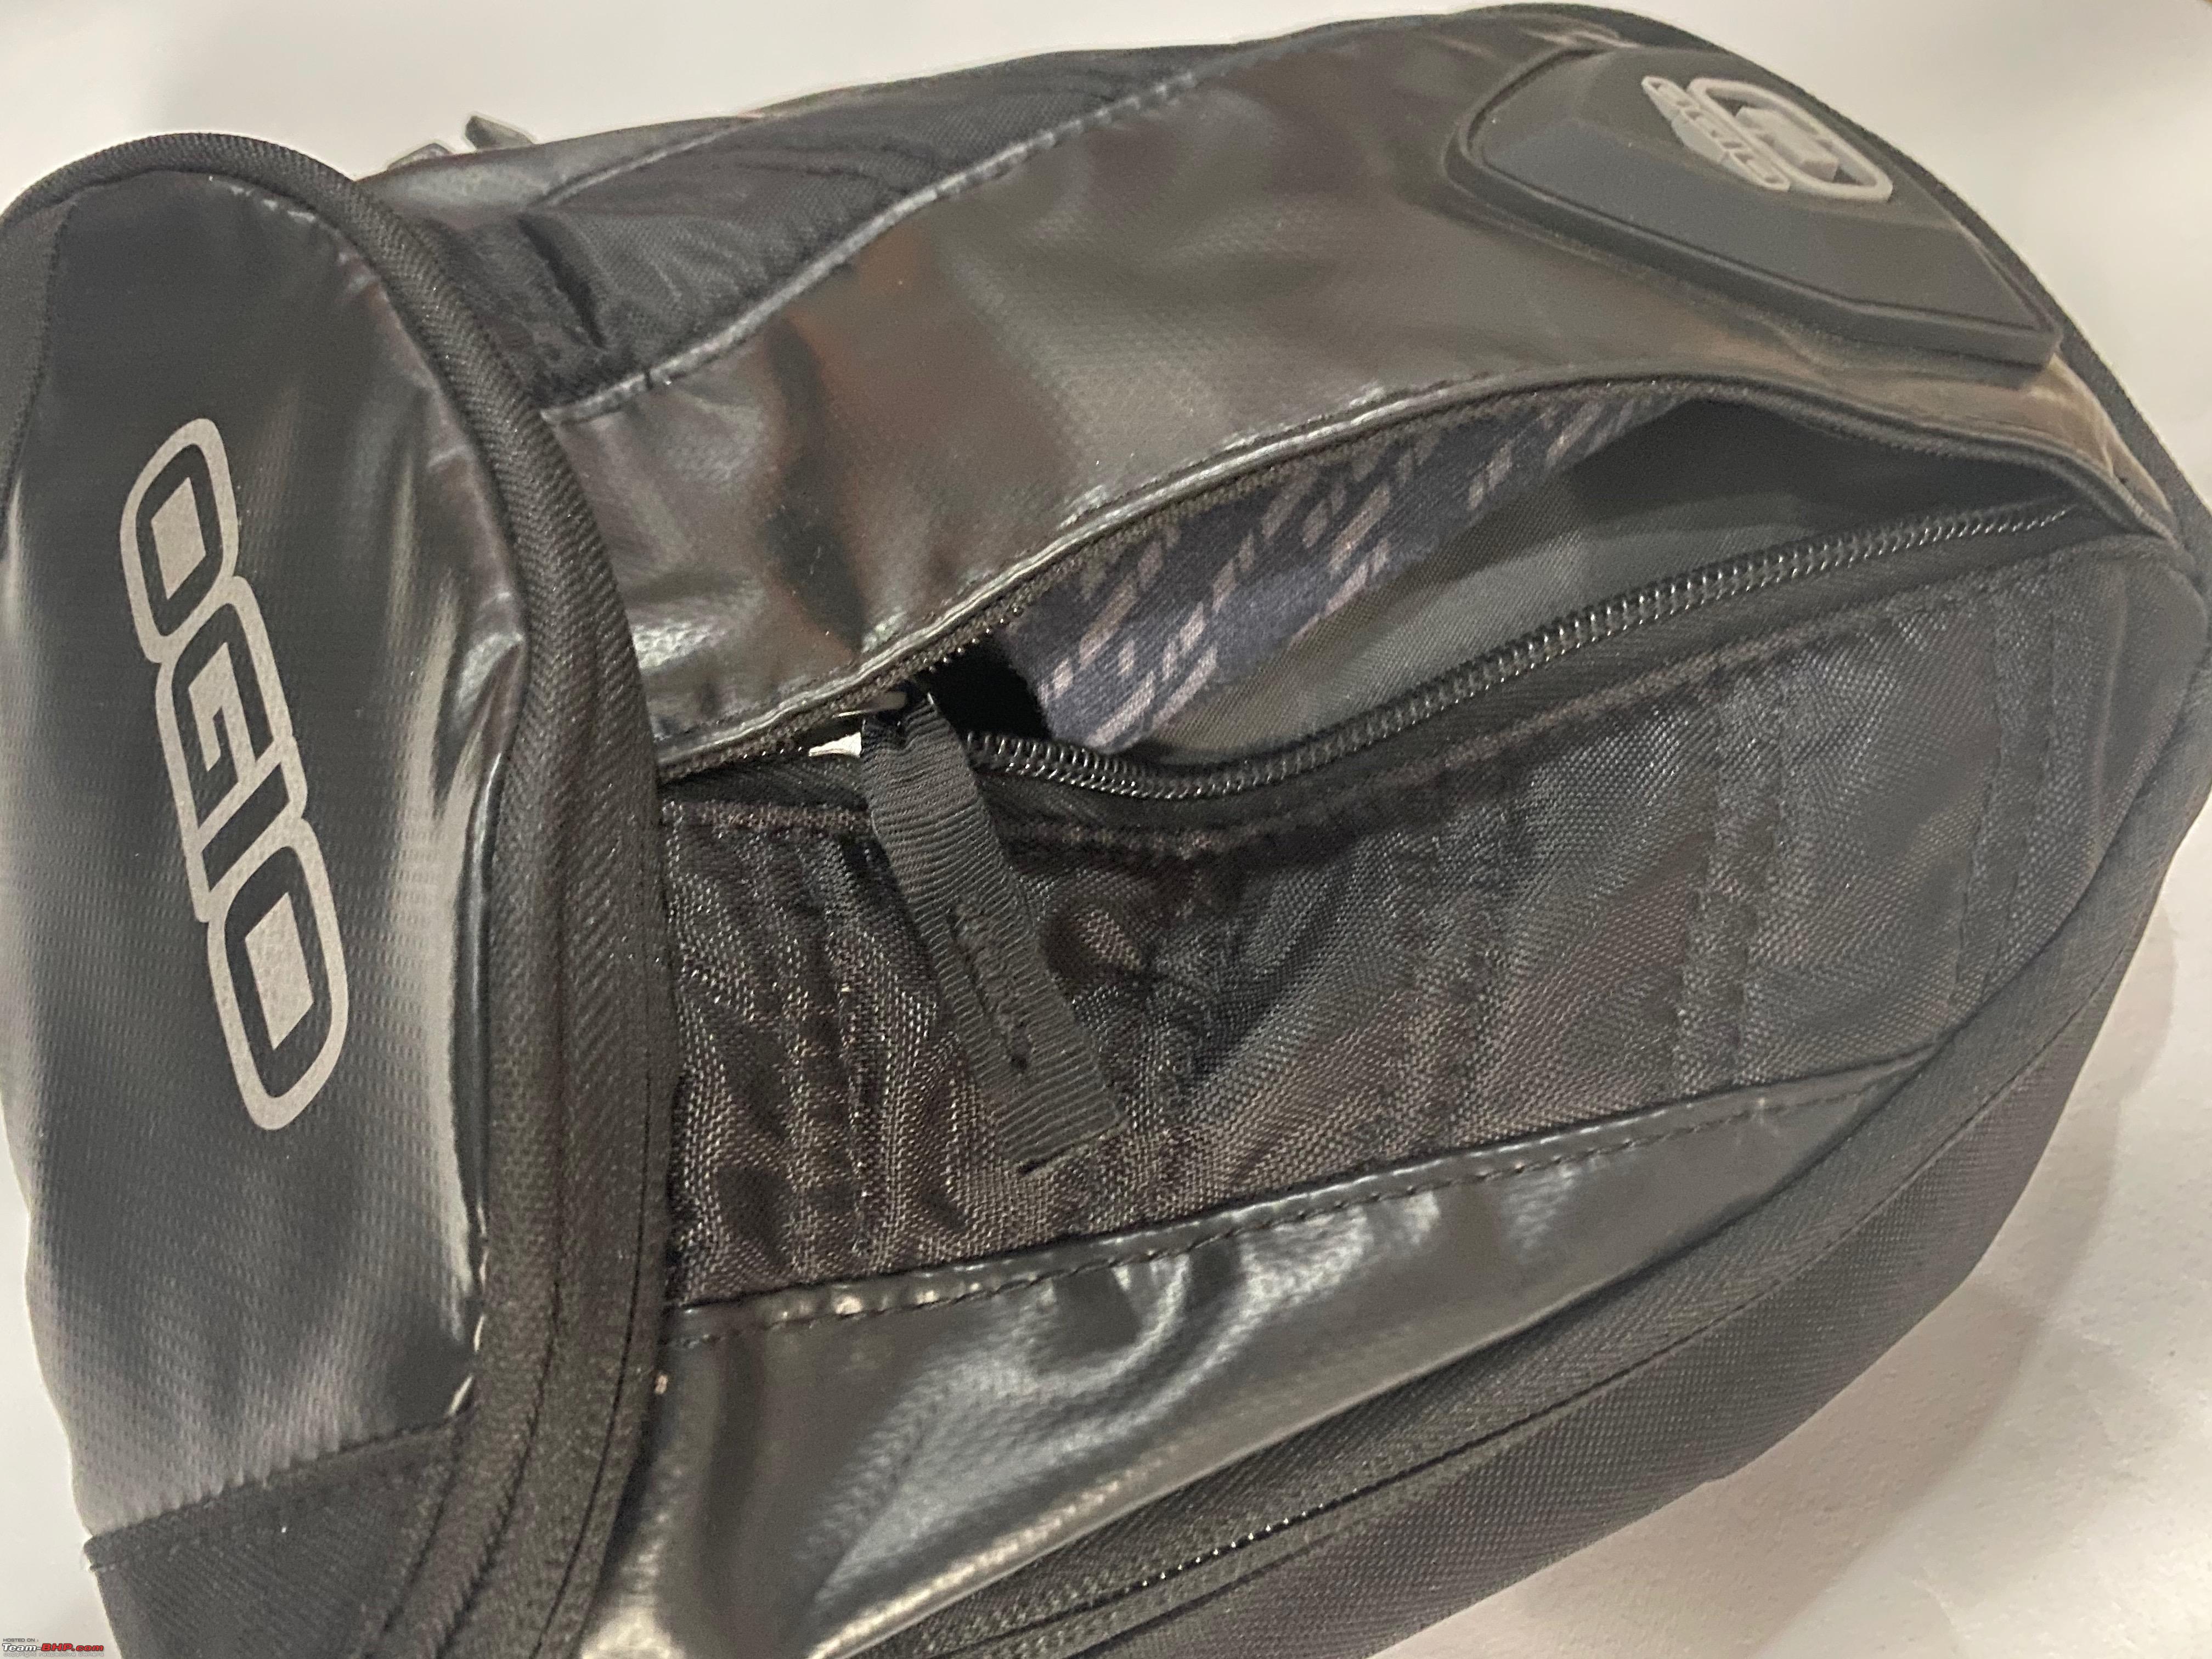 As far as mounting points go, it has 4 mounting points to hold ontop of any metal tank. But the magnet size is nothing short of comical, it is so tiny, it's about the button type batteries you find in your keyfob. It holds on the bag good enough to the tank but offers very little resistance when you try to grab the bag off the tank. Because of this, I was worried about the bag moving/ sliding of the tank while riding or rough movements but to my surprise, it held its place without any issues. I guess the little to no wind buffeting was a huge plus in this case. How it looks on the R1 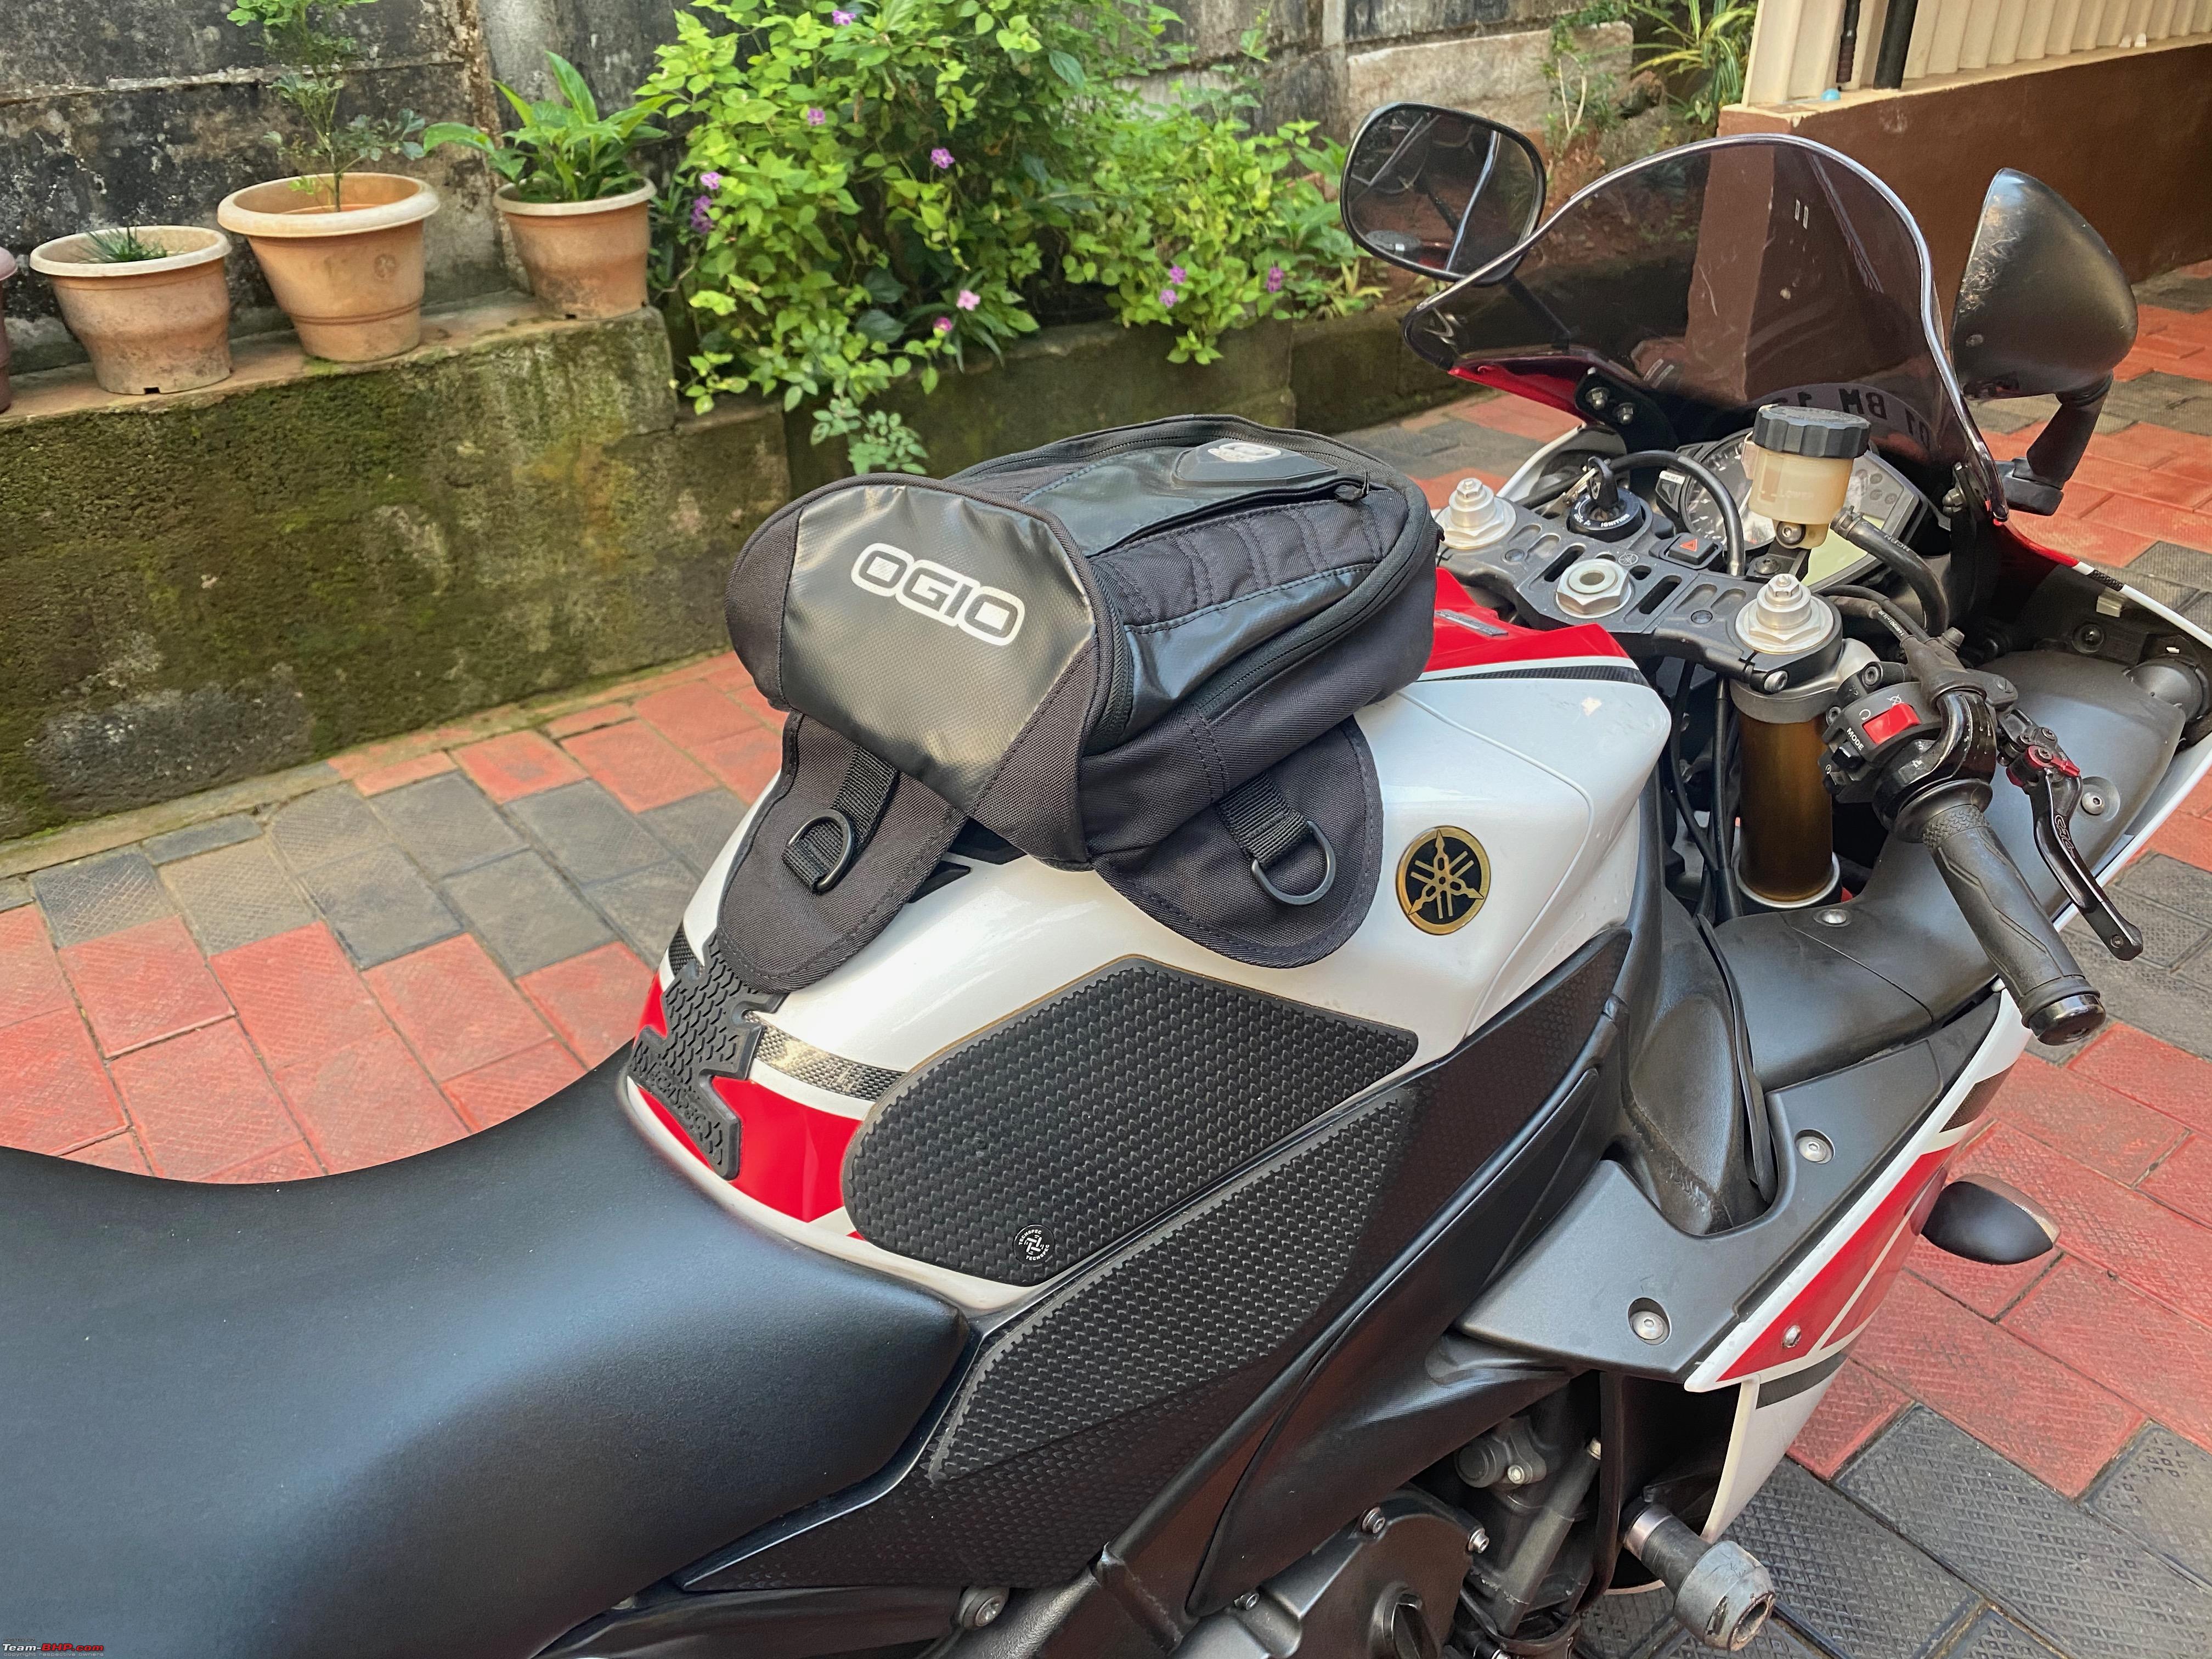  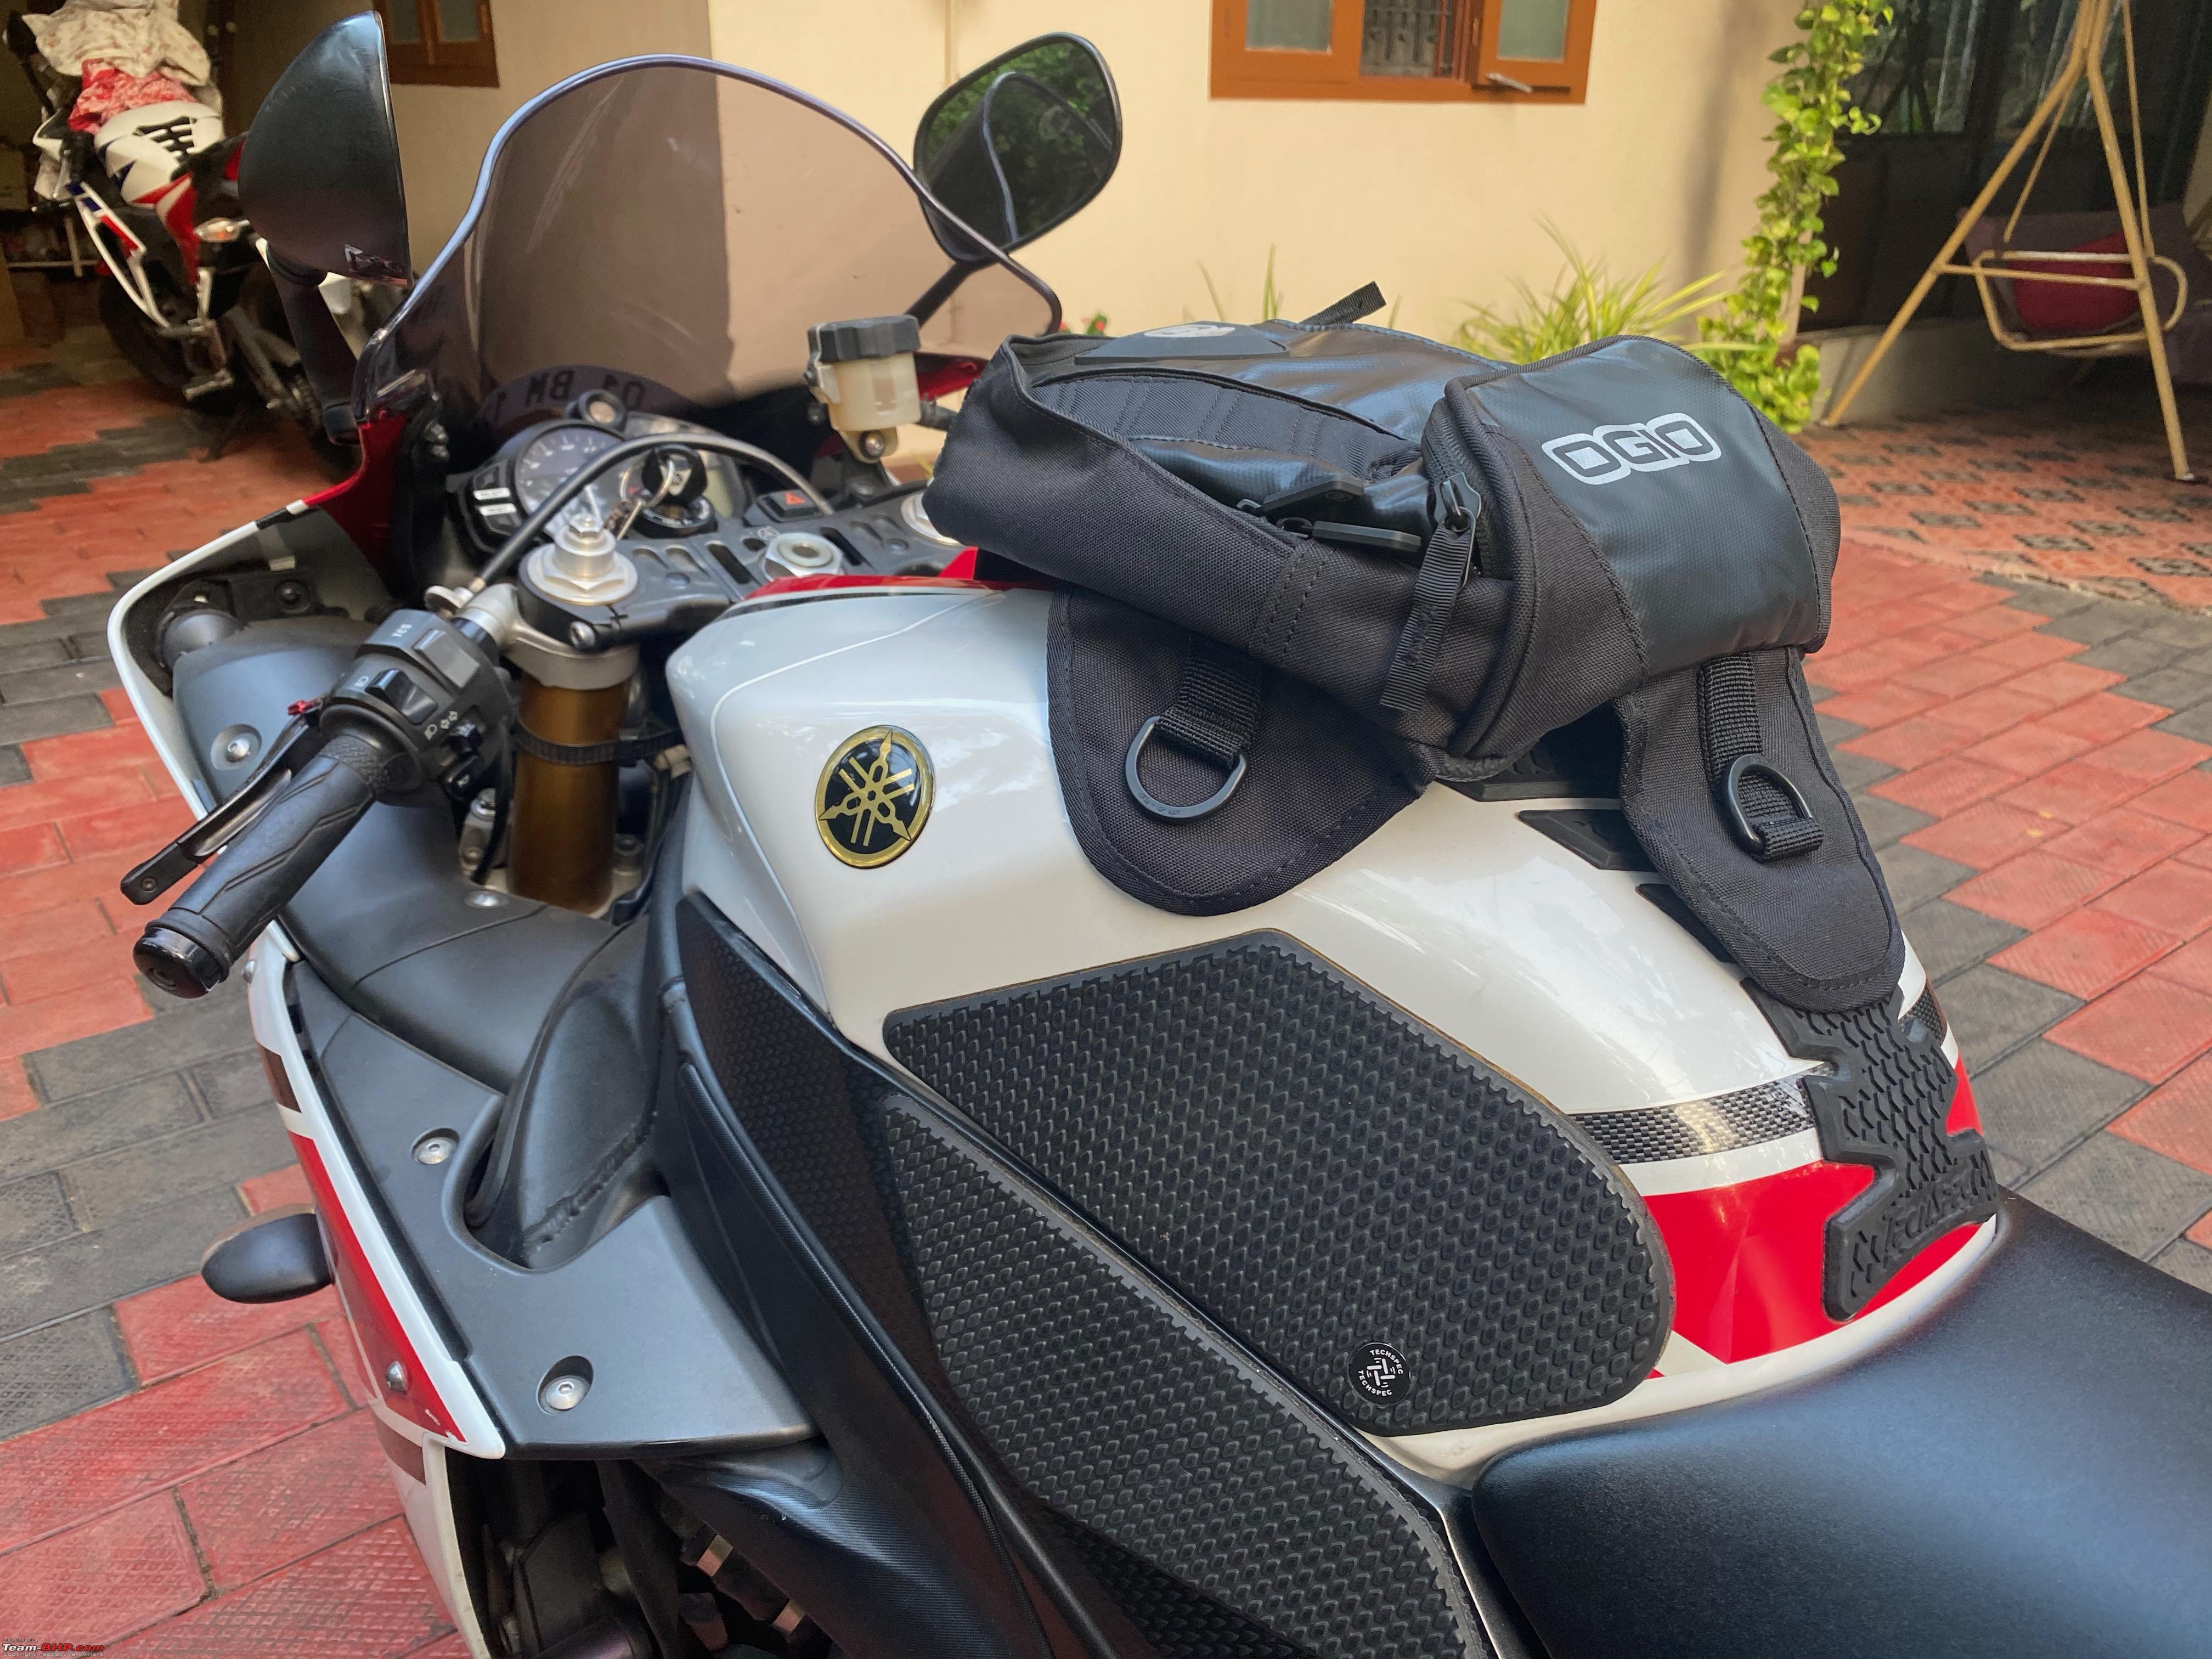 Note how the top part magnet is useless on the R1 as it has that huge plastic panel. But the other 3 points do hold it pretty well.[/center] 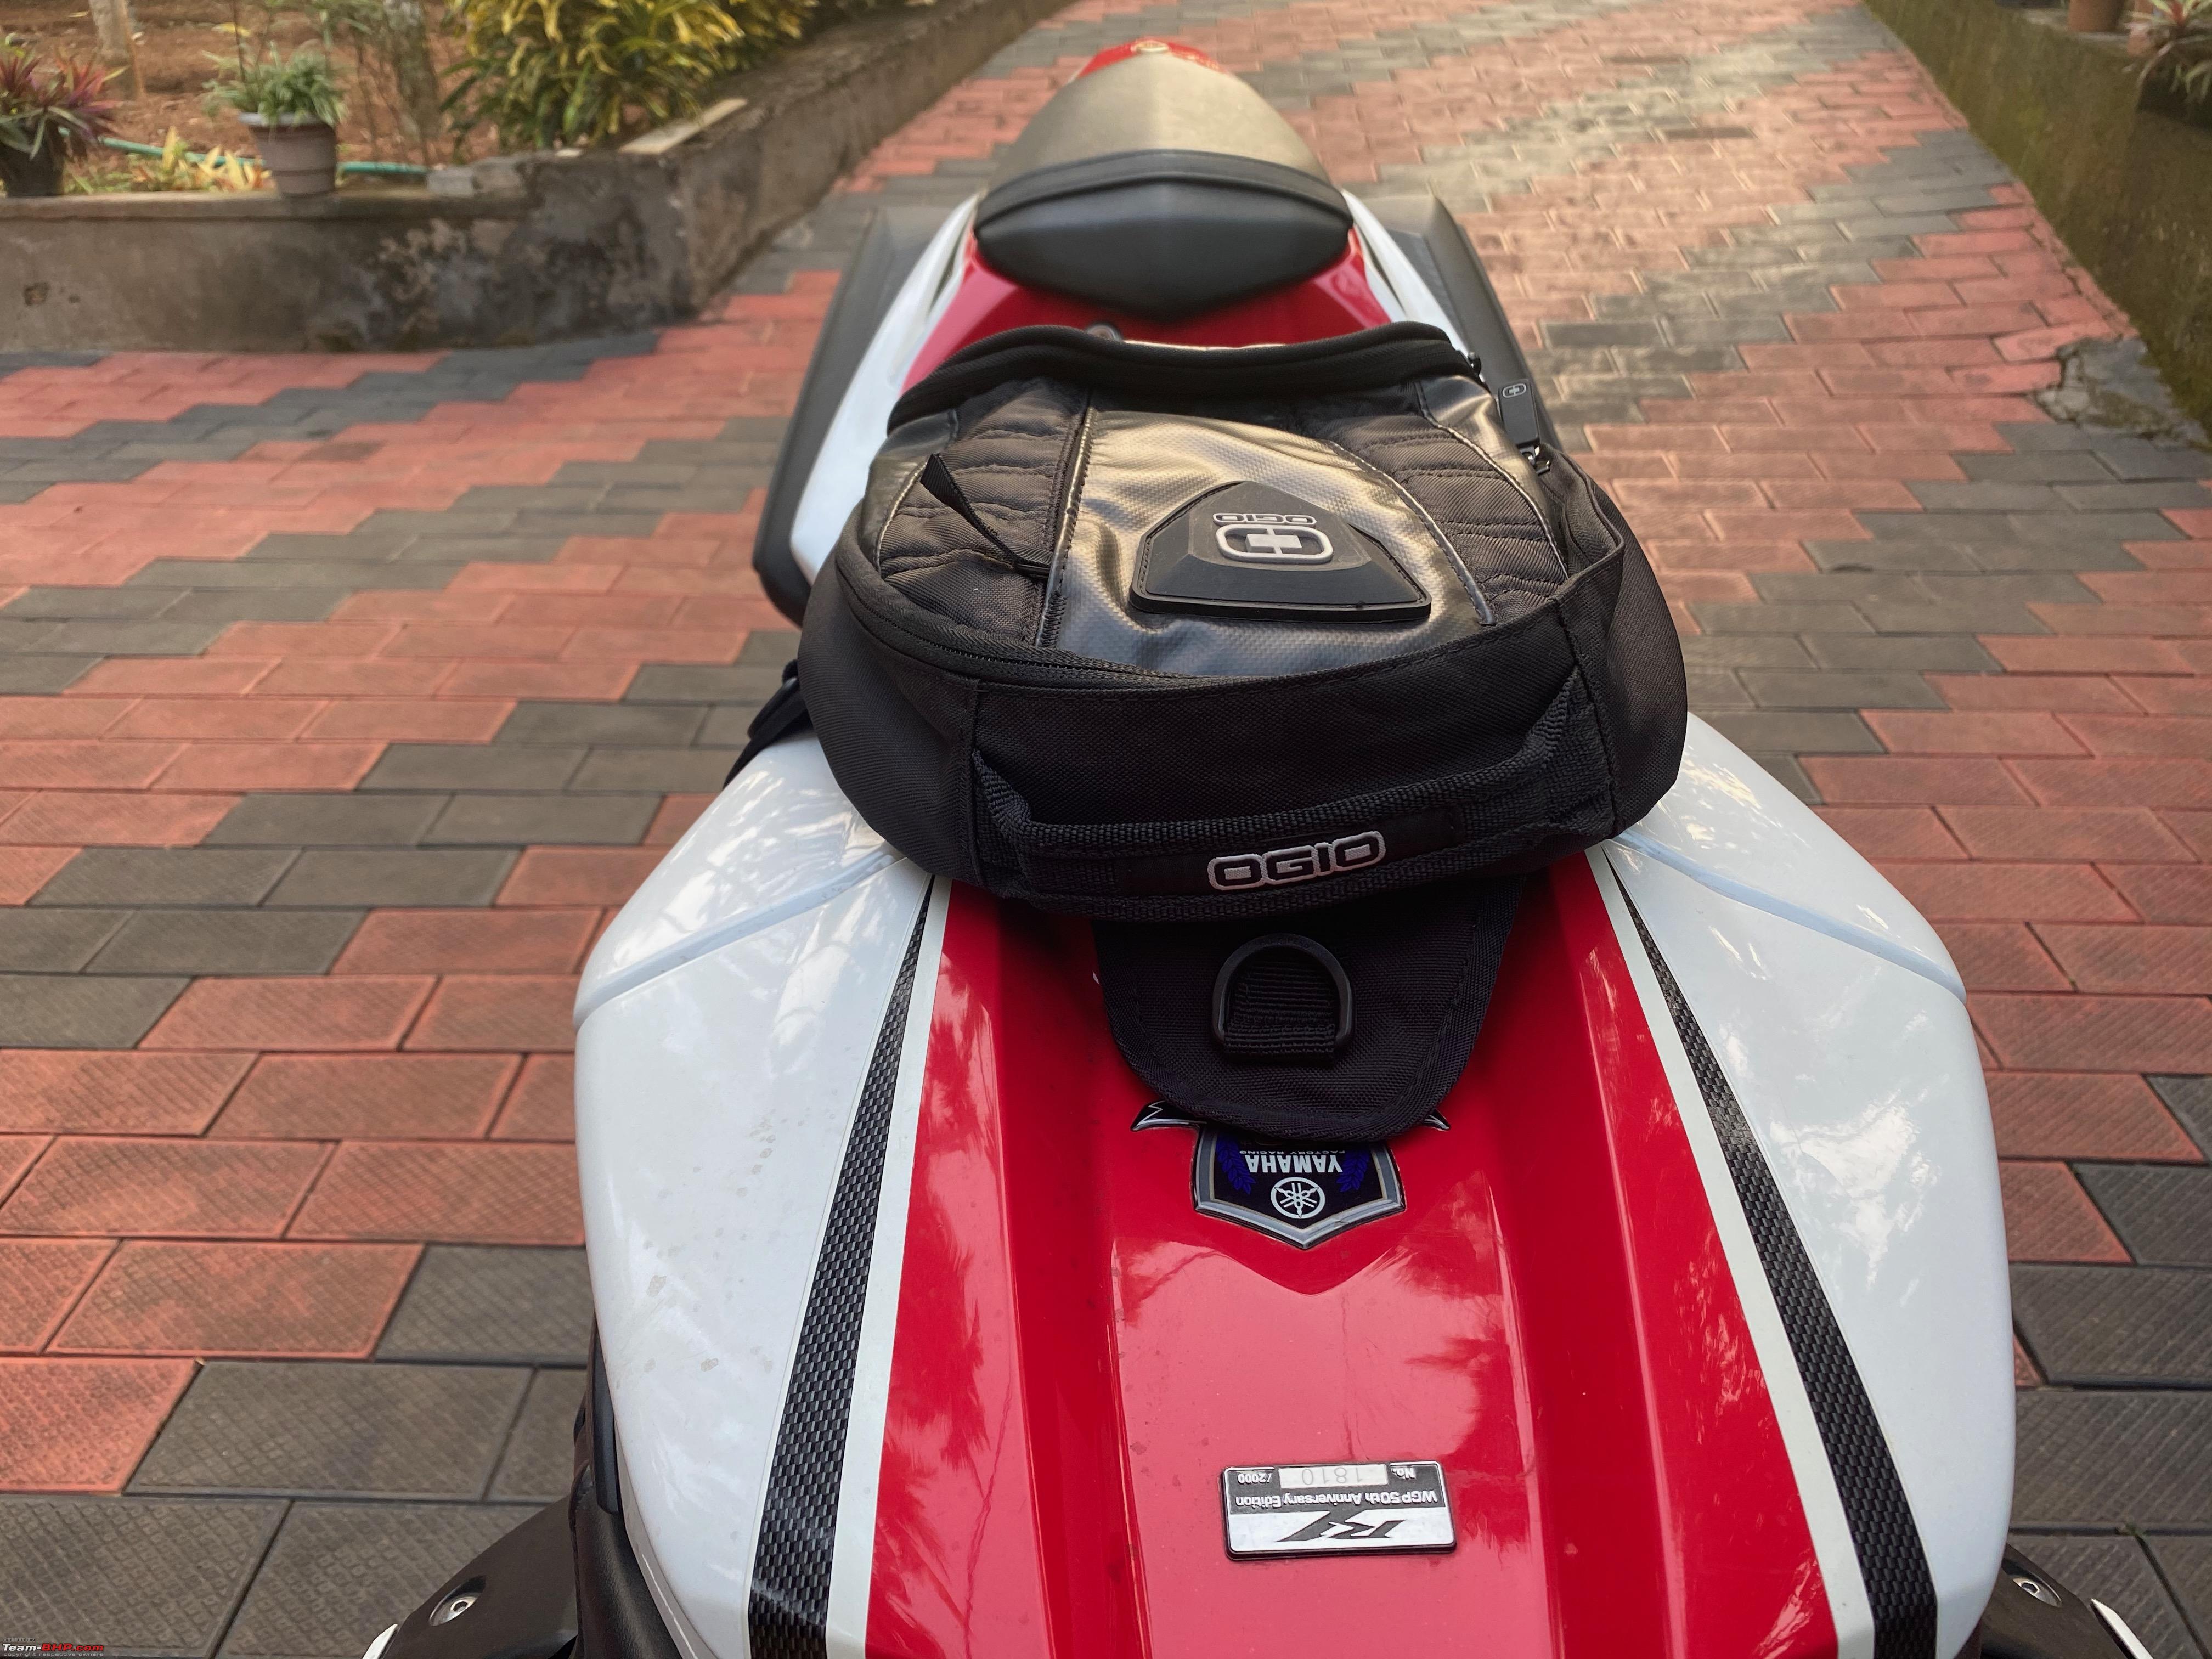 Might work as a good tail bag too..but mounting it is an issue and the exhaust being just right there might not be a good idea after all. 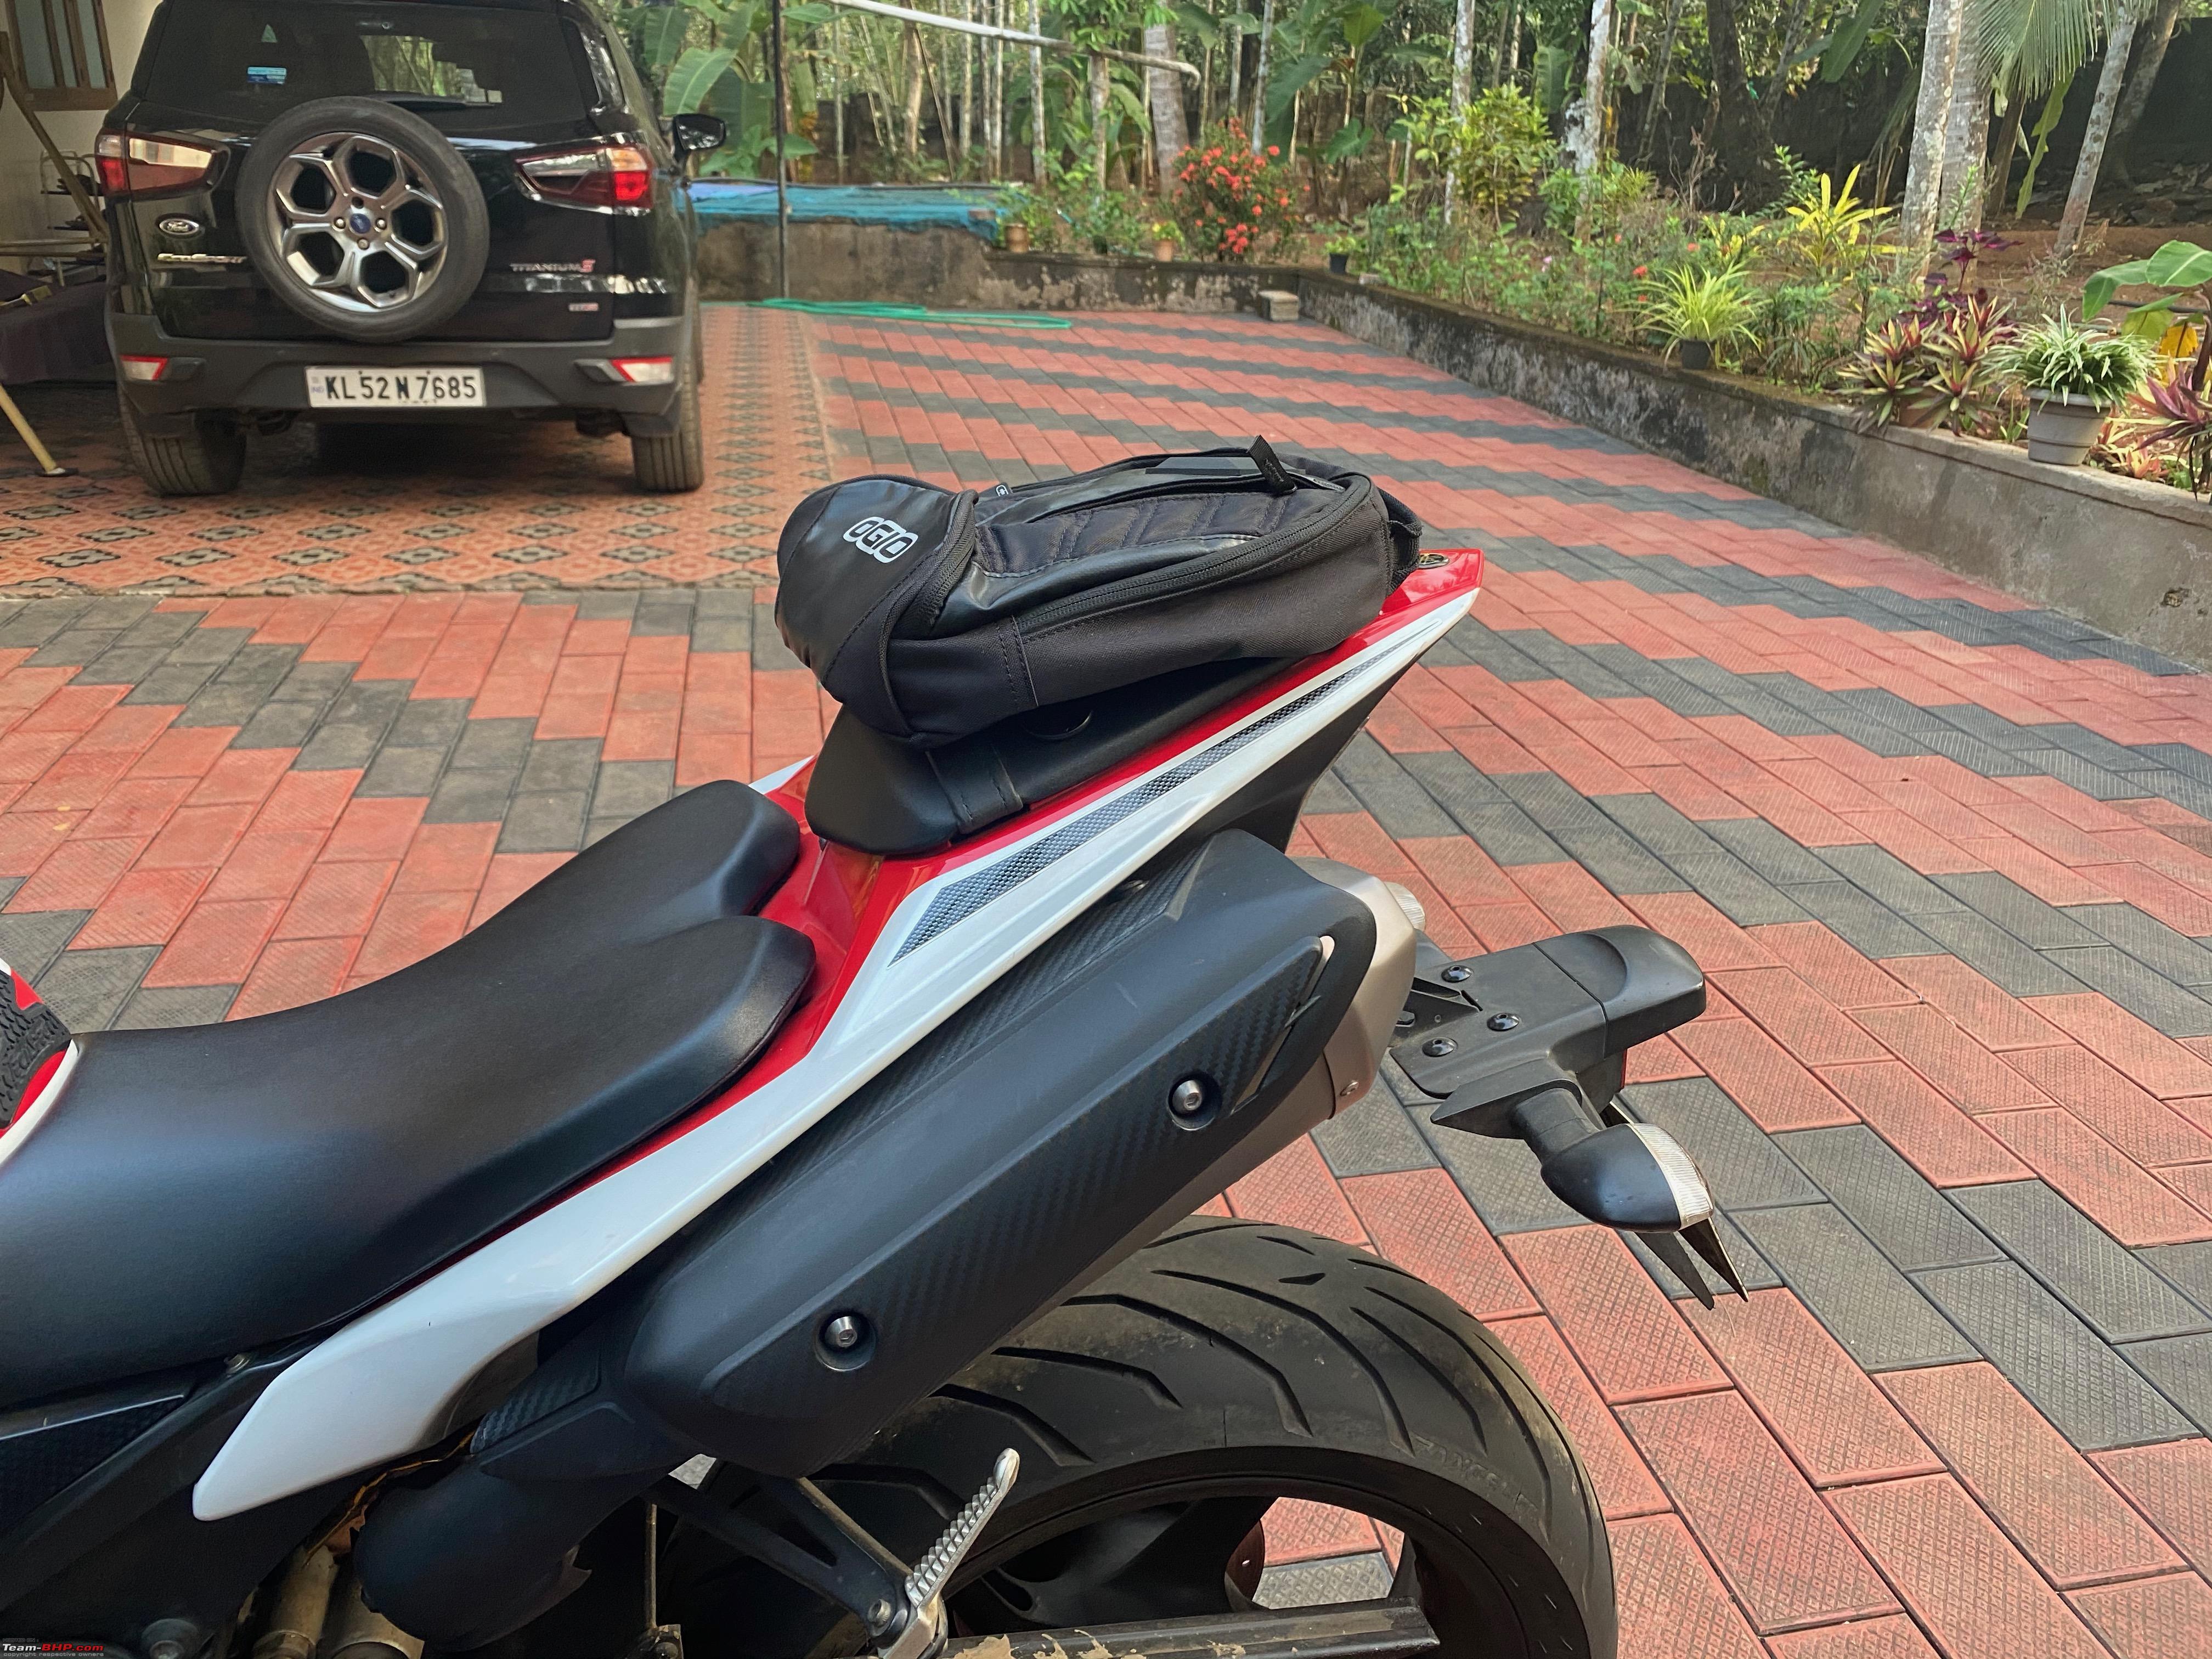  The plus point is that the magnets can be replaced easily as there are velcro patches you can open up to get to the magnets on all 4 corners Bonus point, it also comes with 2 D hook clamps to convert it to a kind of a backpack you can carry, but considering the size of the bag, yeah, I am not doing that. Well, that's been my short review of the tank bag. Hope it helps. Link to product is here Quote:
Quote:
Quote:
Cheers Krishna | |||
|
| (7)
Thanks
|
| The following 7 BHPians Thank krishnaprasadgg for this useful post: | Cyborg, deepfreak15, gauravanekar, JTM, shyamg28, SnS_12, Xaos636 |
|
31st January 2021, 13:32
| #189 |
| BHPian Join Date: Dec 2019 Location: KL52
Posts: 519
Thanked: 3,648 Times
| Re: Review: My Yamaha R1 (WGP 50th Anniversary Edition) Update Post 1/3 In today's update, we are going to be addressing the very irritating hot idle issue that I have been facing for quite some time now. And fair warning this is going to be a long post. In fact, I have split it up into 3 posts because I can't fit all the photos in 1 single big post. Finally, both my friend and I found a day where we can set aside everything else and work on the bike to find and sort out this pestering idling issue when the engine is hot as a DIY job. I decided to ride down to his place since he has some of the right tools in hand which I haven't had the time to purchase yet. I reached his place at Cochin by early morning at about 8 am, which is a 150kms ride for me from my place. Which I was more than happy to do. But the ride was not without incident. Since I started before sunrise I was riding in Mode B to take it easy as I had very limited vision thanks to the R1s headlight throw. After about 50-60 km of riding, I decided to take a small stop and after having a quick stretch I hopped back on and cranked her back up and as usual, she cut out again. I managed to get going with the usual method, but this time to my surprise, every time I pull the clutch in(slowing down / rolling traffic movements) and the rev drops the bike started to cut out. I thought, great that's the last thing I needed right now. I started to think about what could cause this new behavior and I noticed the only difference was that I was in Mode B. I switched back to Std mode and the problem of cutting out on clutch pulling in went away. By this point, it was almost certain that the ThrottleBody is the culprit here. Anyways, post this apart from a very enjoyable ride, I faced no issues what so ever. Reached my friend's place a bit earlier than anticipated and decided to rest for sometime before we started to disassemble the bike to the point we required. In good company  Getting ready to be worked on 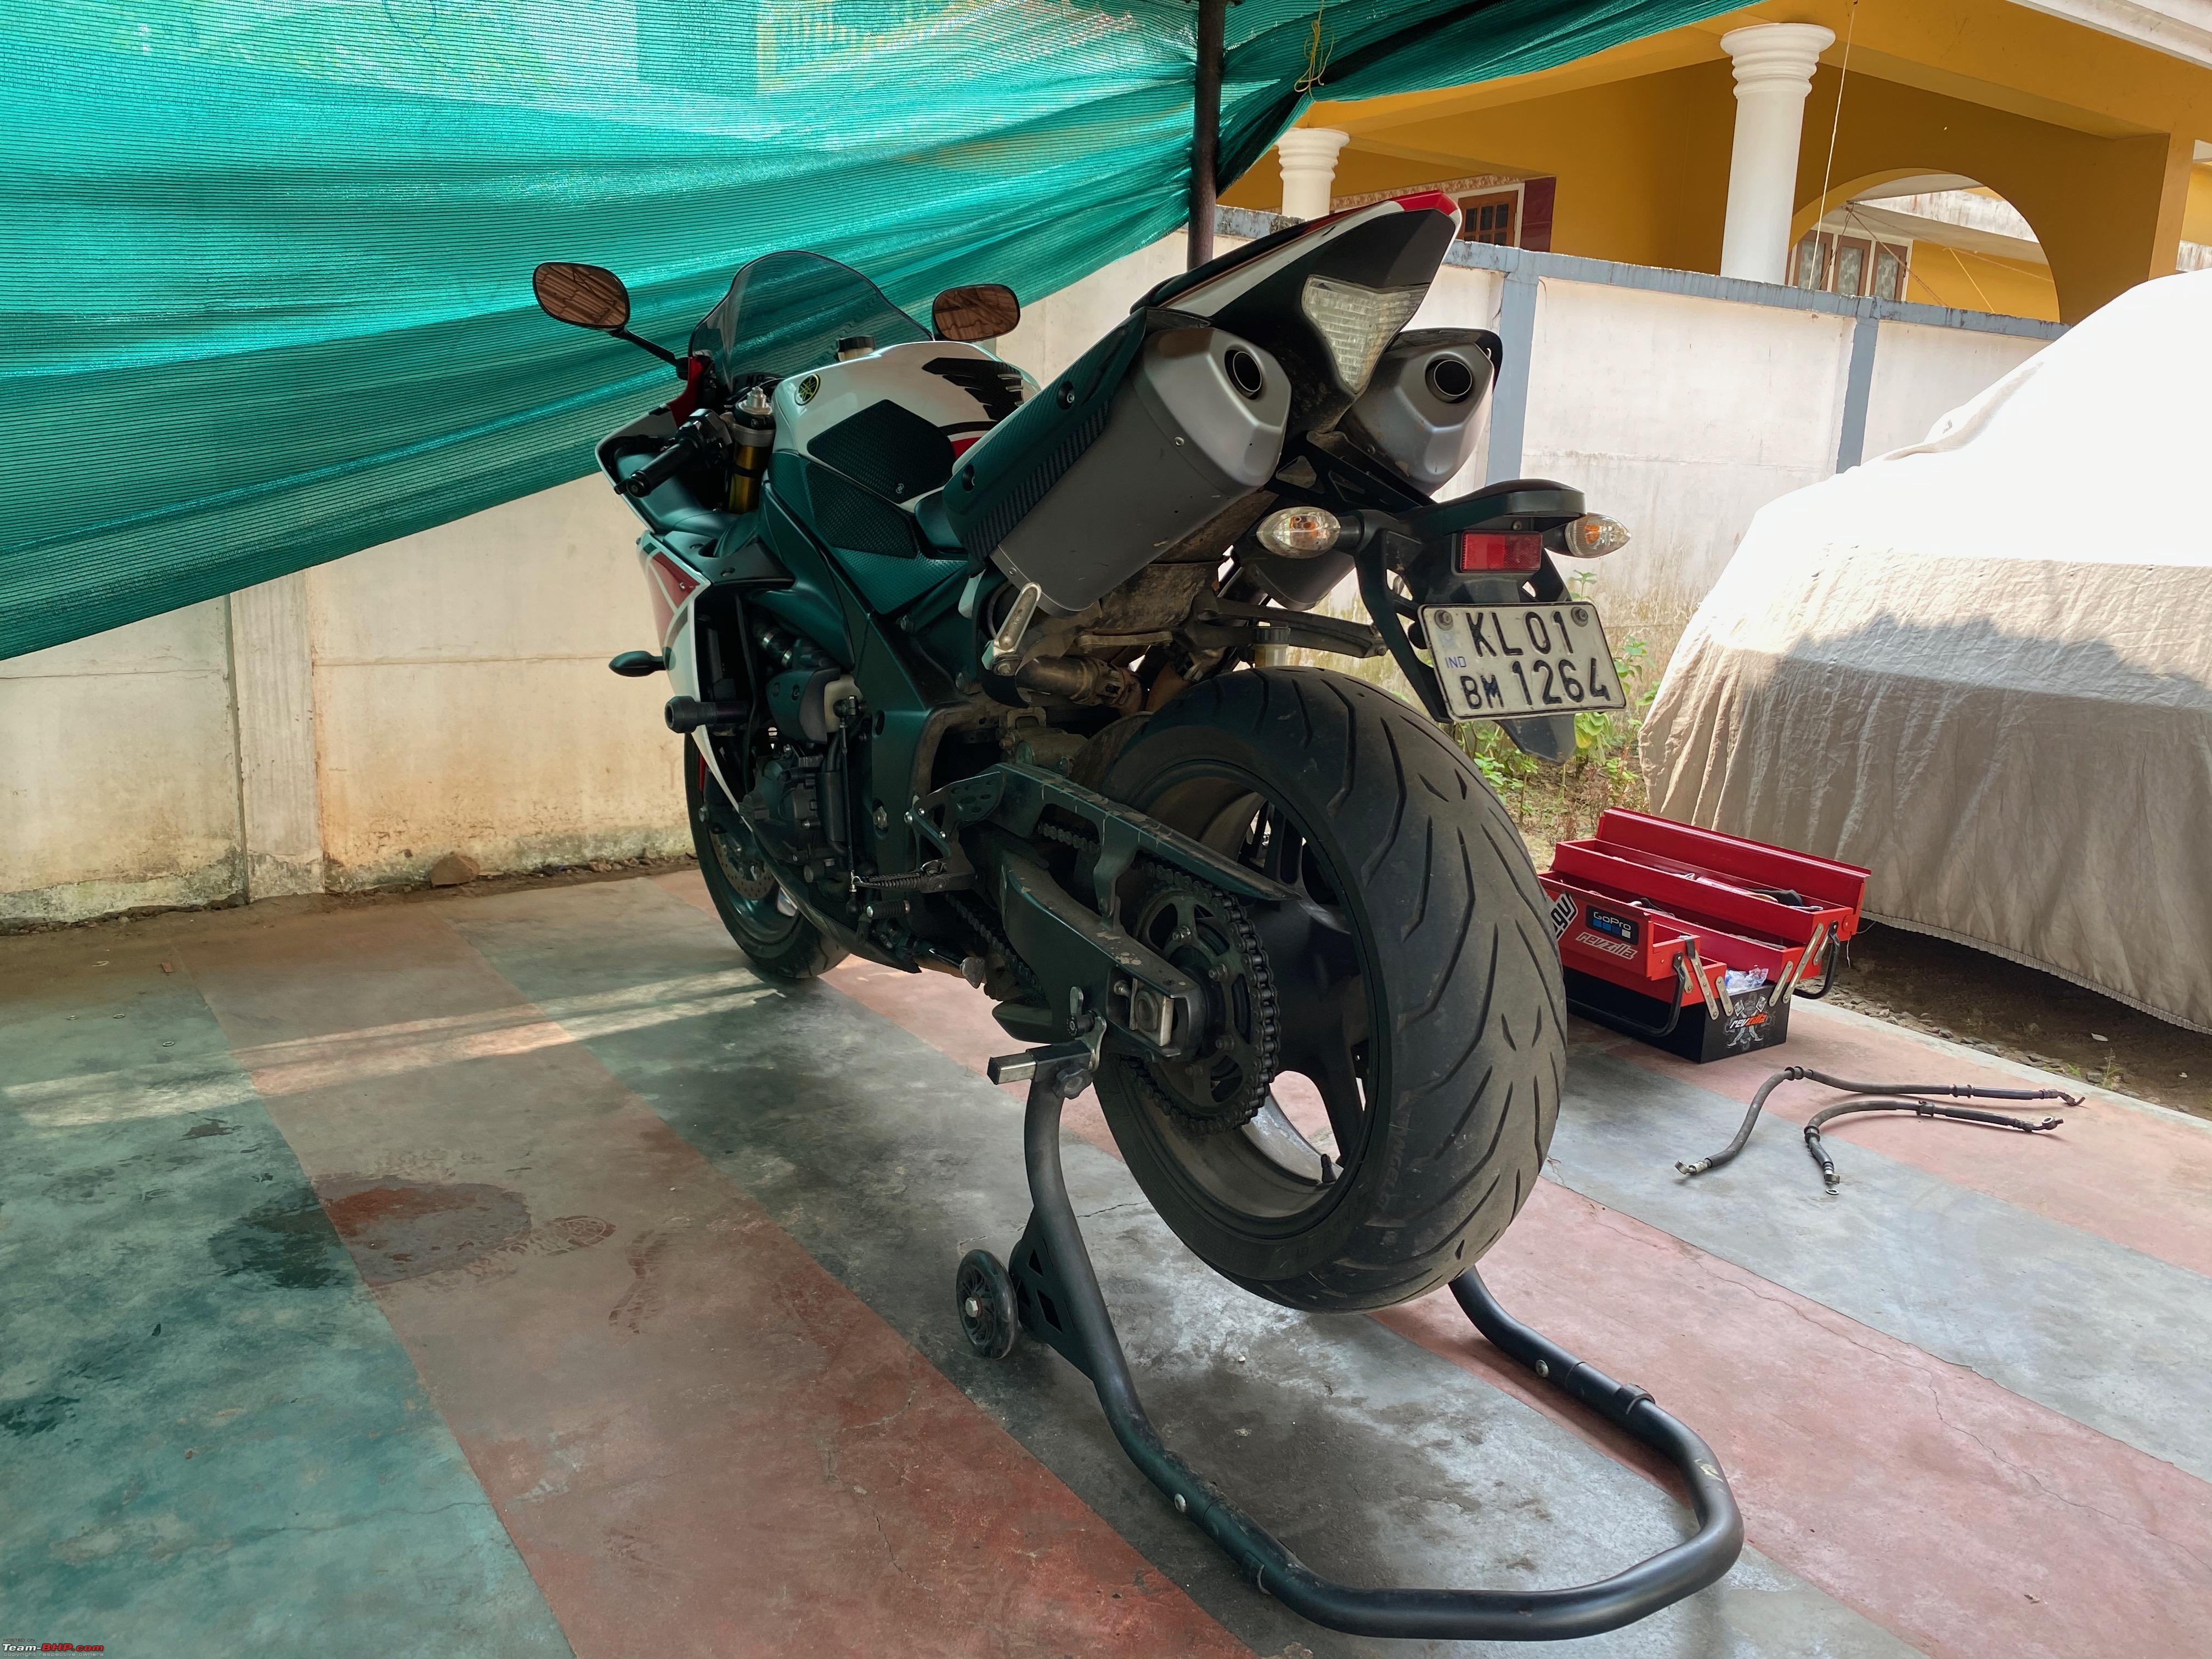 We started by removing the Rider seat which gives access to the 2 screws on either side which hold the fiber piece that hides the mounting bolts for the tank. Once the 2 bolts are removed one bolt is situated at the front of the tank panel, now pull open the tank like you would a car's hood. This makes cleaning the air filter a very easy job. 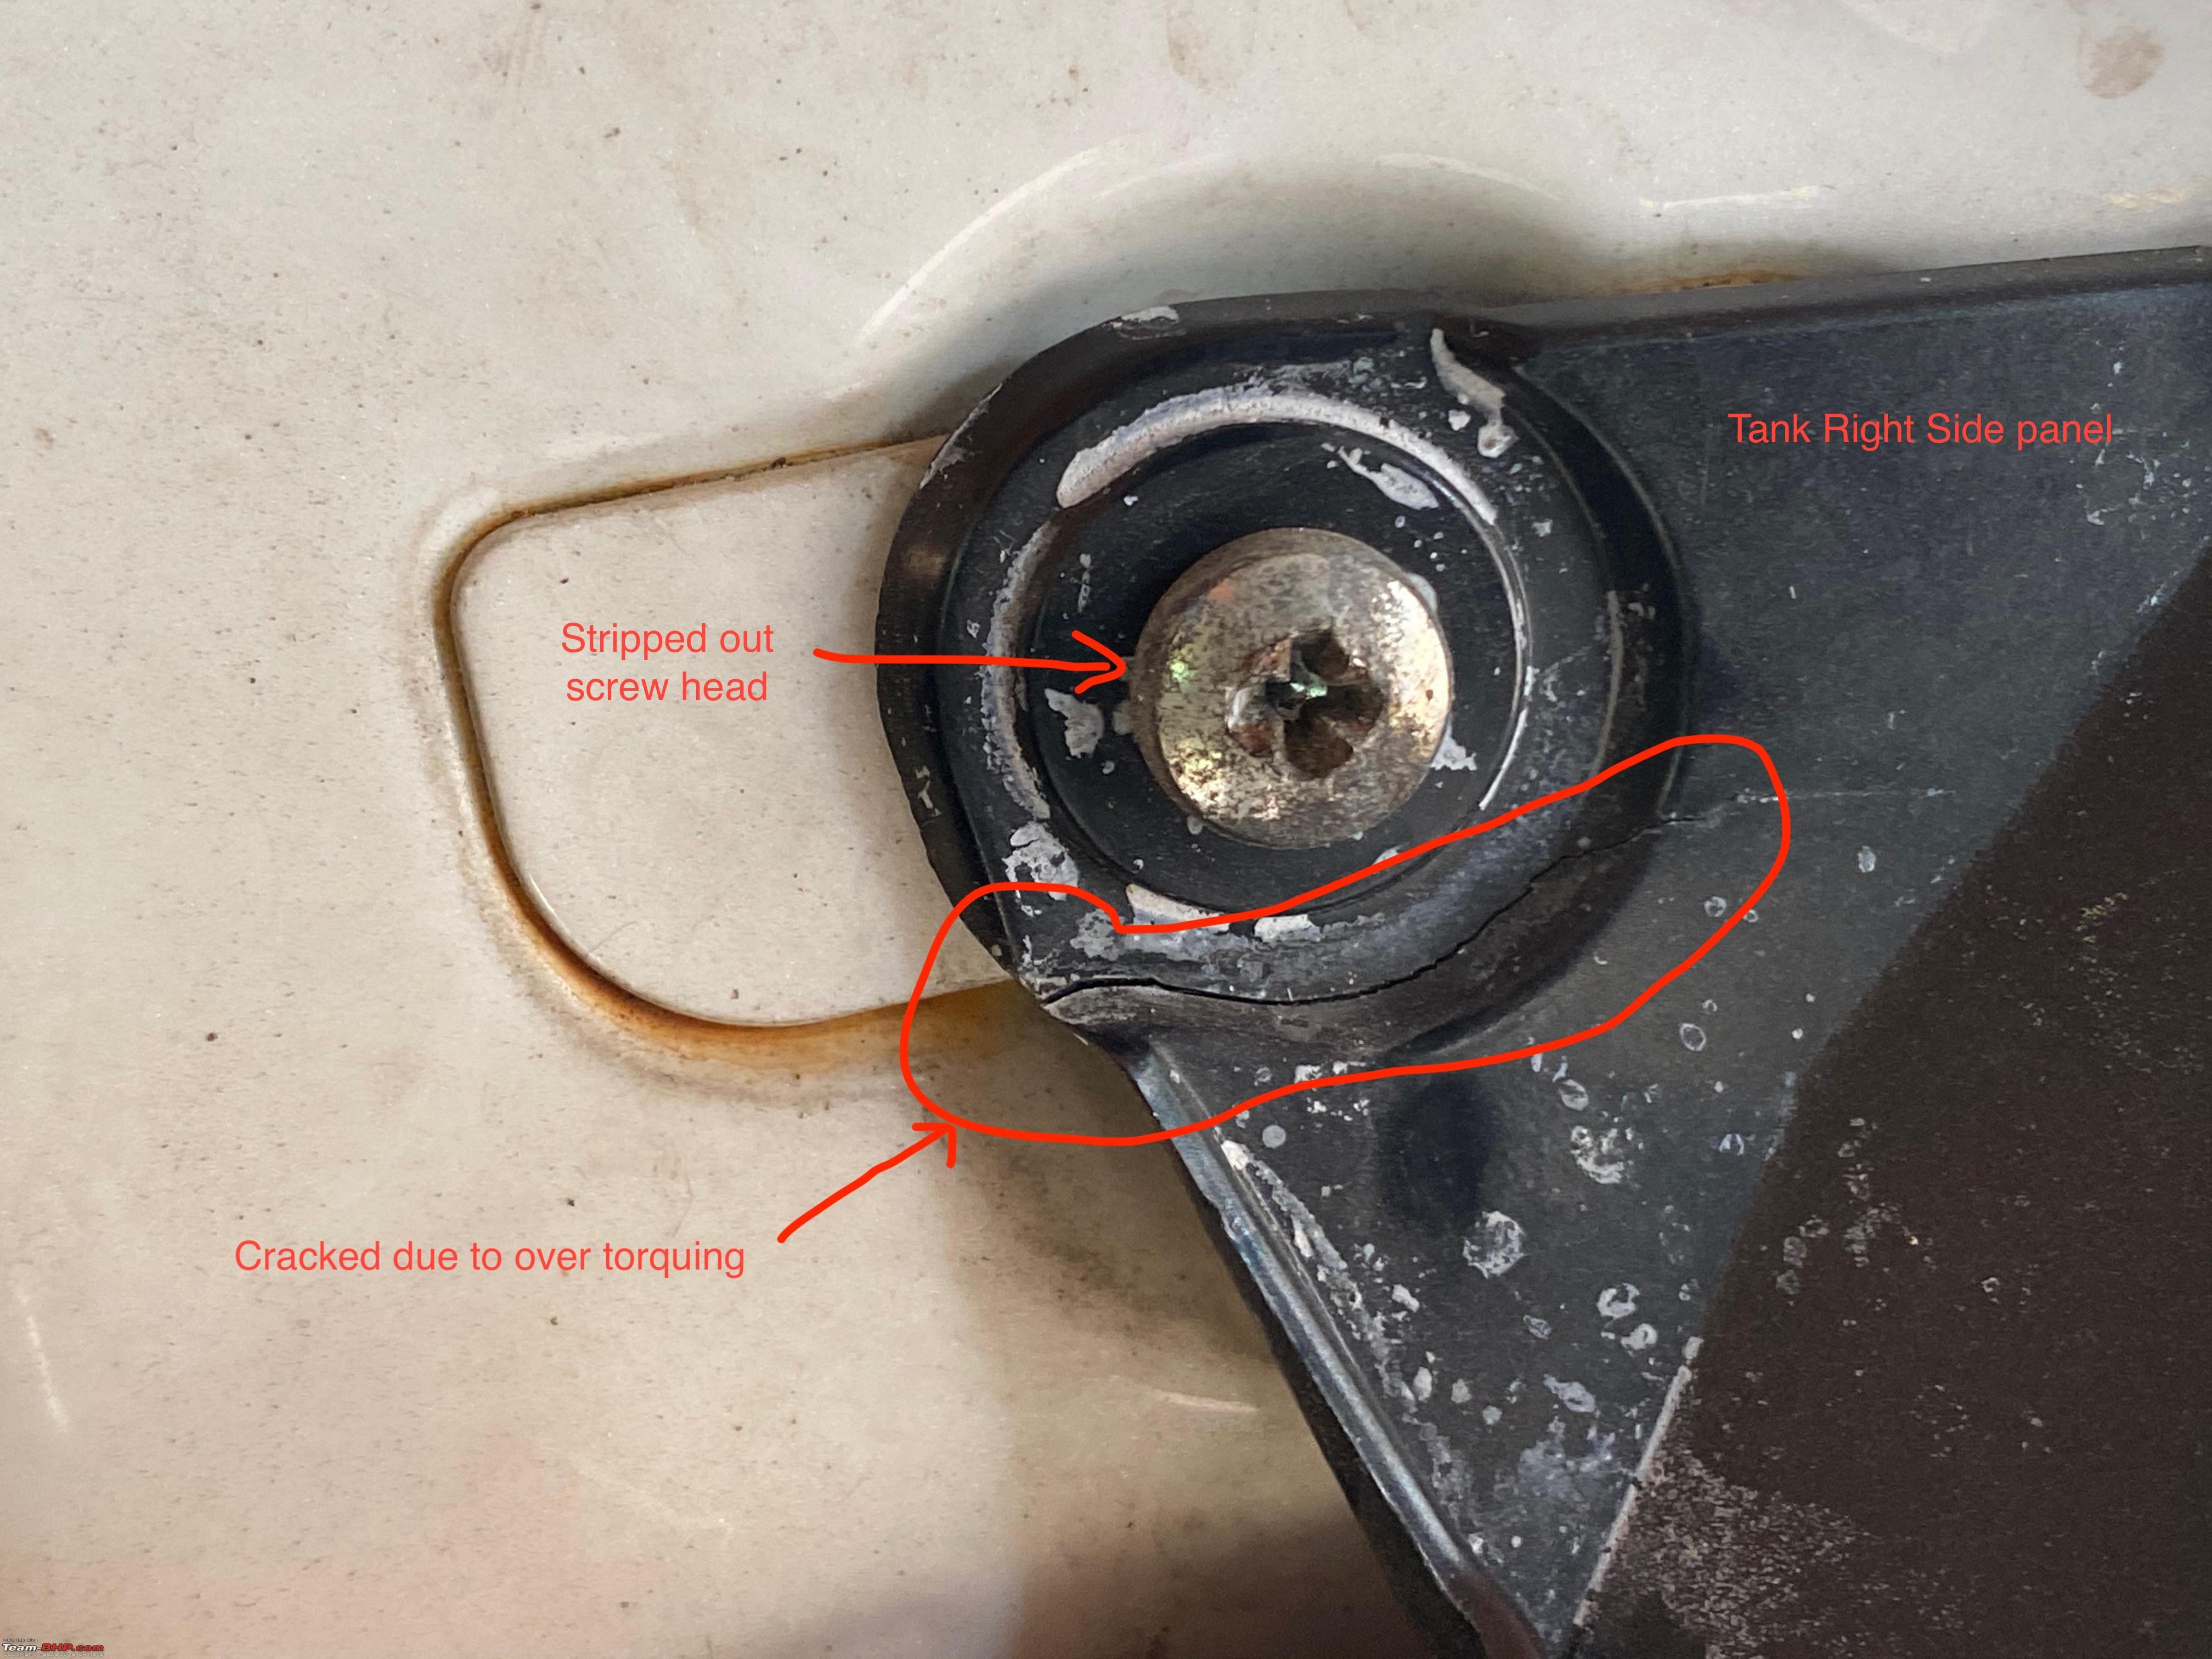 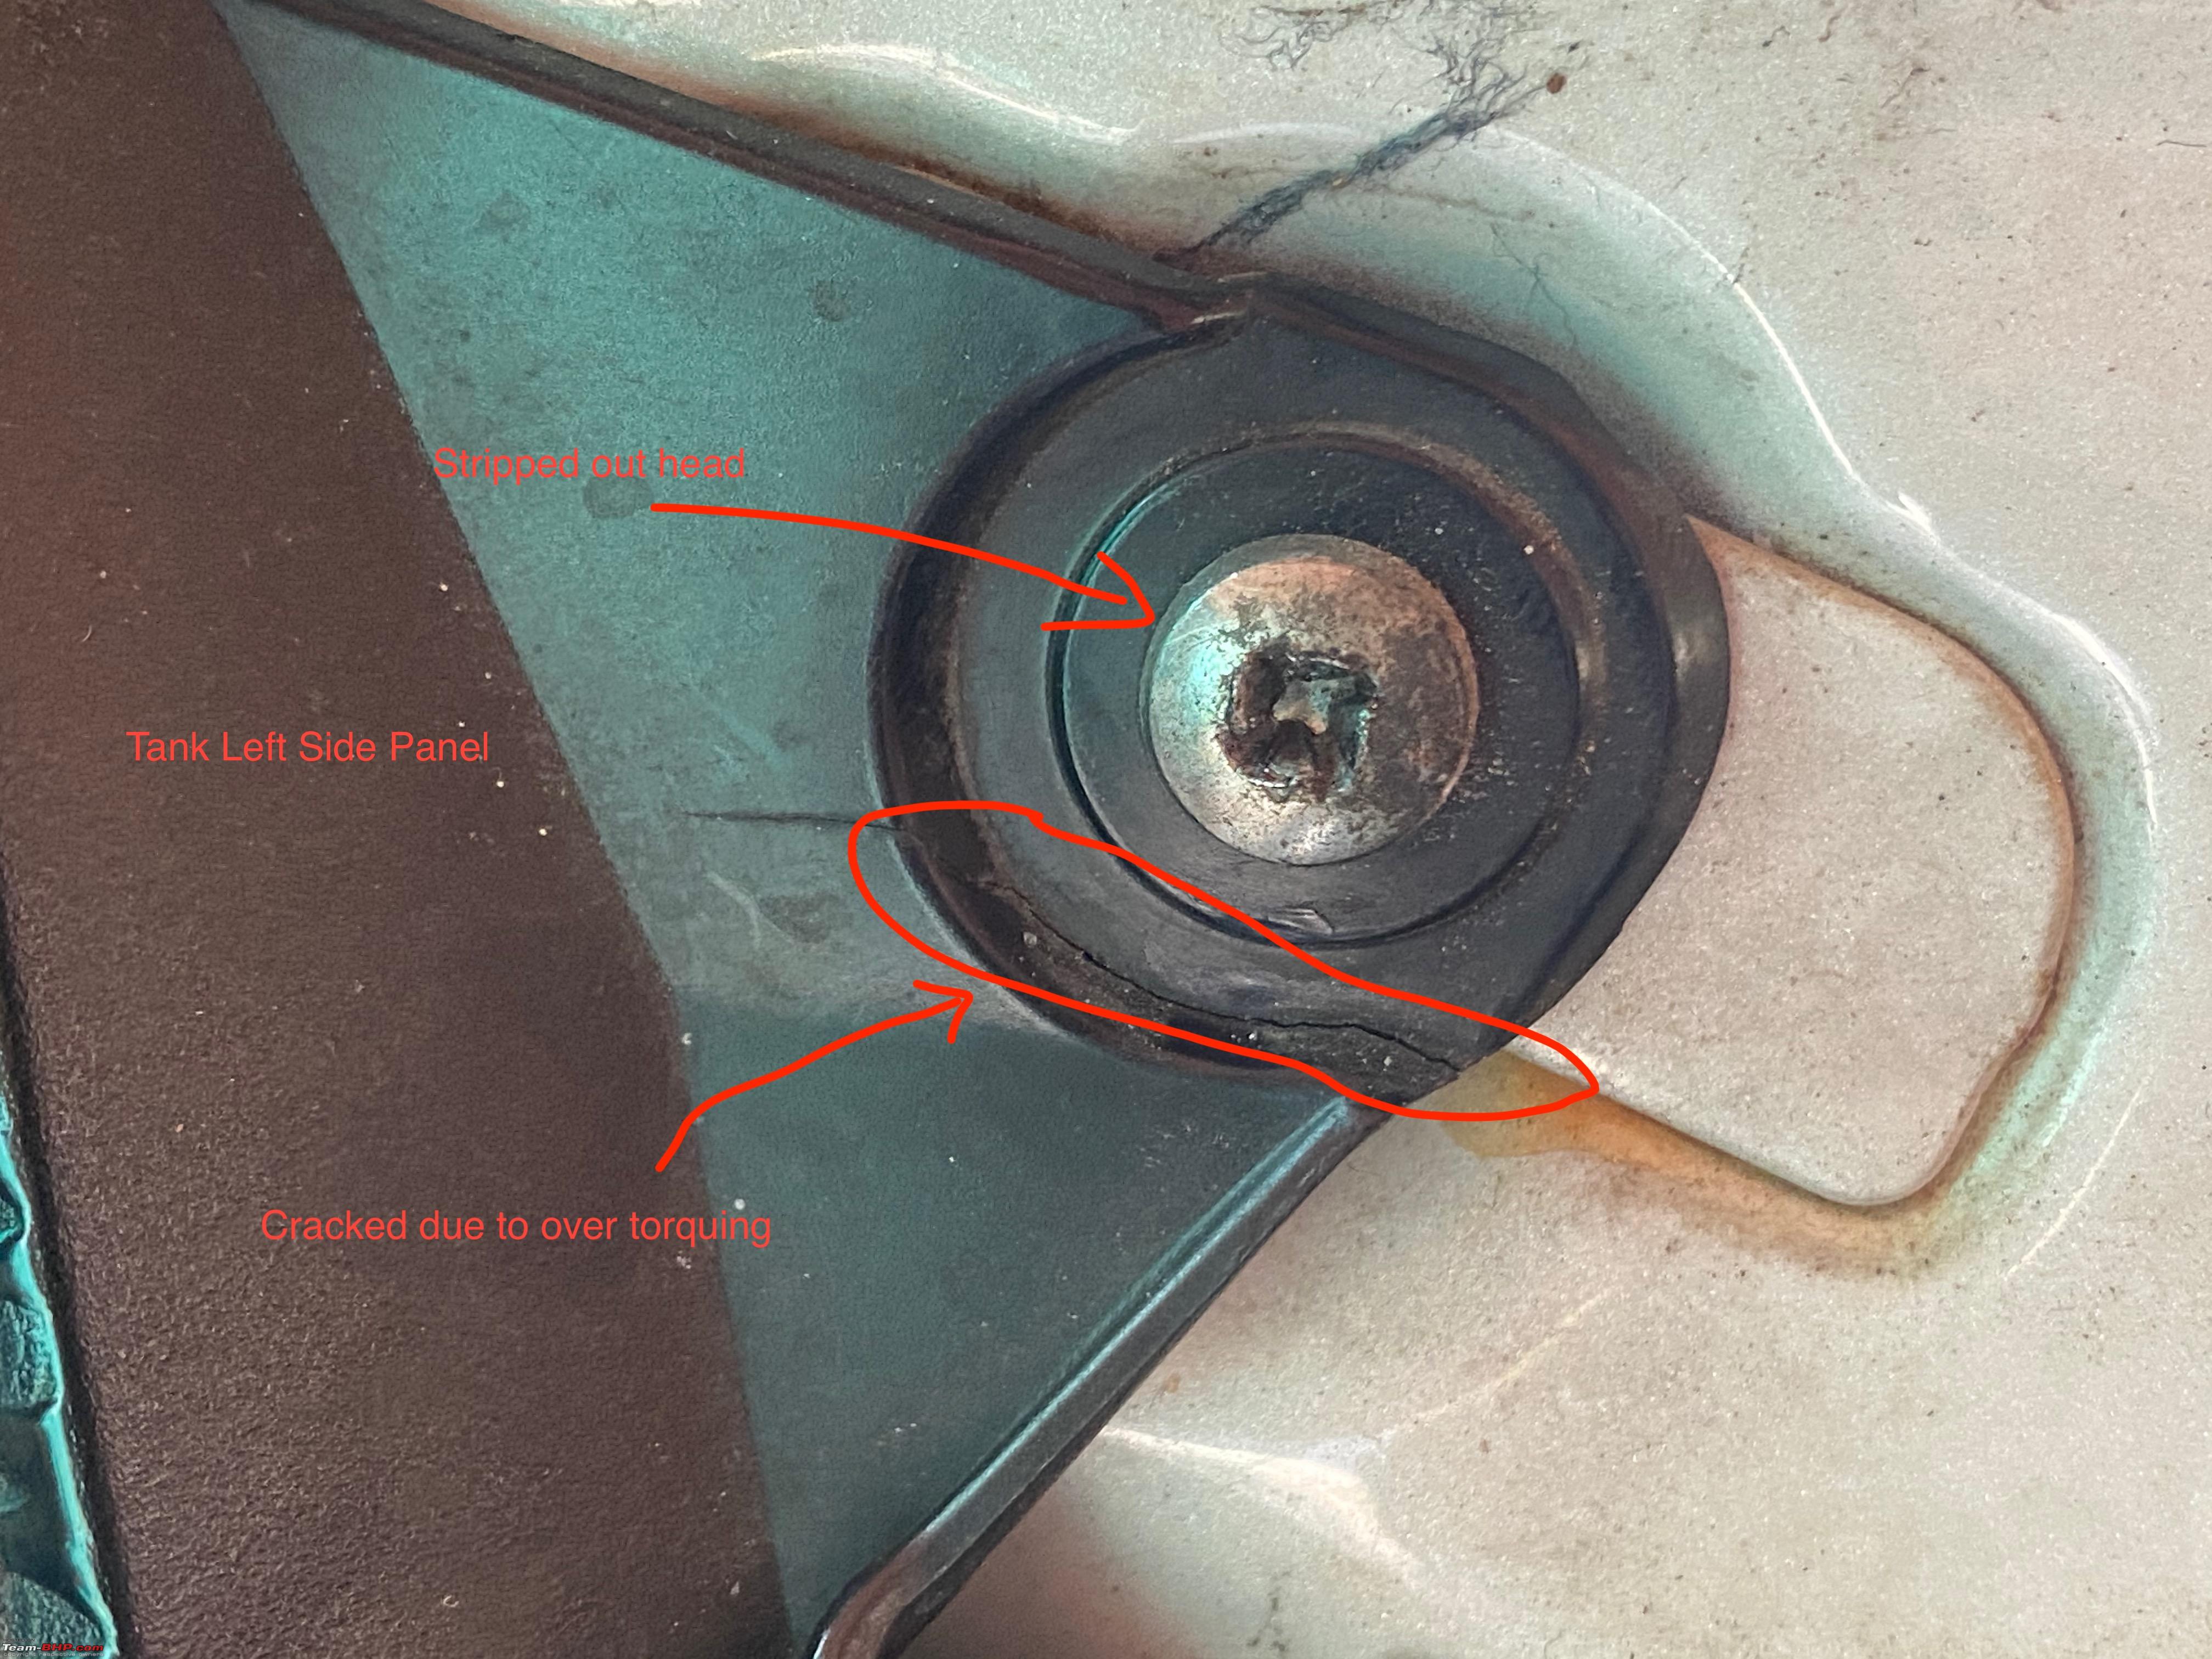 The said screws heads were stripped out and panel mounting points had developed deep cracks due to over-torquing the heads. I believe this was the work of the Yamaha showroom people when the bike was handled by them when it was with the previous owner. I might look into replacing the screws and panels with new ones in due time. Once that was done we used a T handle to keep the tank propped up in position so that we can remove the air filter from within the airbox to inspect the condition of the filter and clean it if required. T-Handle used to prop up the tank and hold it in place to give access to the top of the air box  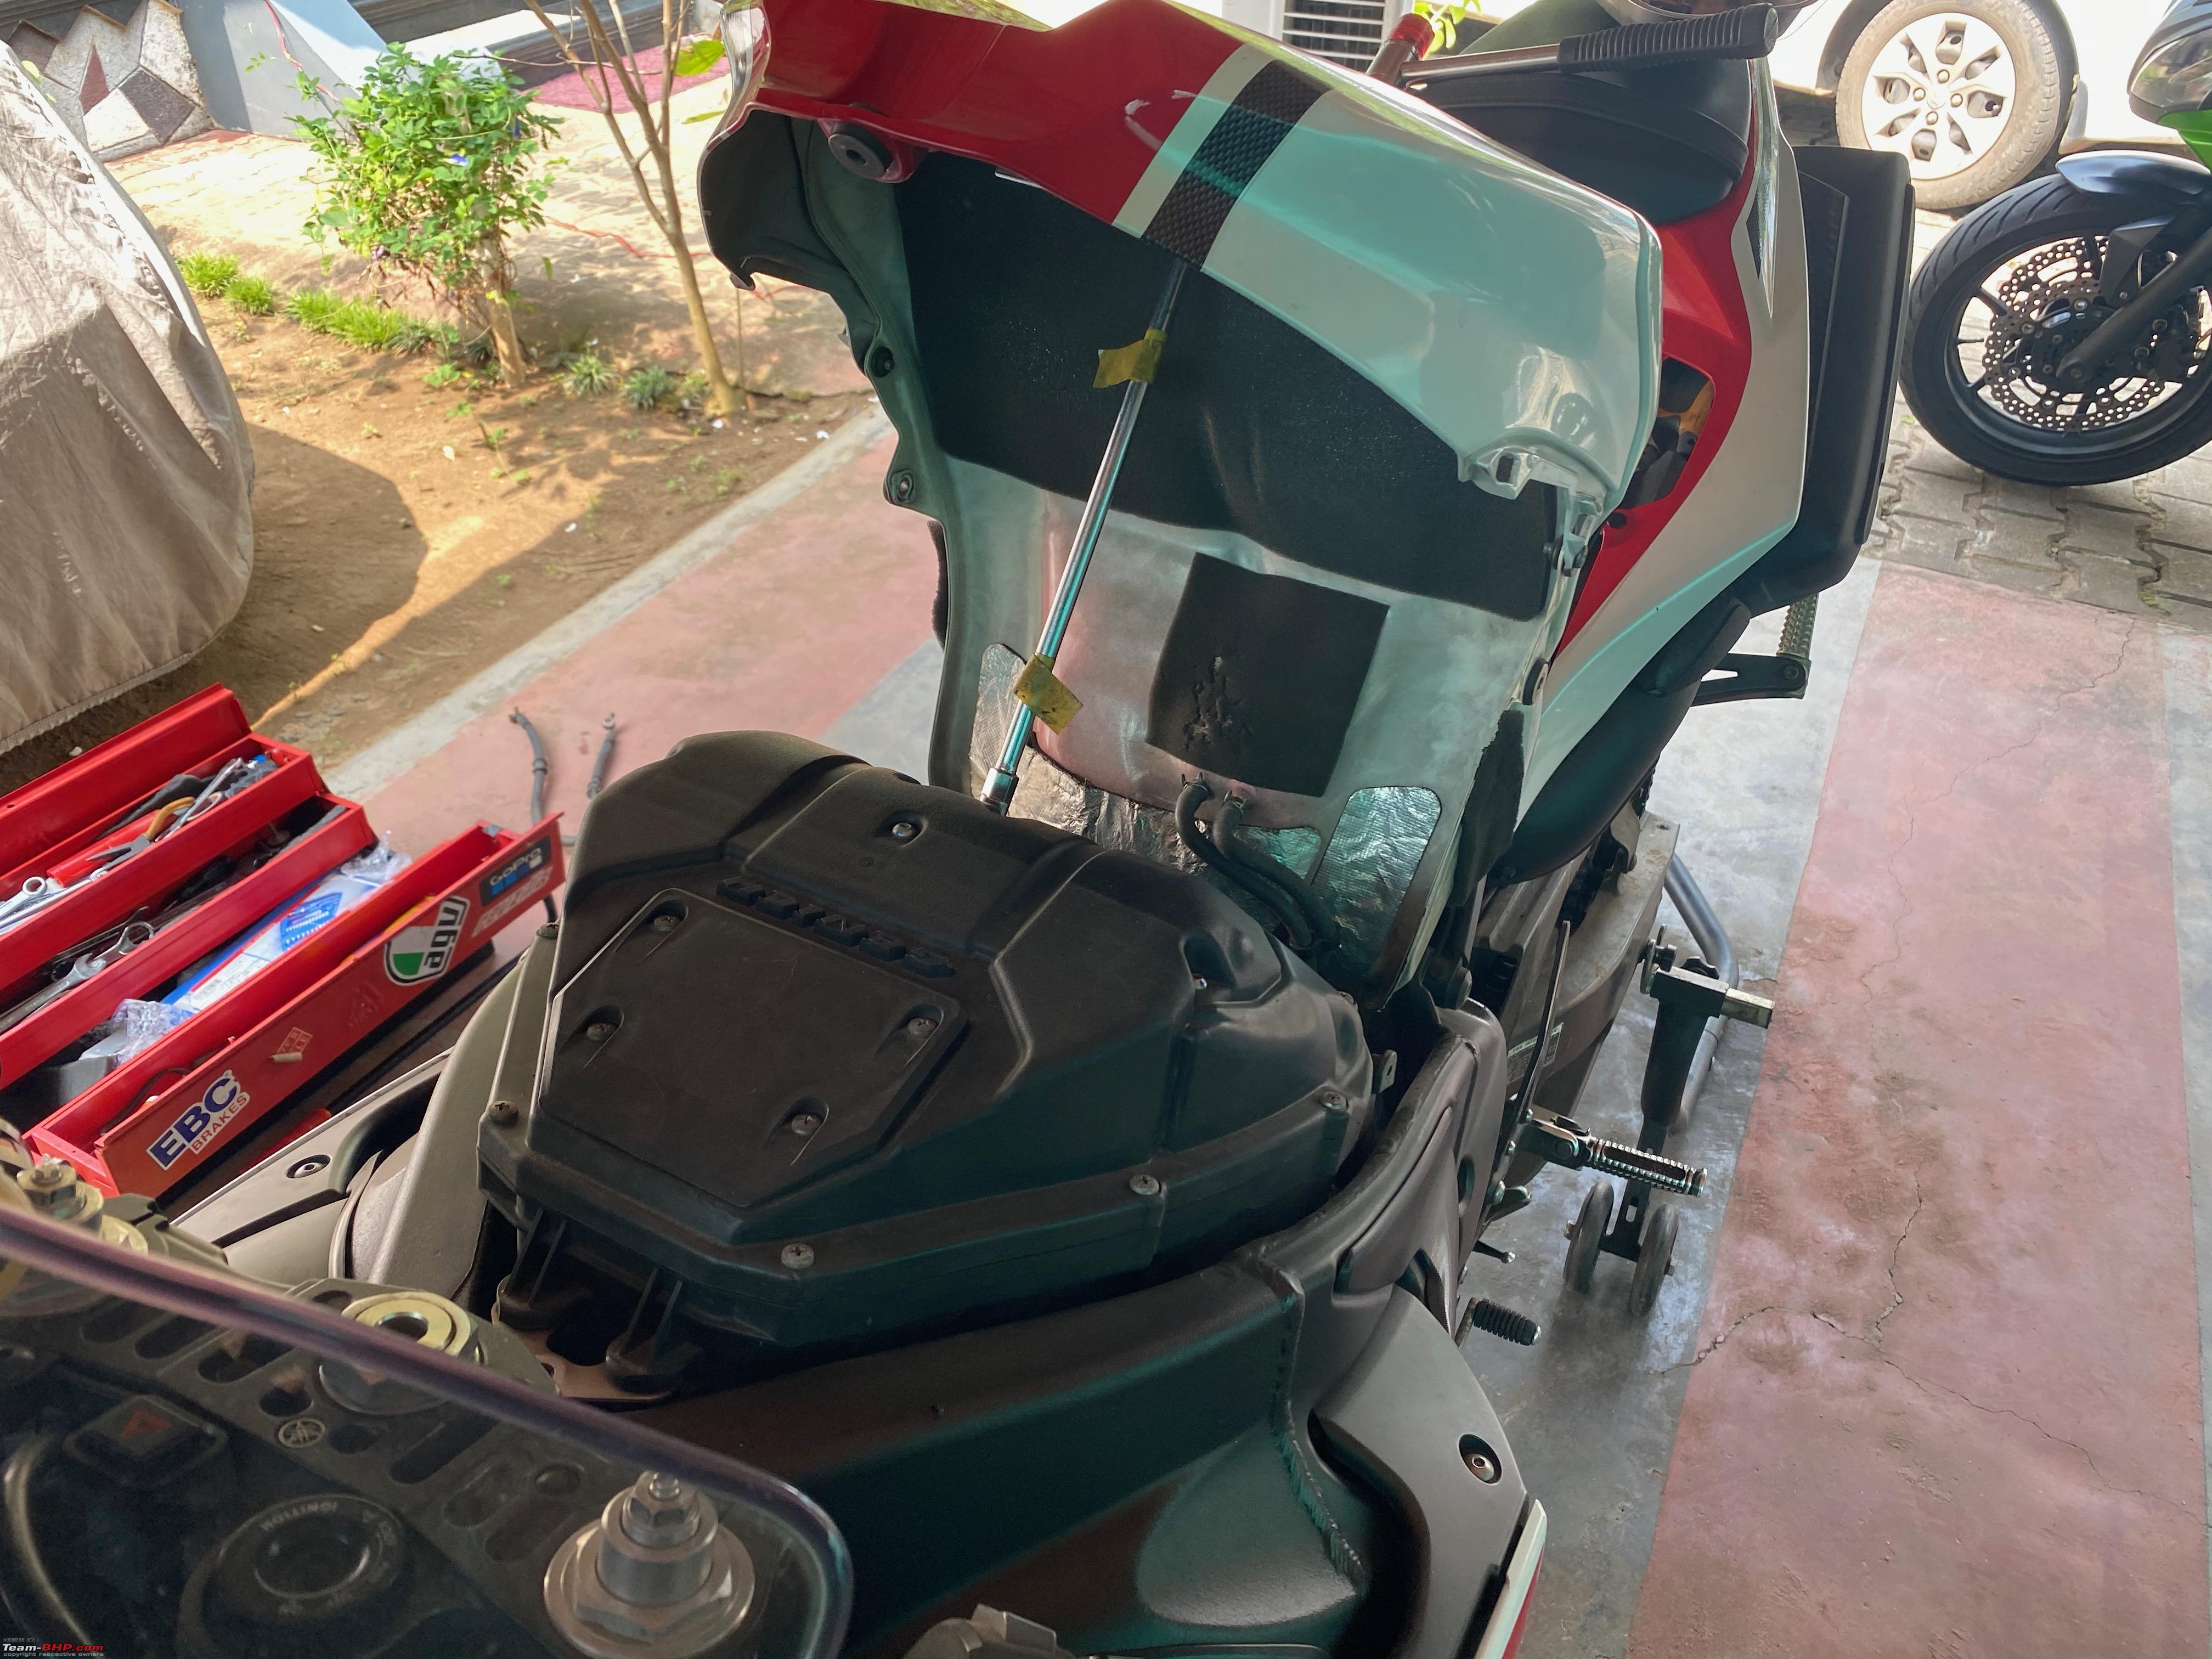 And as expected the air filter was filthy to the core with about just 2-2.5k km worth of riding. The air filter was set aside and cleaned and recharged using the K&N recharger kit and kept aside to continue the disassembly. Filthy!  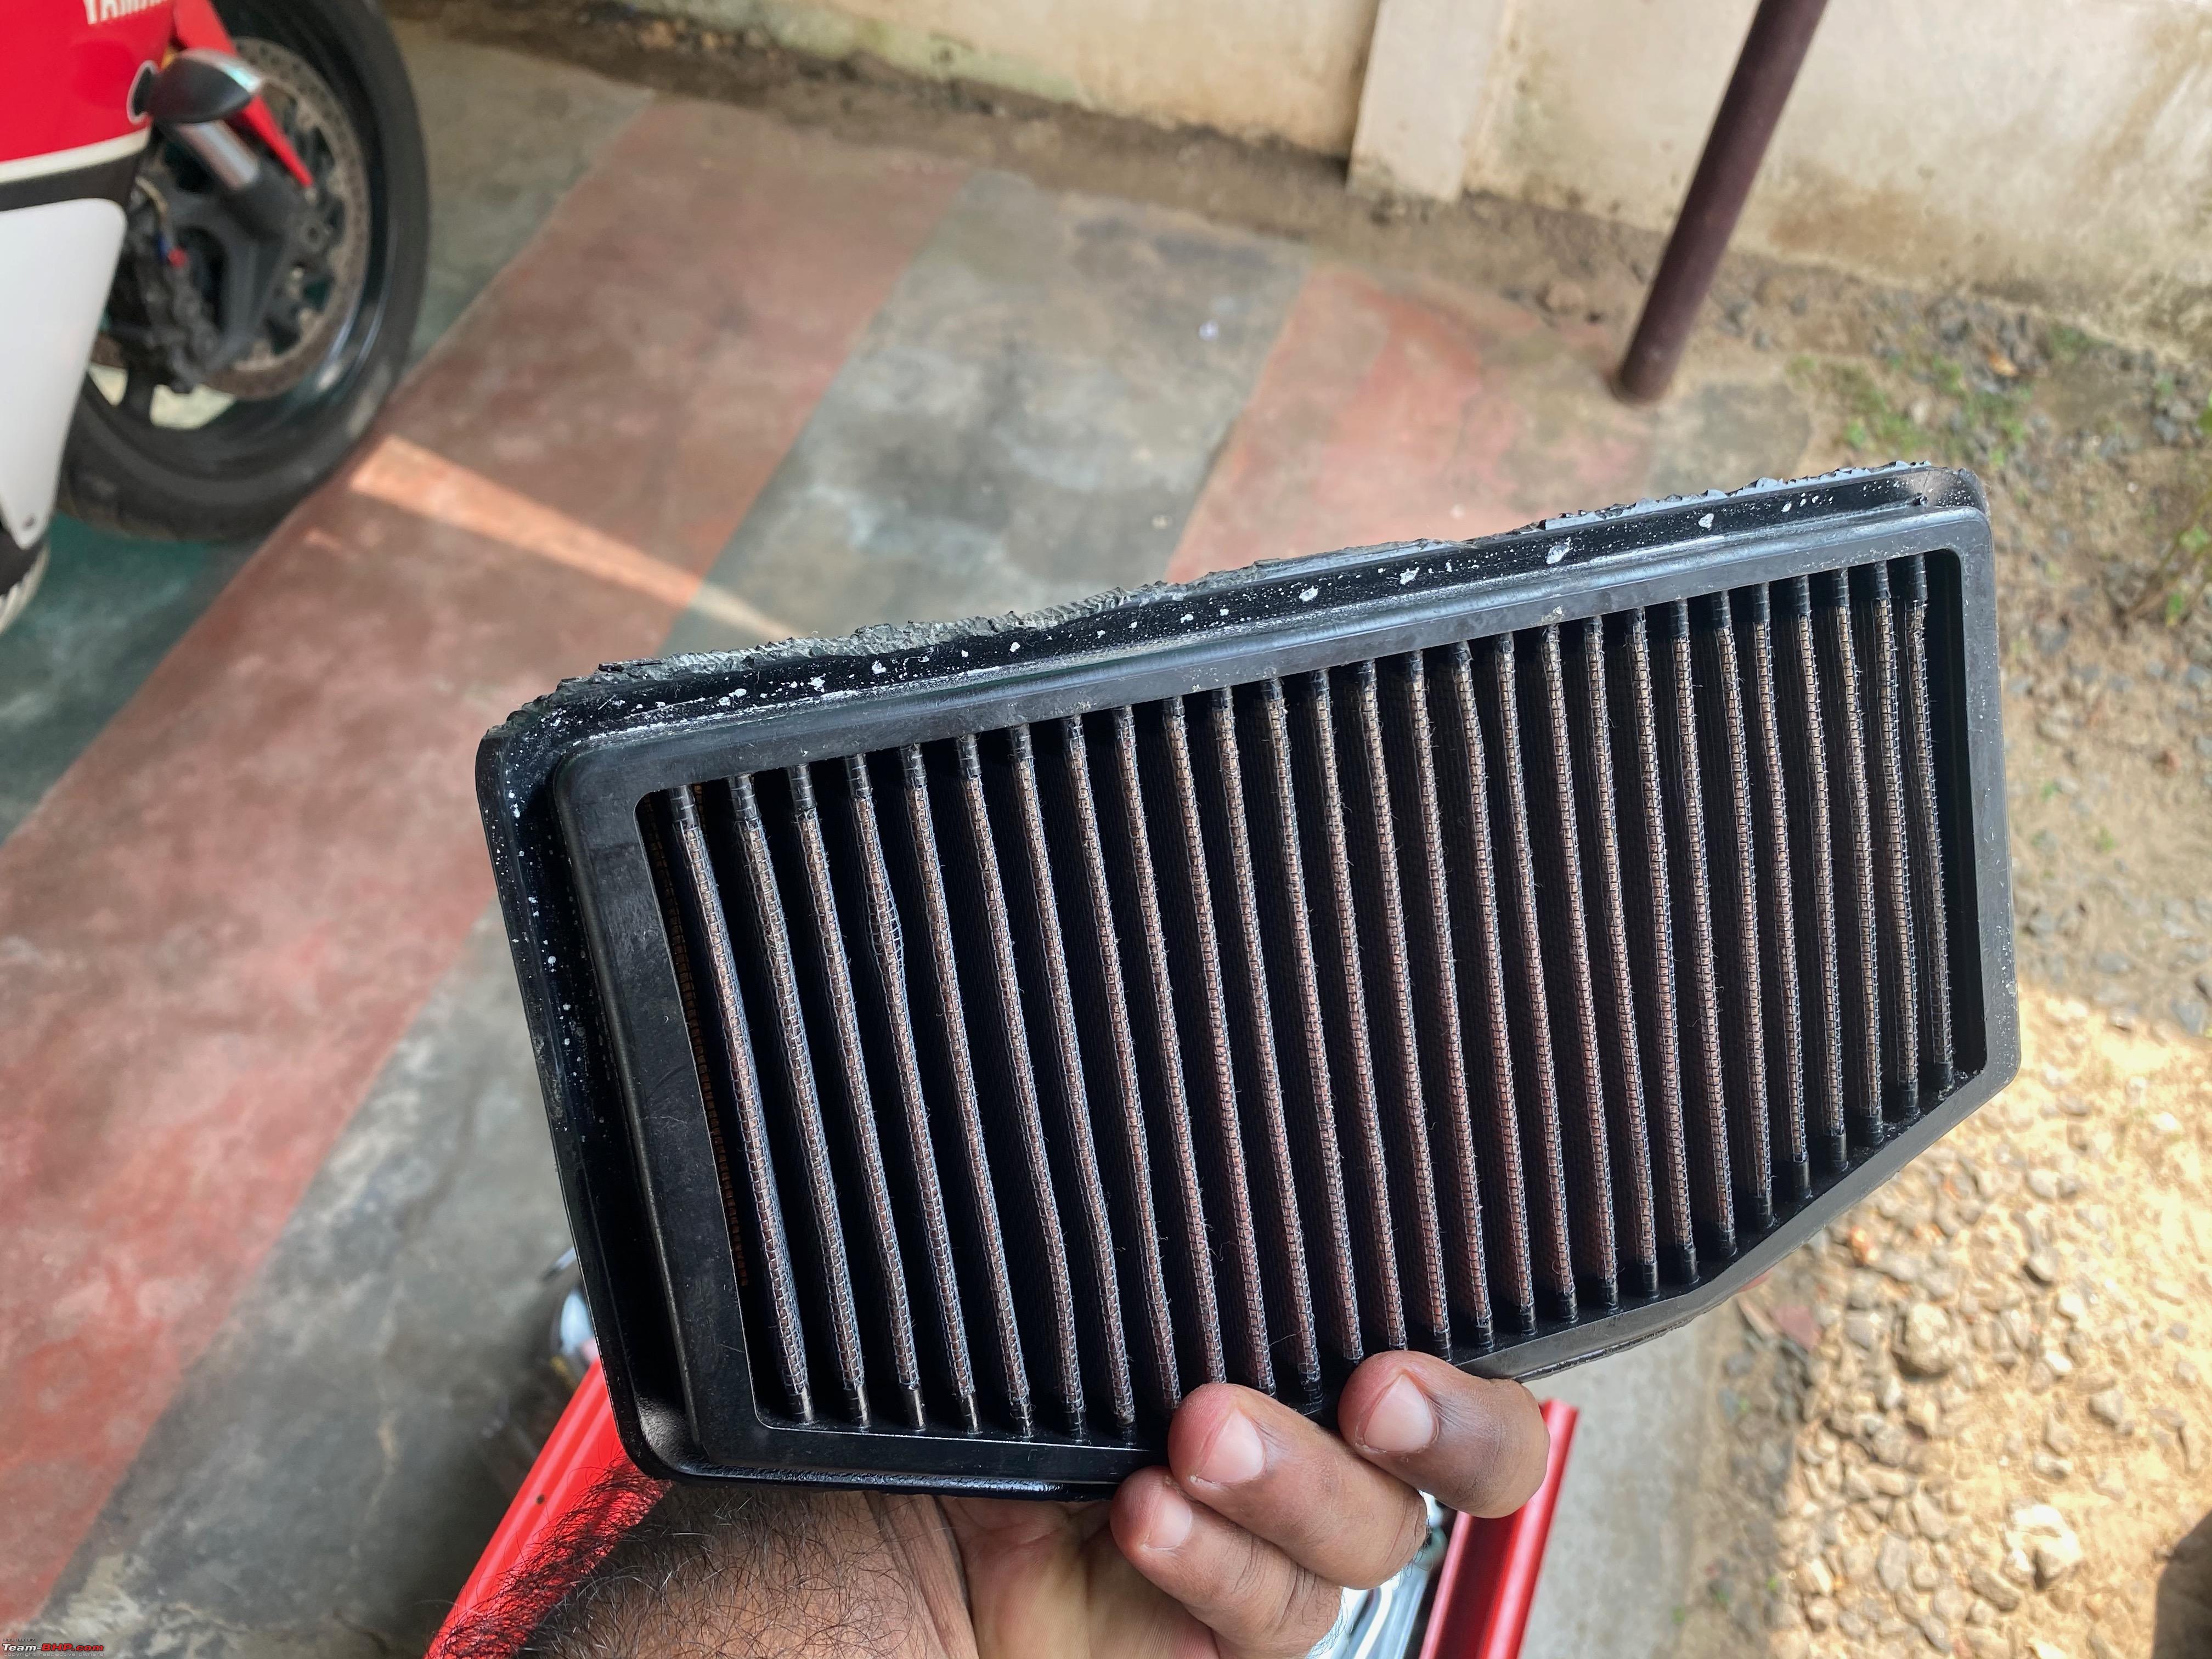 A poor dragonfly or whatever remains of it that got pulled into the airbox via the RAM air intake 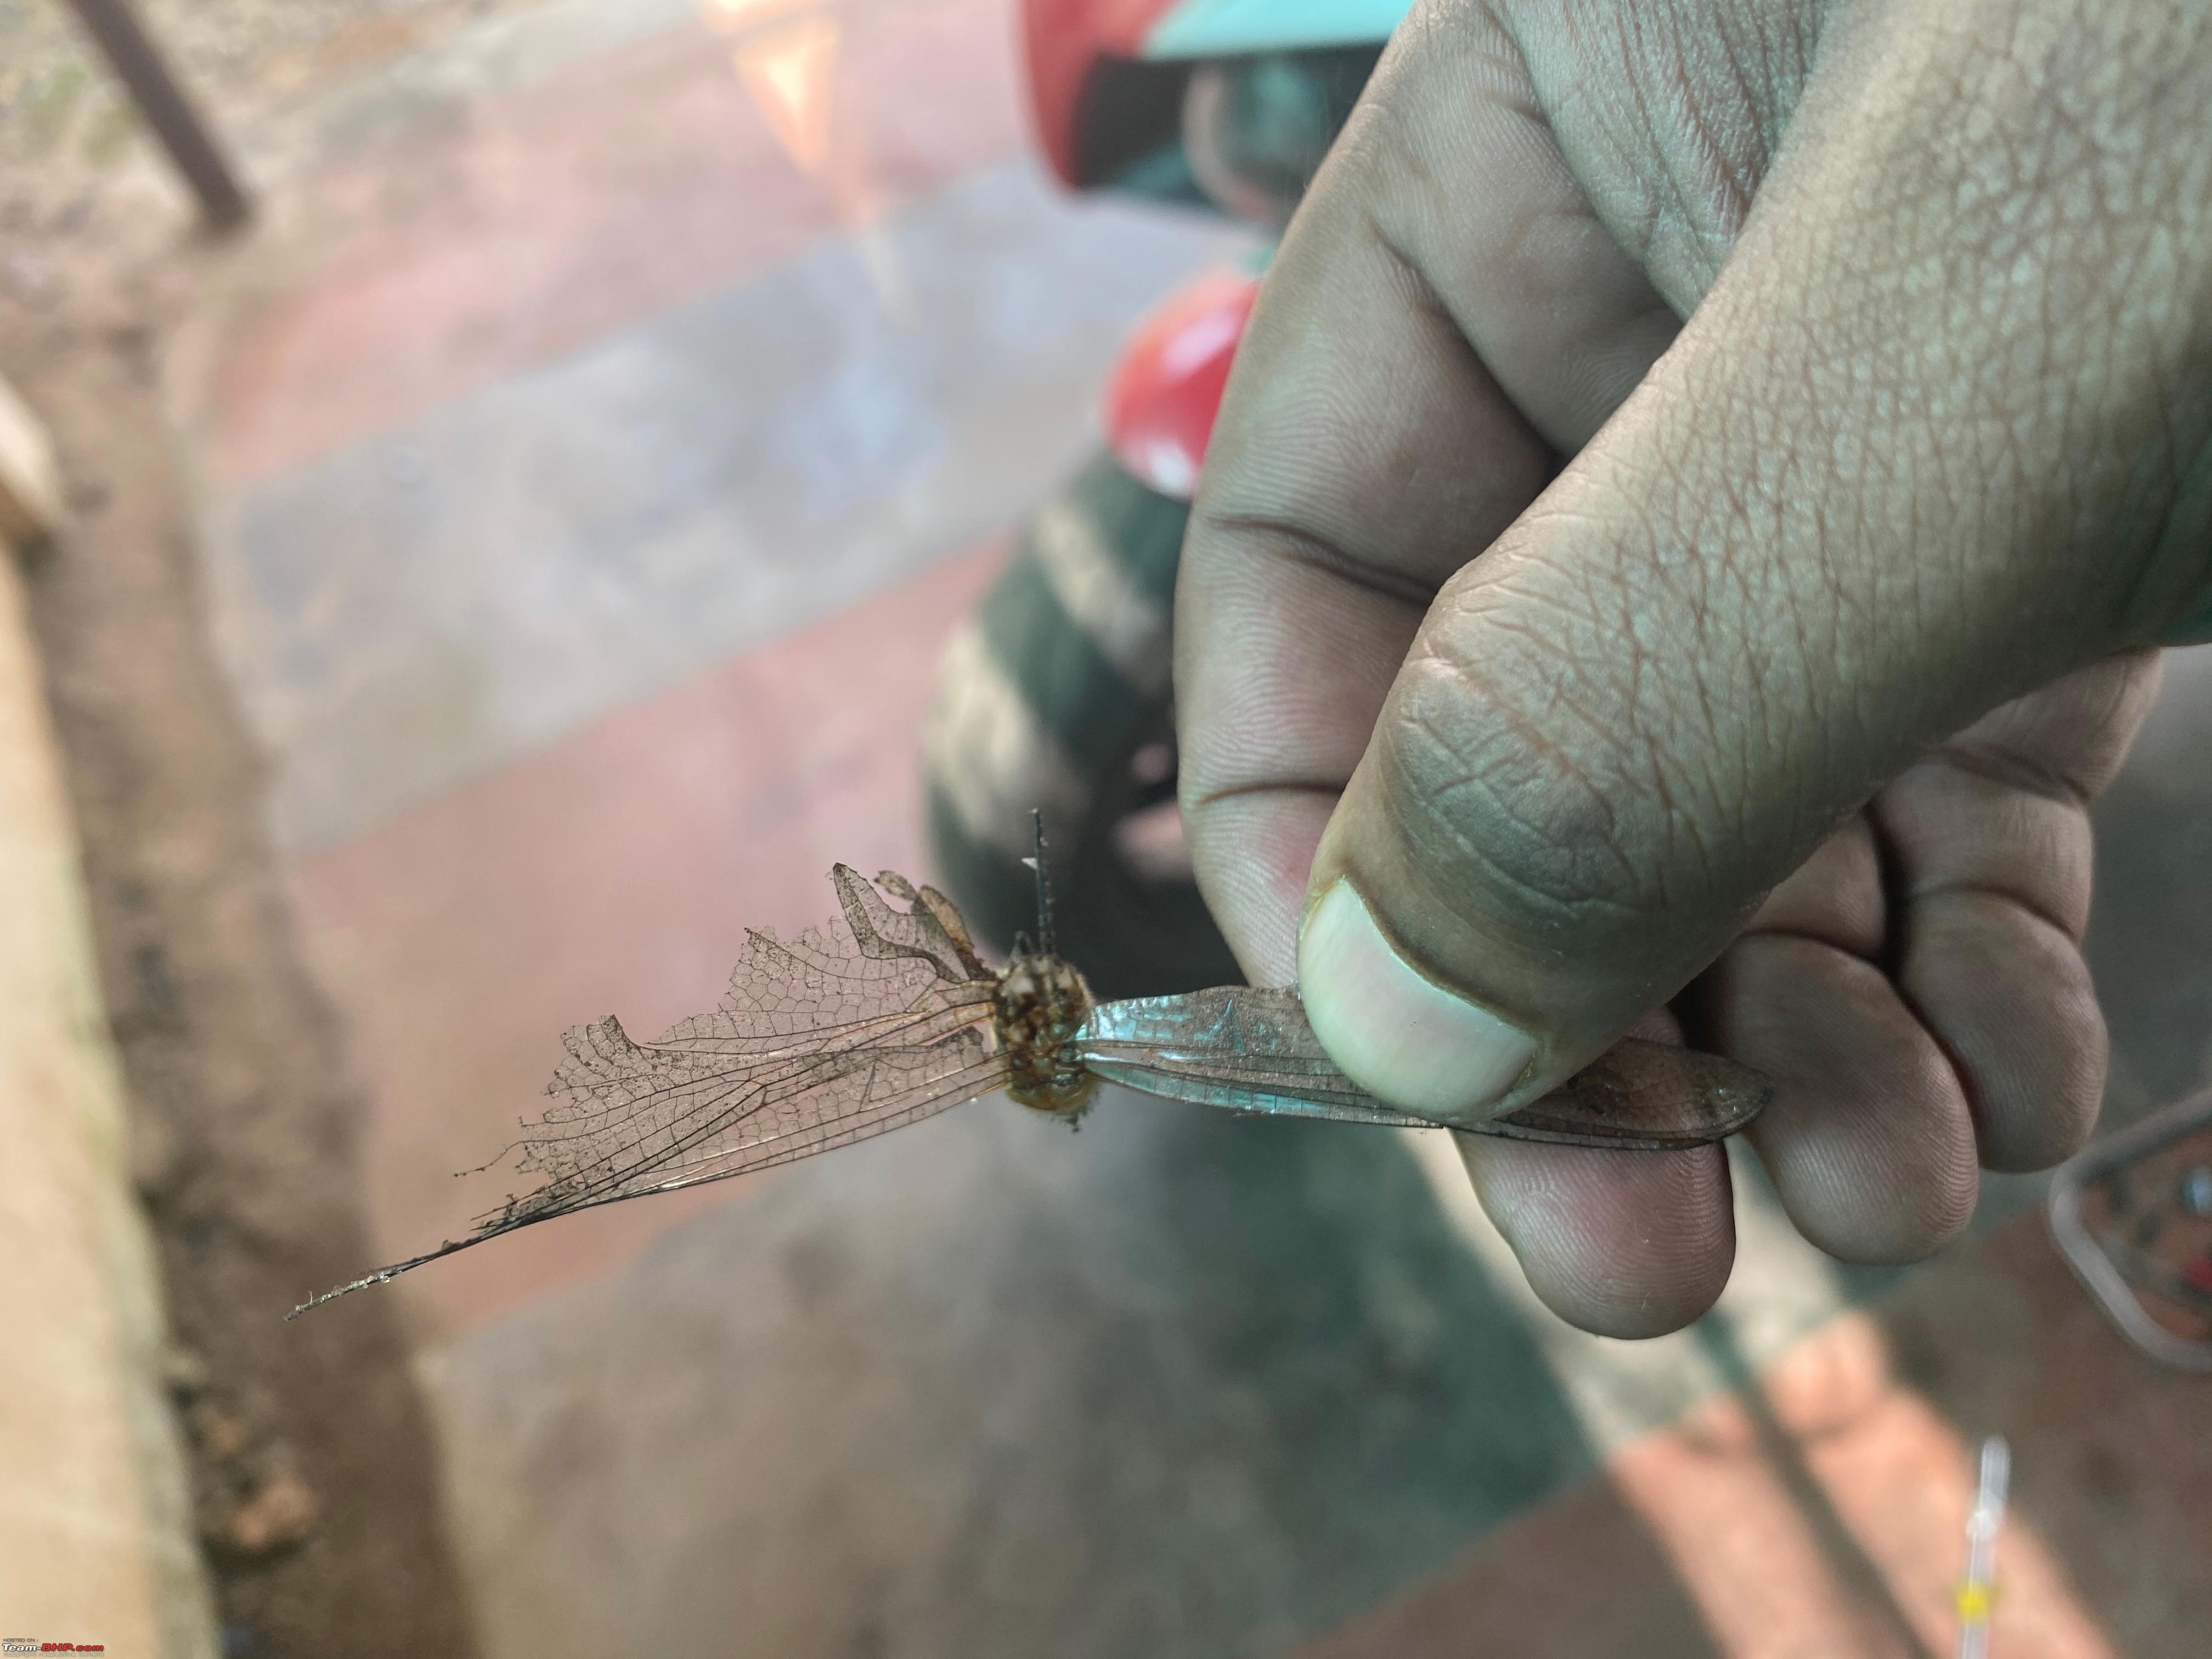 The Dragonfly was found inside the snorkel box as seen here  The next step was removing the tank from the bike in order to gain more room/access to remove the airbox entirely. Disconnecting the fuel line, season plugs, and a couple of overflow and drain pipes and removing the bolt holding the tank at the swivel point(located just below the toolbox, forgot to take a photo of it being visible).  At this point, the tank can be lifted out and placed out of the way. I always choose to keep it on an old tyre or some spongy surface so that the fuel pump area underneath the tank does not hit and cause any damage to itself.   Once the tank was removed, next we started to disassemble the velocity stacks, since the air box was already opened up. It's pretty easy it has 5 mounting points onto which the trumpets just slot in and removing and fixing back takes just a matter of seconds. Velocity stacks/ trumpets  At this point, the air box is held onto the bike by just 6 Allen bolts which are placed as shown in the circles marked in red. Remove that and the airbox can be pulled up and you get full access to the top of the throttle body. Bolt positions to remove the airbox marked in red  Do be careful before yanking the air box out as it has a sensor that is connected to the wiring loom, make sure to disconnect it before pulling out the airbox completely. 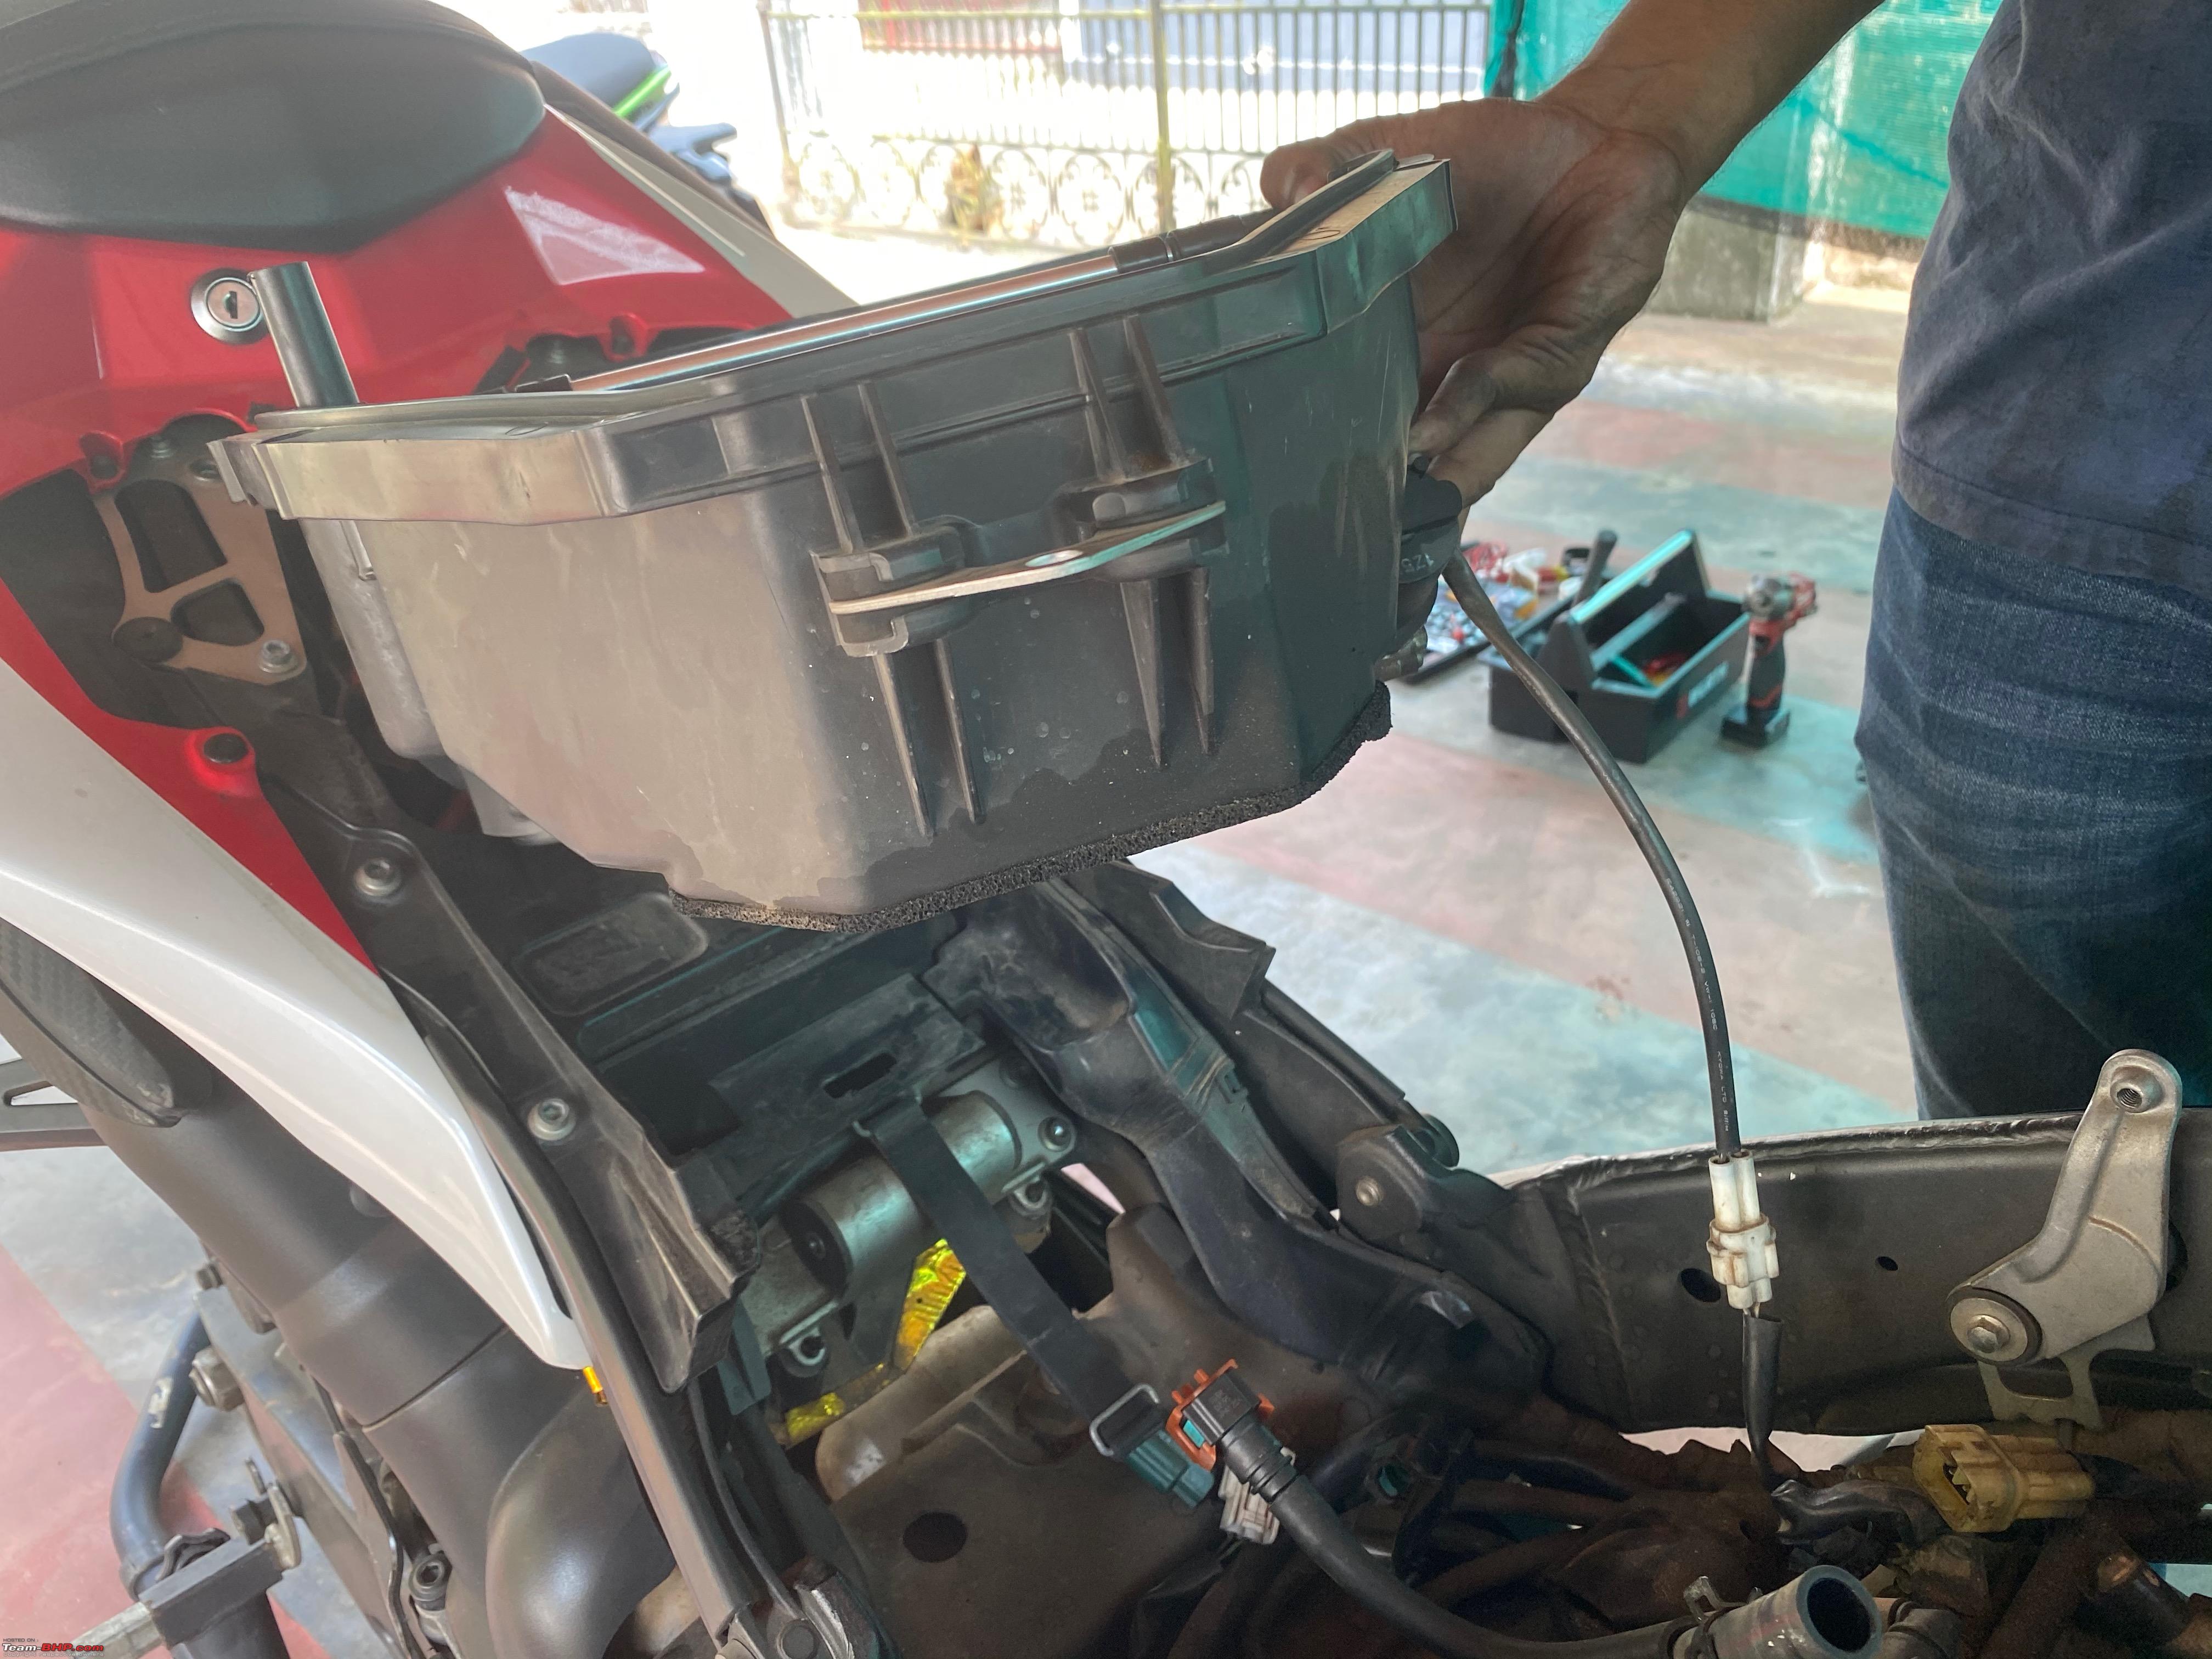 Air Box Fully dismanteled  This is how the bikes looks after all this. Reaching till here takes about 30 mins or so if you have another person to help. At this point, we have proper access and space to work on the Throttle body and primary injectors  The next step is inspecting the Throttle Body(TB) and injectors(primary & secondary) which I'll update in the next post. Cheers Krishna |
|
| (23)
Thanks
|
| The following 23 BHPians Thank krishnaprasadgg for this useful post: | //M, 100Rabh, abhi_tjet, AmitRavi07, CrAzY dRiVeR, Cyborg, deepfreak15, Divya Sharan, fluidicjoy, gauravanekar, JoeTheWanderer, jomson13, JTM, neil.jericho, nikhn, nitinkbhaskar, NoSugarNoSpice, Researcher, SnS_12, tchsvy, Ultim8, Xaos636, yesyeswe |
|
31st January 2021, 15:42
| #190 |
| BHPian Join Date: Dec 2019 Location: KL52
Posts: 519
Thanked: 3,648 Times
| Re: Review: My Yamaha R1 (WGP 50th Anniversary Edition) Update Post 2/3 Now that we have full access to the Throttle body and primary fuel injector rail. We started on cleaning both the throttle body and injectors. We decide to not remove the throttle body off the bike but instead clean it while it was already on the bike, but completely removing the injectors from the fuel rail to do a proper deep clean on it. The reason we decided to go that route for the Throttle body was that removing it seemed a bit cumbersome and we were not yet comfortable going that deep in disassembling it. Throttle body cleaning As you can see both throttle body & fuel rail/injectors are easily accessible 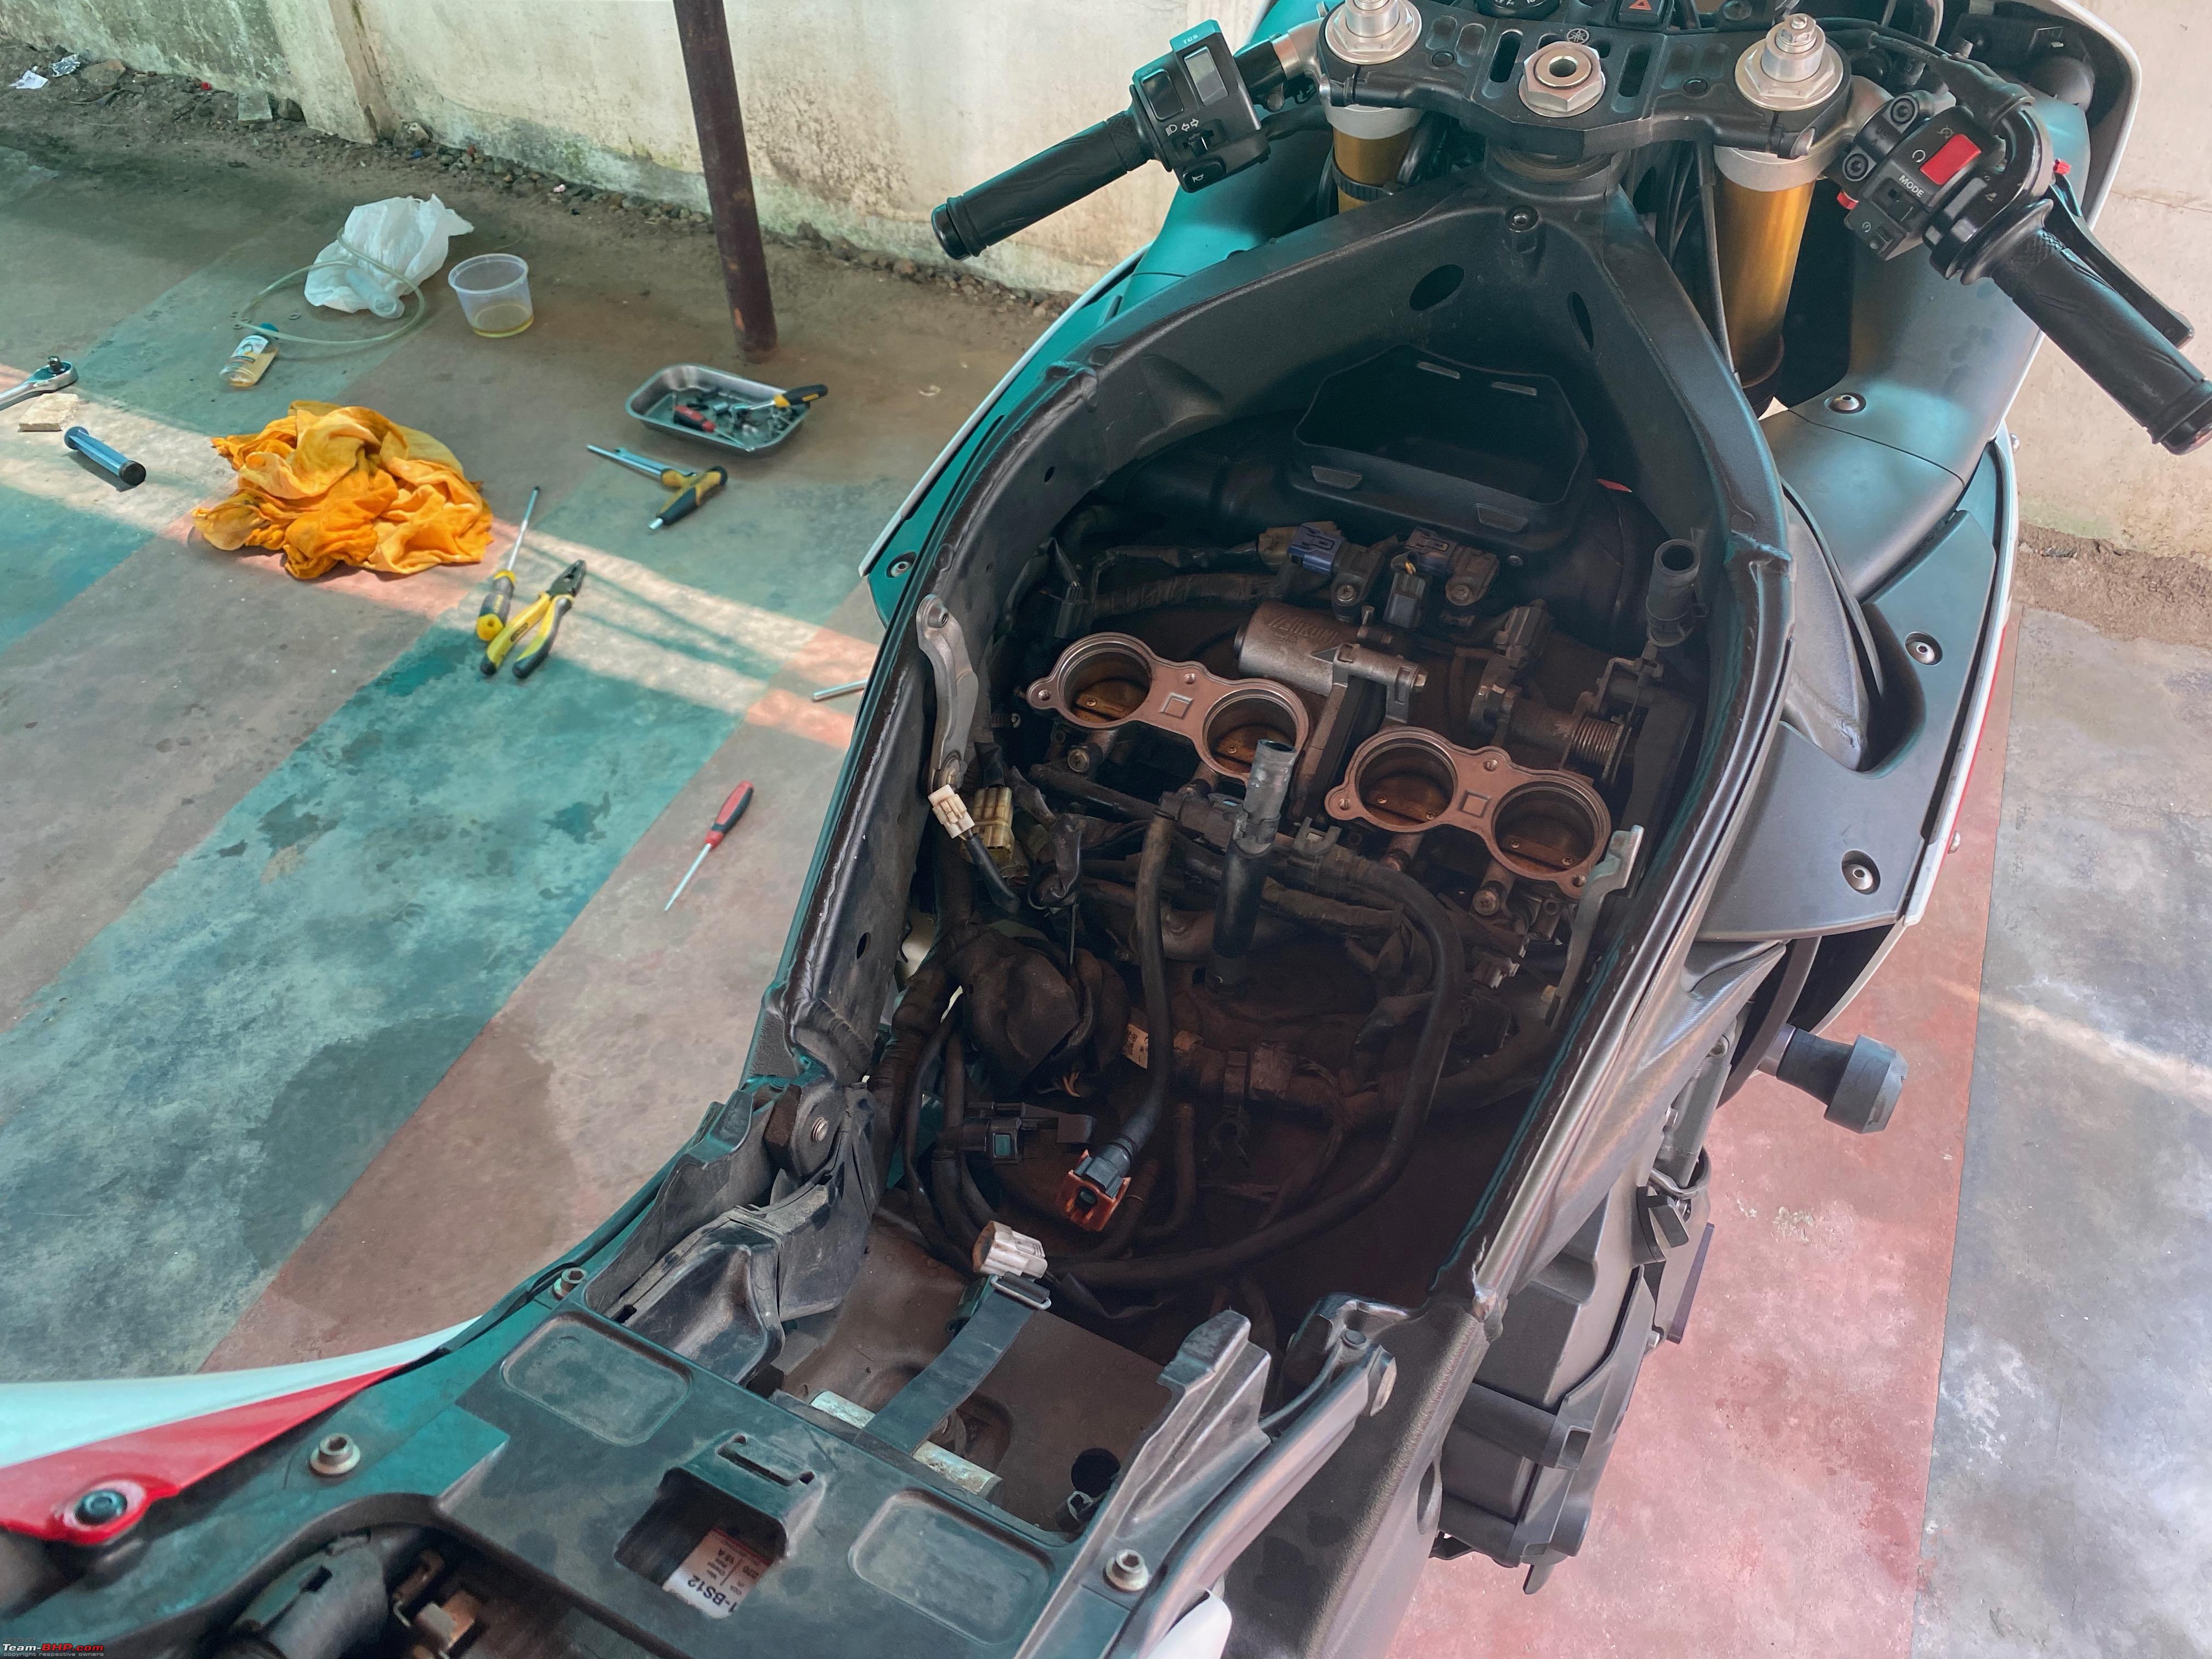 Next, let's look at the 2 banks on the throttle. I think the pictures can do most of the talking for this case. Look at how dirty and the soot build-up that is present and that too on this side of the valve Bank 1 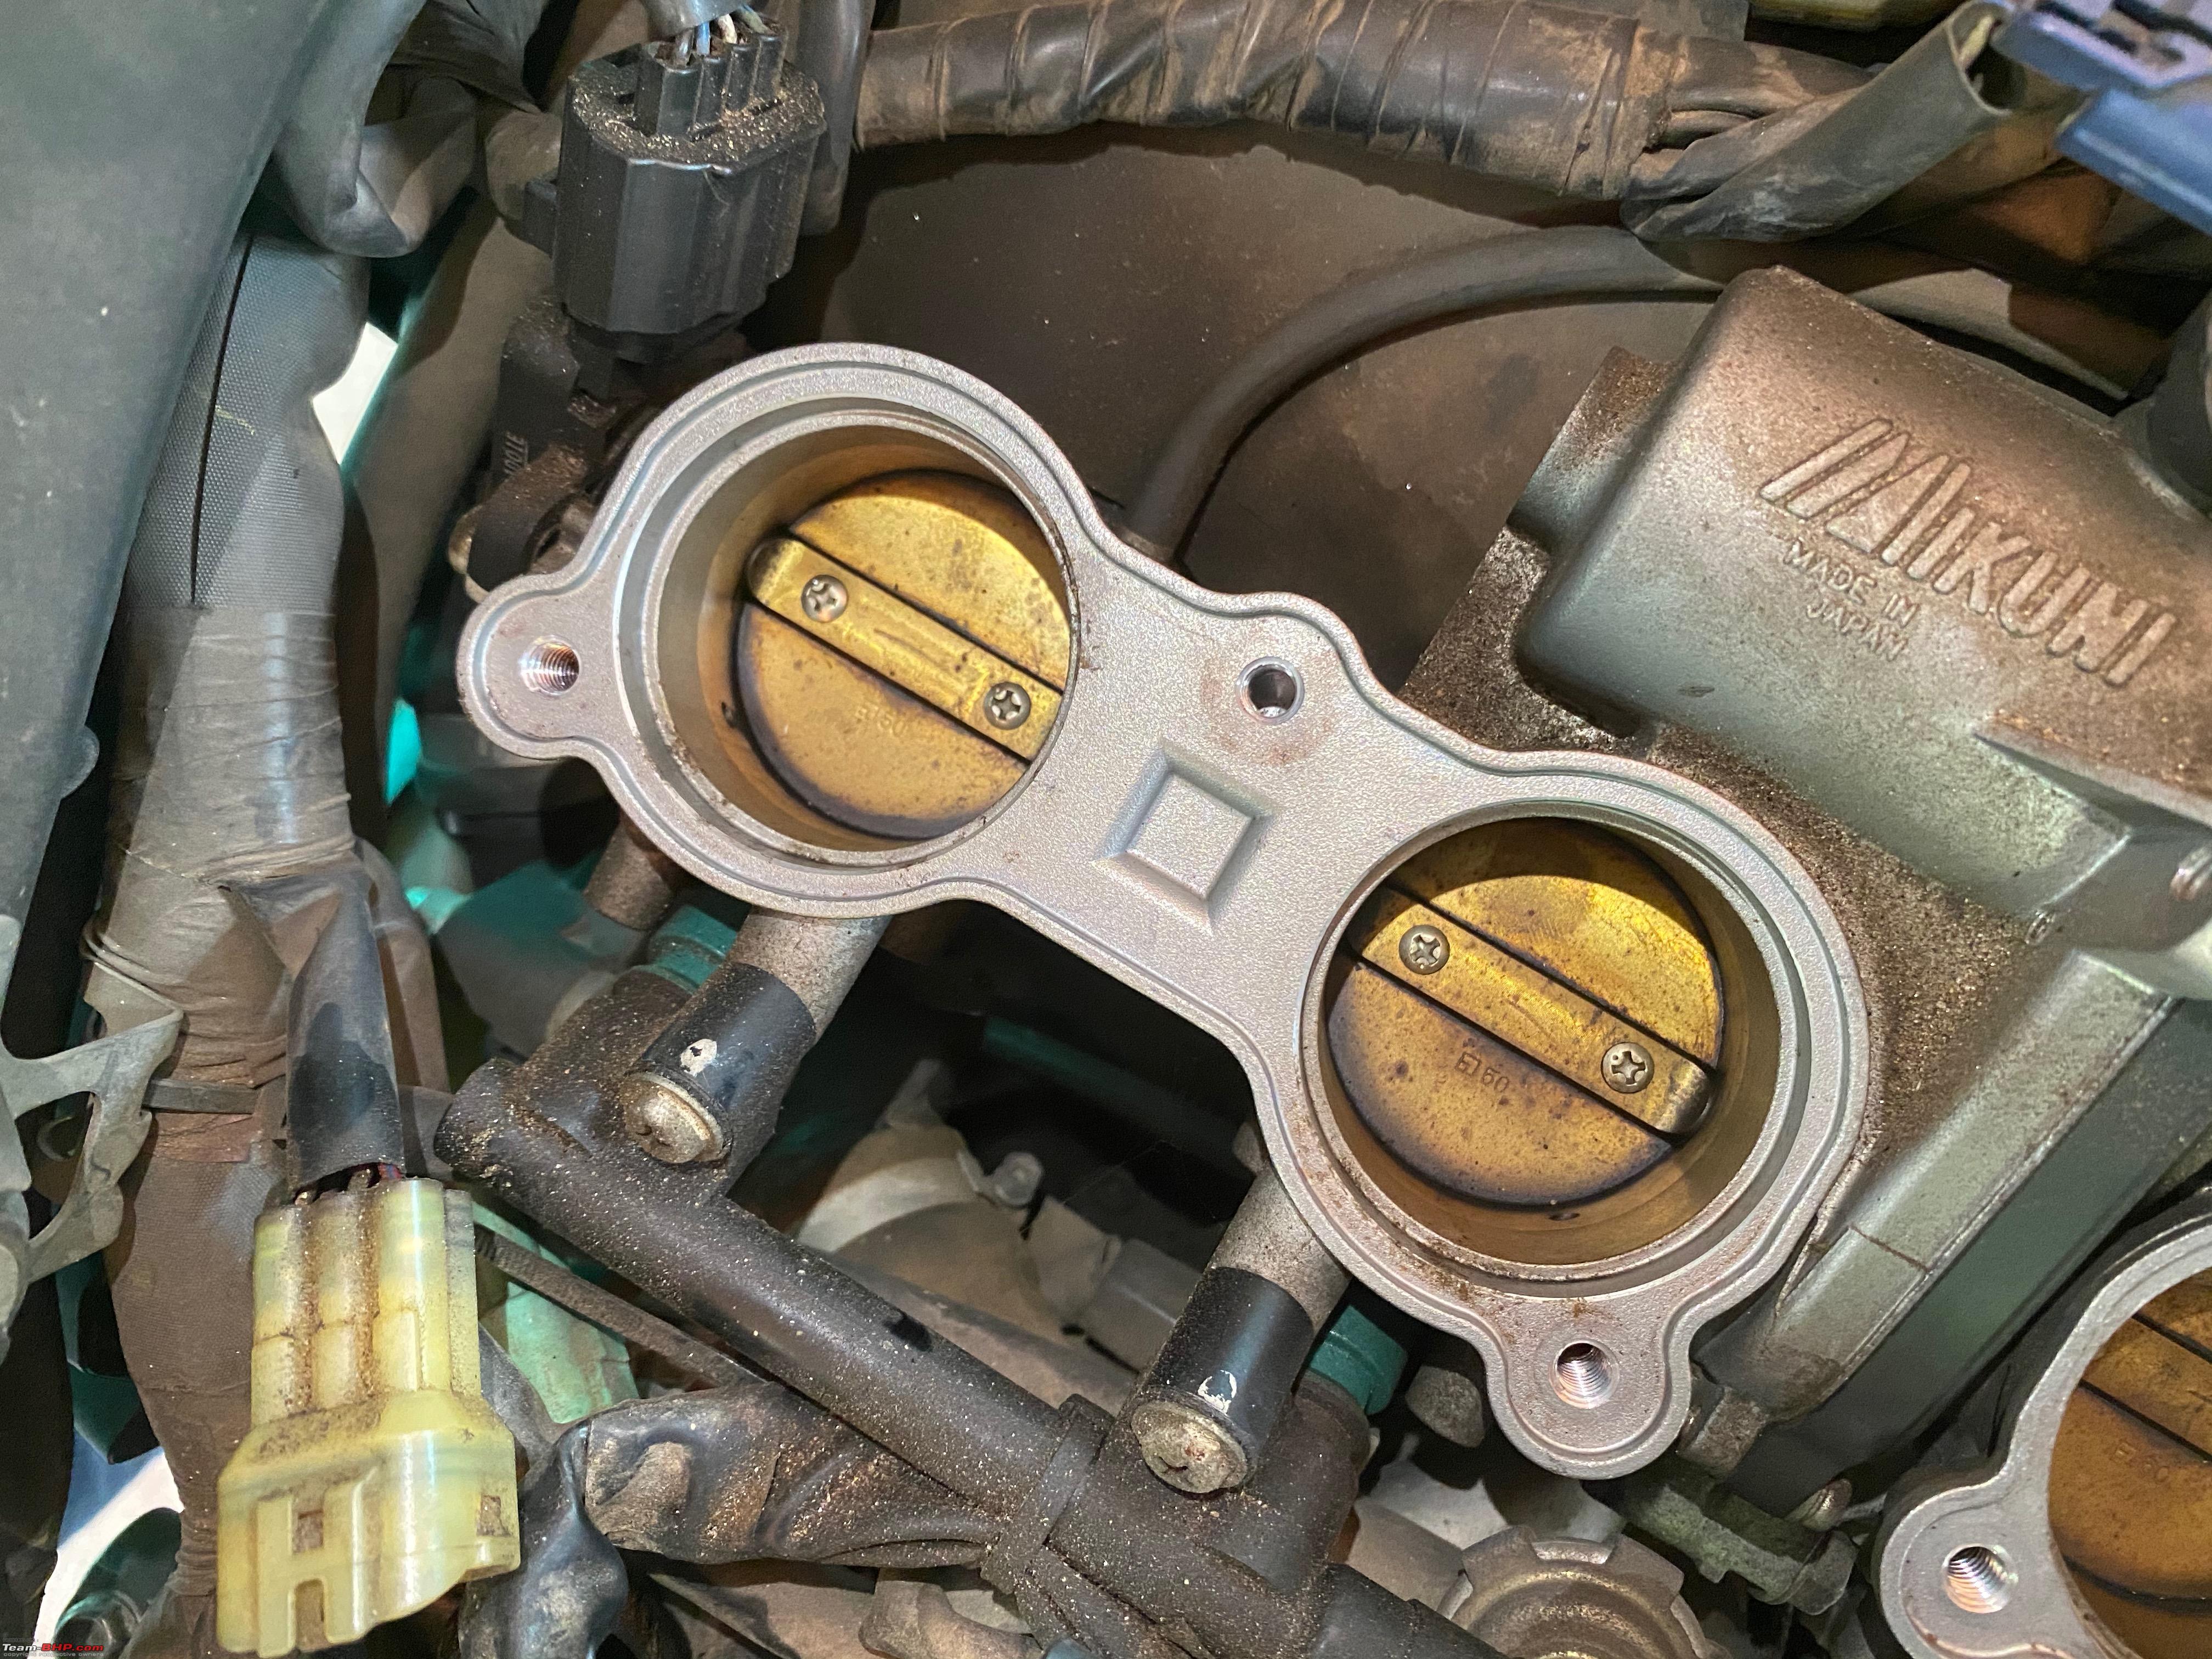 Bank 2 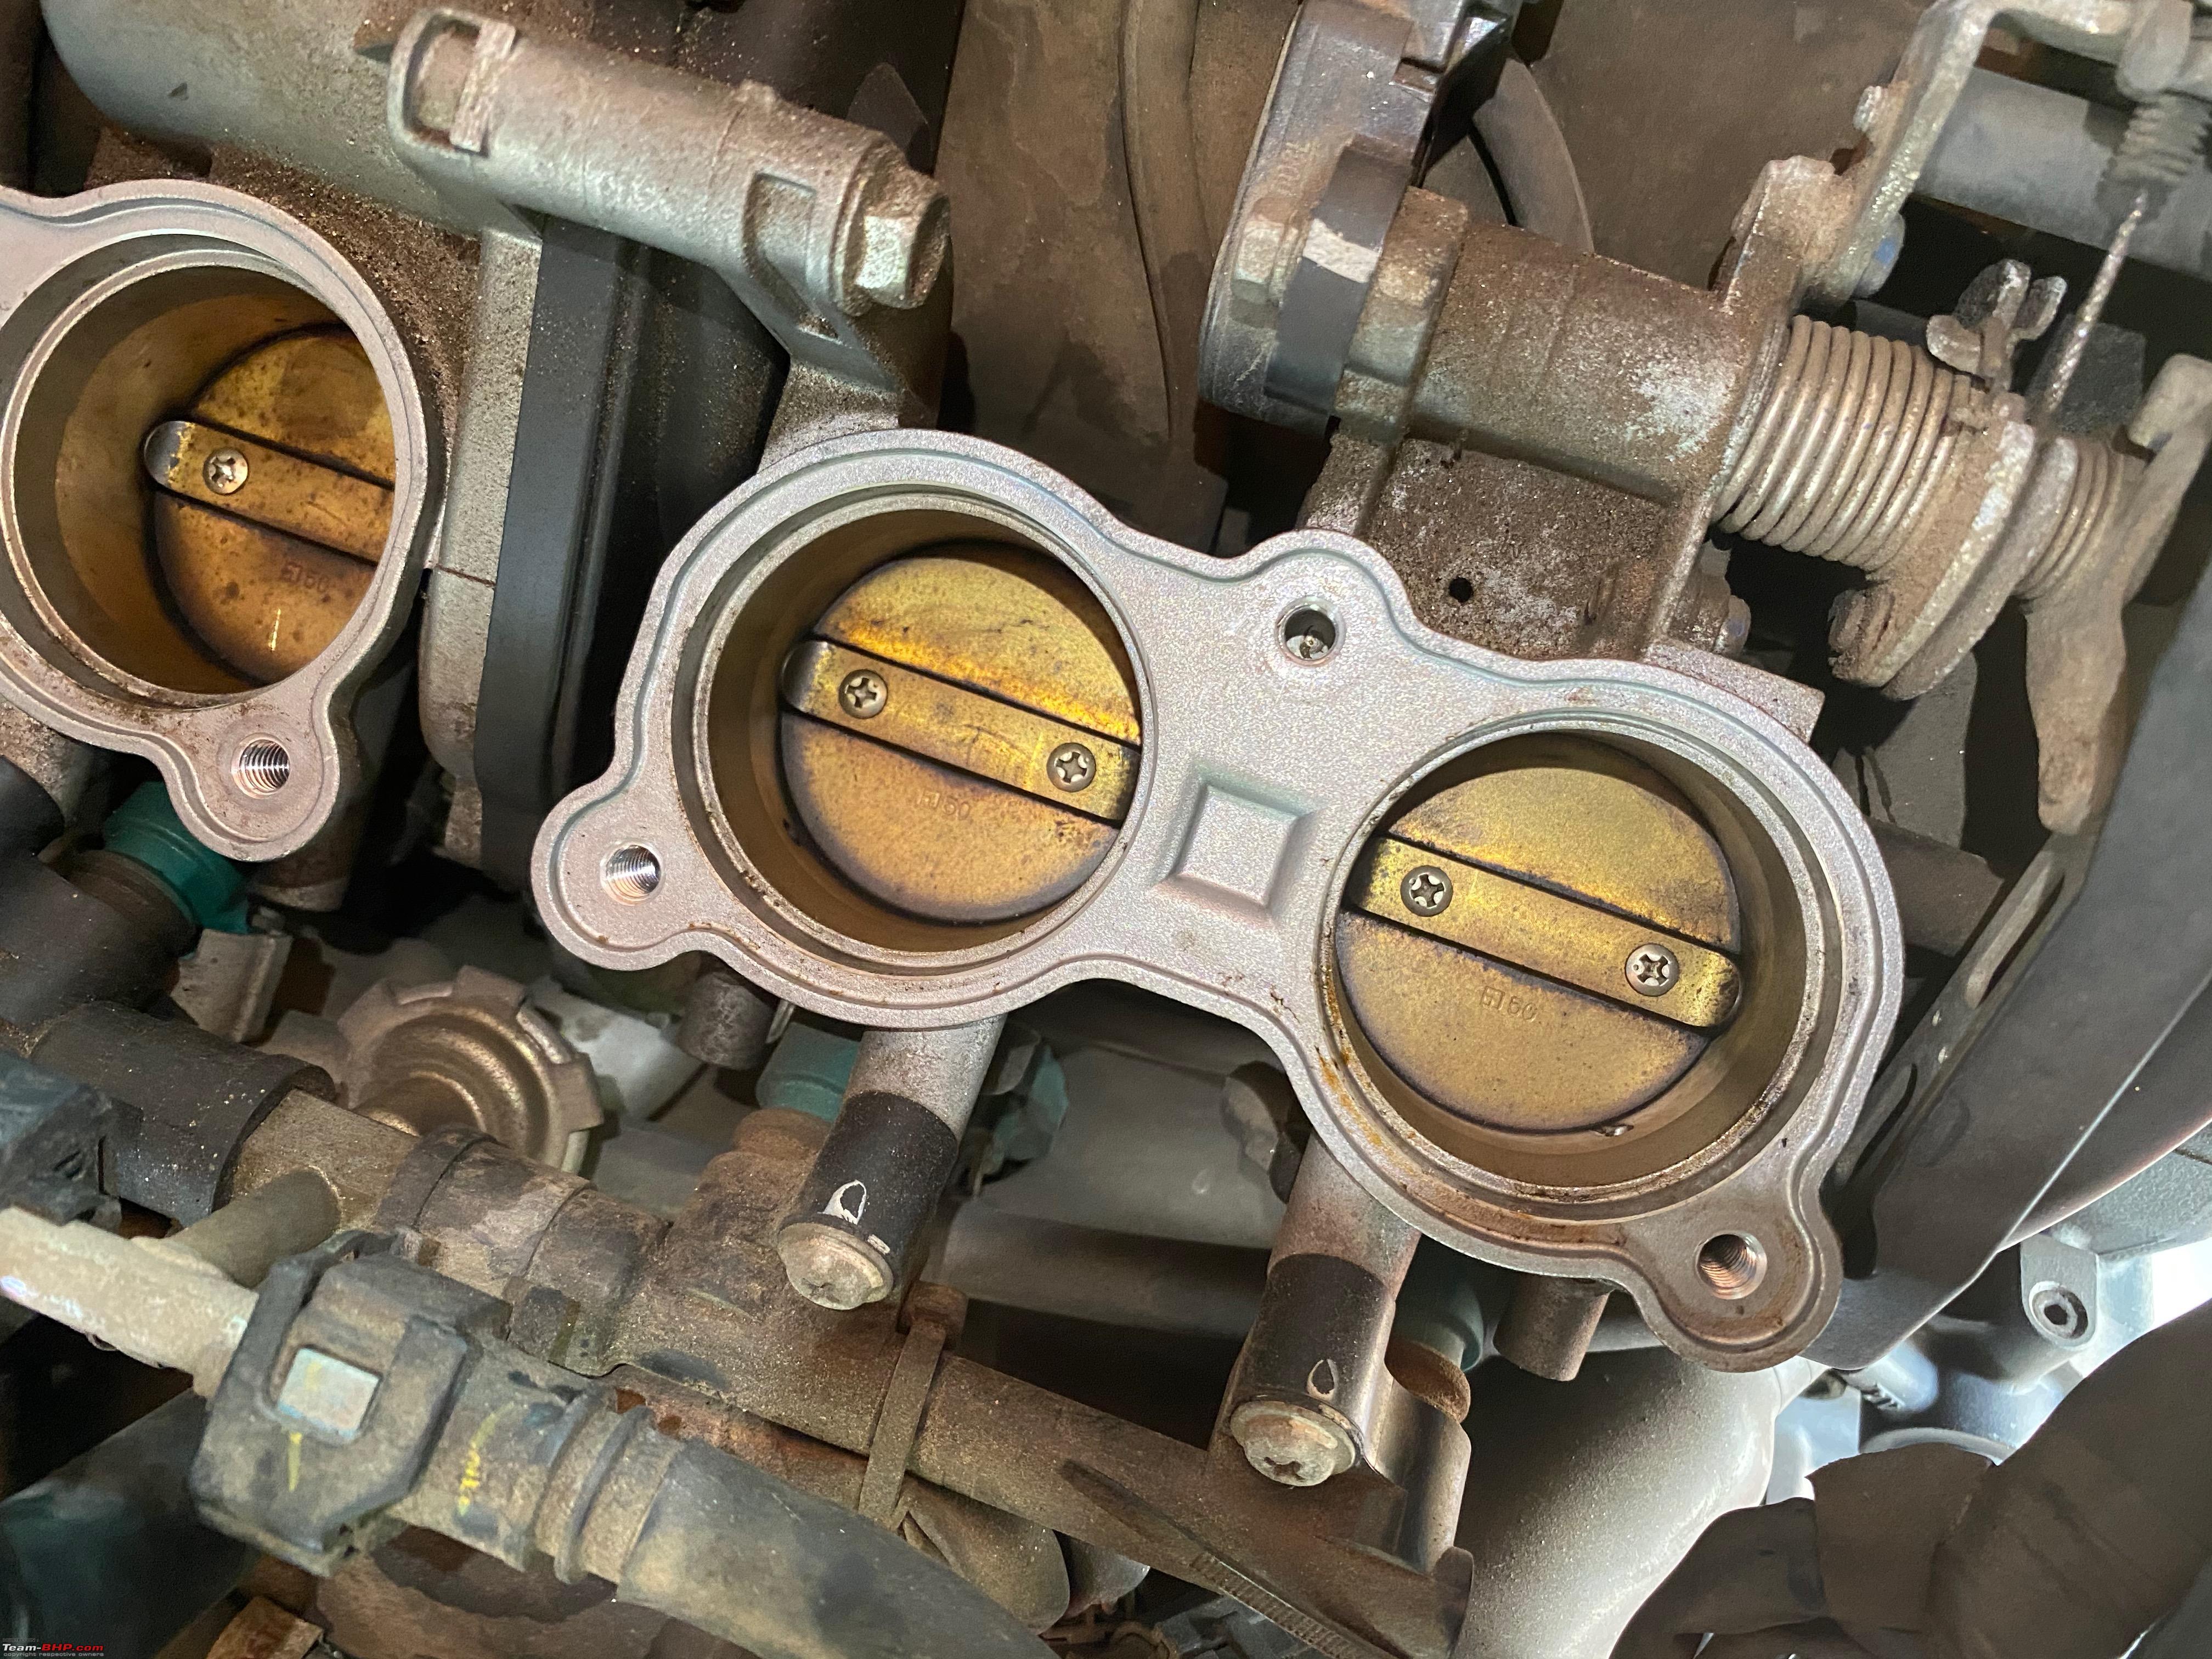 If you notice the markings on the fuel rail mounts you can see that it has never been removed before on this bike, the marking on the screws and the mount point are in the same place, unless it was removed before and marked by someone else, which I think is highly unlikely. Now on the R1 the throttle body valves are not directly controlled by the throttle cables unlike older bikes or bikes with no power mode selectors. Since this bike has a power mode selector there is a motor that controls the opening or closing of the throttle body valves. The throttle body is made by Mikuni 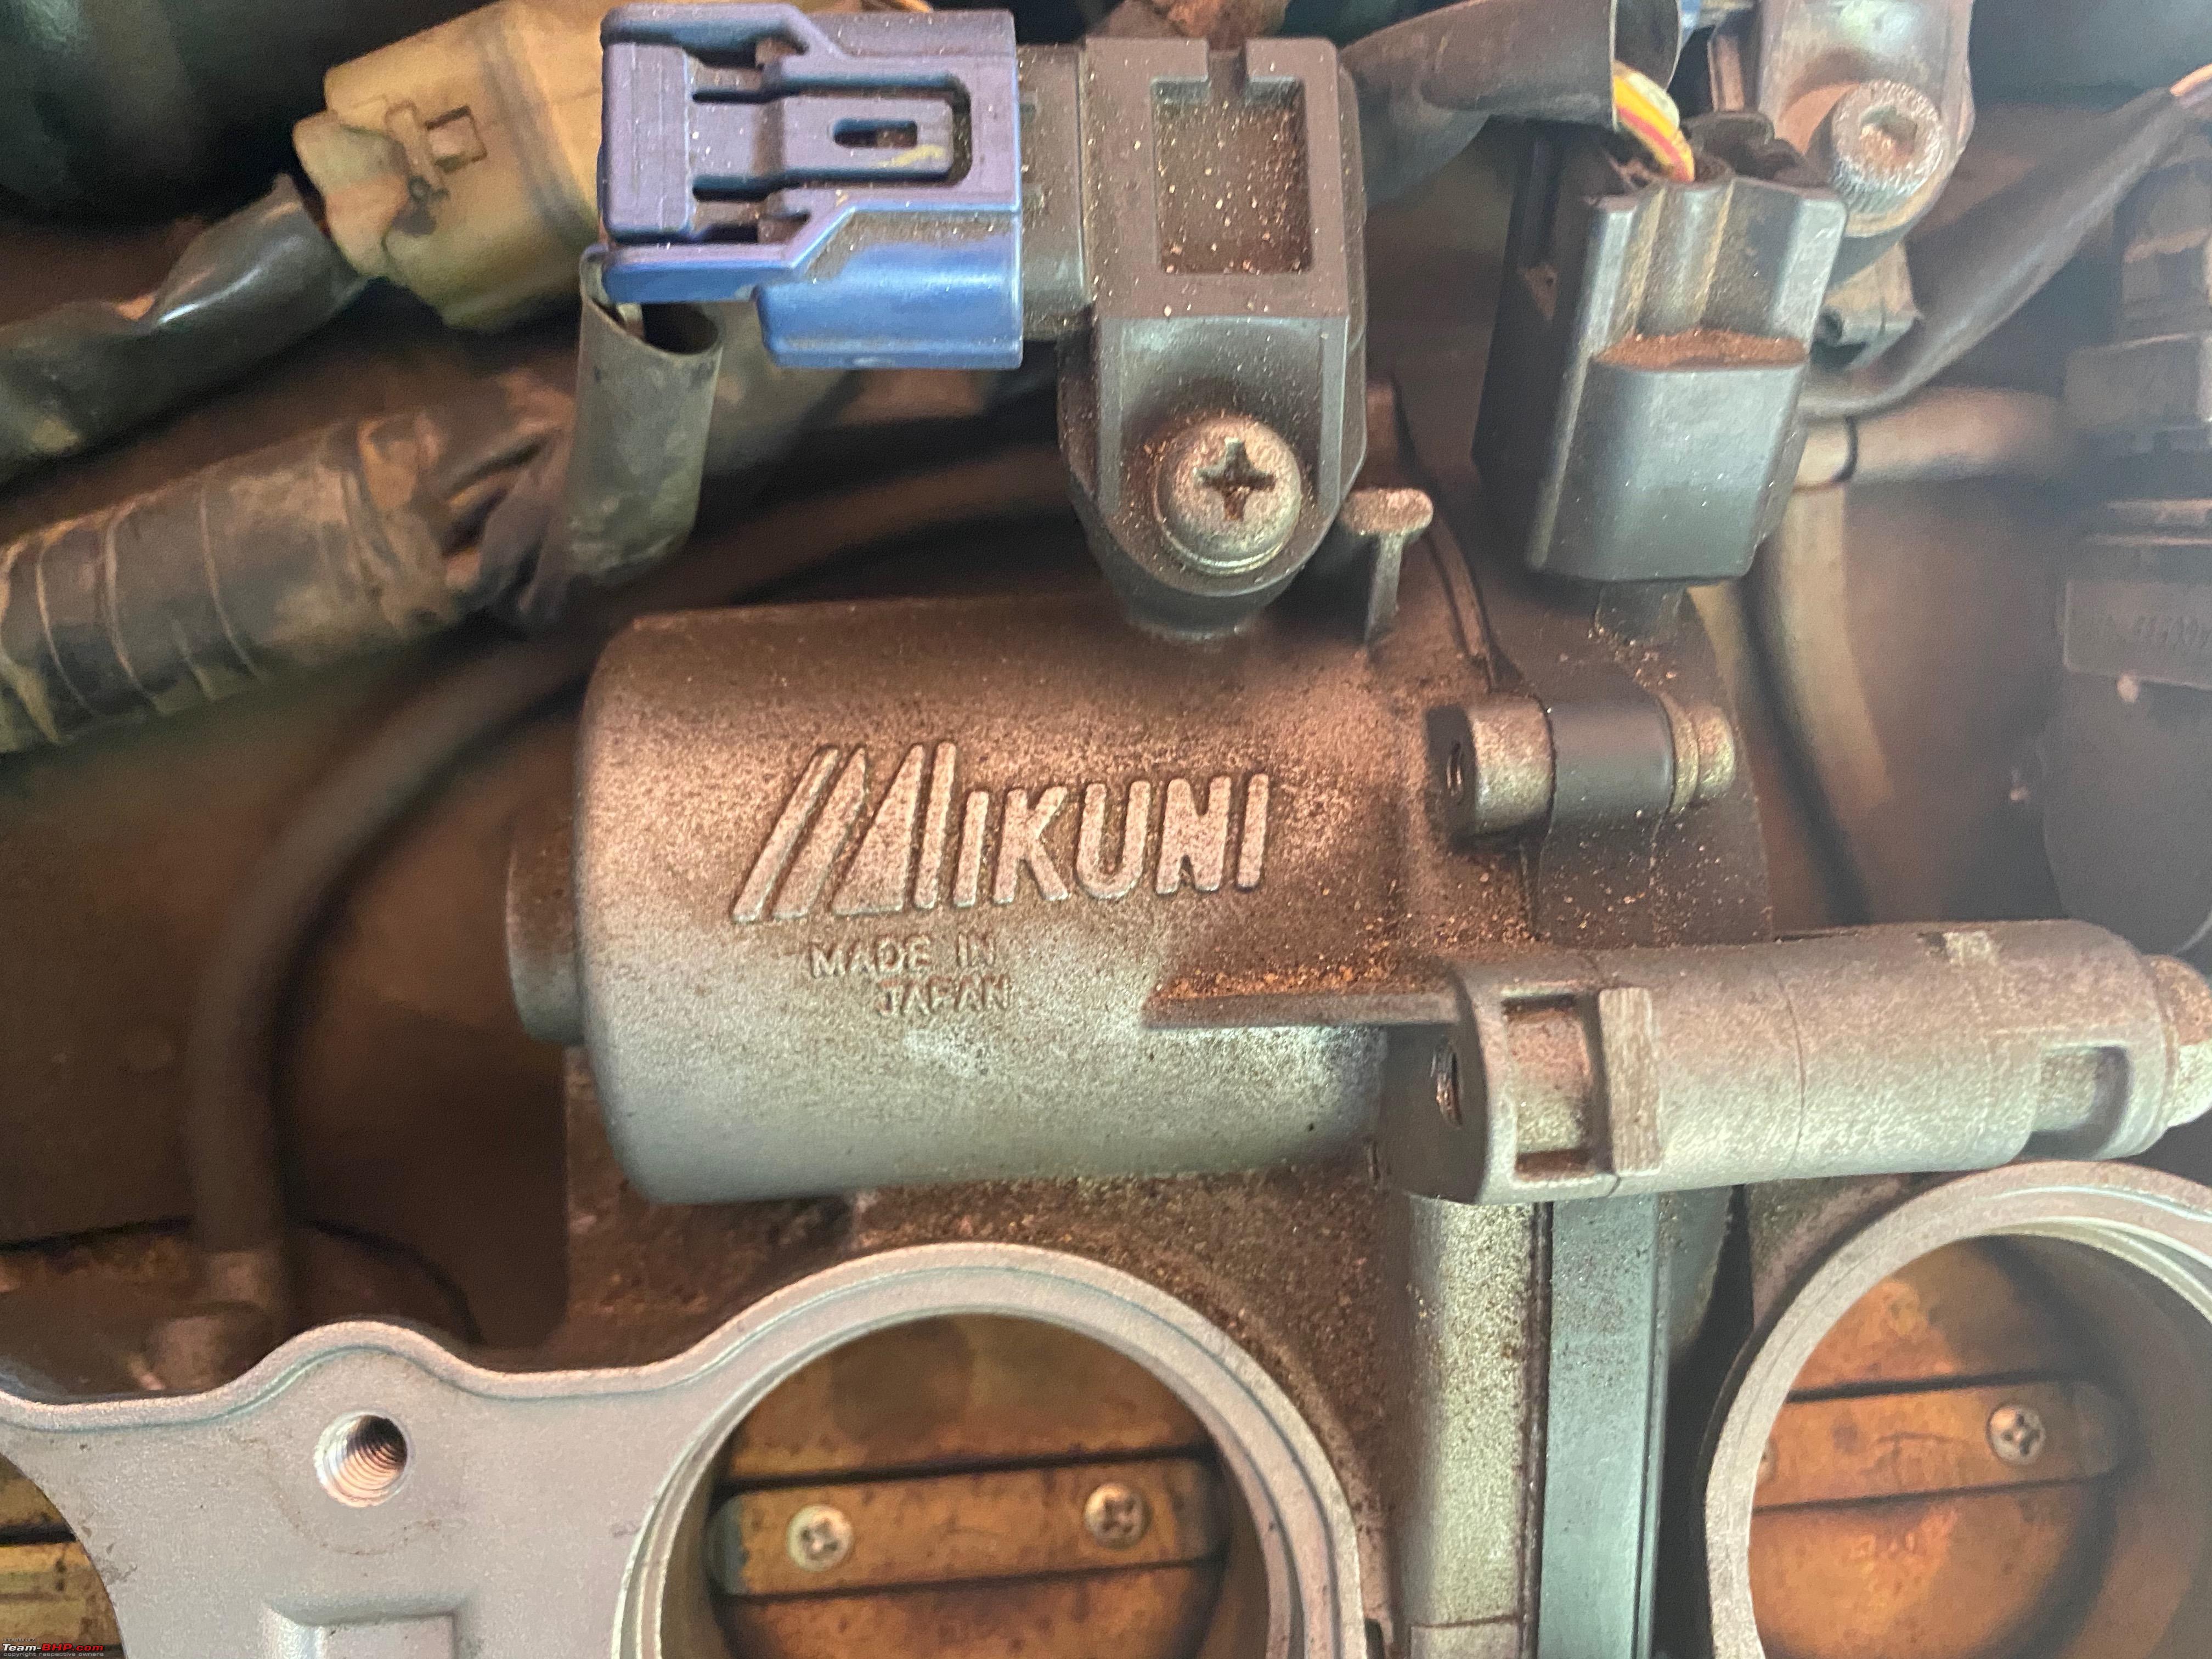 So when you swap between modes it is the ECU that decides the throttle response required and how much the TB valves need to be opened for the corresponding amount the physical throttle has been opened. For eg: In mode B 50% open throttle on the accelerator translated to less than 20%(Approx figures) of TB valve getting opened. Since you have access to the cables that the motor controls you can manually turn it to get the valves to open. 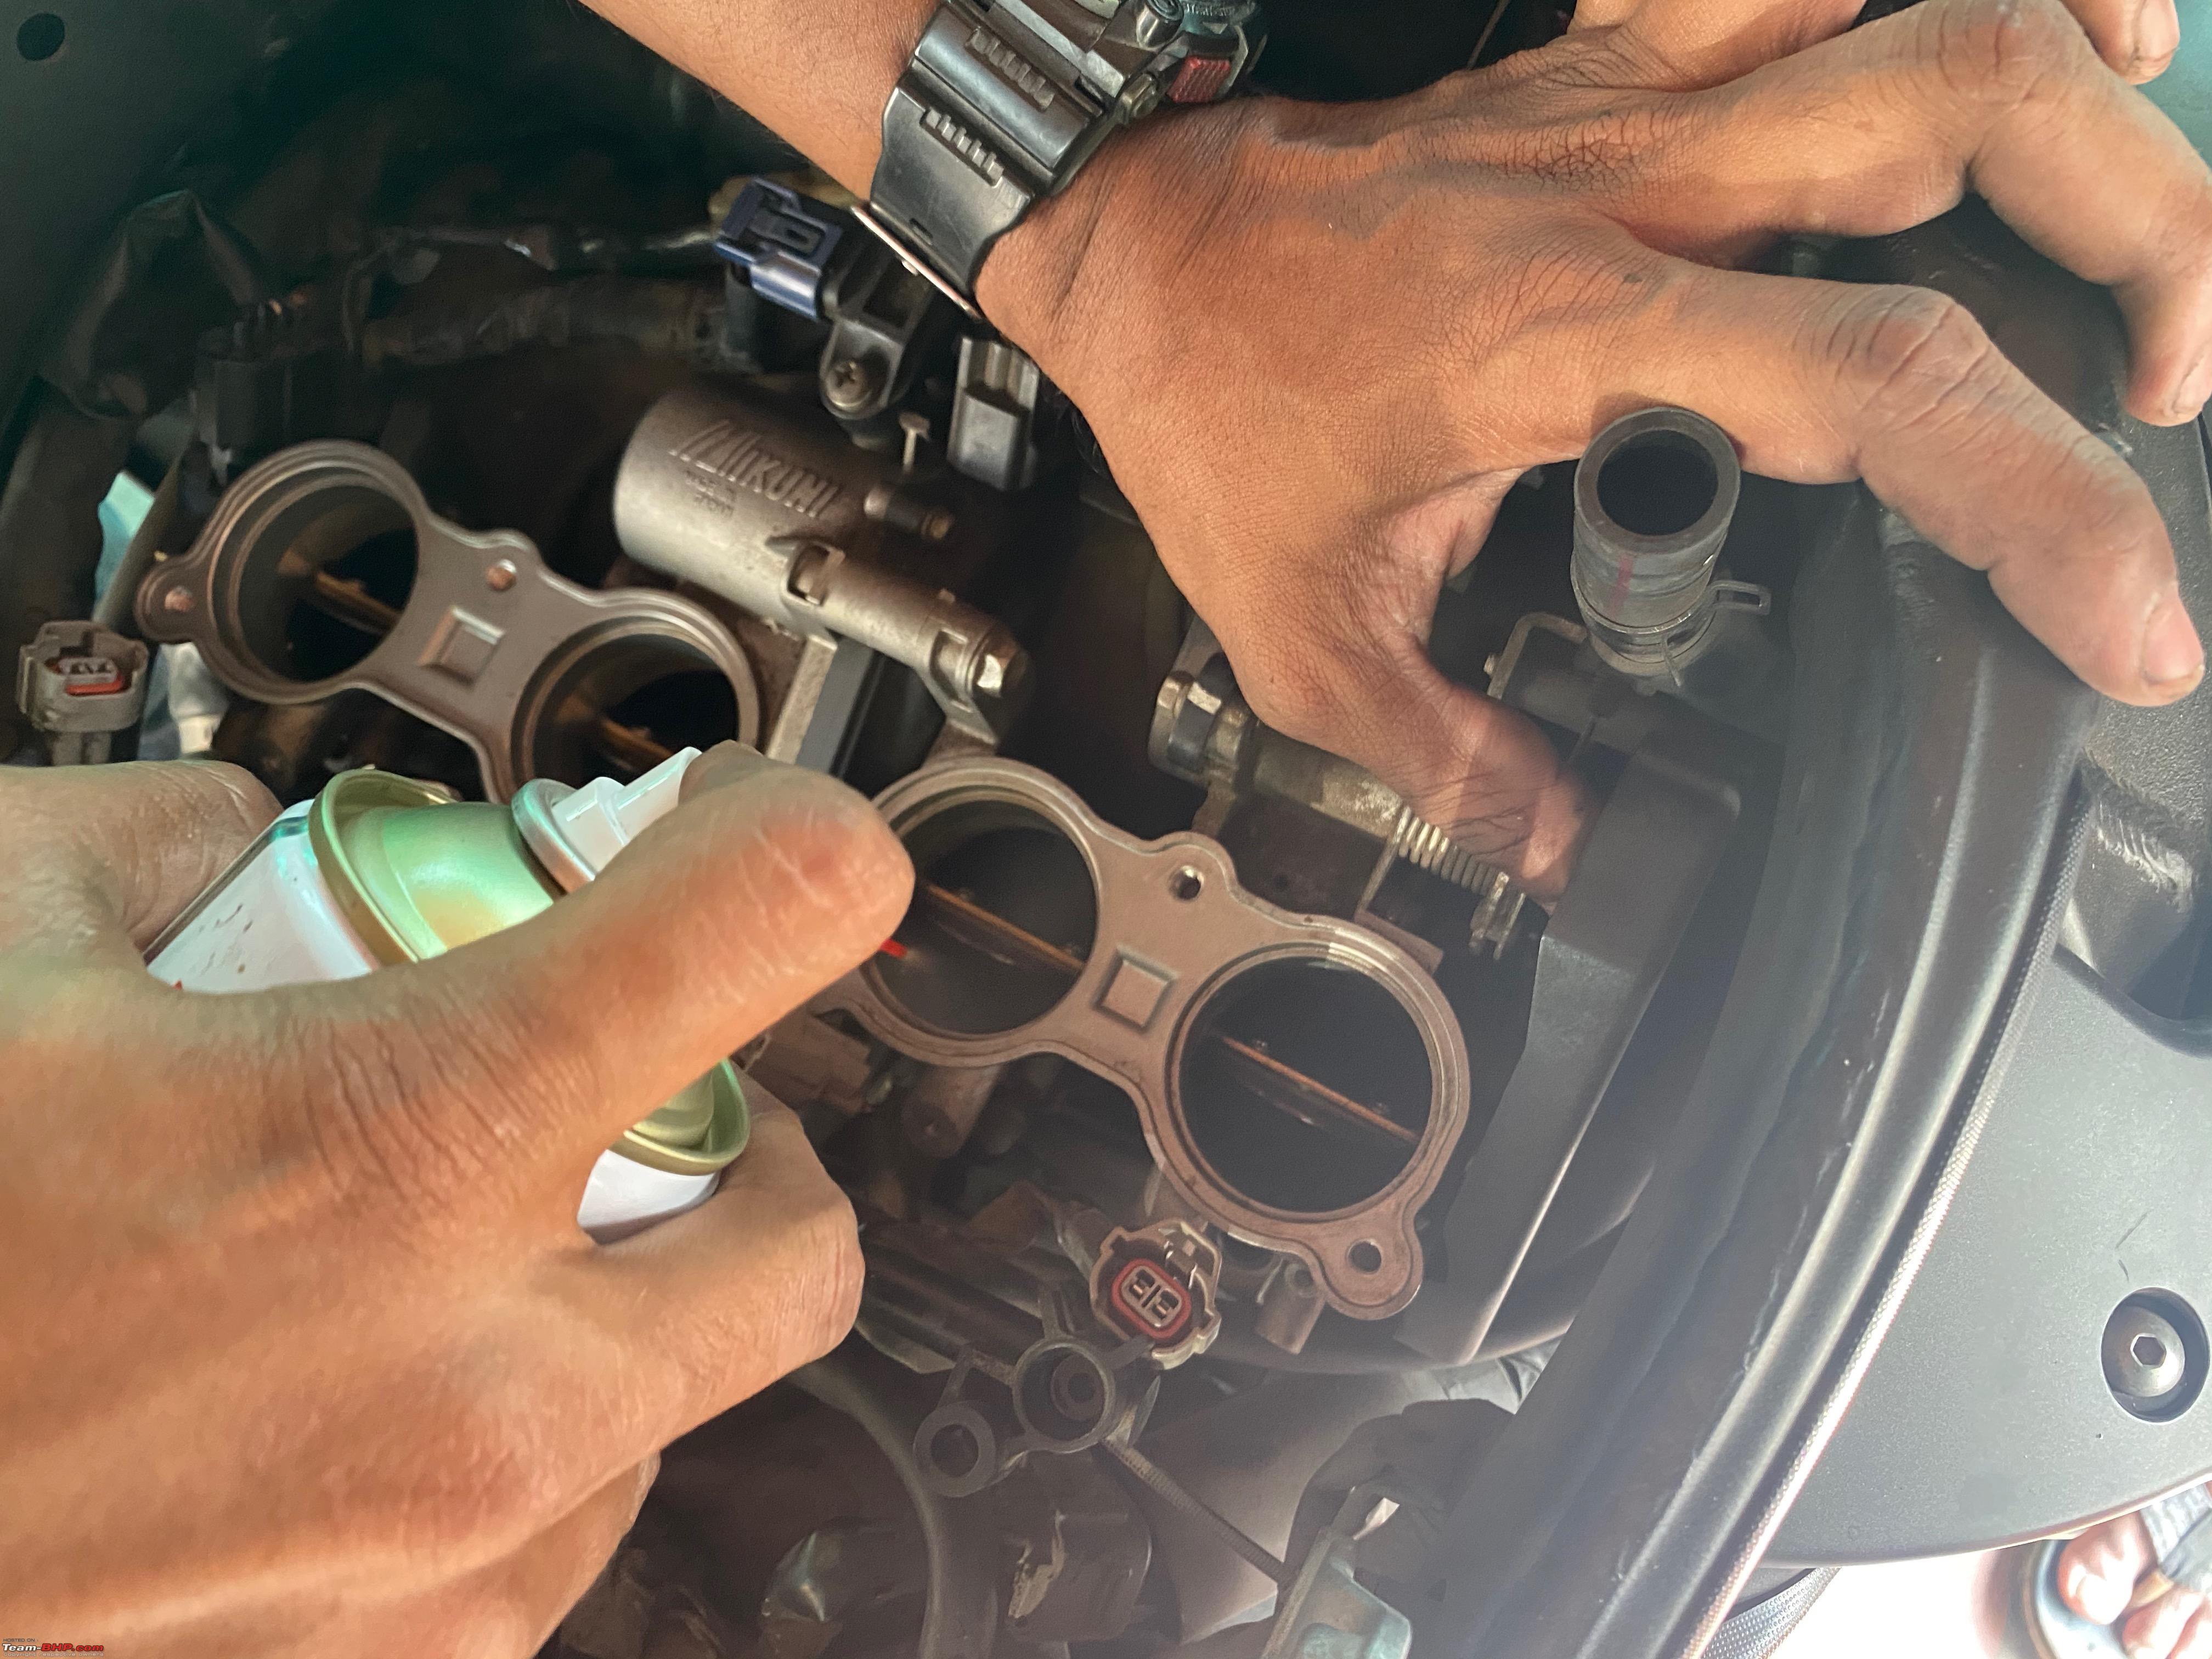 Next, you can see the underside of the valves and the state they are in. Just to make it clear the underside of the valves is also supposed to be golden in color but here you can see how covered in carbon it is right now. The whole valve when clean is supposed to be the same golden color throughout 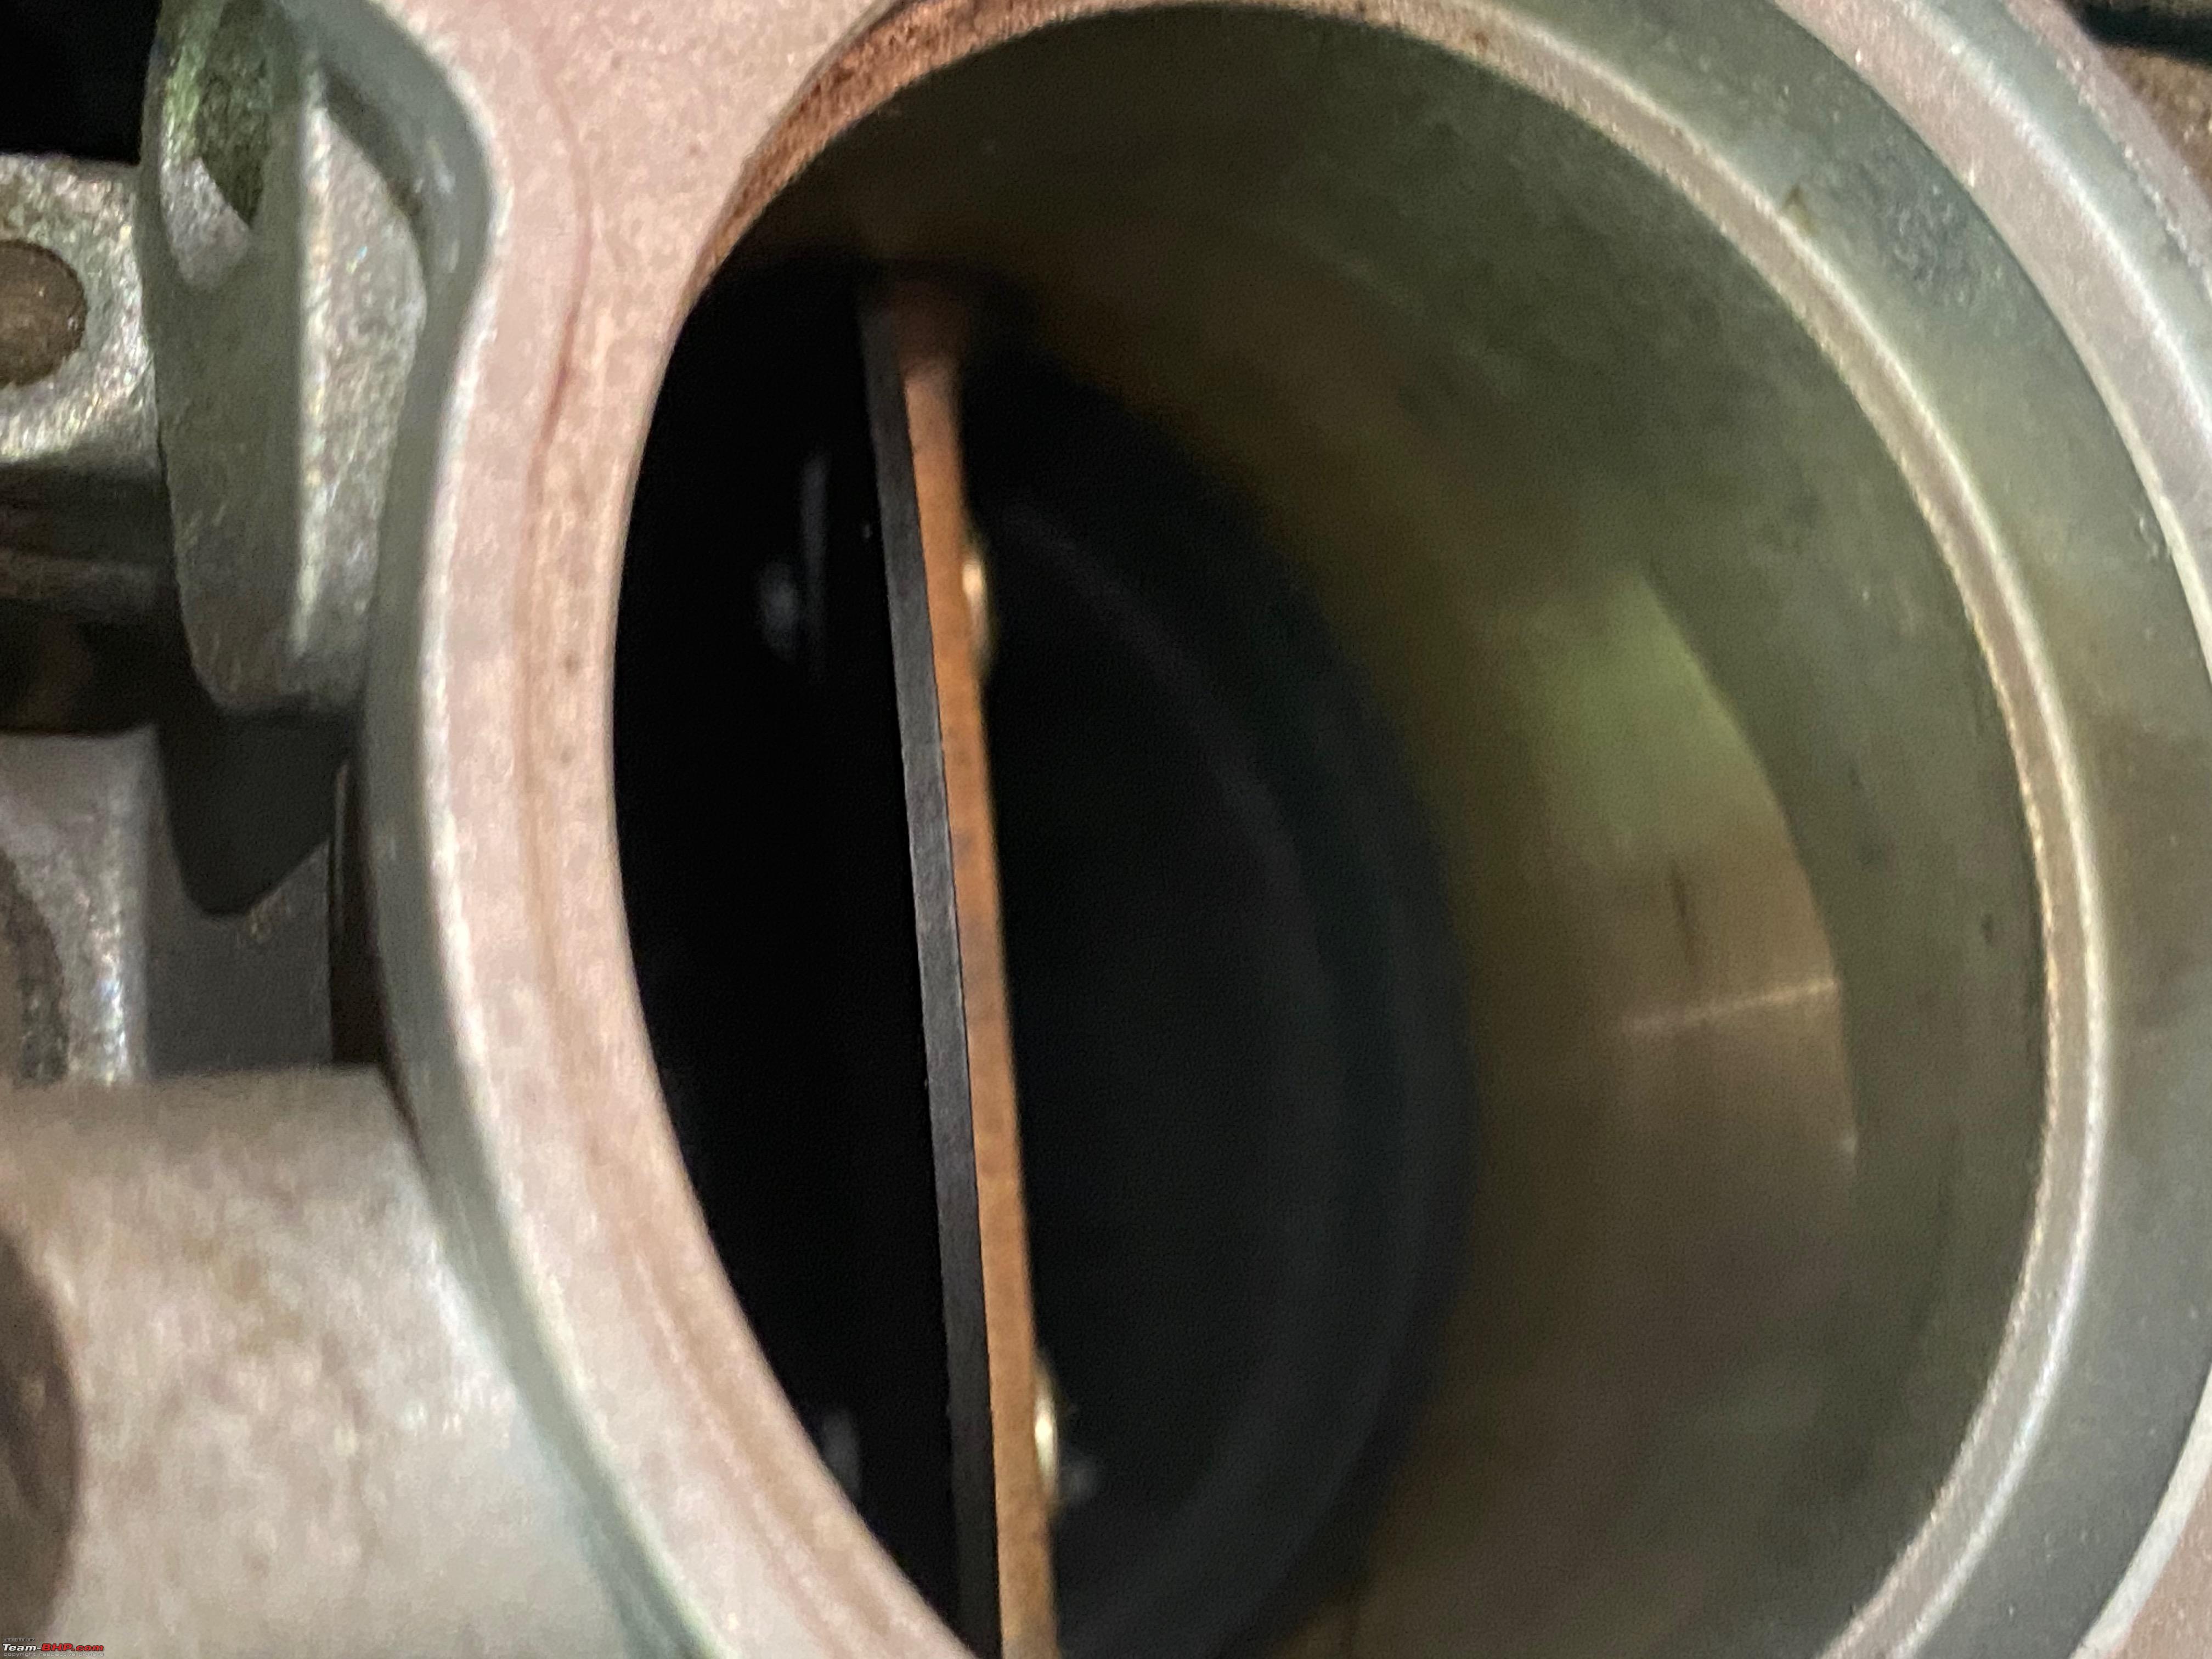 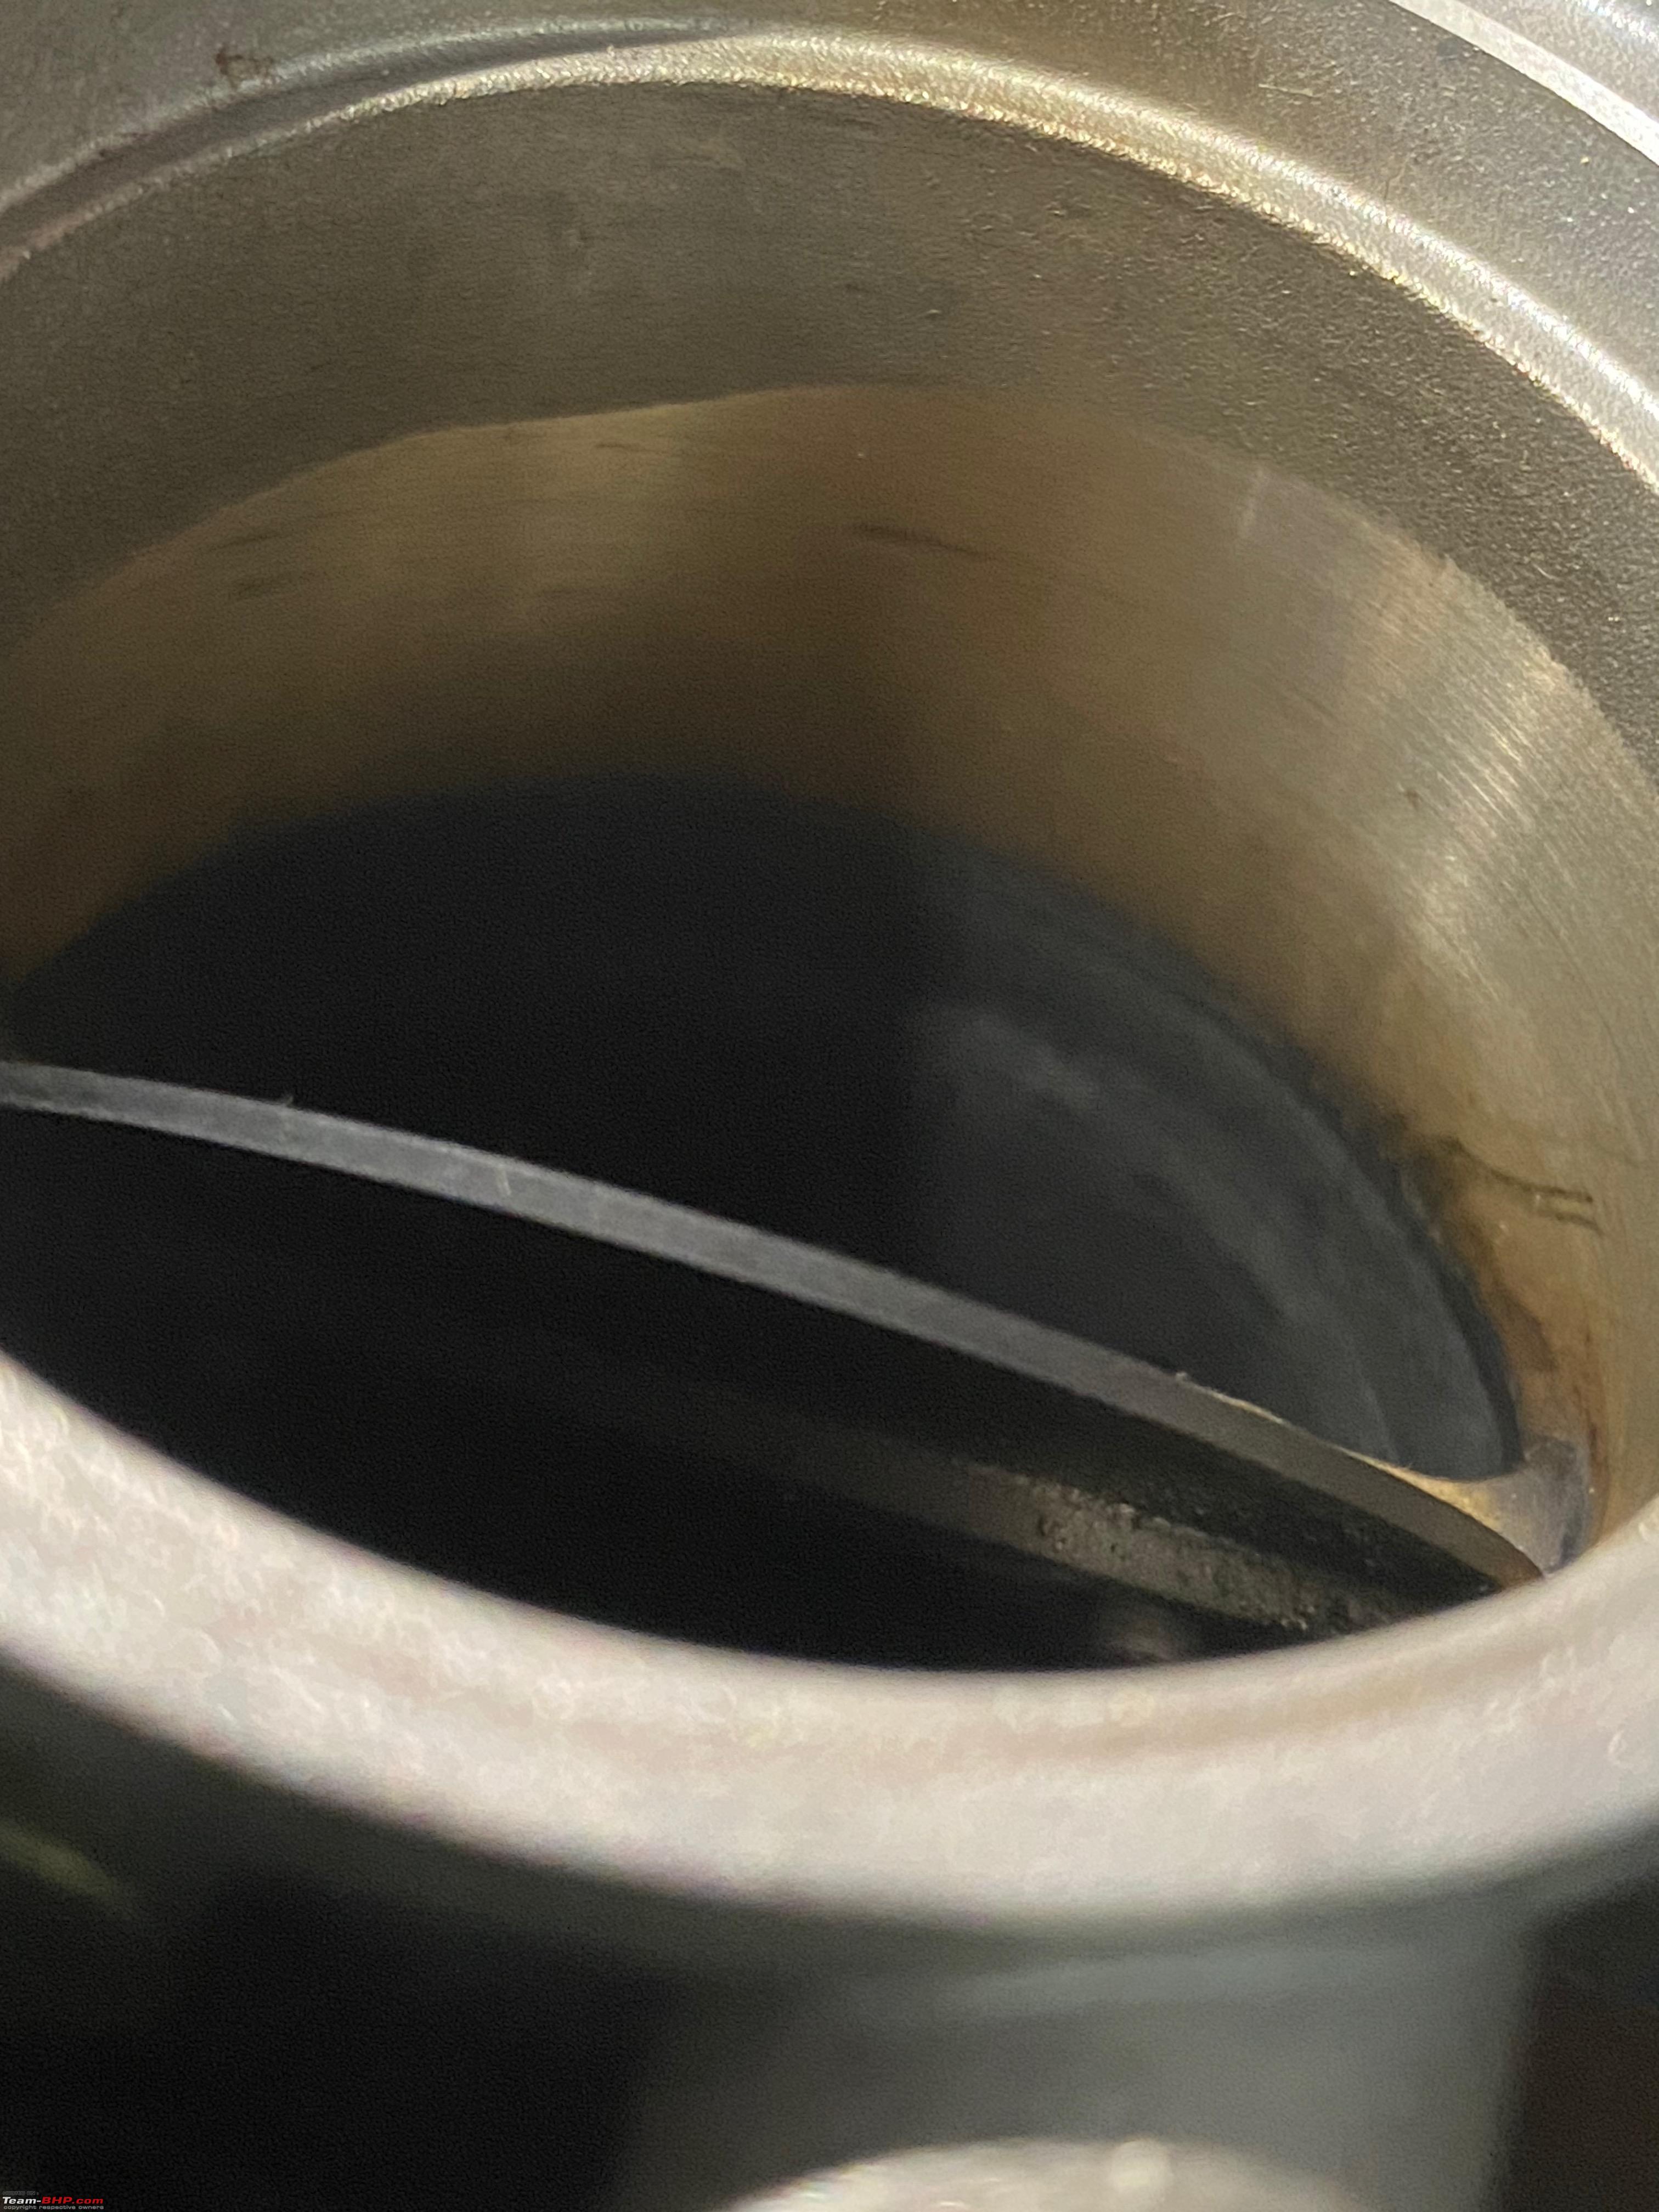 Next, we started spraying each valve on the throttle body with a generous amount of throttle body cleaner which just instantly started to displace all the gunk that is there in the TB. Throttle Body cleaner being used 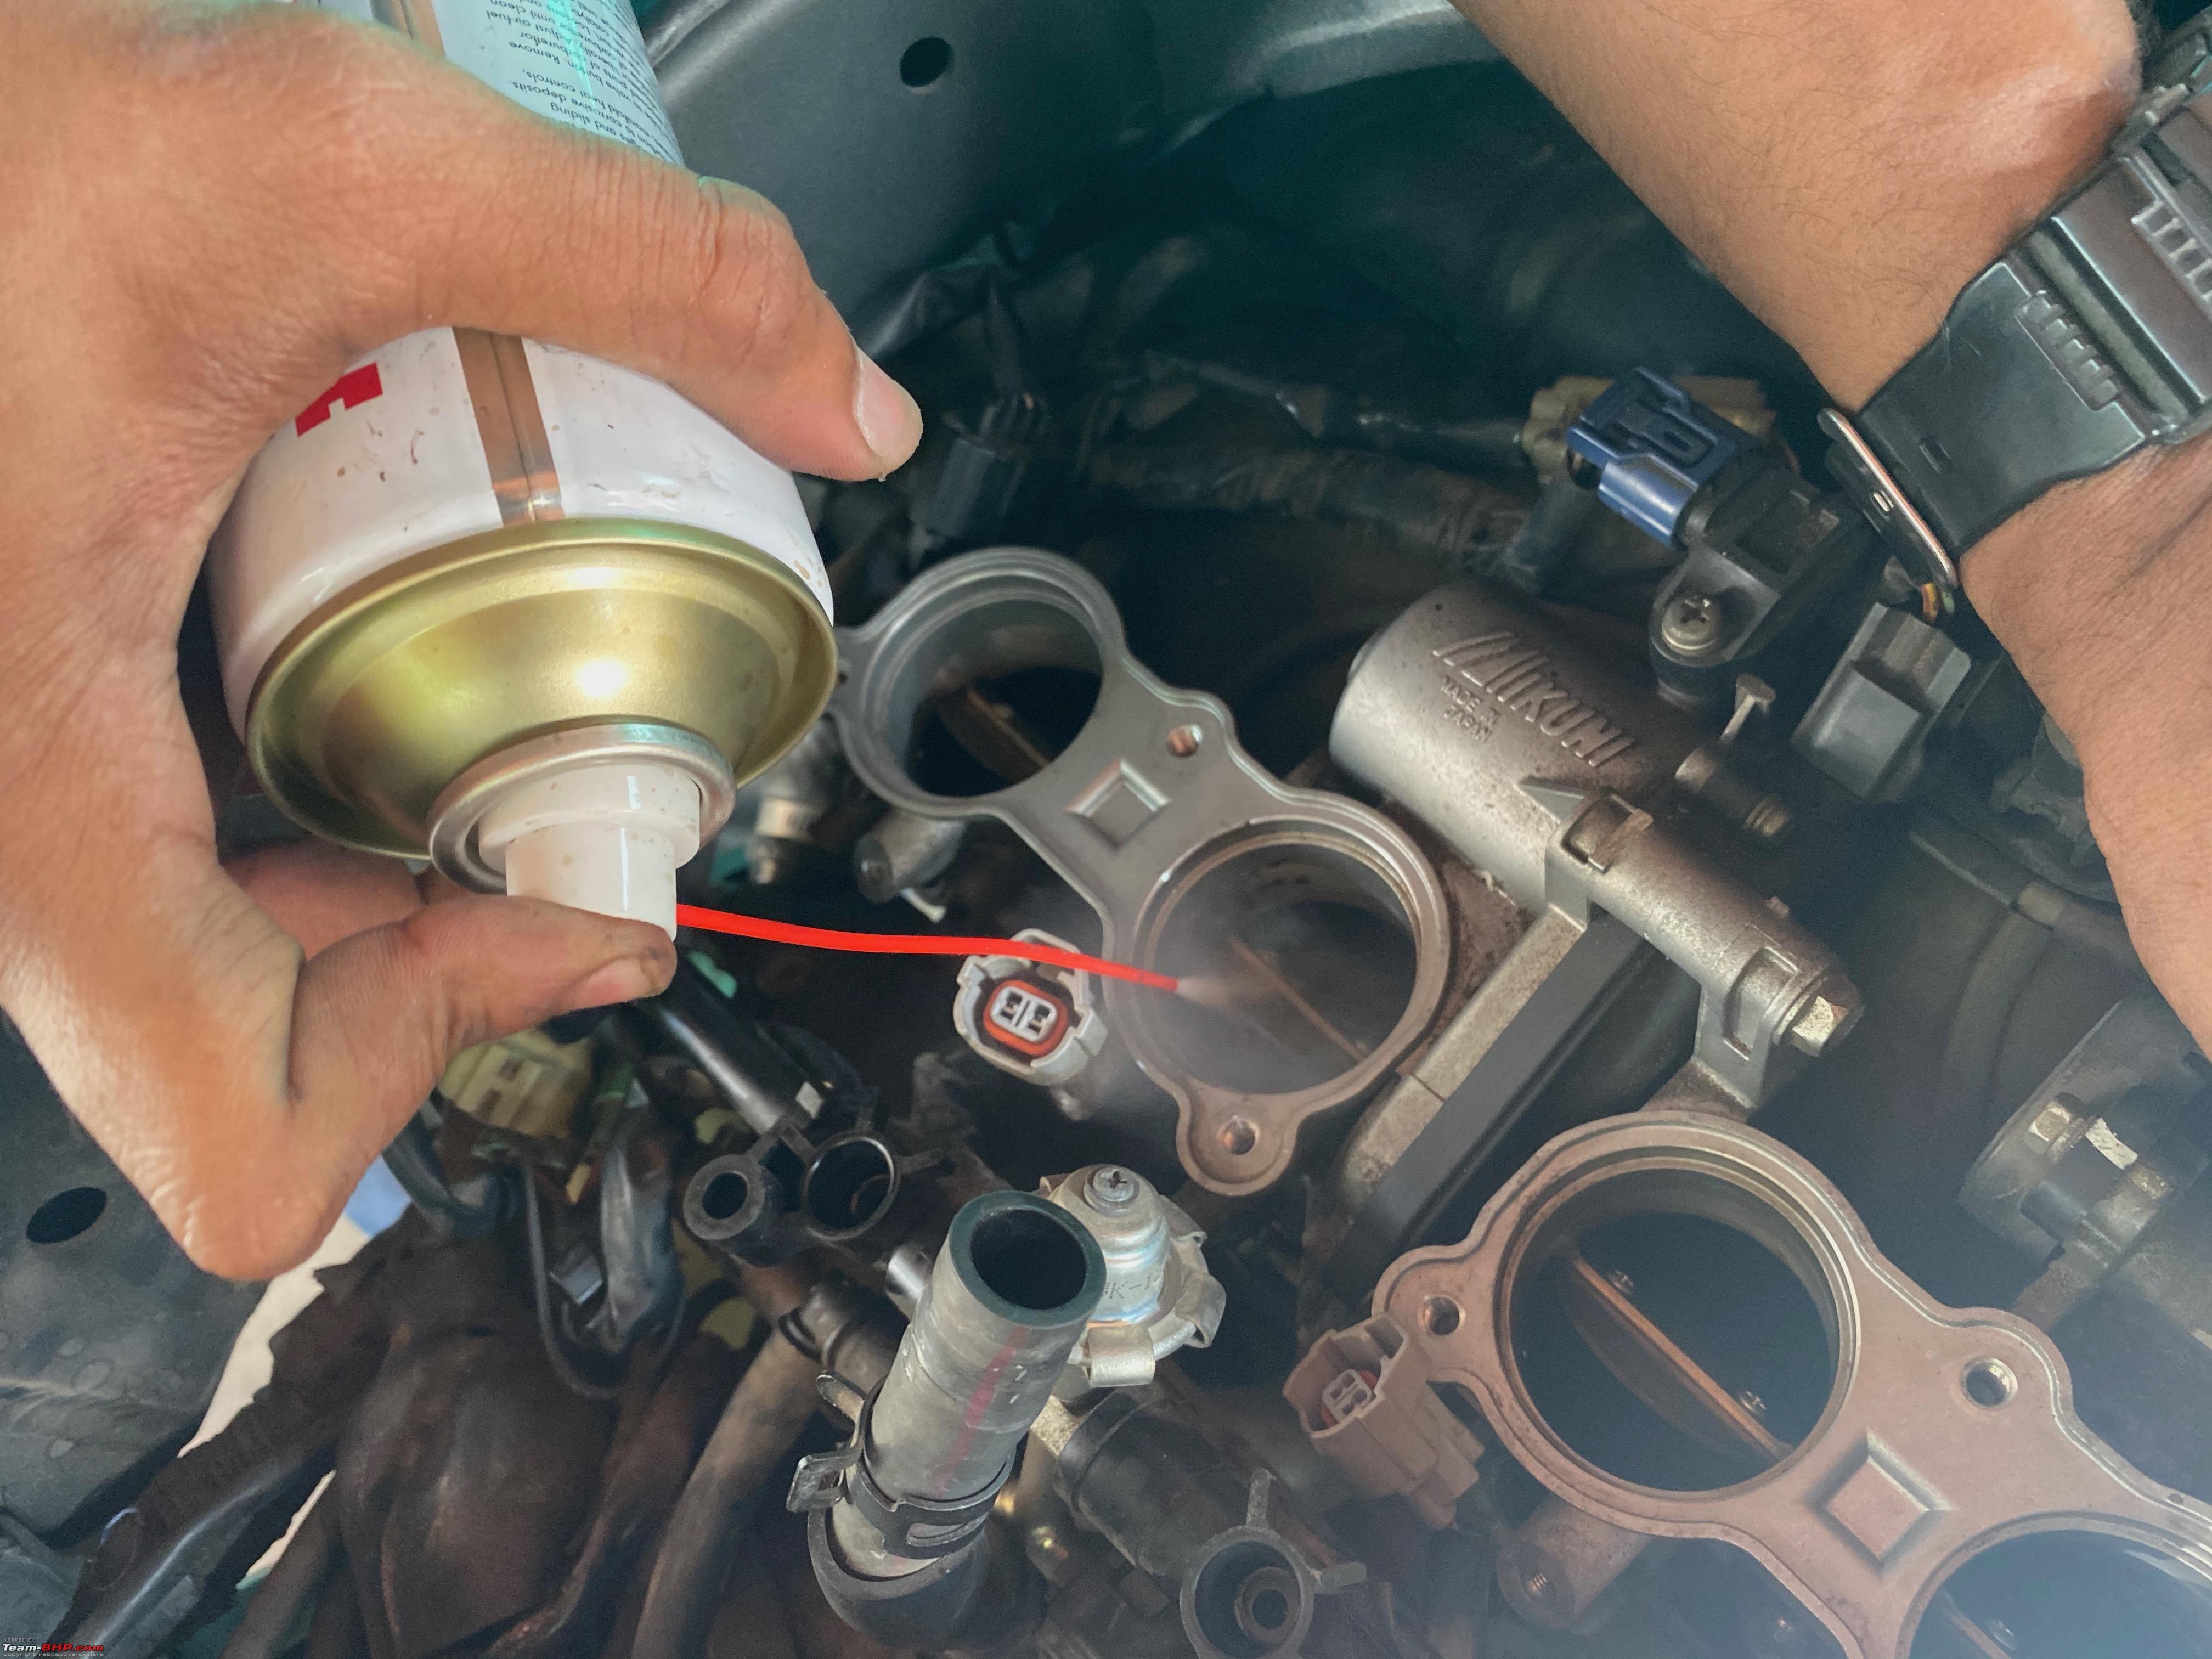 Look at the carbon buildup that was in there 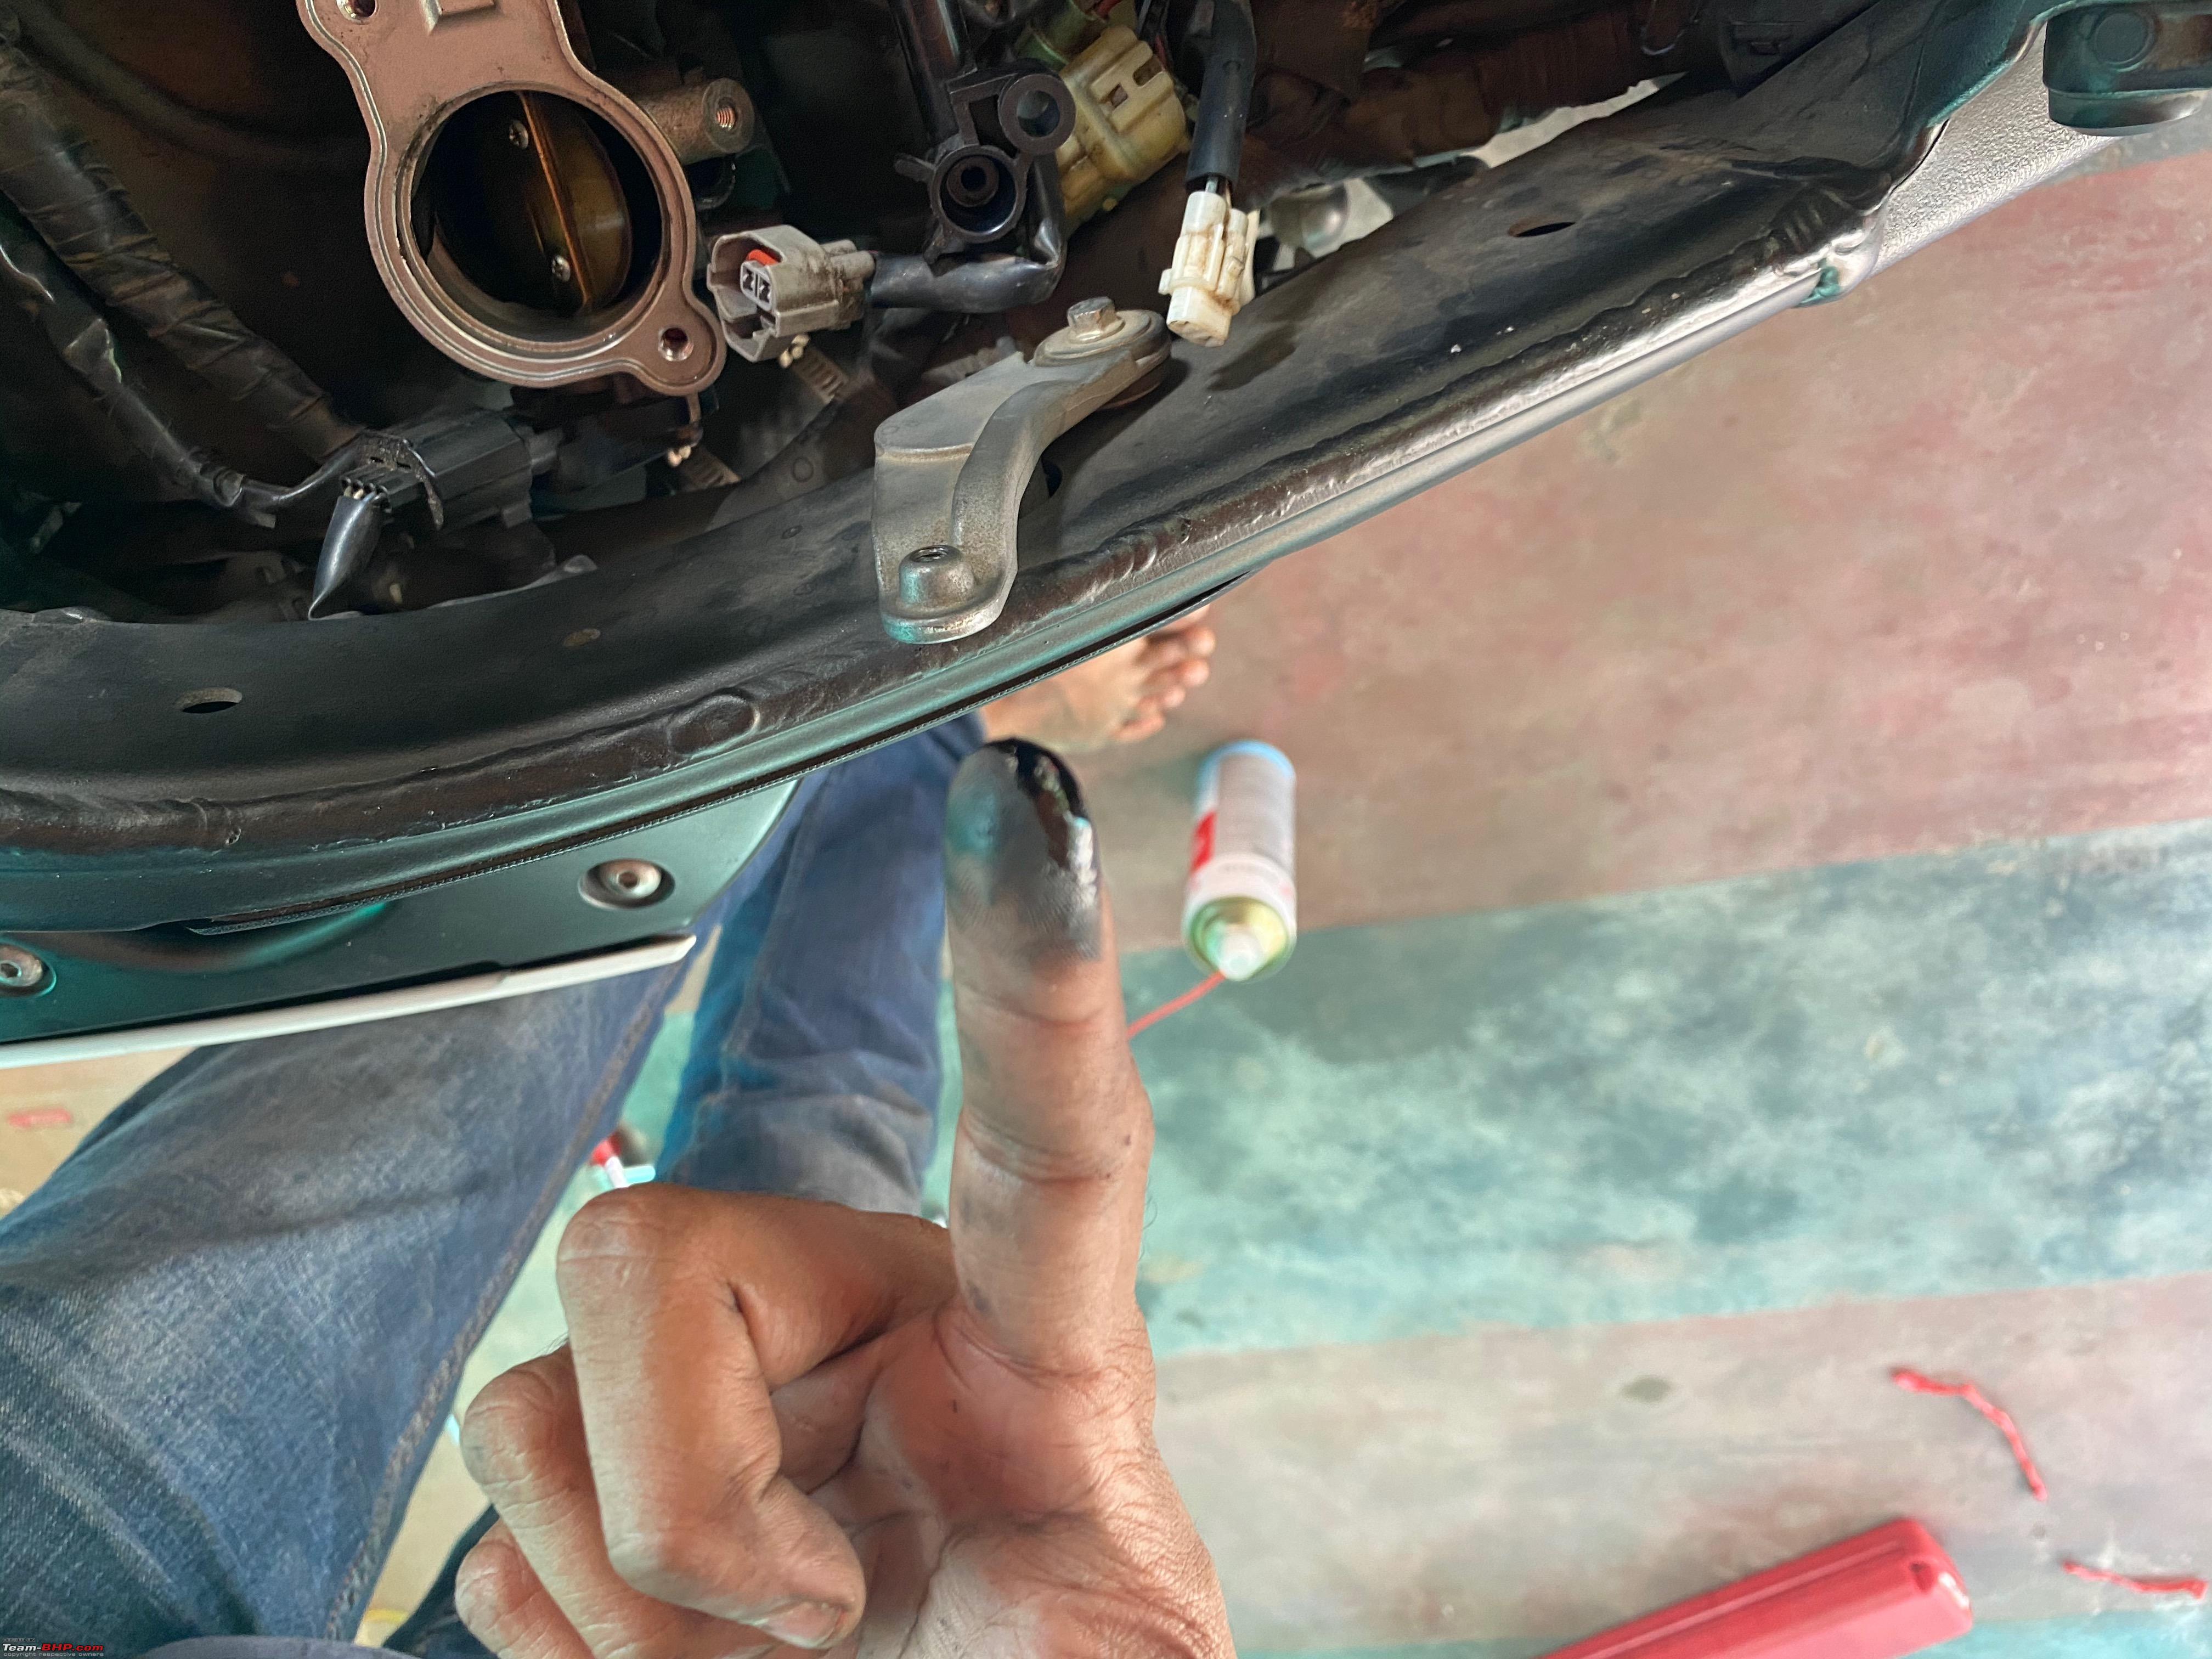 Getting there  P.S: One negative side of not removing the TB off the bike while doing this is that all that gunk and fluid goes into your combustion chamber and it can very easily flood the combustion chamber if you are not careful about how much fluid you use. I know I said we used it generously but we still keep this in mind while doing it, it's important to remember there is always a point where it becomes too much. Agitating the stubborn carbon deposits with a Q tip 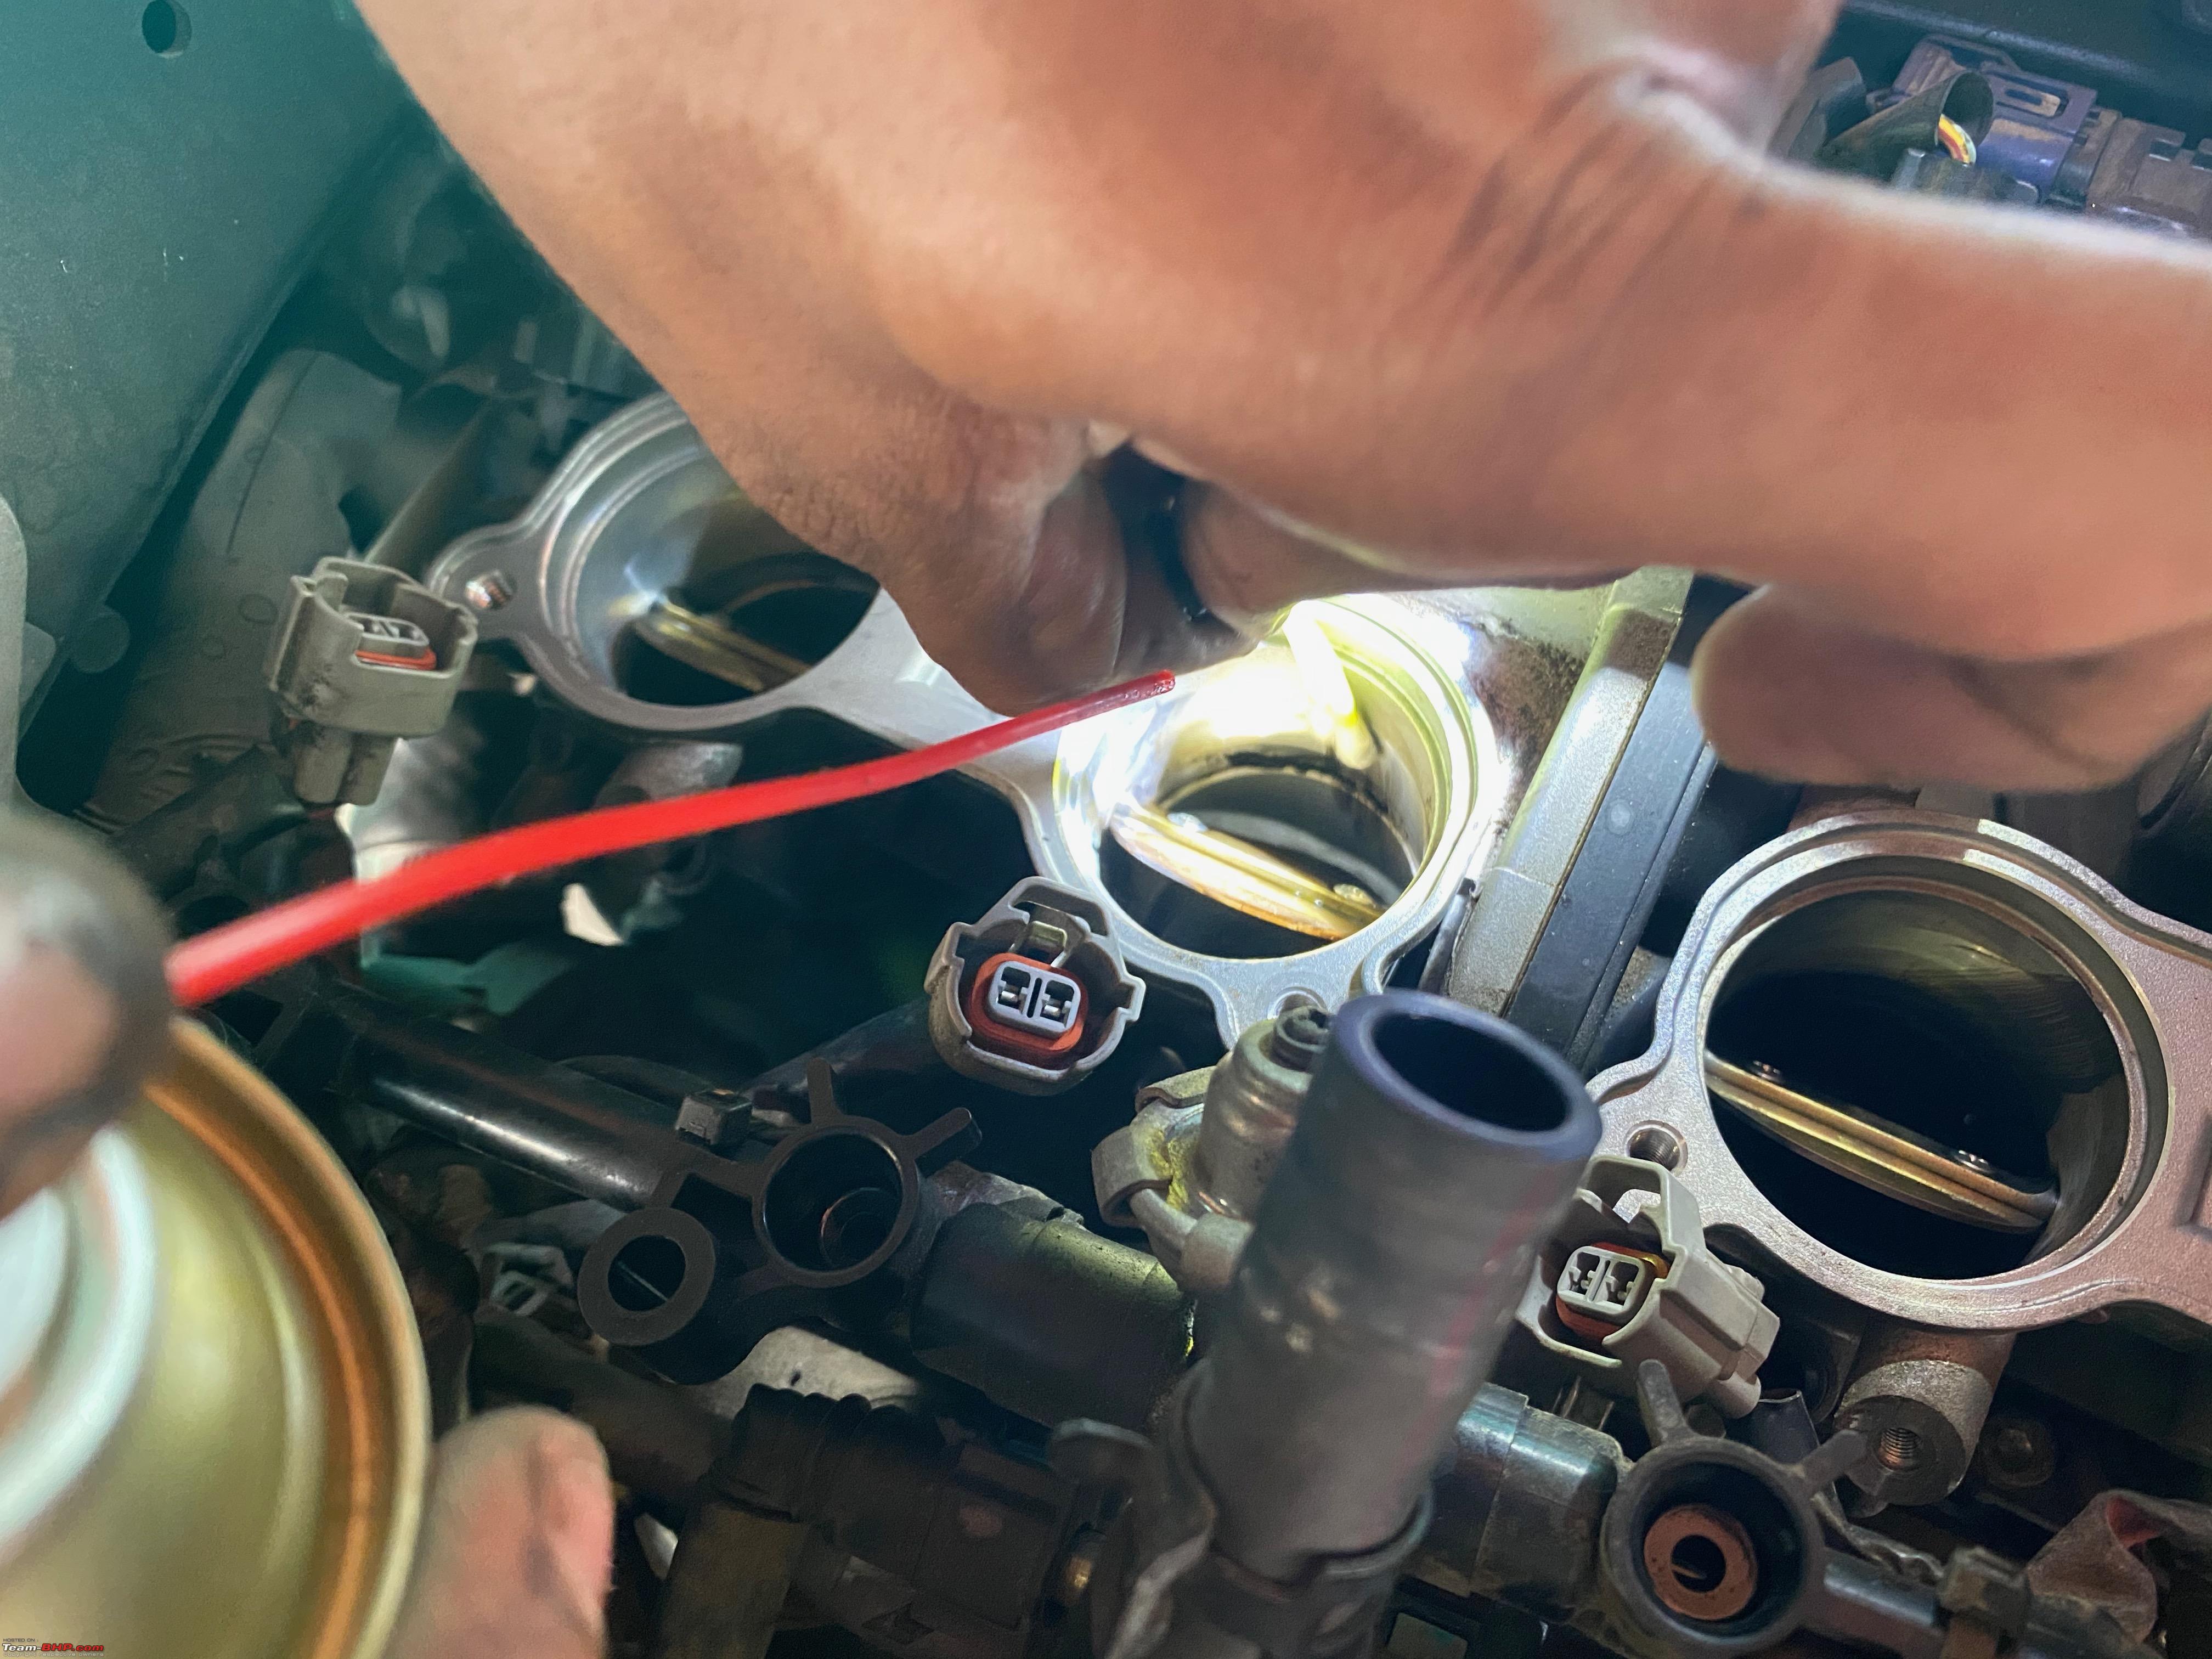 We used a soft Q-tip to agitate the gunk at some more stubborn areas which were not displaced by just spraying the cleaner fluid. This allowed it to get removed by another pass with the cleaner fluid. We repeated this step for all 4 valves. As clean as we could get it to be 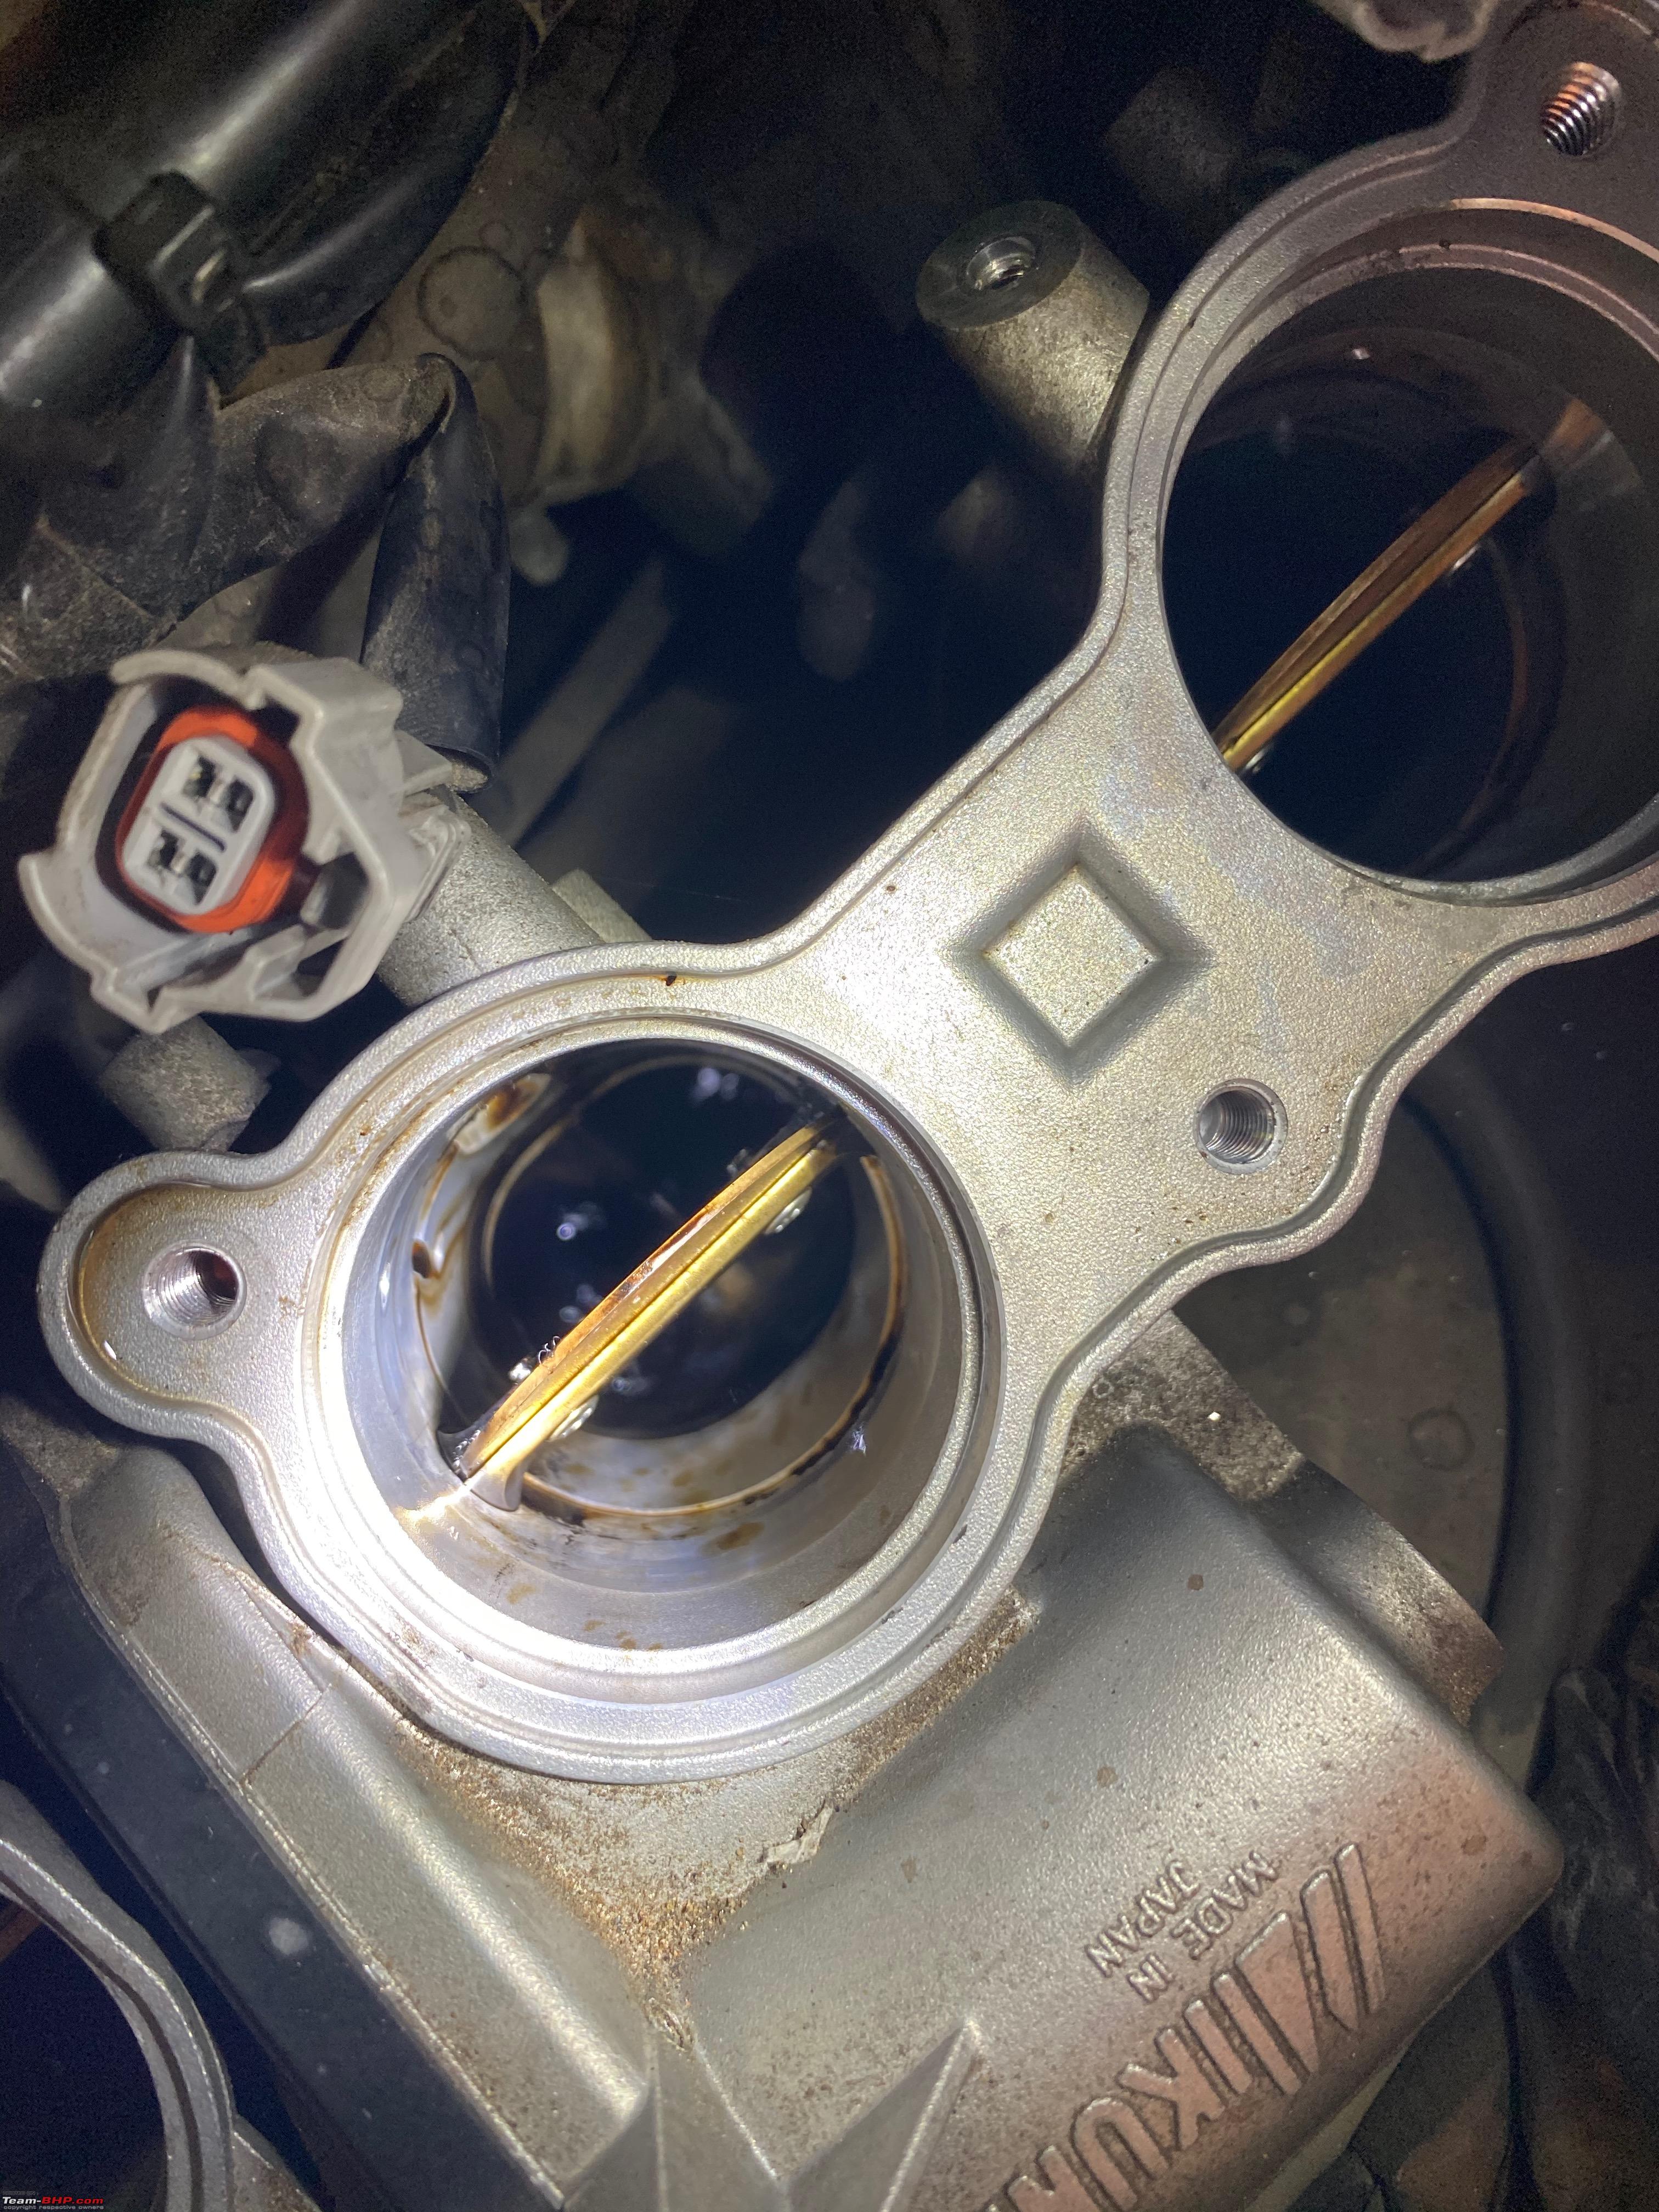 Just have a look at the difference it made. Before  After 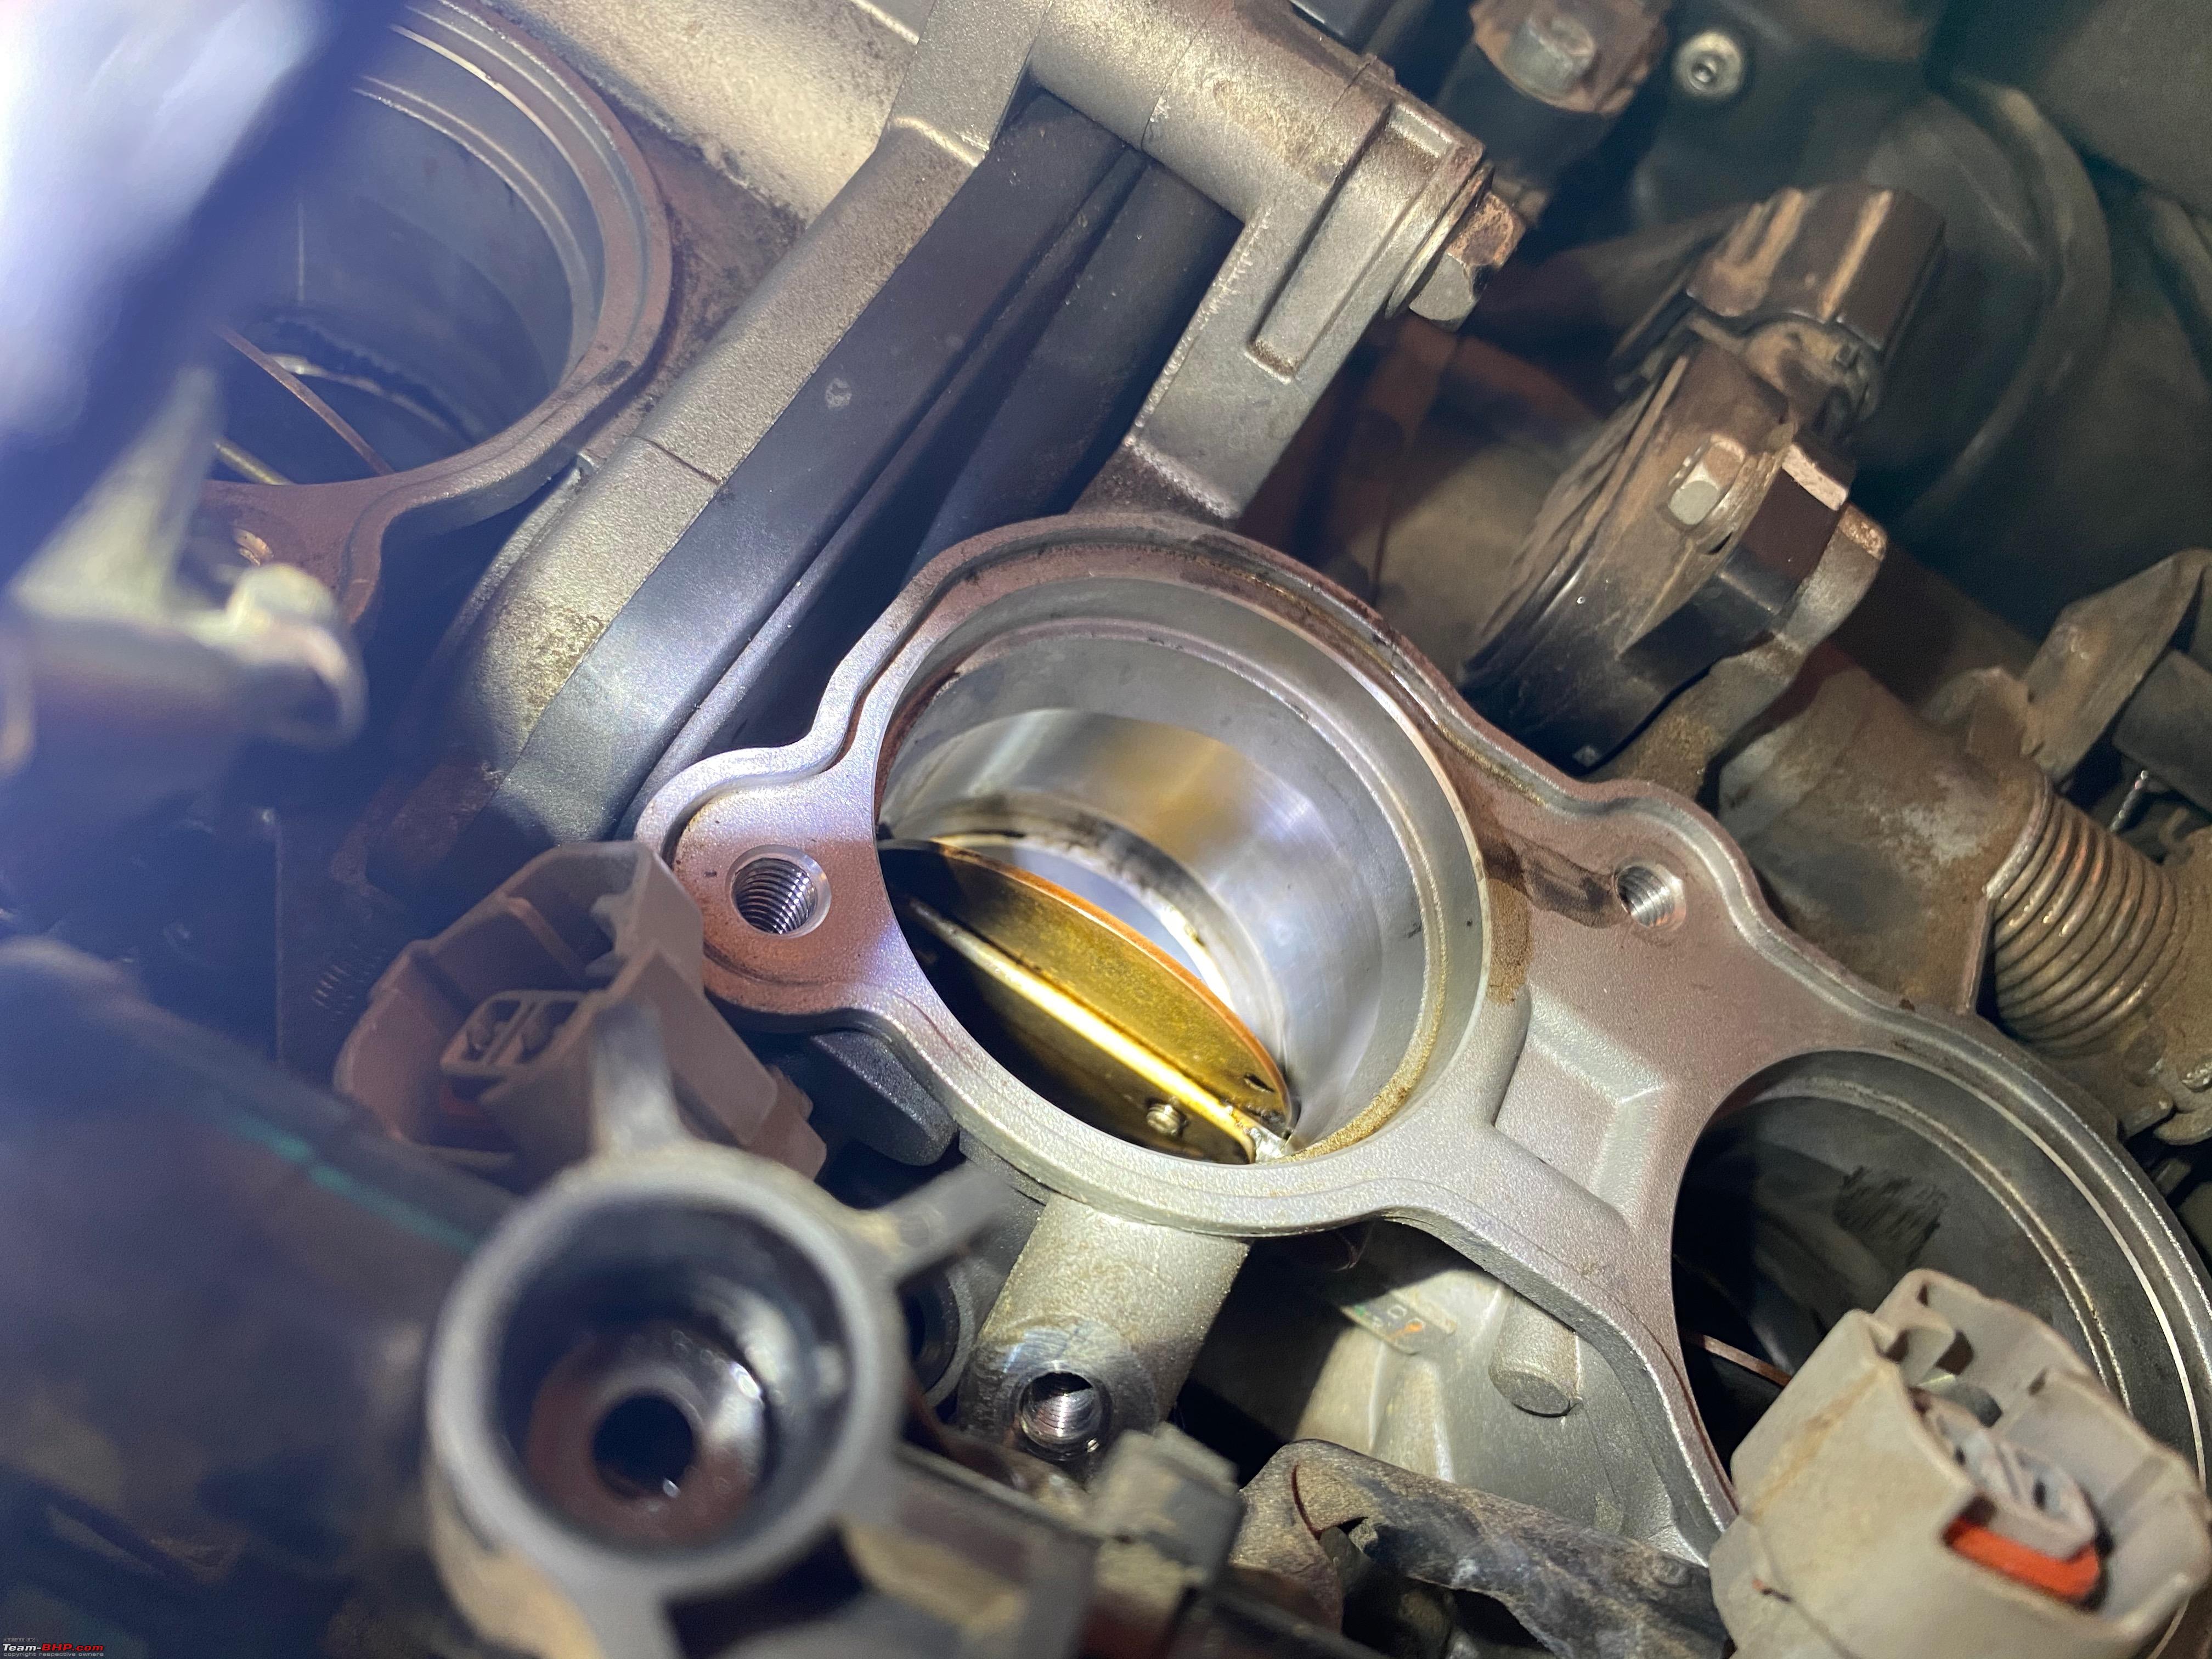 The aftermath 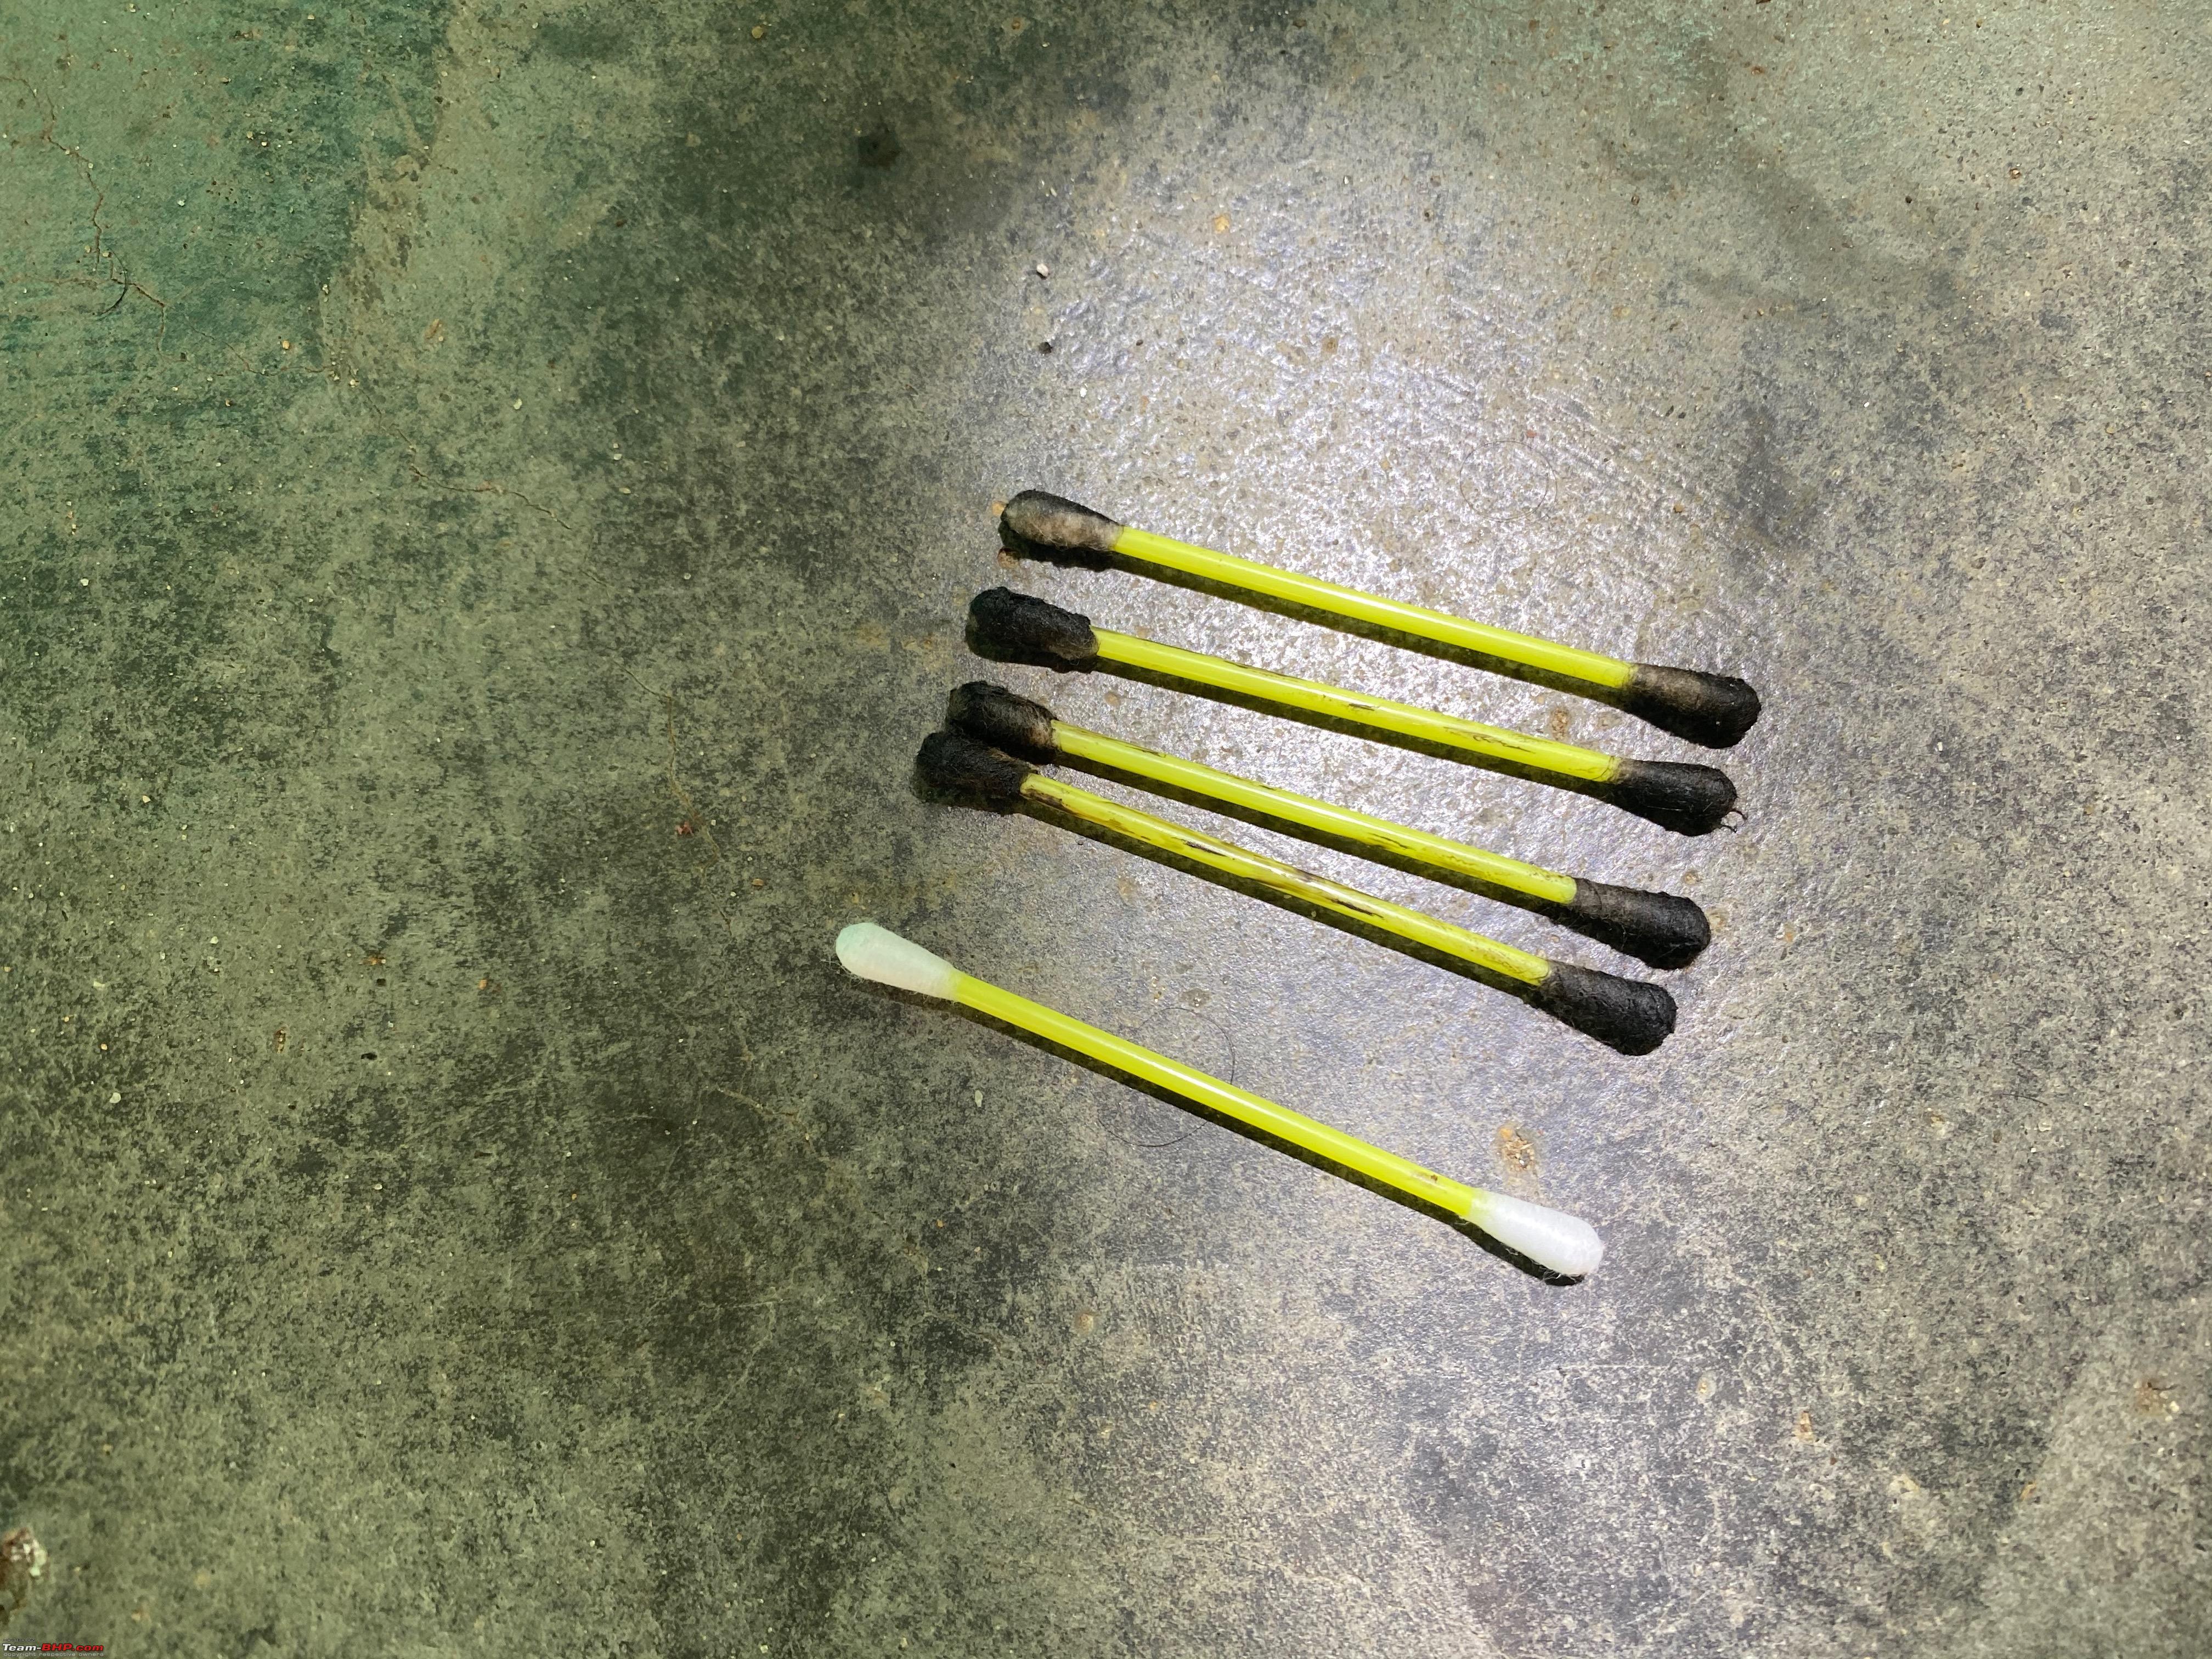 Injectors Cleaning Once the TB cleaning was done, we moved onto the next step of cleaning out the injectors. Step one was to remove the fuel rail from its mounting position so we have access to each of the injectors that we can pull out of its connection holder and clean them thoroughly. Fuel rail dismounted from its mounting points  Once the fuel rail was removed we disconnected each of the injectors and took it for cleaning. Injector 1 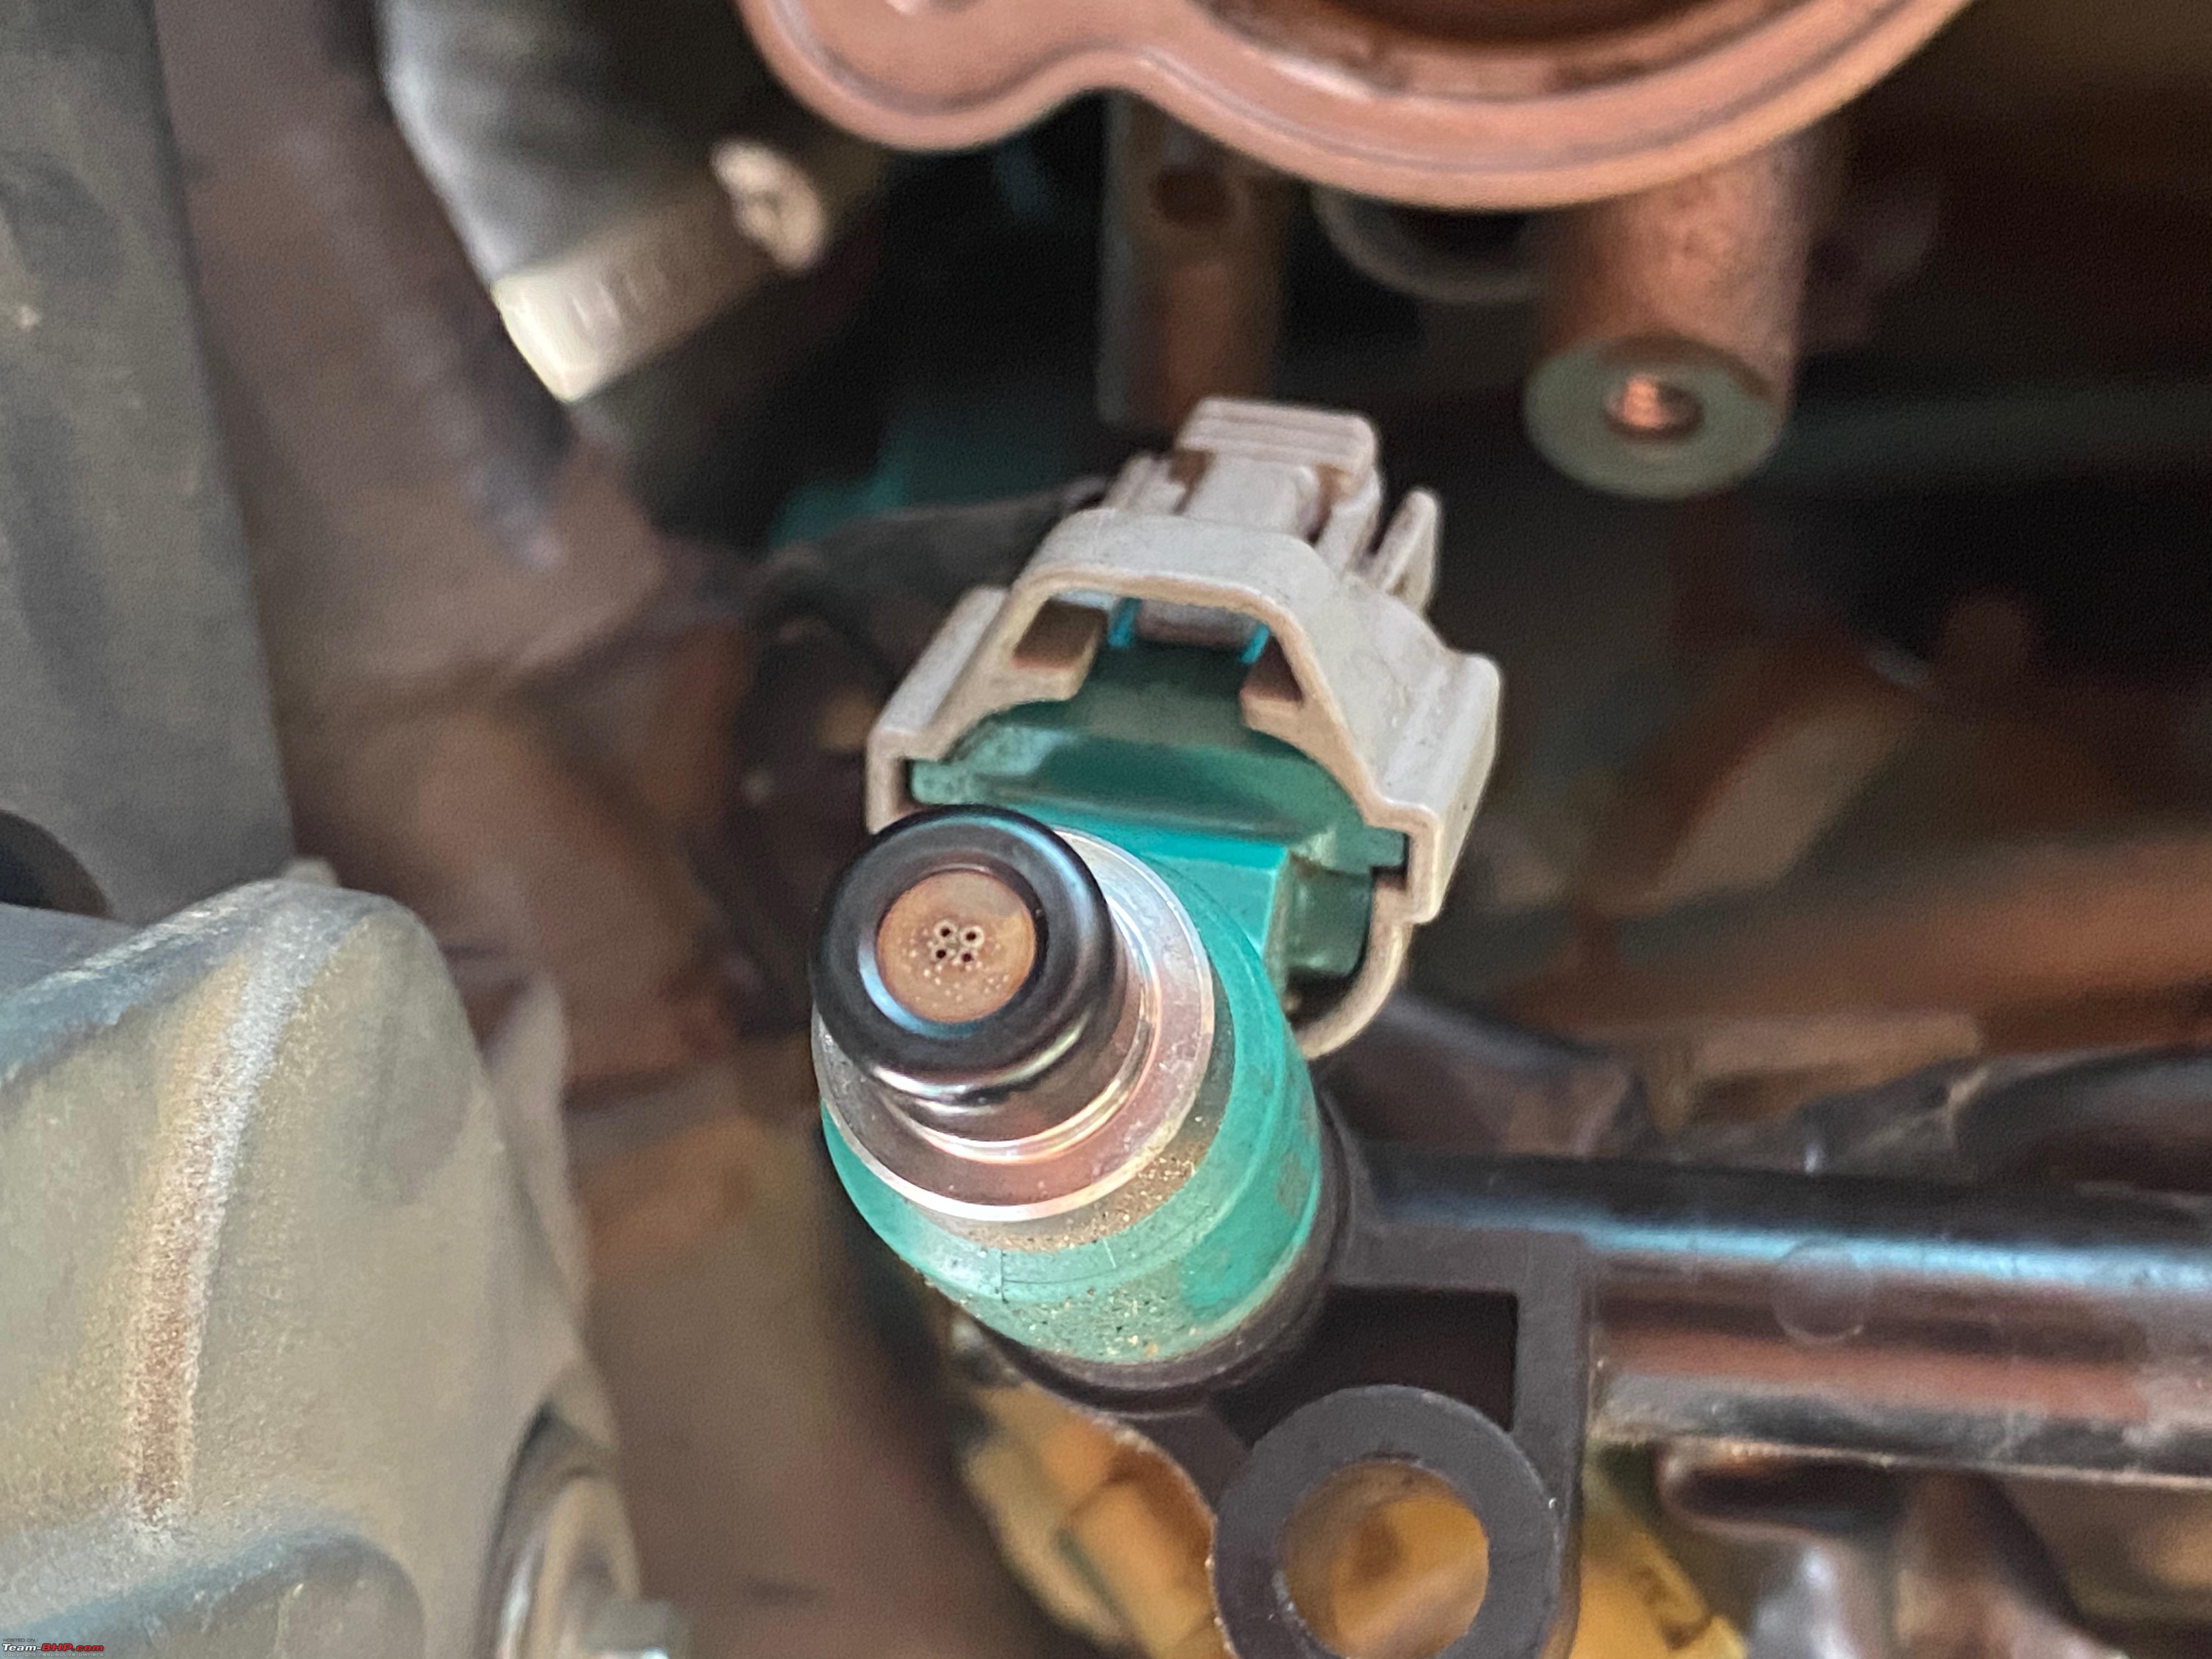 Injector 2 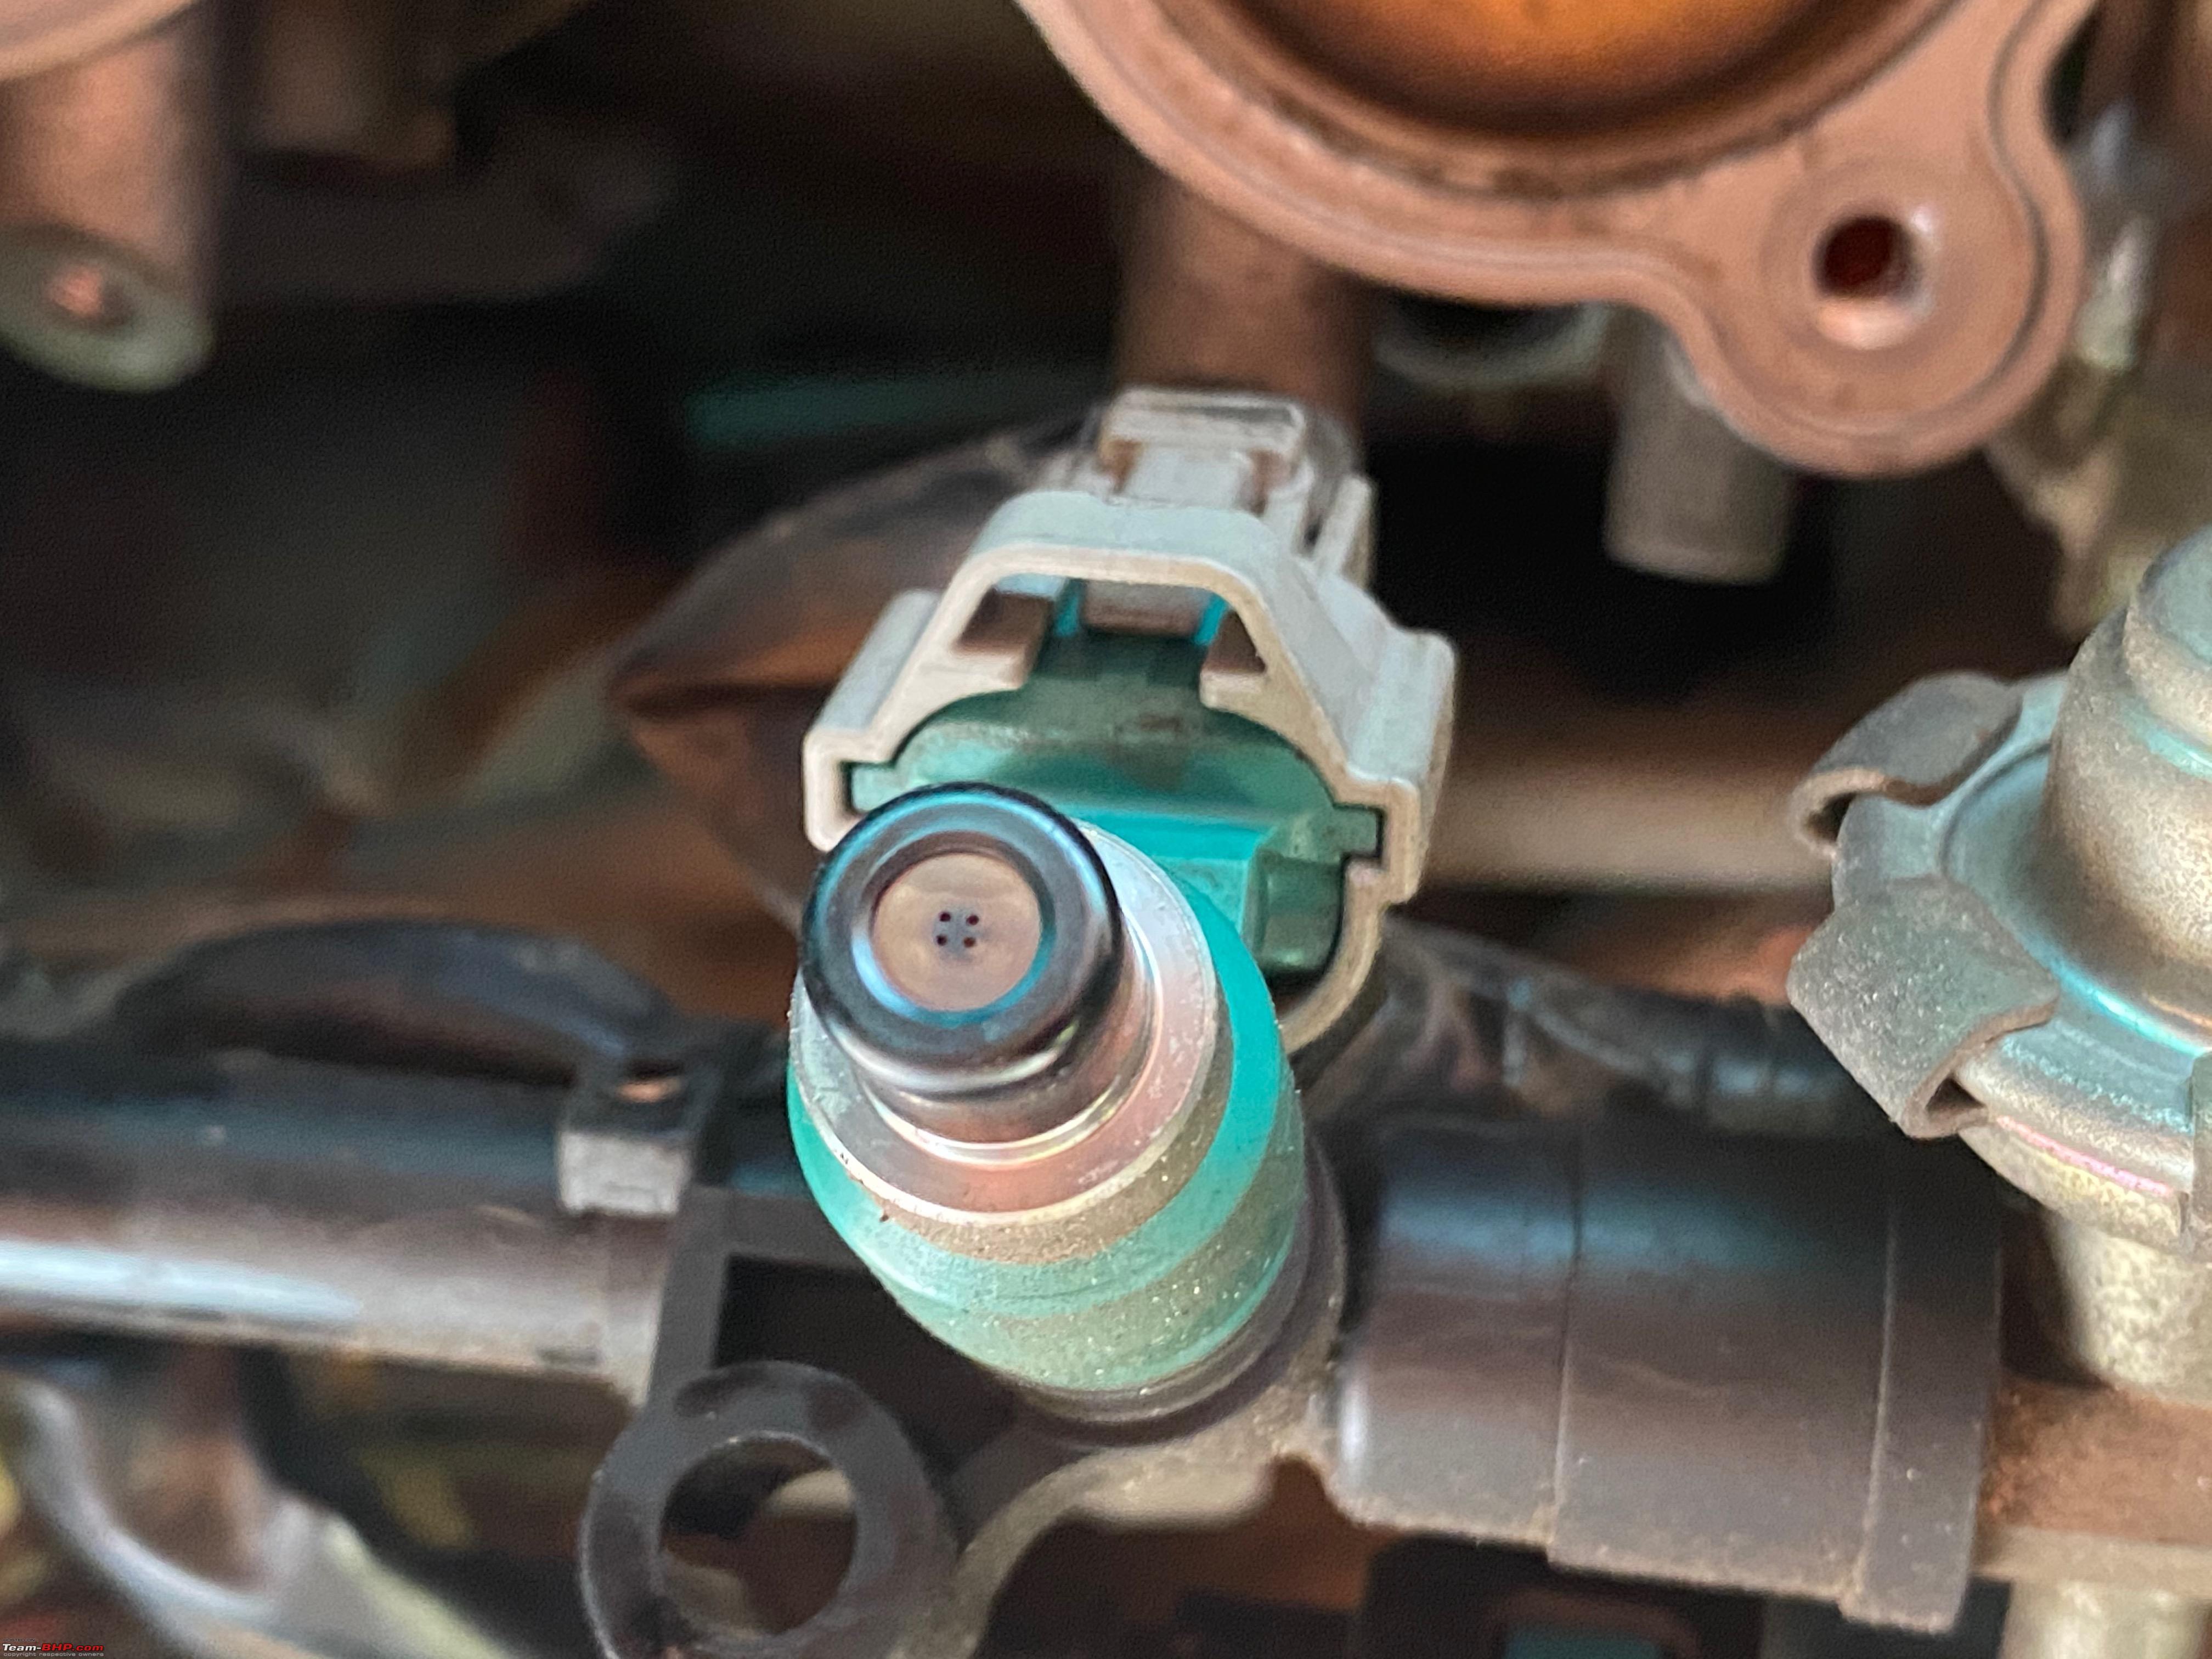 Injector 3 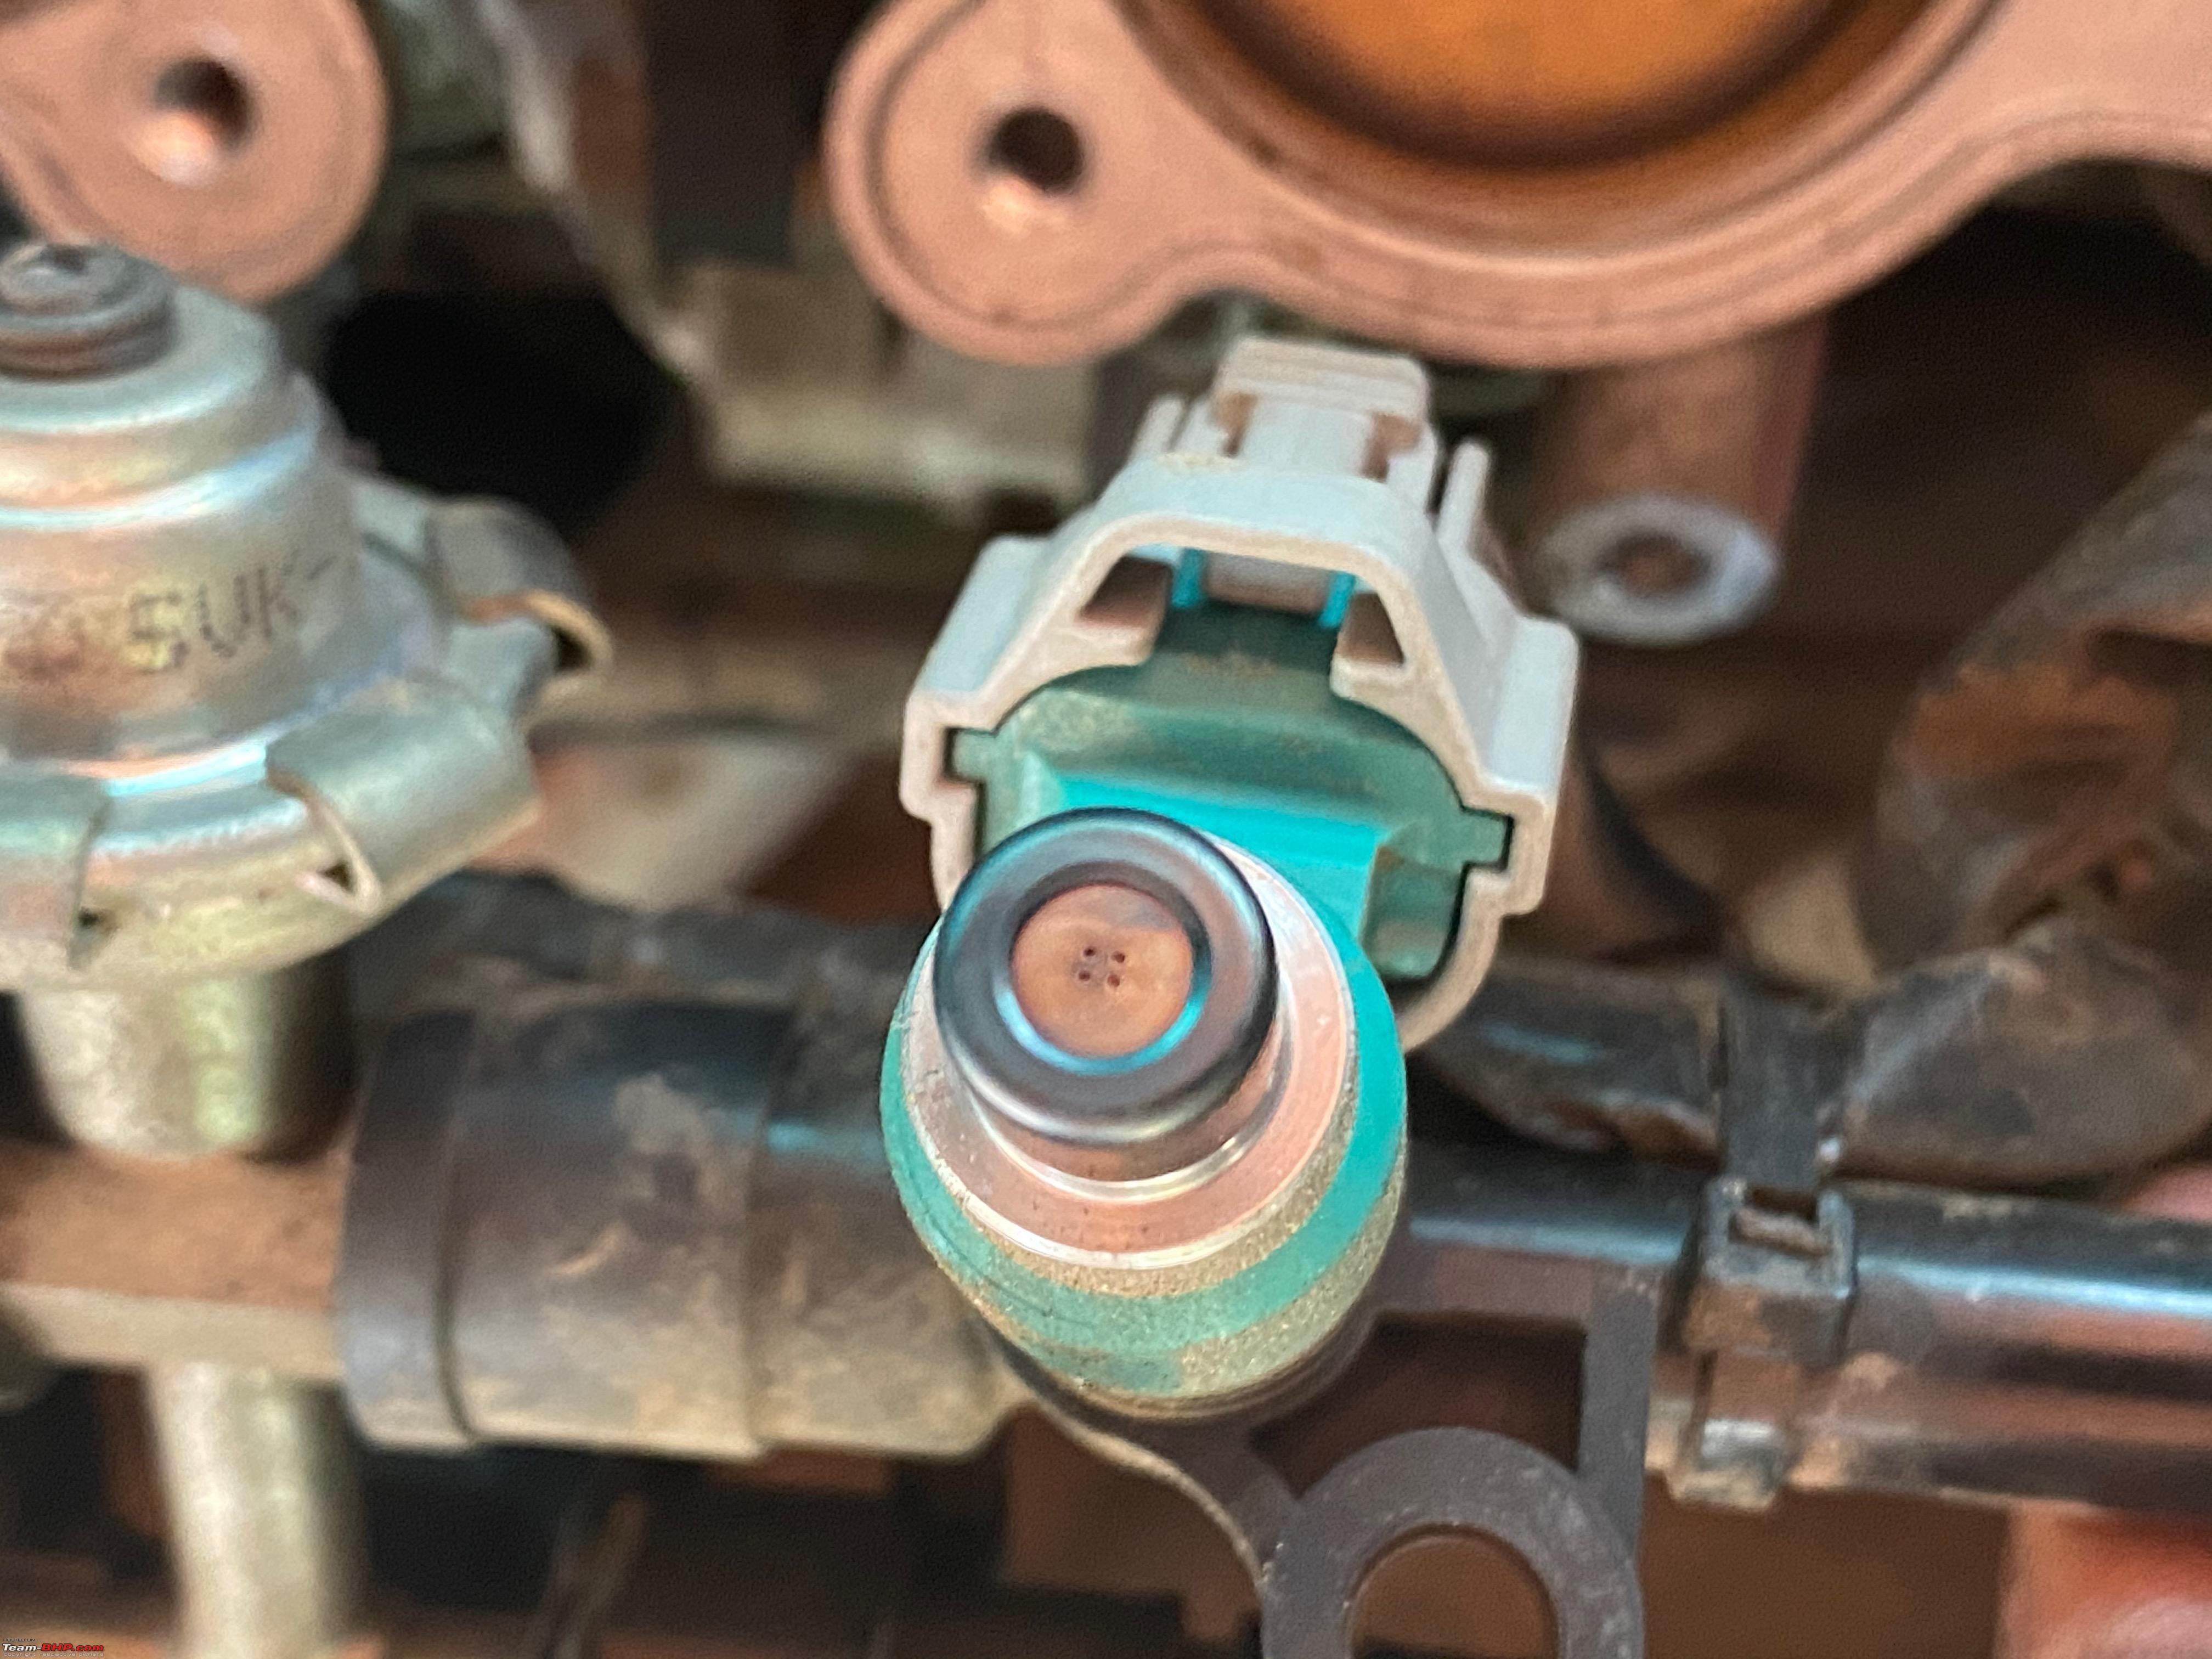 Injector 4  The left side is where fuel is fed and the injectors spray out the fuel through the right side output  A better look at the tine holes through which the fuel is squirted out. 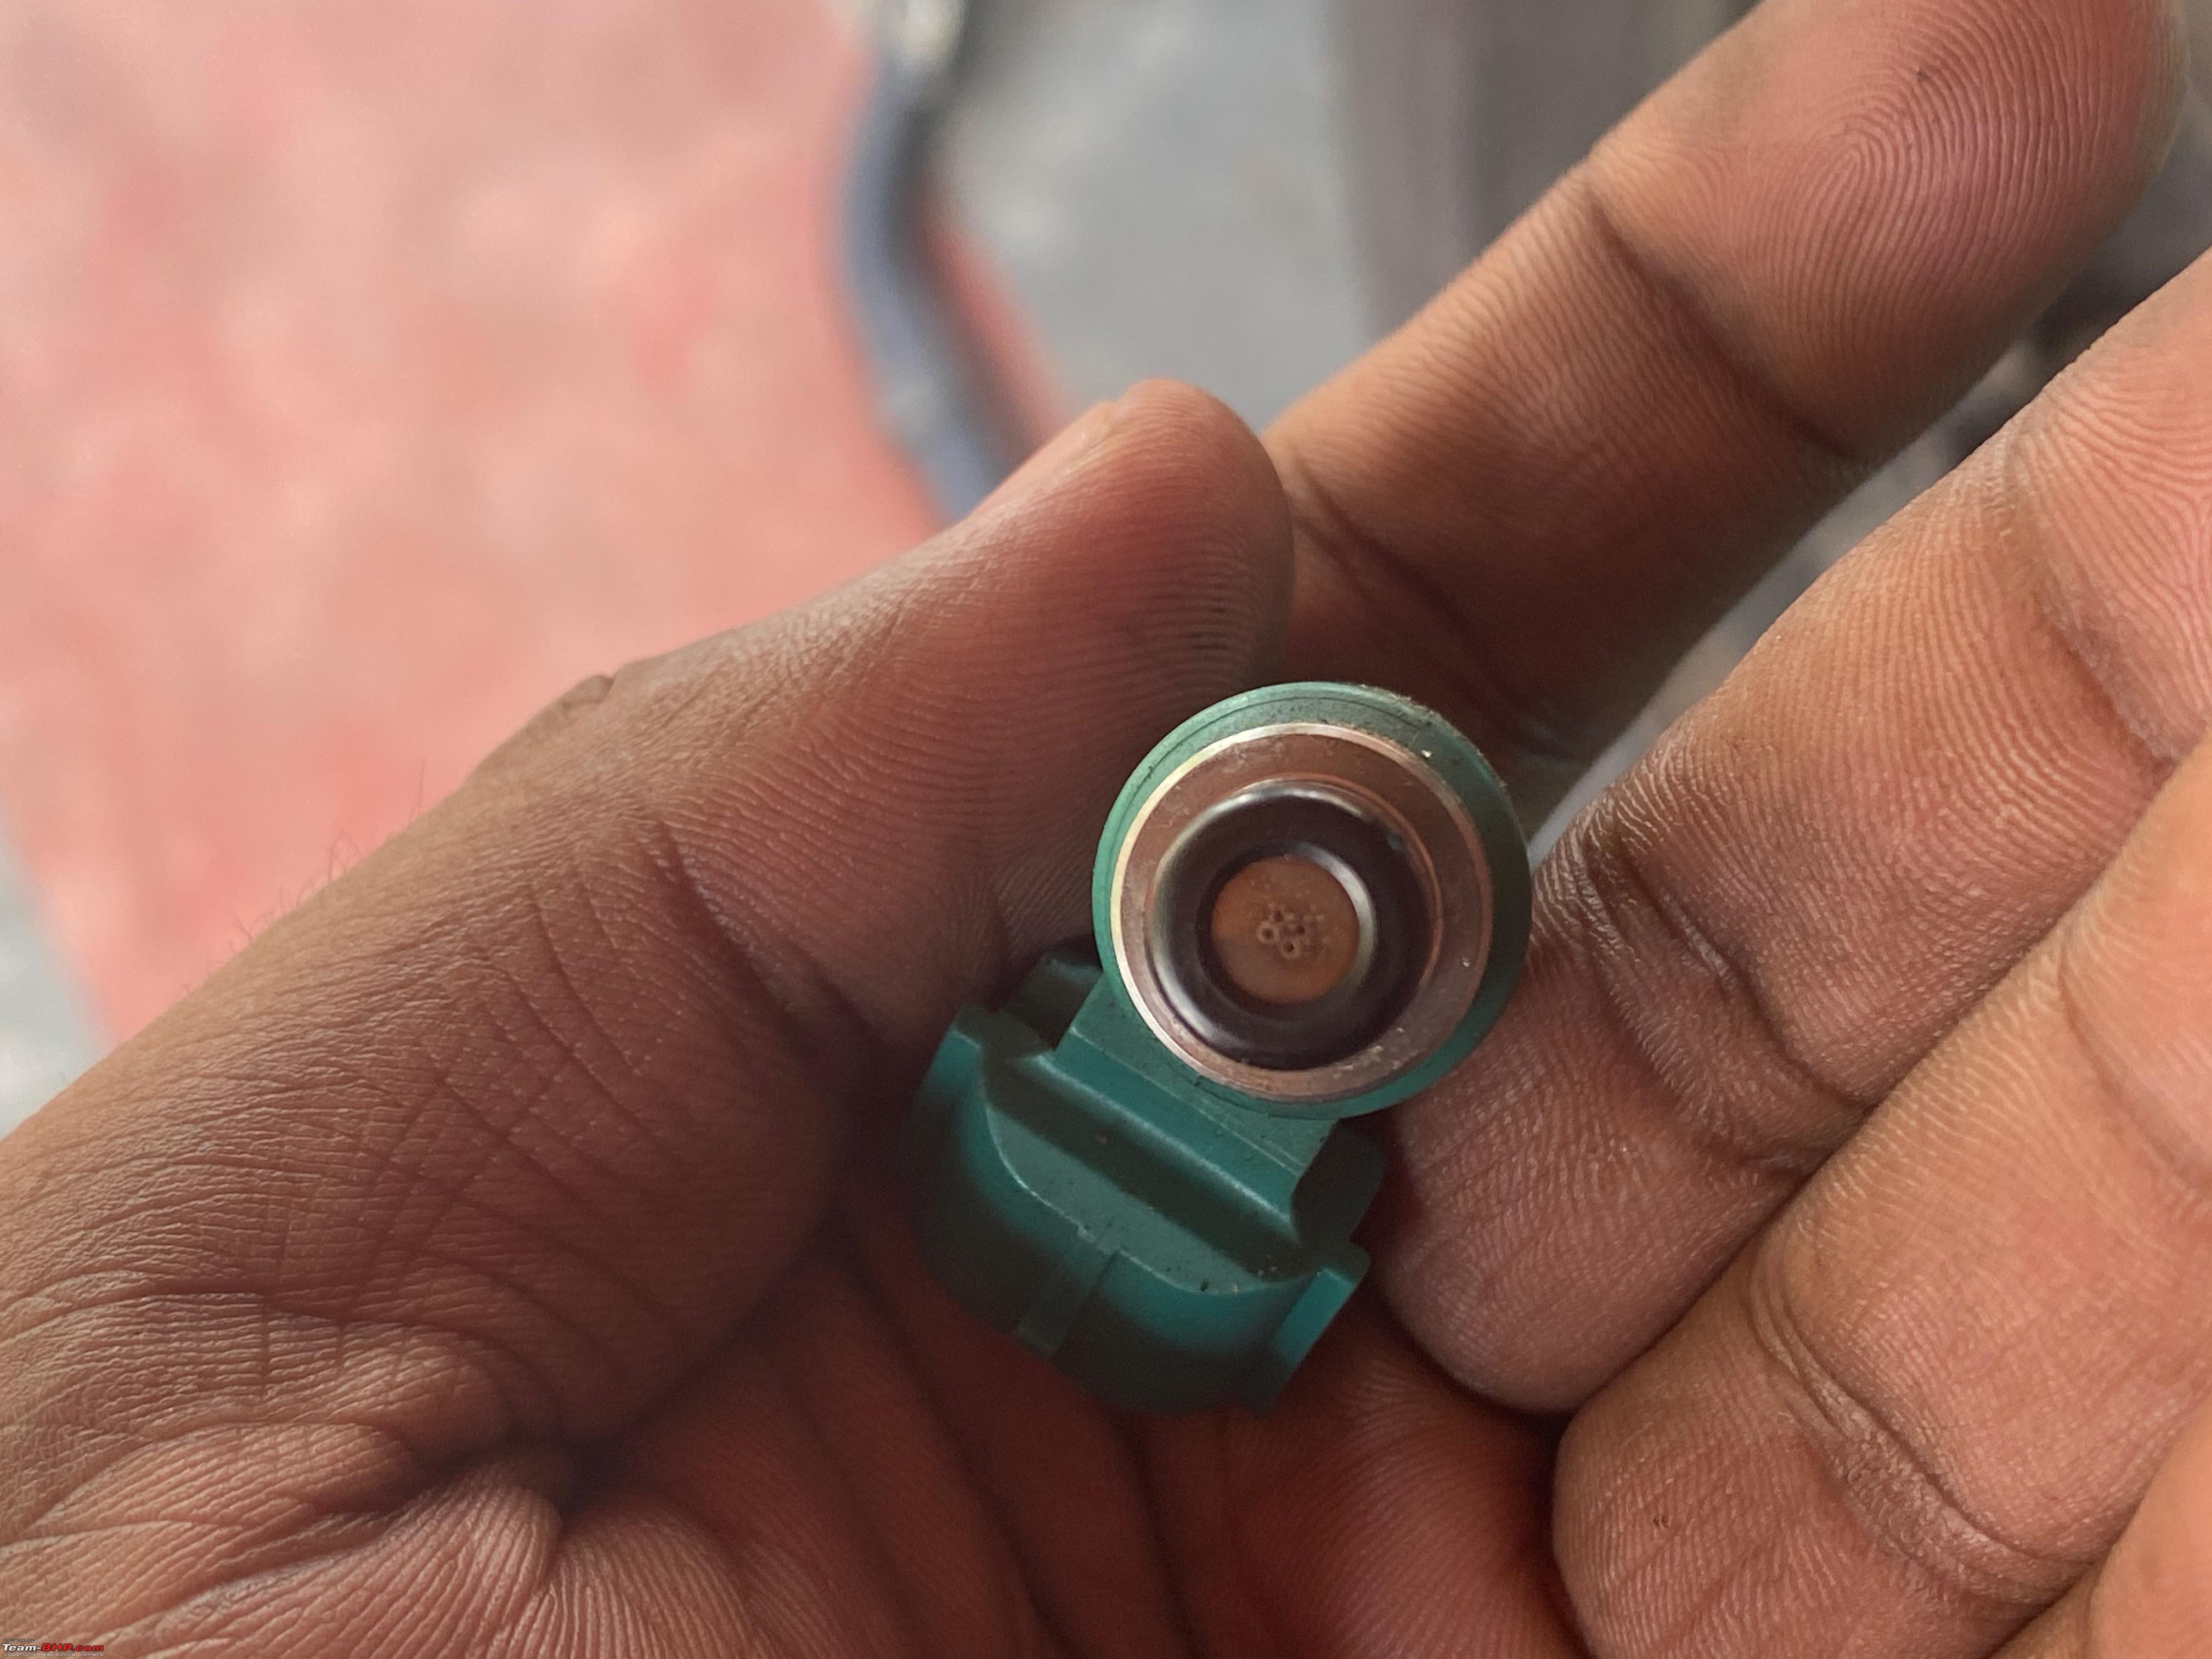 Now, this is where we adopted a jugaad method which works wonders. We created a homemade wiring connection which when connected to a 12V output battery turns on the solenoid inside the injectors and we spray the cleaner fluid from the back end of the injector and the injectors spits it out in the form of a high-pressure stream through the other side, it's a quite fun thing to watch and we enjoyed a lot making this too(Credit of making this goes to my friend, I was just there for this and only helped in it). I'll let the pictures do the talking. Wurth Injector cleaner was used for this job  The homemade injector cleaner wiring setup  Connectors 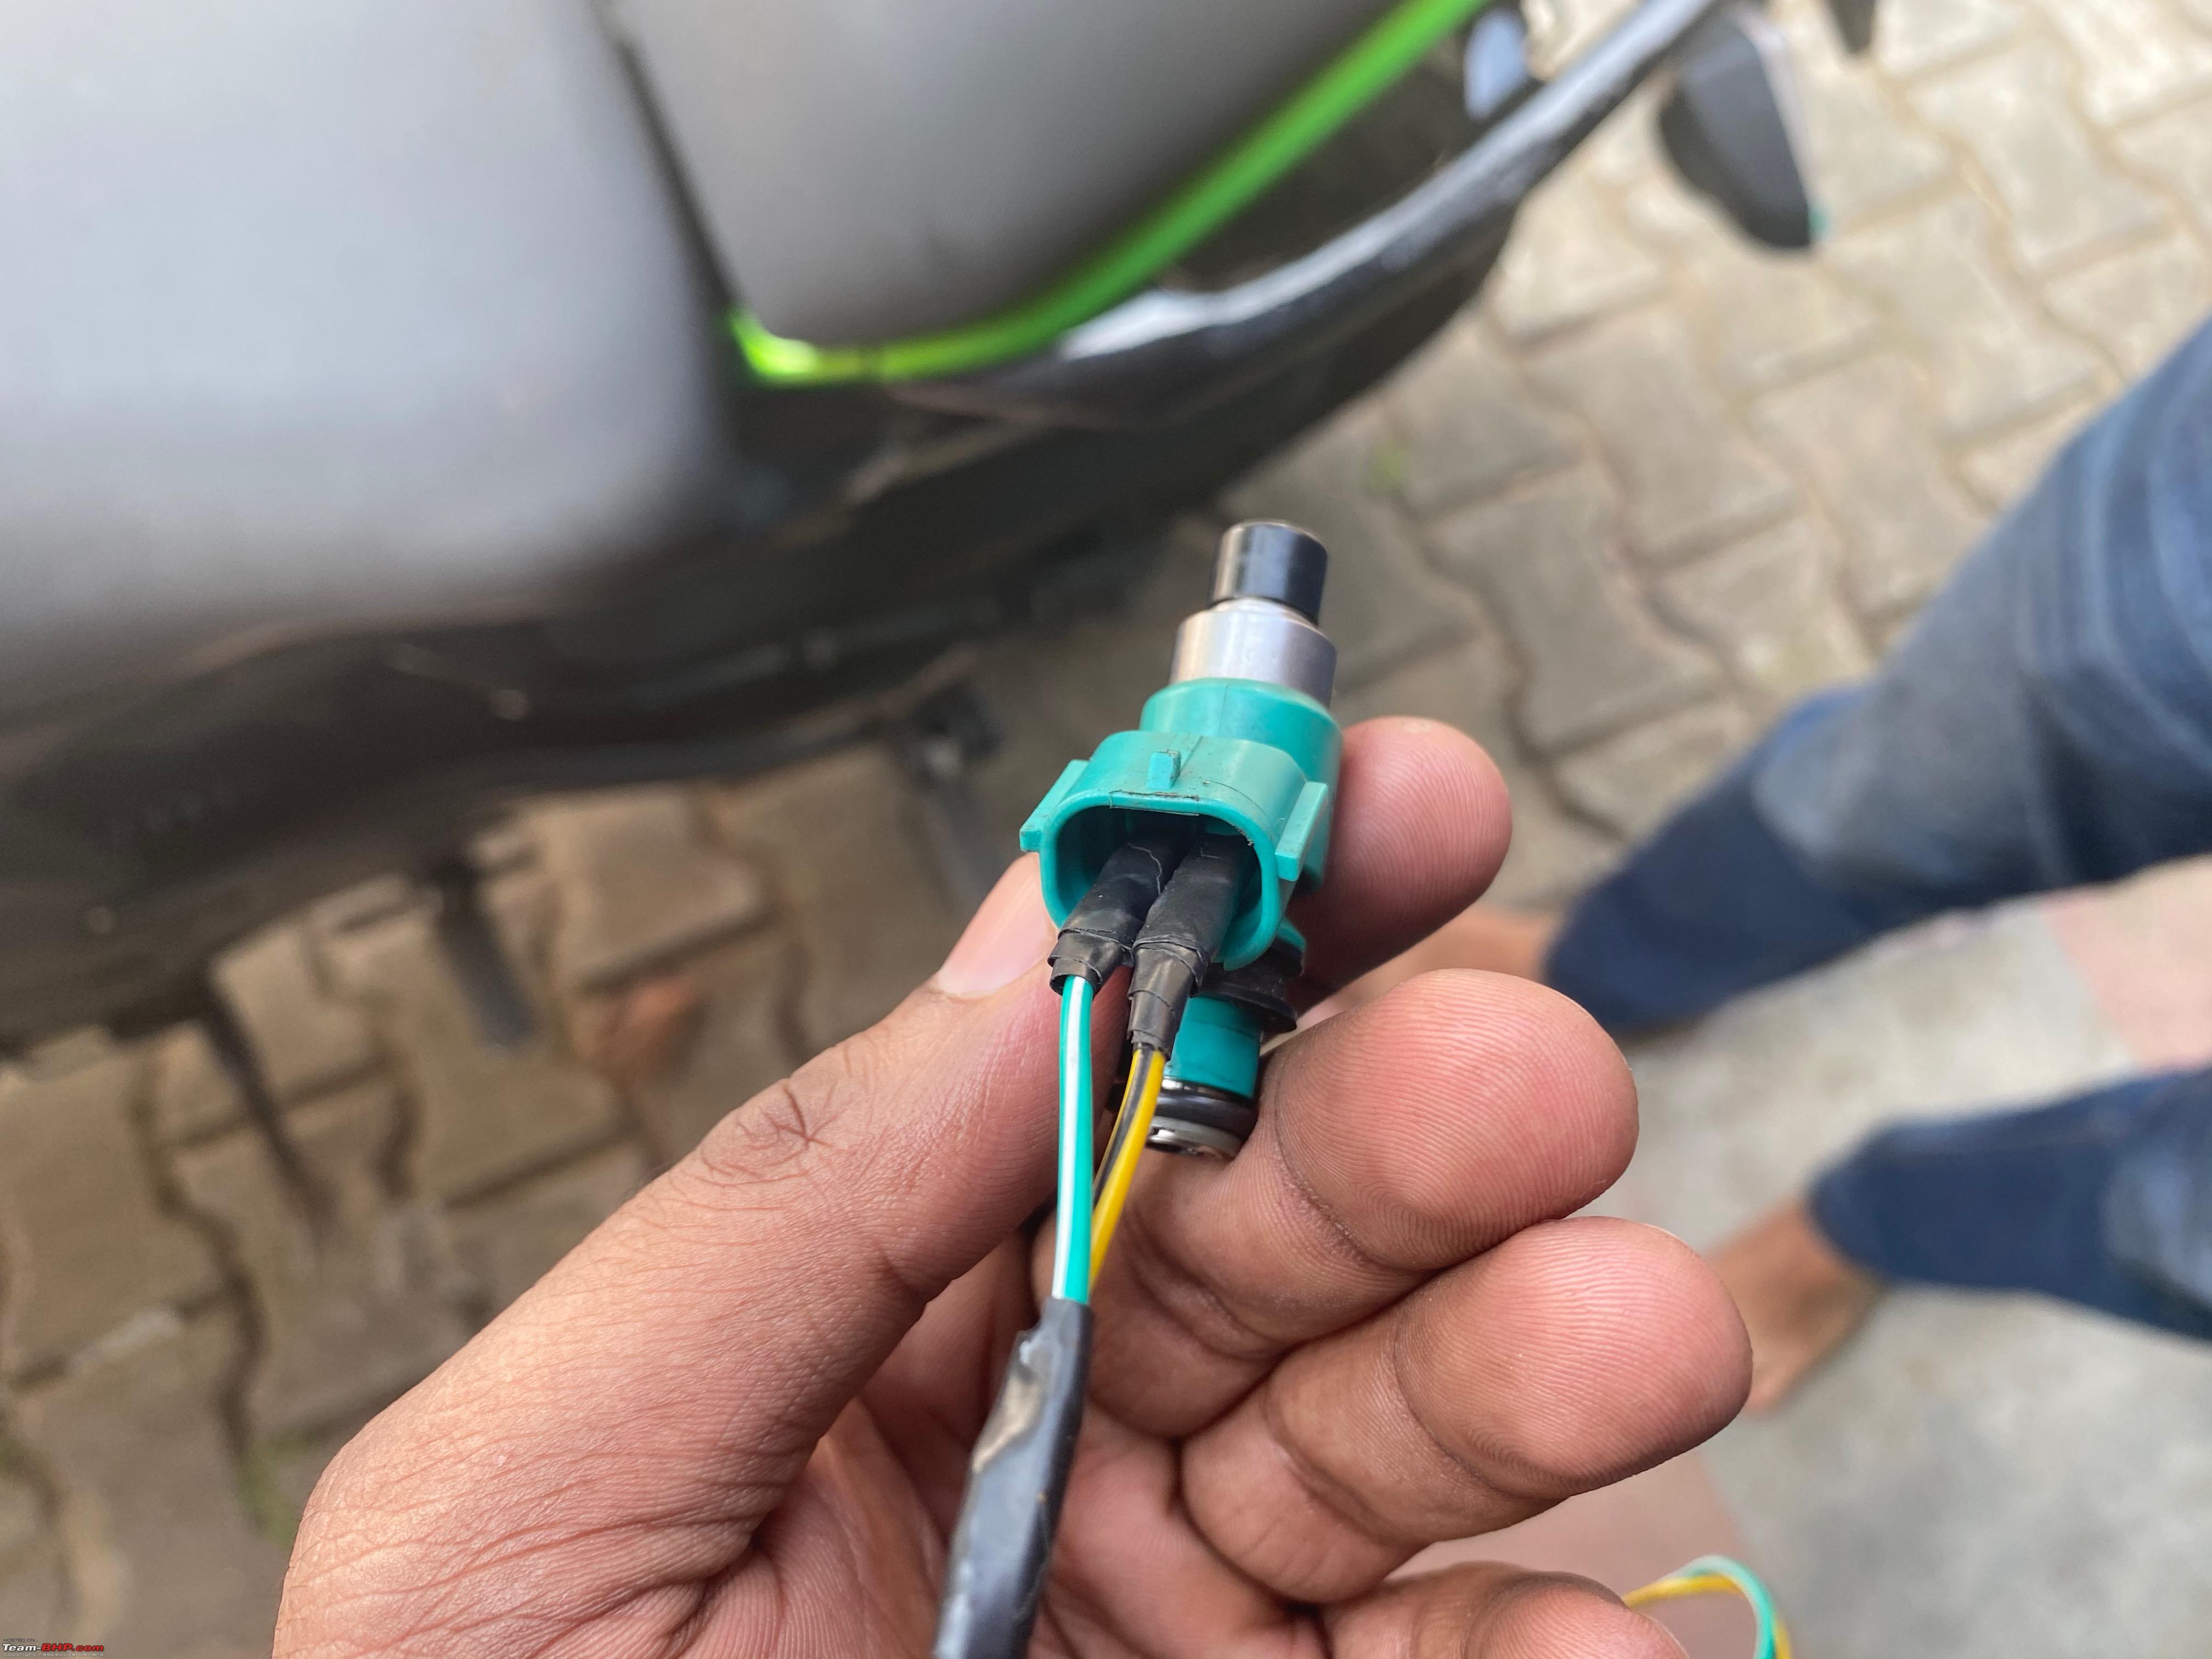 Soaking it up before passing the fluid through the injector 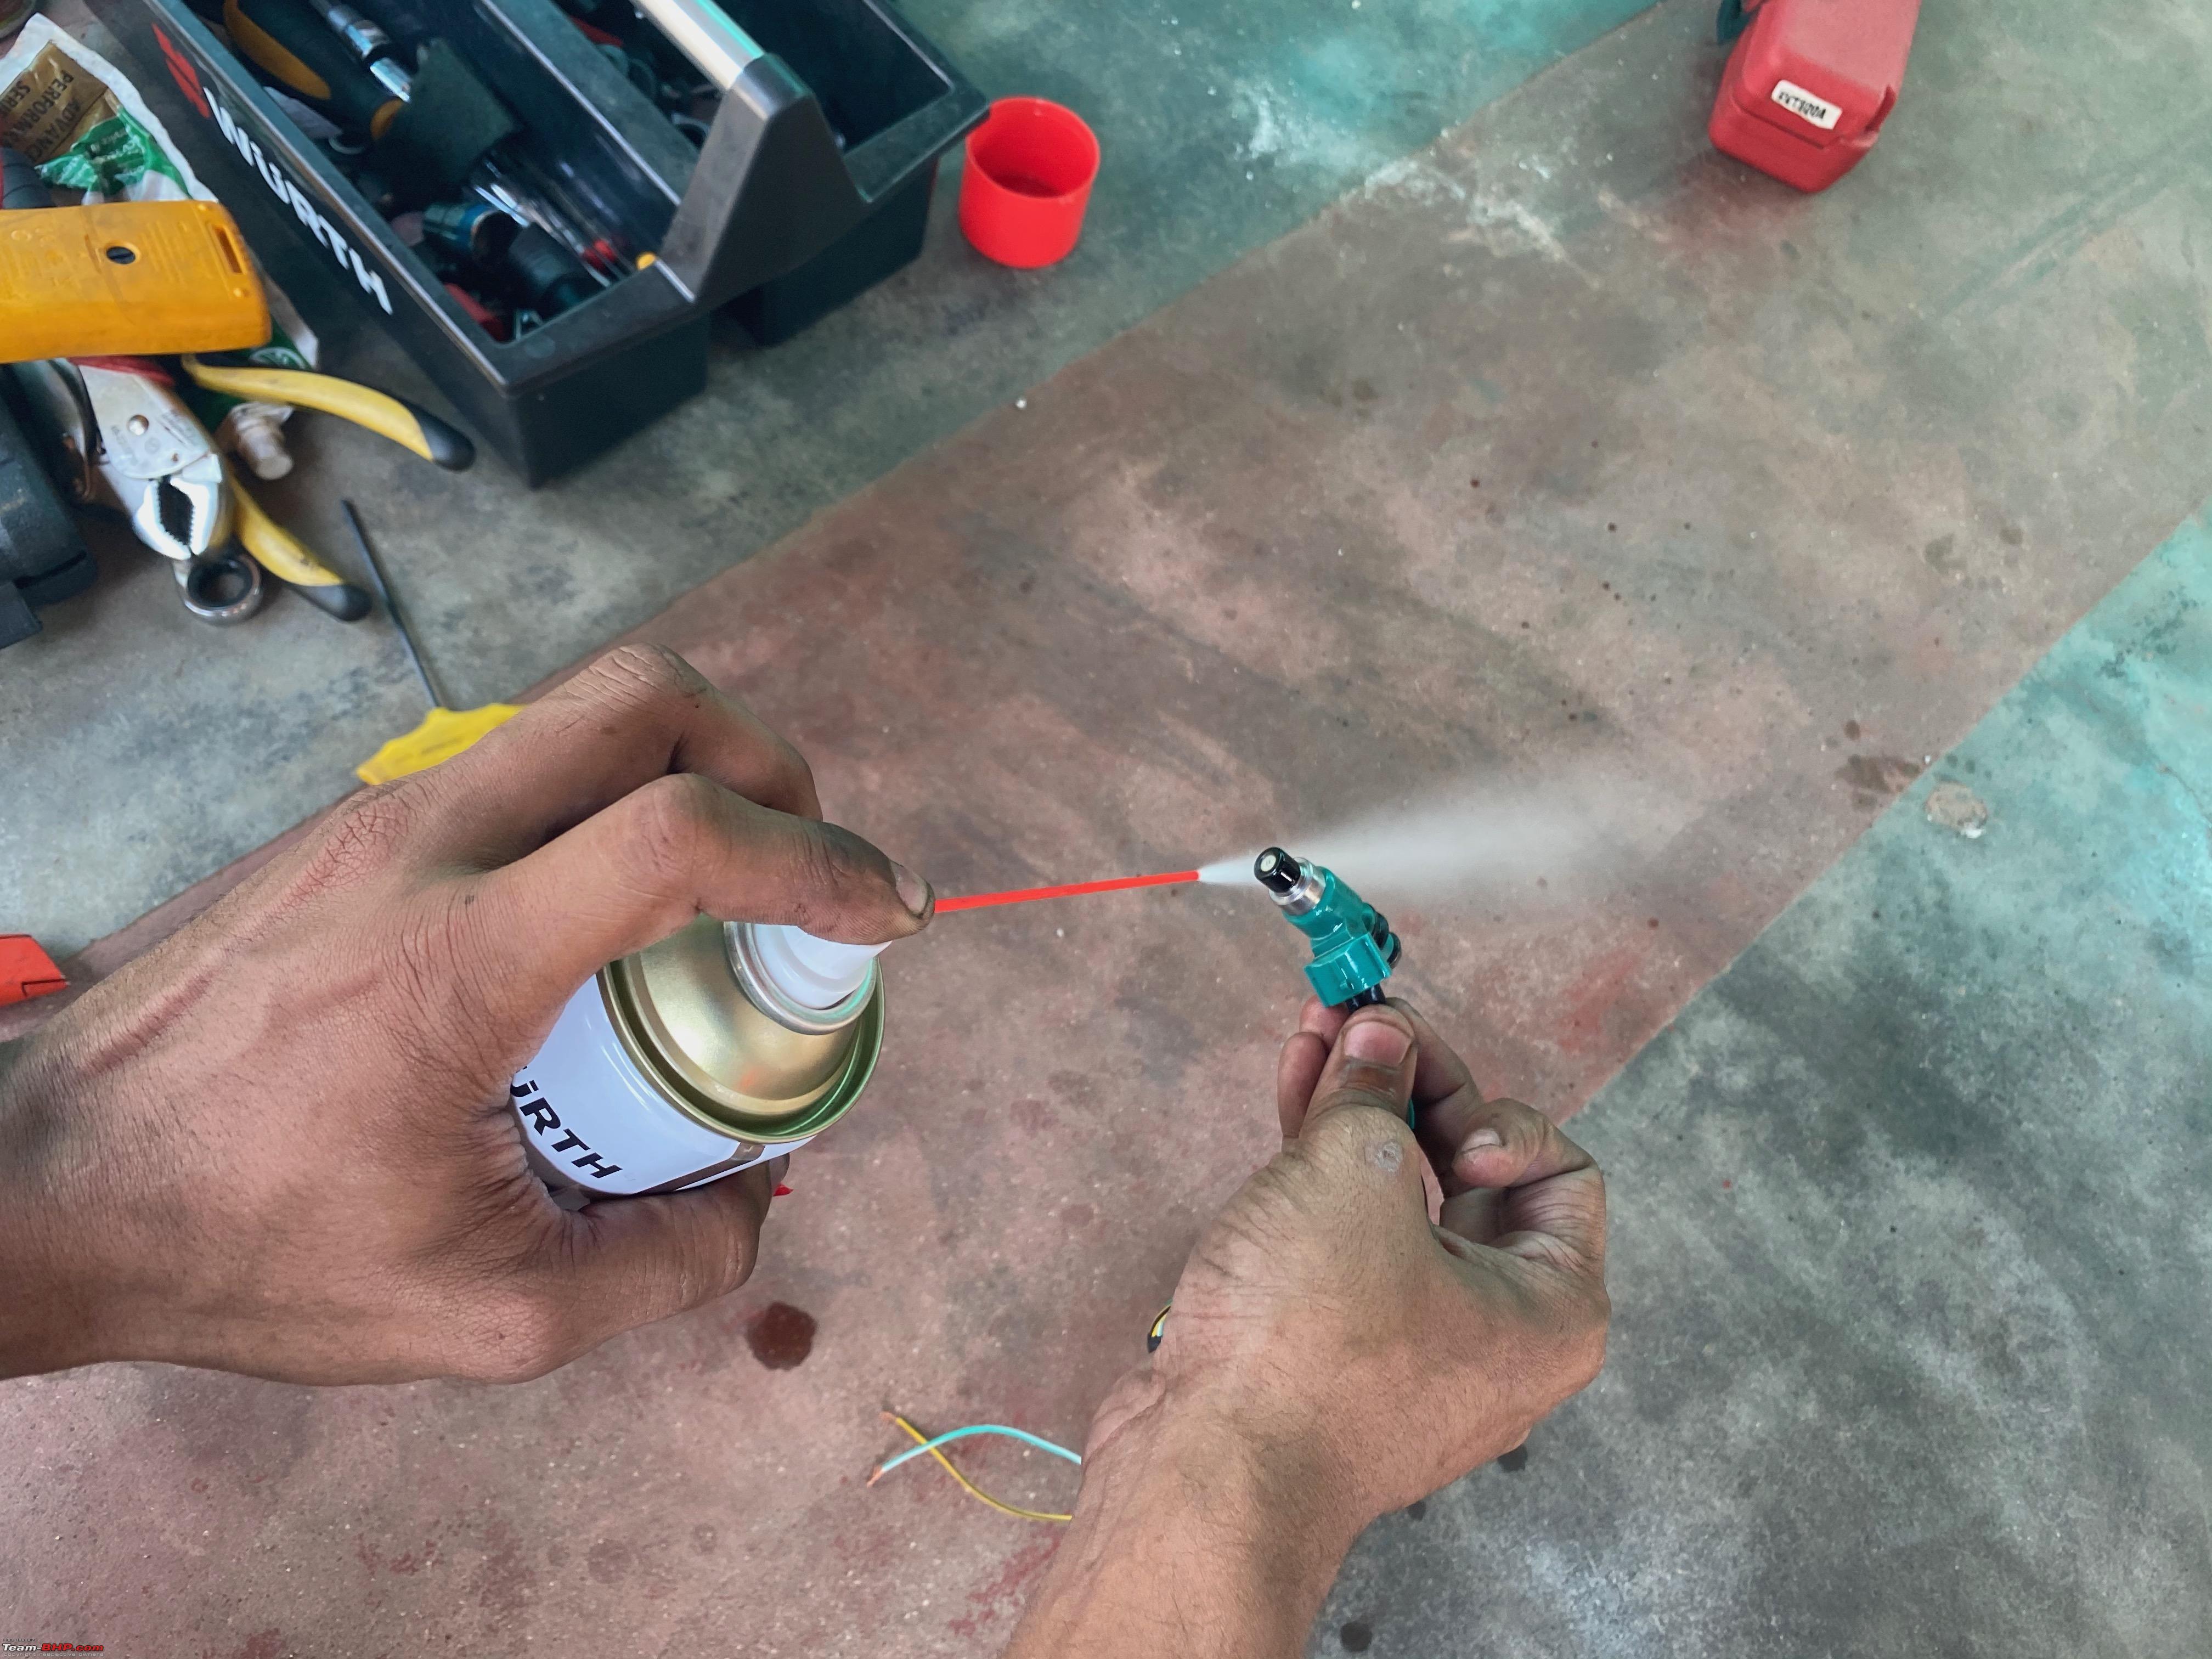 Here is our homemade setup put to work 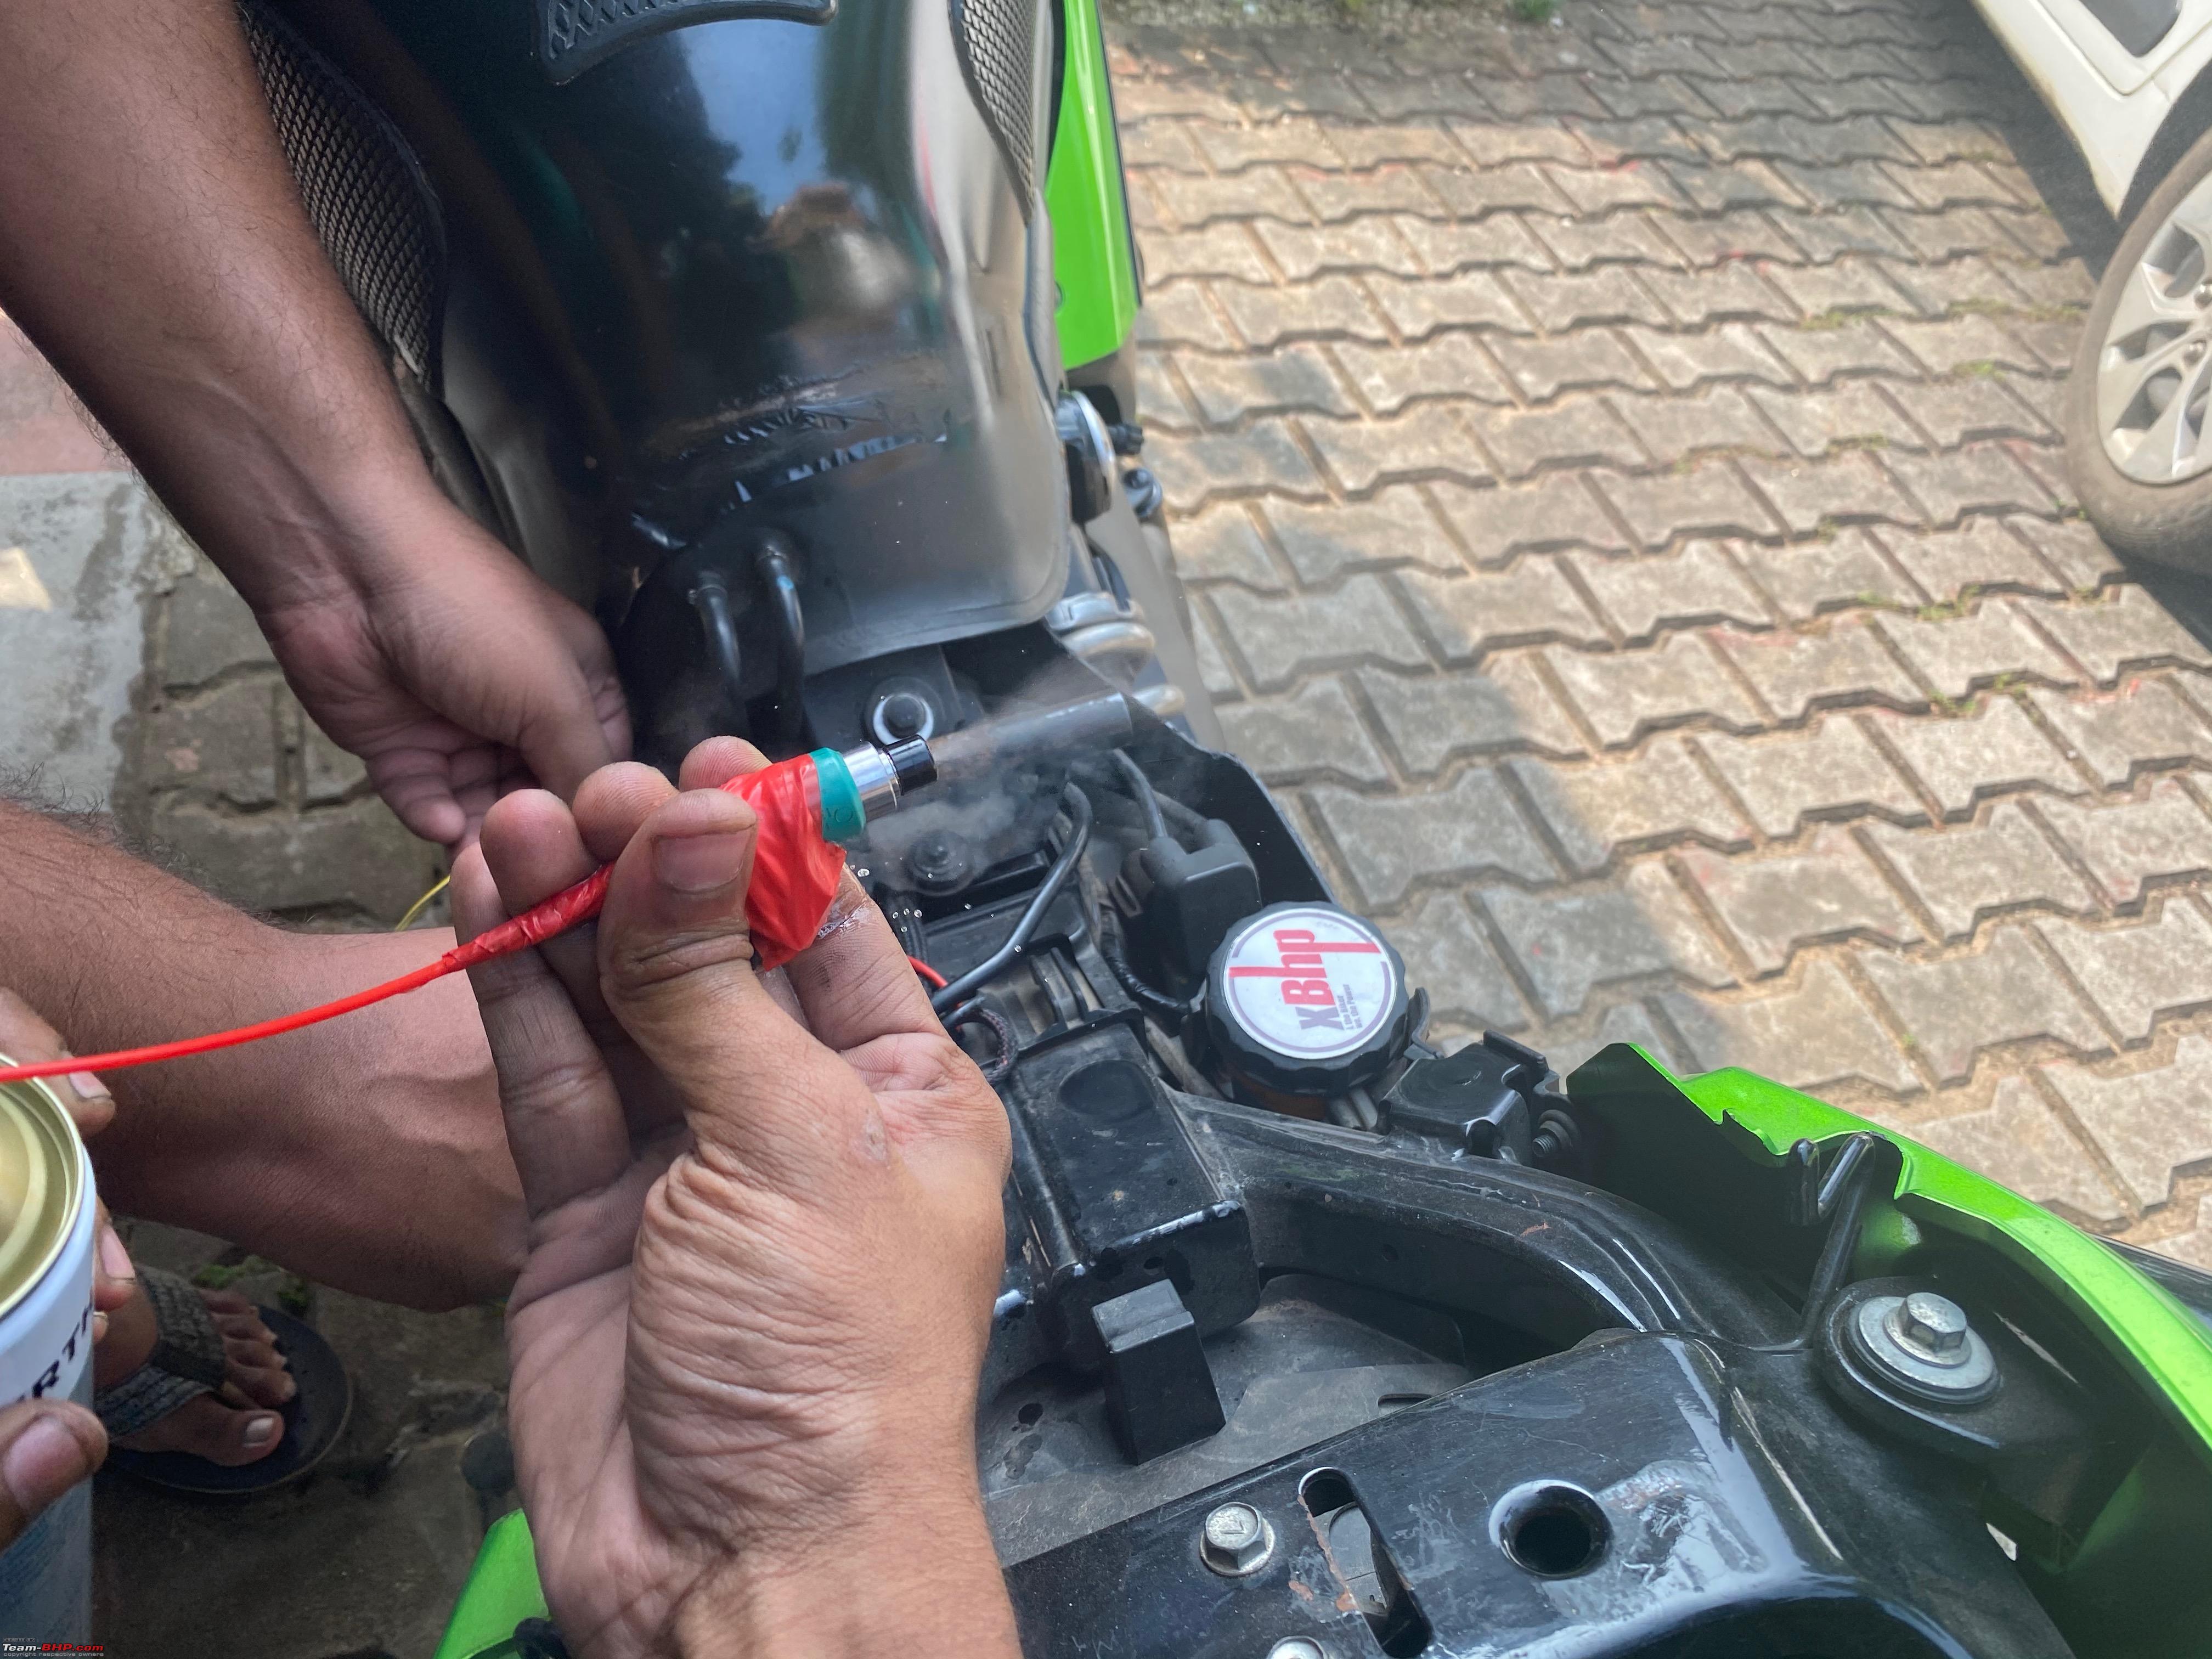 Squirting away at full blast  Just for people who are curious to see it work, I am adding a video of the same. Here you get to see how the injector pulses through and sprays the fuel into the combustion chamber. Now that we completed this for 1, we just rinse and repeat for the remaining 3 and with that, we have completed the cleaning of the primary injectors. Now that the primary injectors were cleaned we moved onto the secondary injectors which as mentioned before is on the bottom of the airbox cover. Secondary injector Bank 1 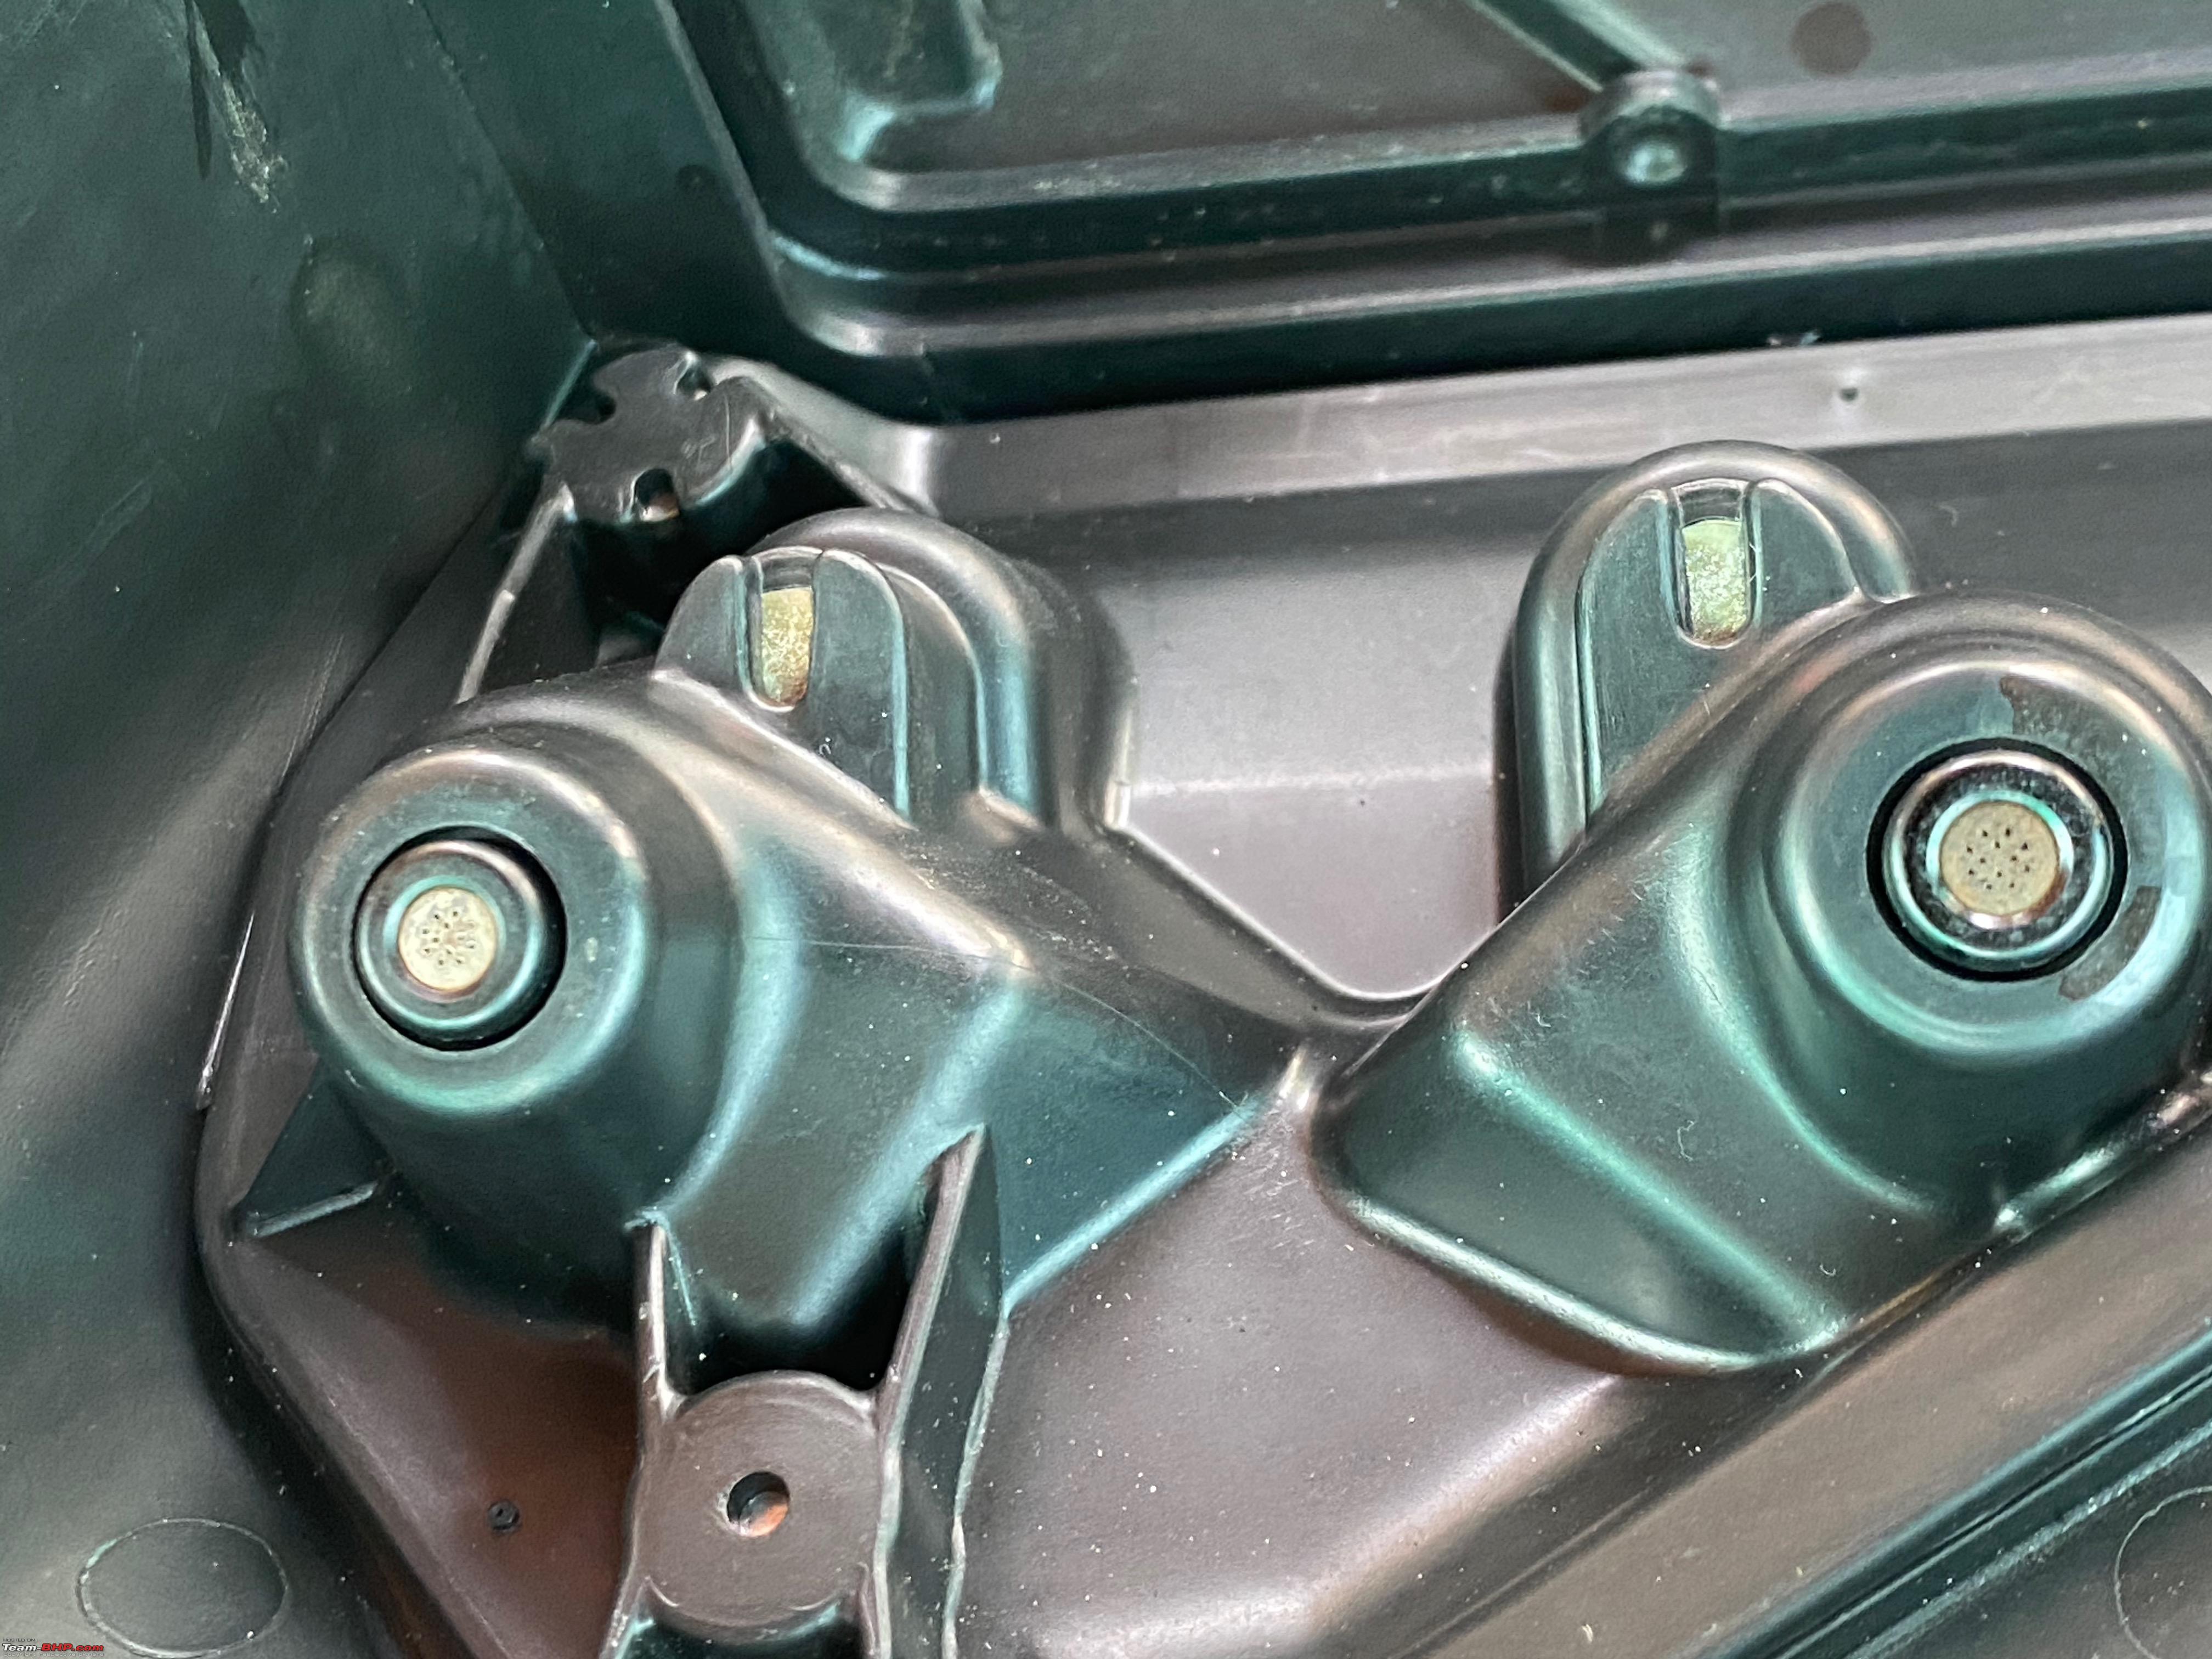 Secondary injector Bank 2 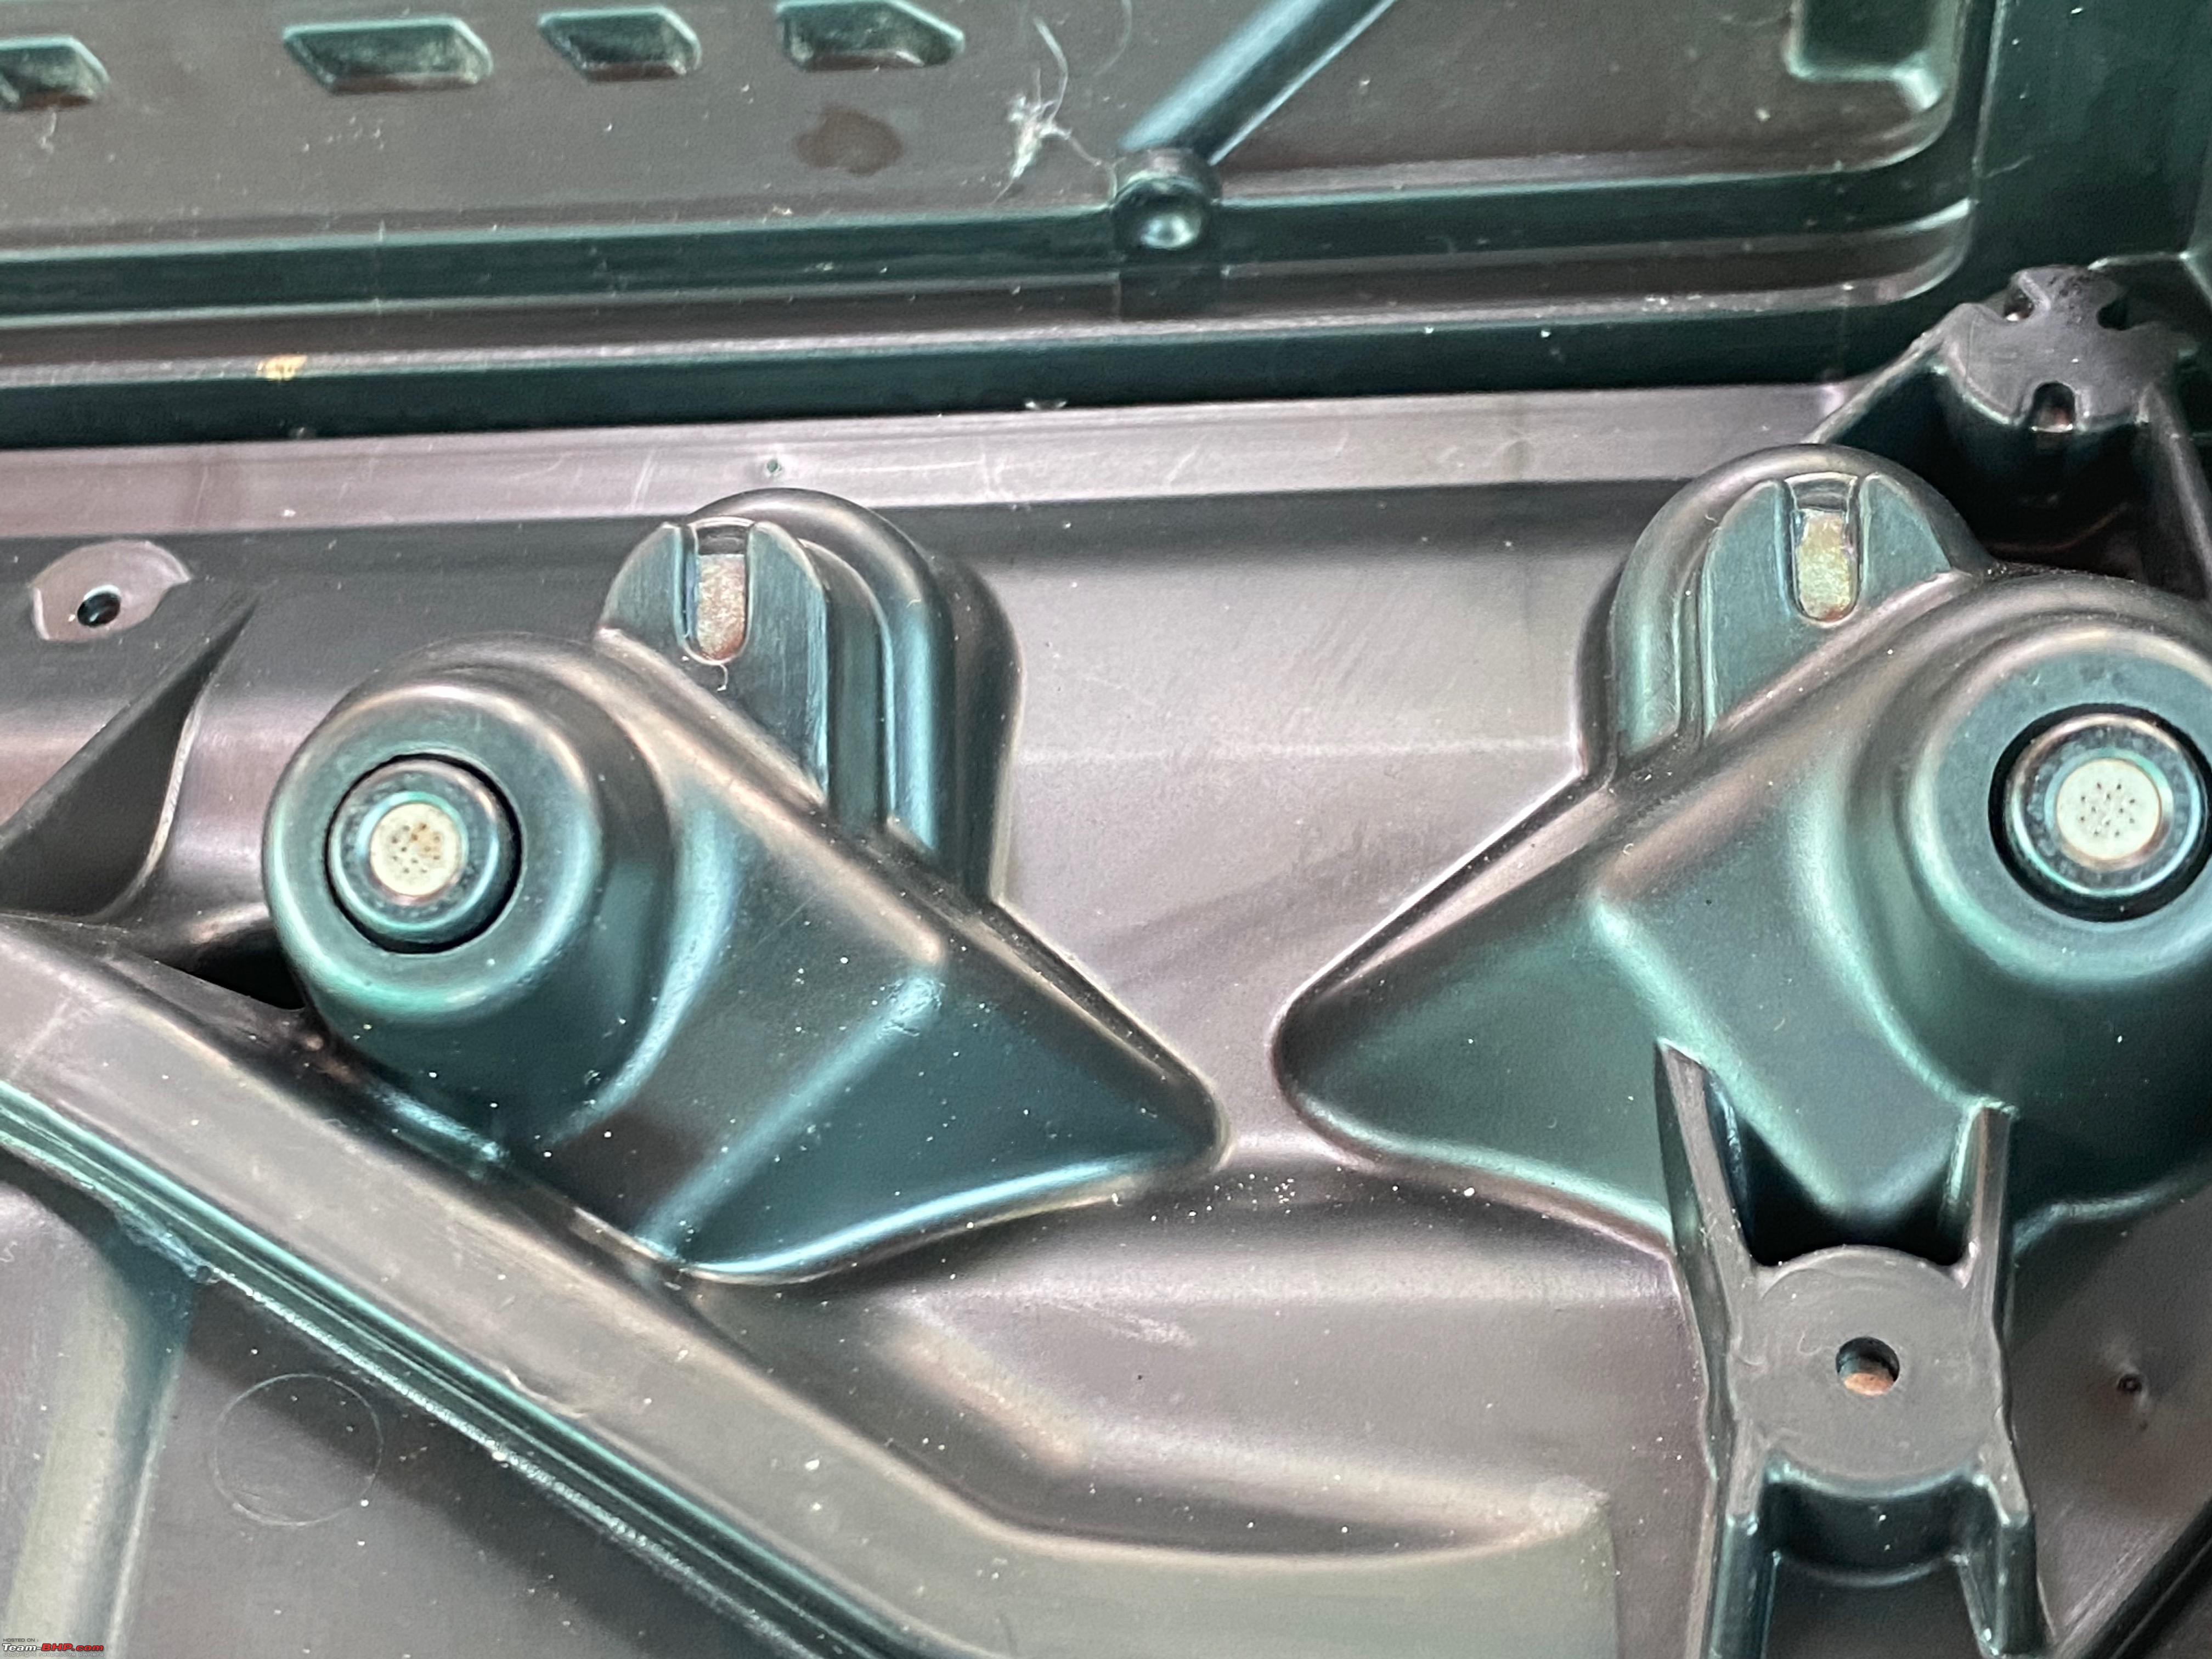 We did not bother dismantling it to the point of removing each injector instead we just sprayed the cleaning fluid up the injector holes so that whenever they do get primed it spits out the gunk and the cleaner fluid along with it. Might not be the best way to do it, but the secondary injectors looked relatively clean on inspection as compared to the primary injectors. By now we had successfully completed cleaning both the TB and the injectors(4 primaries, 4 secondaries), next step was putting it all back together and attempting to start the bike to see if we have solved our hot idle cut out issue. Moreover, we also had to get the bike in running order before we can go in for the TB synchronization check and adjustment. So we did all the steps we did for removing the injectors in reverse order and in about 5 minutes were ready to reinstall the airbox and filter and the fuel tank. Now since we had to remove all of this back out again to do the TB sync we did not tighten down the airbox top cover or the fuel tank as it would prove to be just extra work, but we did make sure the air box has a proper seal on top of the TB so that was bolted down properly. Now we knew we would require quite a few long cranking sessions to get the bike to fire up since now the bike will have to burn and spit out all that gunk through the exhaust before the bike can start up and run properly. And that is exactly what happened, it took us close to 2-3 minutes of cranking(in 5-6 bursts) to get the bike to even cause proper combustion and start-up, and while this was happening you could see all that fluid that had flooded the chamber was exiting through the exhaust as smoke and rich fluid smell. But after enough cranks, the bike sputtered to life and settled to a very healthy idle. No matter how sure you are of what you are doing, the last step of a startup always is a tense moment, and seeing the bike idling butter-smooth was when I had a sigh of relief. We let the bike stay on till temperatures reached 115degrees, flipping it a few times helped speed up the process and then we cut off the bike. Now here was the moment of truth, will the bike hold idle on the next crank. Fingers crossed we went for it and sure enough, the bike roared into like on one single crank and was holding idle steady as a rock. So we finally sorted out the issue and like we suspected it was just a very dirty filthy throttle body and injectors that was at play here. A few here might note that I did mention that apart from hot idle the bike held idle and ran well in any other case. It was after this I realized how wrong I was, I had progressively gotten used to the rougher idle and running that when I saw the way it idled now post-cleanup the difference I noticed was like night and day. Just to make sure it wasn't a fluke, we repeated the process a few more times and the bike held idle when hot without breaking a sweat. The next step is Throttle body synchronization. I'll explain that in the next and final post for the day. Cheers Krishna |
|
| (25)
Thanks
|
| The following 25 BHPians Thank krishnaprasadgg for this useful post: | //M, AmitRavi07, classiccurves, Cyborg, deepfreak15, Divya Sharan, gauravanekar, gururajrv, JoeTheWanderer, jomson13, JTM, KarthikK, neil.jericho, NiInJa, nikhn, NoSugarNoSpice, Researcher, Samfromindia, SnS_12, tchsvy, Ultim8, vaasu, vishy76, Xaos636, yesyeswe |
|
31st January 2021, 16:48
| #191 |
| BHPian Join Date: Dec 2019 Location: KL52
Posts: 519
Thanked: 3,648 Times
| Re: Review: My Yamaha R1 (WGP 50th Anniversary Edition) Update Post 3/3 Now that that was sorted we planned for the next step. Throttle body synchronization, now to do this we have to dismantle everything back again because the adjuster screws and vacuum plug points were at the bottom side of the TB. So we had to do all the steps of removing the tank, airbox, and fuel railings just to get to those points again to hook up the Carbtune synchronization tool onto the TB. So we let the bike cool down for a bit so that we can work on it without burning ourselves. Now we couldn't take picture of how we connected the tubes and cables properly because even with removing everything we had to work with very tight spaces where we can't fit a phone camera into. So I am pasting the workshop manual pictures with a diagram so you get an idea of how it was fit.  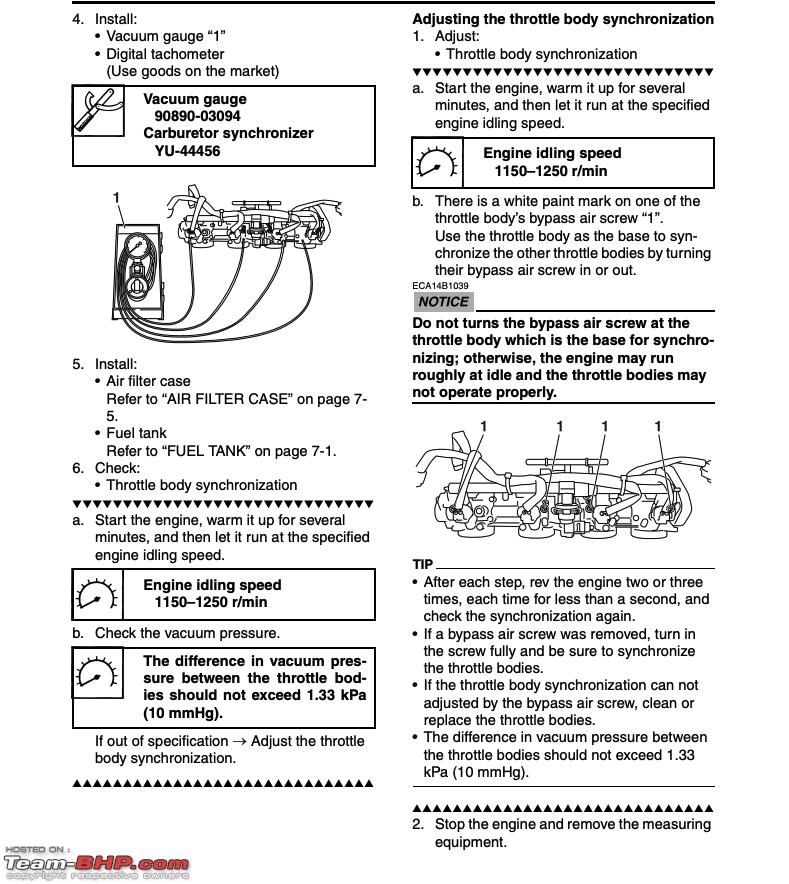 So after connecting the machine we need to now assemble everything back together as we did for the previous job and turn the bike on and let it run for a few minutes. So as we suspected the throttle bodies were out of sync when we now started the work of turning the adjustment screws for cylinders 1, 2 & 4 , keeping cylinder 3 as the reference. After quite a few attempts of adjustment, we managed to get it under spec. Here is a before and after pic of the gauges which show the sync among the TB's Before  After  Also here's a video snippet of the same Now that we were happy with the TB sync we took everything apart to remove our machine and put back the sealant caps on the vacuum plugs and we reassembled everything for the final time and turned on the bike for one last check to make sure nothing is out of place and it was at this point that disaster struck, the bike suddenly started to piss fuel at a very high rate, I was scrambling to find the location fo the leak, at first I feared the worst that we accidentally kinked or cut the fuel line because the fuel was gushing out of the clutch case side at a high rate. I quickly turned off the bike and started to inspect the source of the leak, luckily we had not fixed the tank in its final place so we quickly jacked it up and searched and we found the source of the leak. Luckily the fuel line was intact, the source of the leak was through primary inject for cylinder 3. What happened was when we removed the fuel rails to remove the TB sync tool when we put back the injector in place the inlet seal had not sealed shut properly and that's why fuel was gushing through like a broken pipe. We quickly dismantled everything back and made sure that all injectors were seated in (both sides) properly and there was no chance of a leak again. Luckily this time everything was sorted. We buttoned down everything but the fuel tank and ran the bike for 1 last check and everything was in place, no leaks or anything of the sorts, retested the hot idle case and it held idle beautifully, bike even sounded a lot smoother, and the throttle input was much crisper in the RPMs rising and falling. By now it was around late evening and we stopped for a break to grab some food as we only had an oil change and a shakedown run to do. At the rate that we breezed through the tougher jobs, one would think this would the easiest of all jobs, right? WRONG! Everything went wrong about the oil change. To start with we pushed the oil change to be done at late night so that we won't have to work on the bike the next day(today) and since it was just an oil change we don't need a lot of light just a few proper concentrated lights should do which we had. Which was still not really a problem Next, the oil filter would not budge, no matter how hard we tried, it just won't budge. We used a filter removal clamp tool, we used the filter removal strap tool, nothing worked. We tried so hard with the clamp tool that it ruptured the old filter a bit and oil started leaking out. We even tried the famous drive a screwdriver through the filter method and that too did not work. At this point, we were sitting with our heads in our hands thinking what to do next. That is when we used the clamp tool again but clamped it on the outer edge of the filter and gave it one last try, for some lucky reason it worked and the filter cracked loose. We inspected the oil filter mating surface and the seal was intact without any cuts or gauges and the filter was proper wet and lubricated too, so it was not that the filter seal got damaged, there were no scratch marks on the engine sump mating surface also it's all clean and shiny. To make the matter more confusing I know for a fact that the oil filter was just hand tight on there because the person who installed it was my trusted mechanic and I was standing right beside him watching him do it. I have no idea what happened there but that was a weird one. Have a look at the surface and seal of the old oil filter, everything looks perfect. 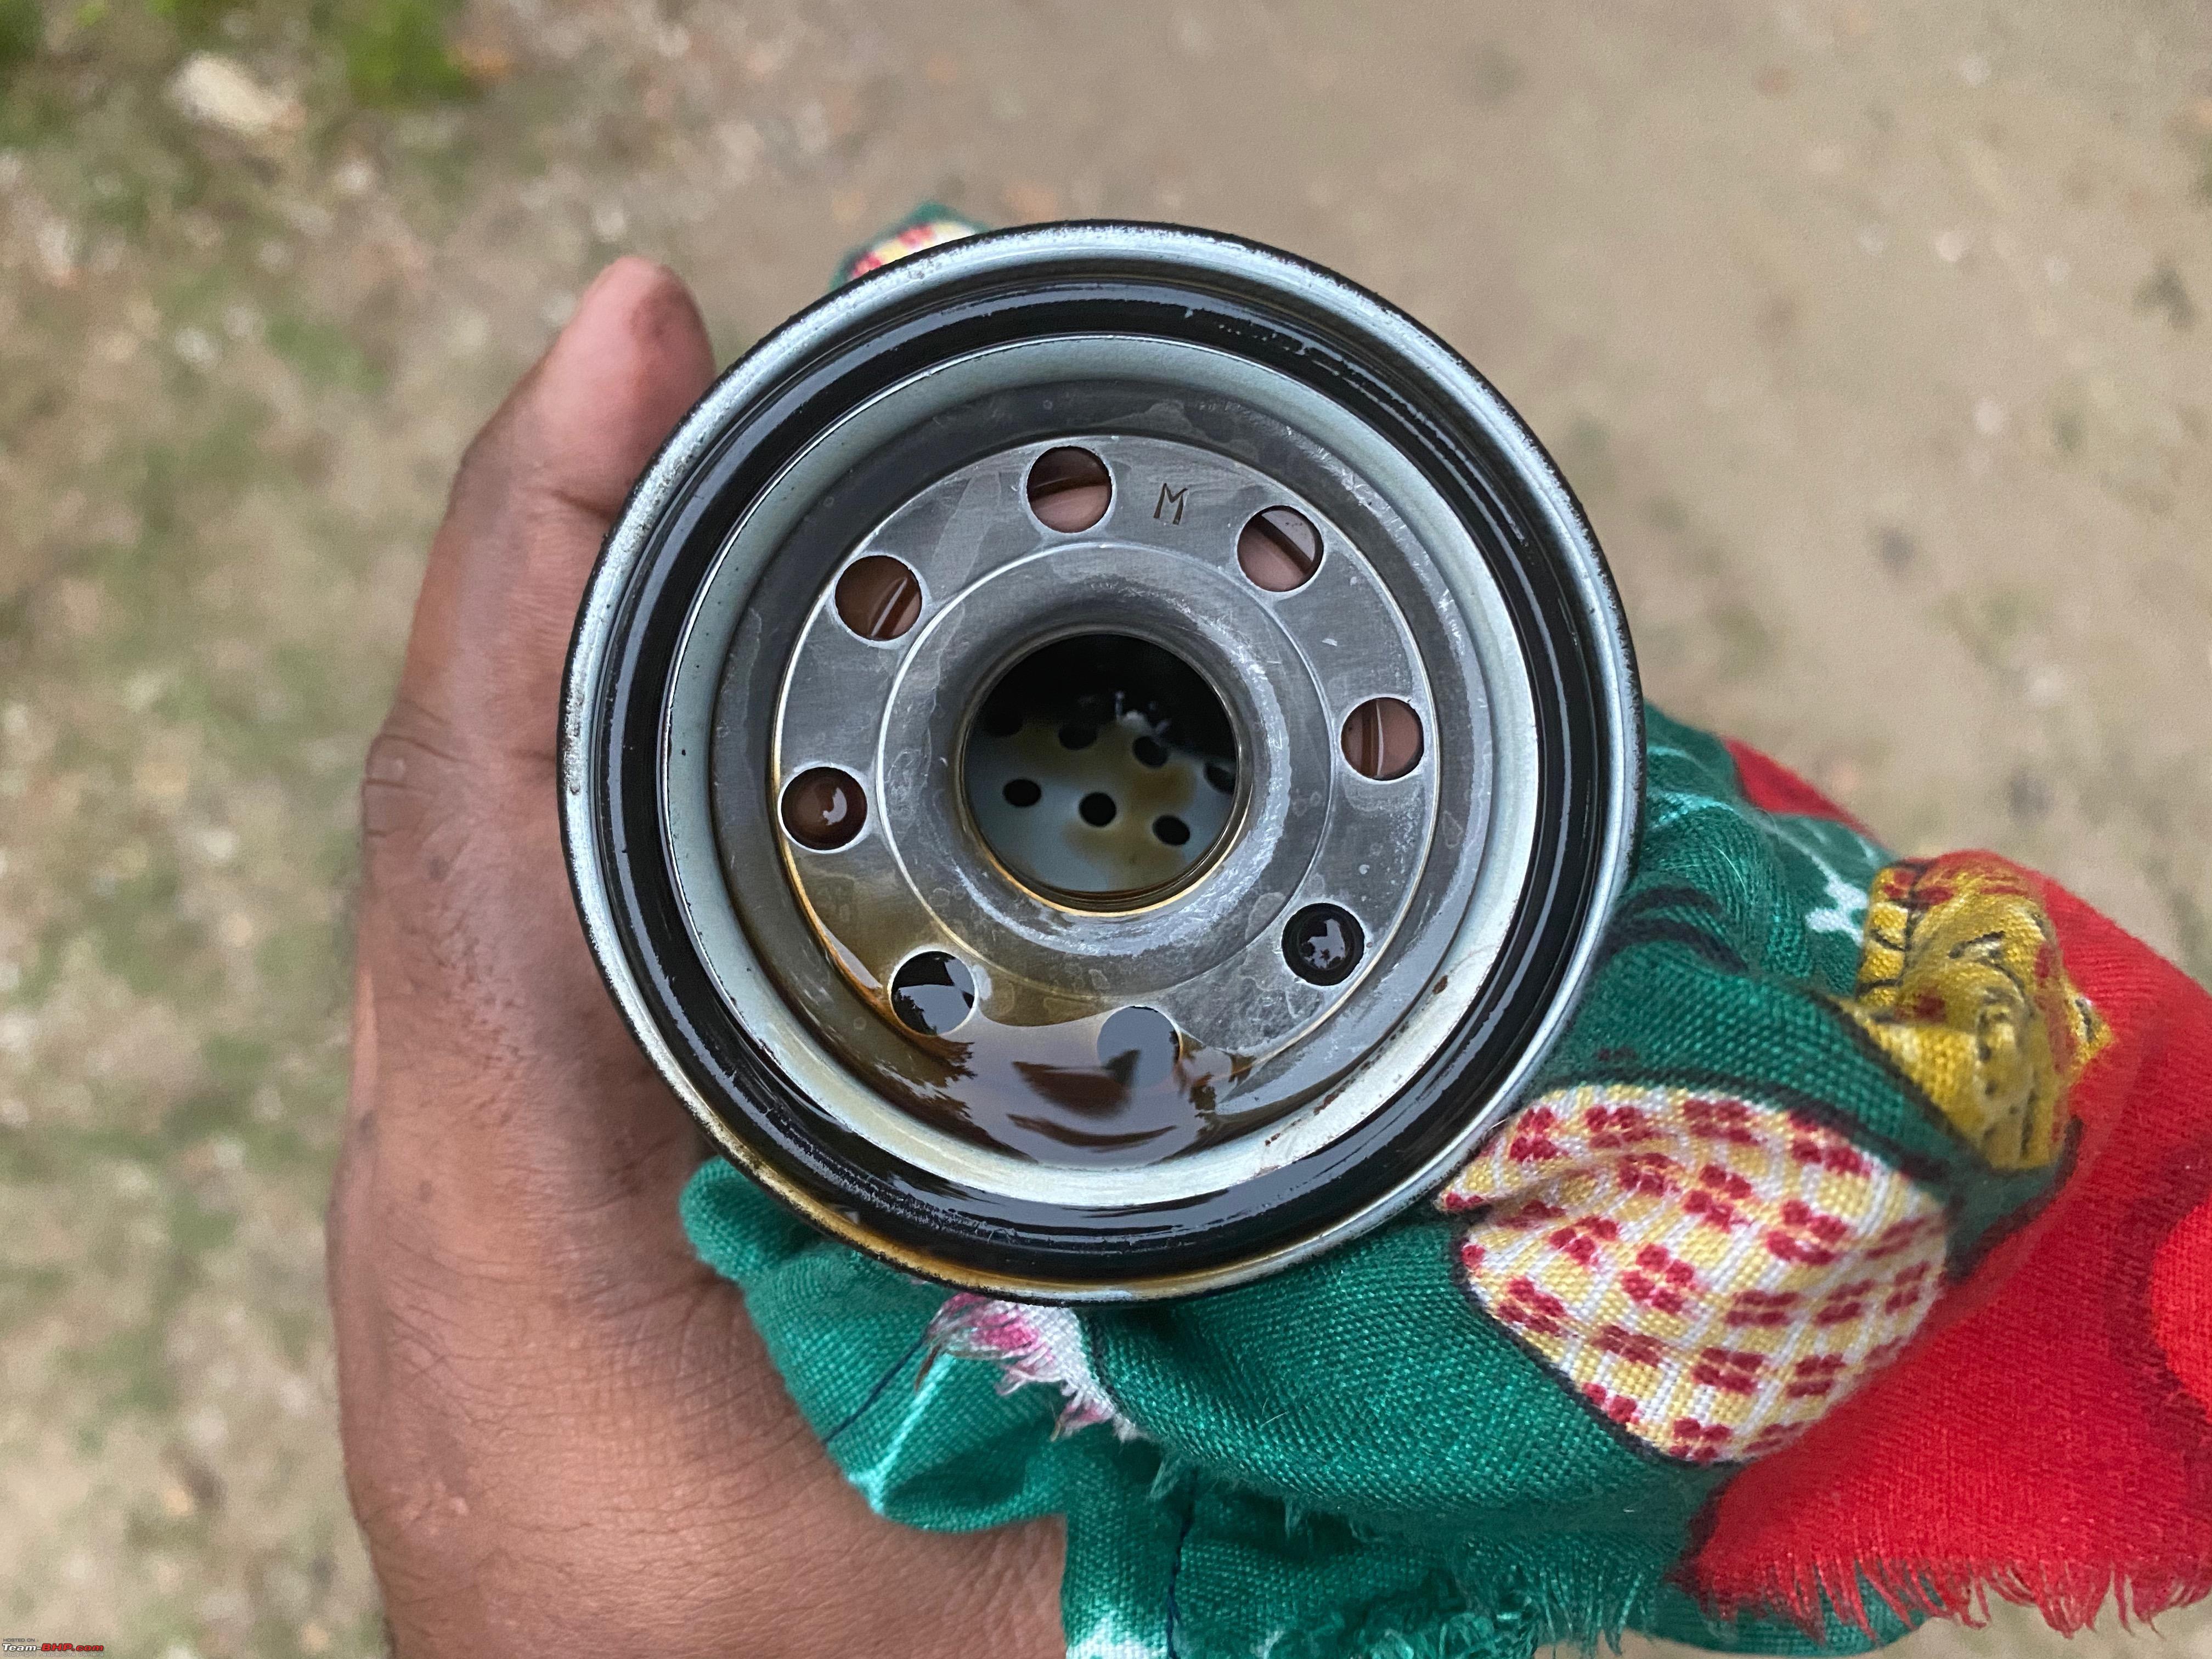 The aftermath of our multiple attempts to remove it using the clamp and the screwdriver technique. 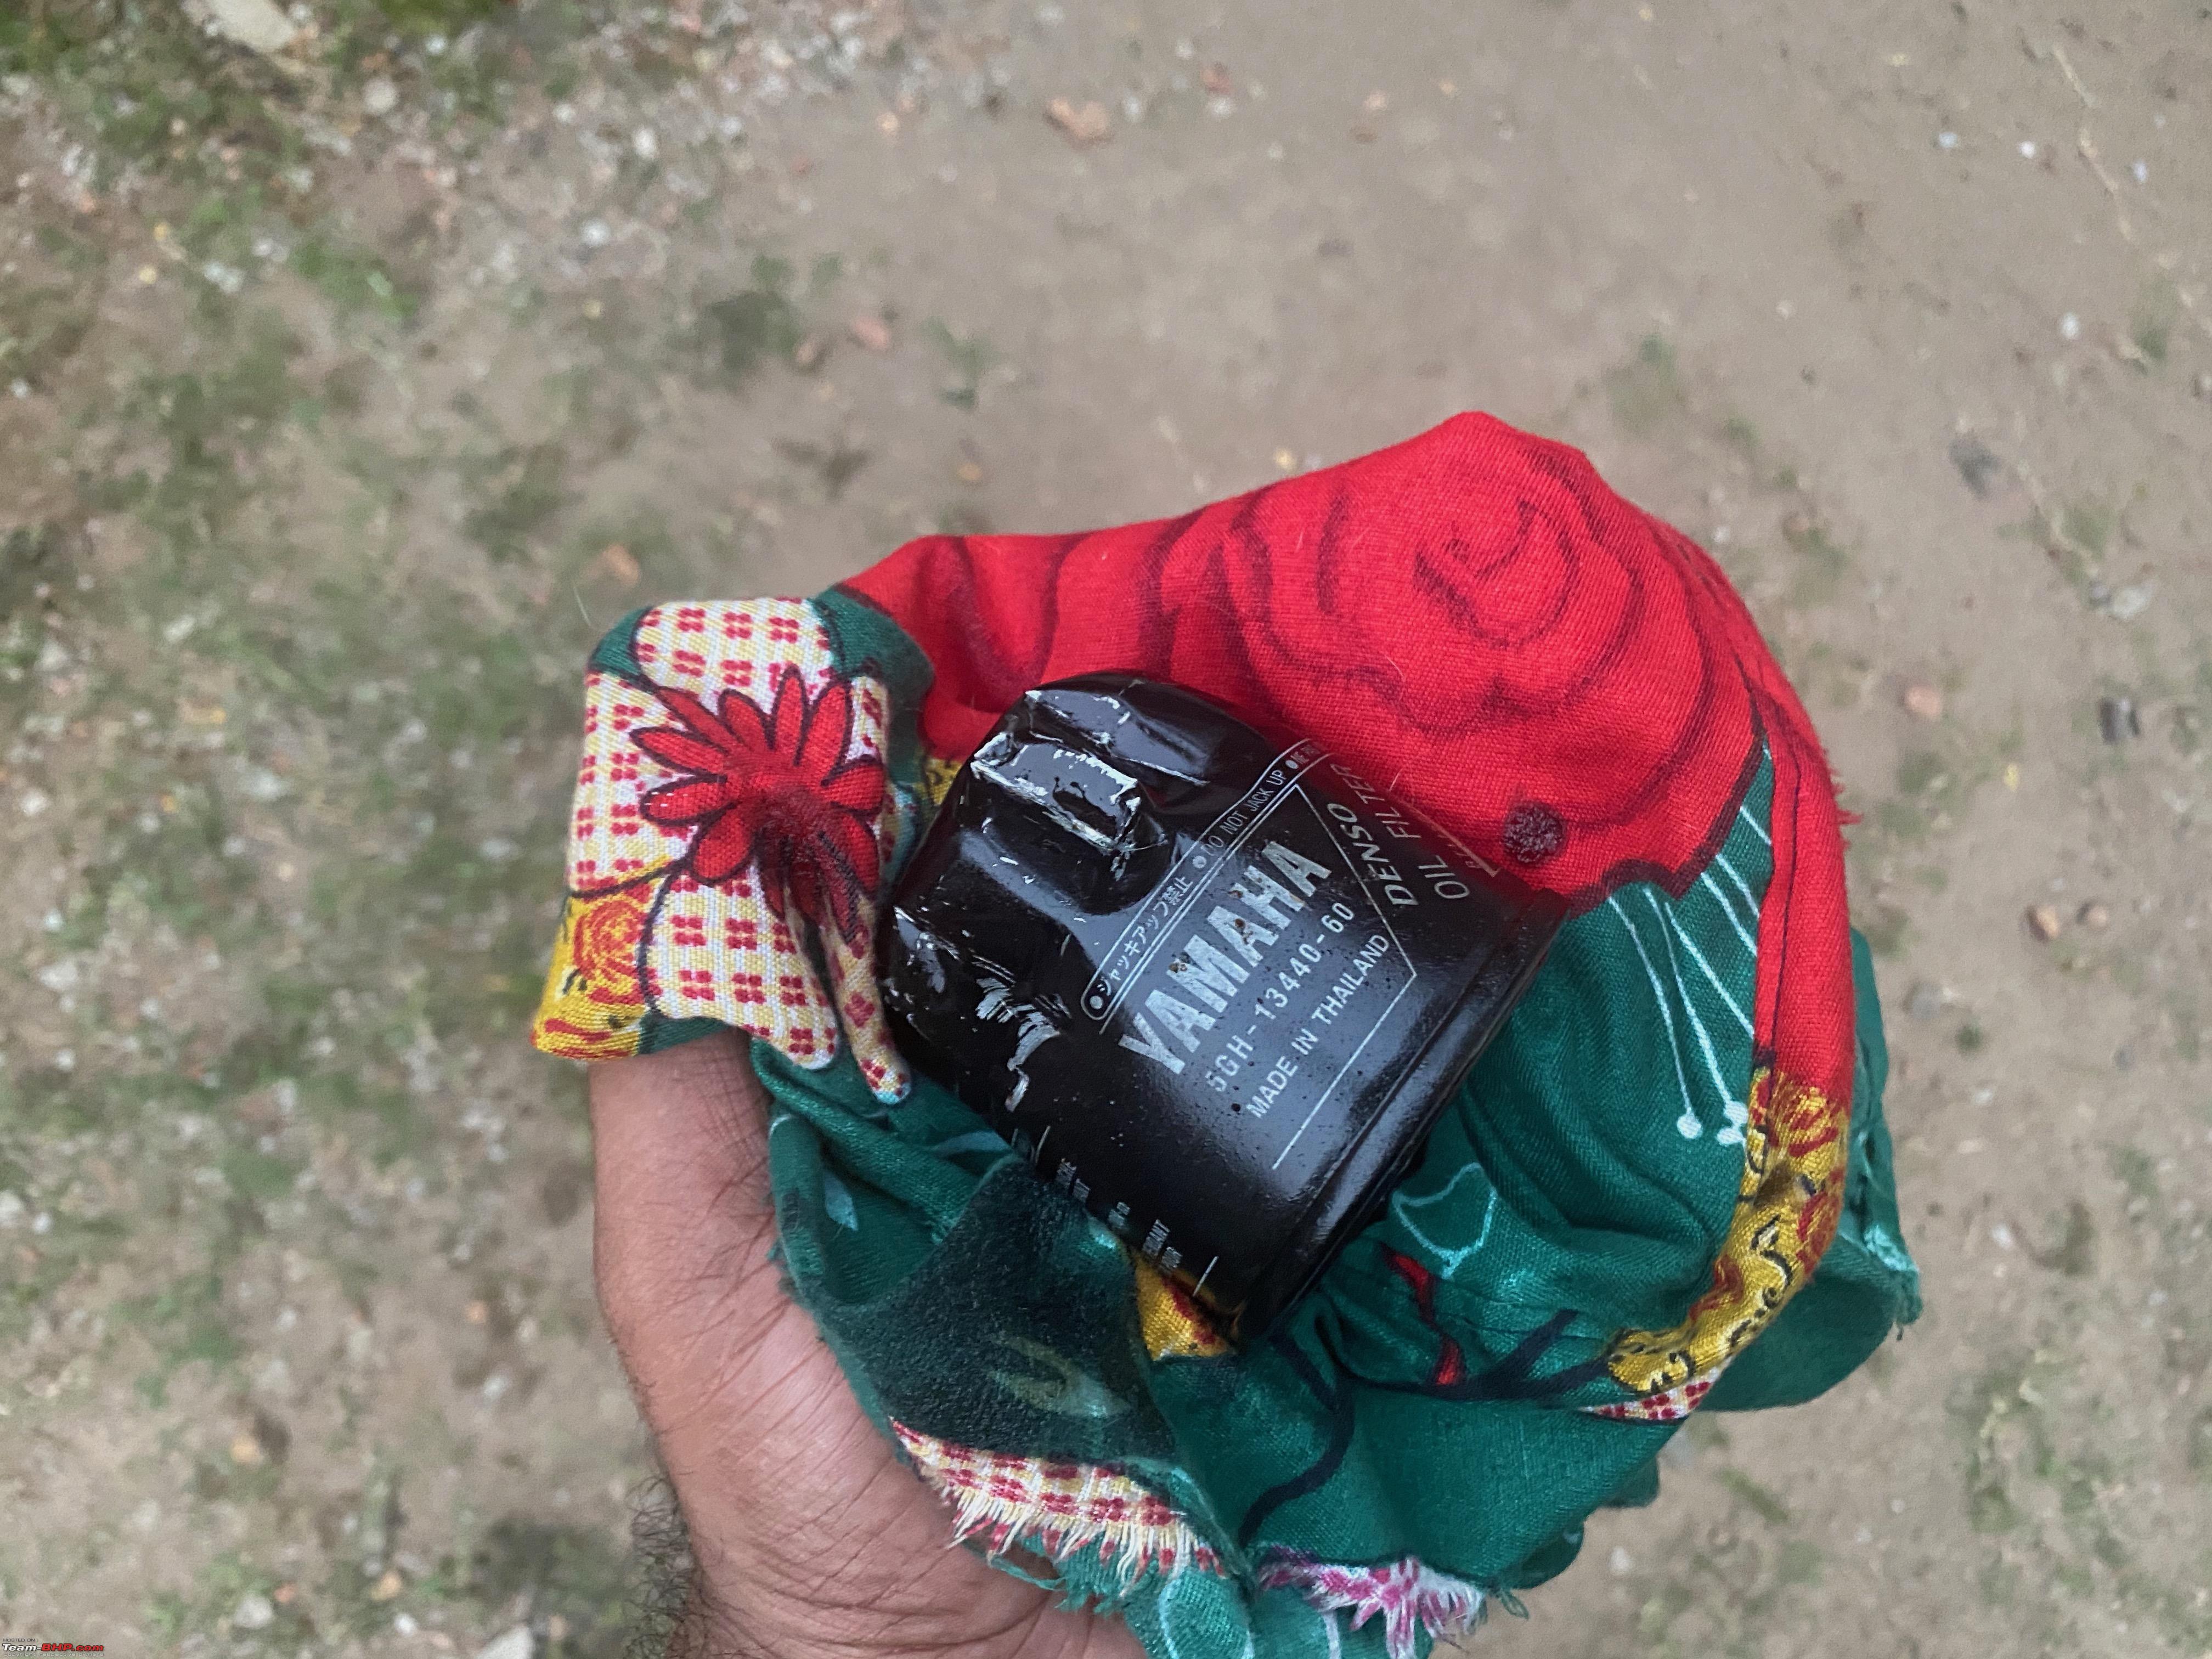 Next, it was the turn of the drain plug, same issue, it took much more effort from our side to get it to open up but when we inspected the crush washer and the surface, absolutely no scratches or marring anywhere to be found. once again the last time it was tightened back it was torqued down to spec. Torque rating for the oil filter  I don't know if it was the cold or that the filter and drain plug were left untouched for close to a year that caused it to be so stubborn with us. I have no clue. By the time this was sorted, we left the bike to fully drain out the oil for about 20 mins and then put back the drain plug with a fresh crush washer and torqued to spec and poured in fresh oil. I used Liqui Moly Street Race 10W40. Same as last time, I am pretty happy with it. Filling up fresh oil 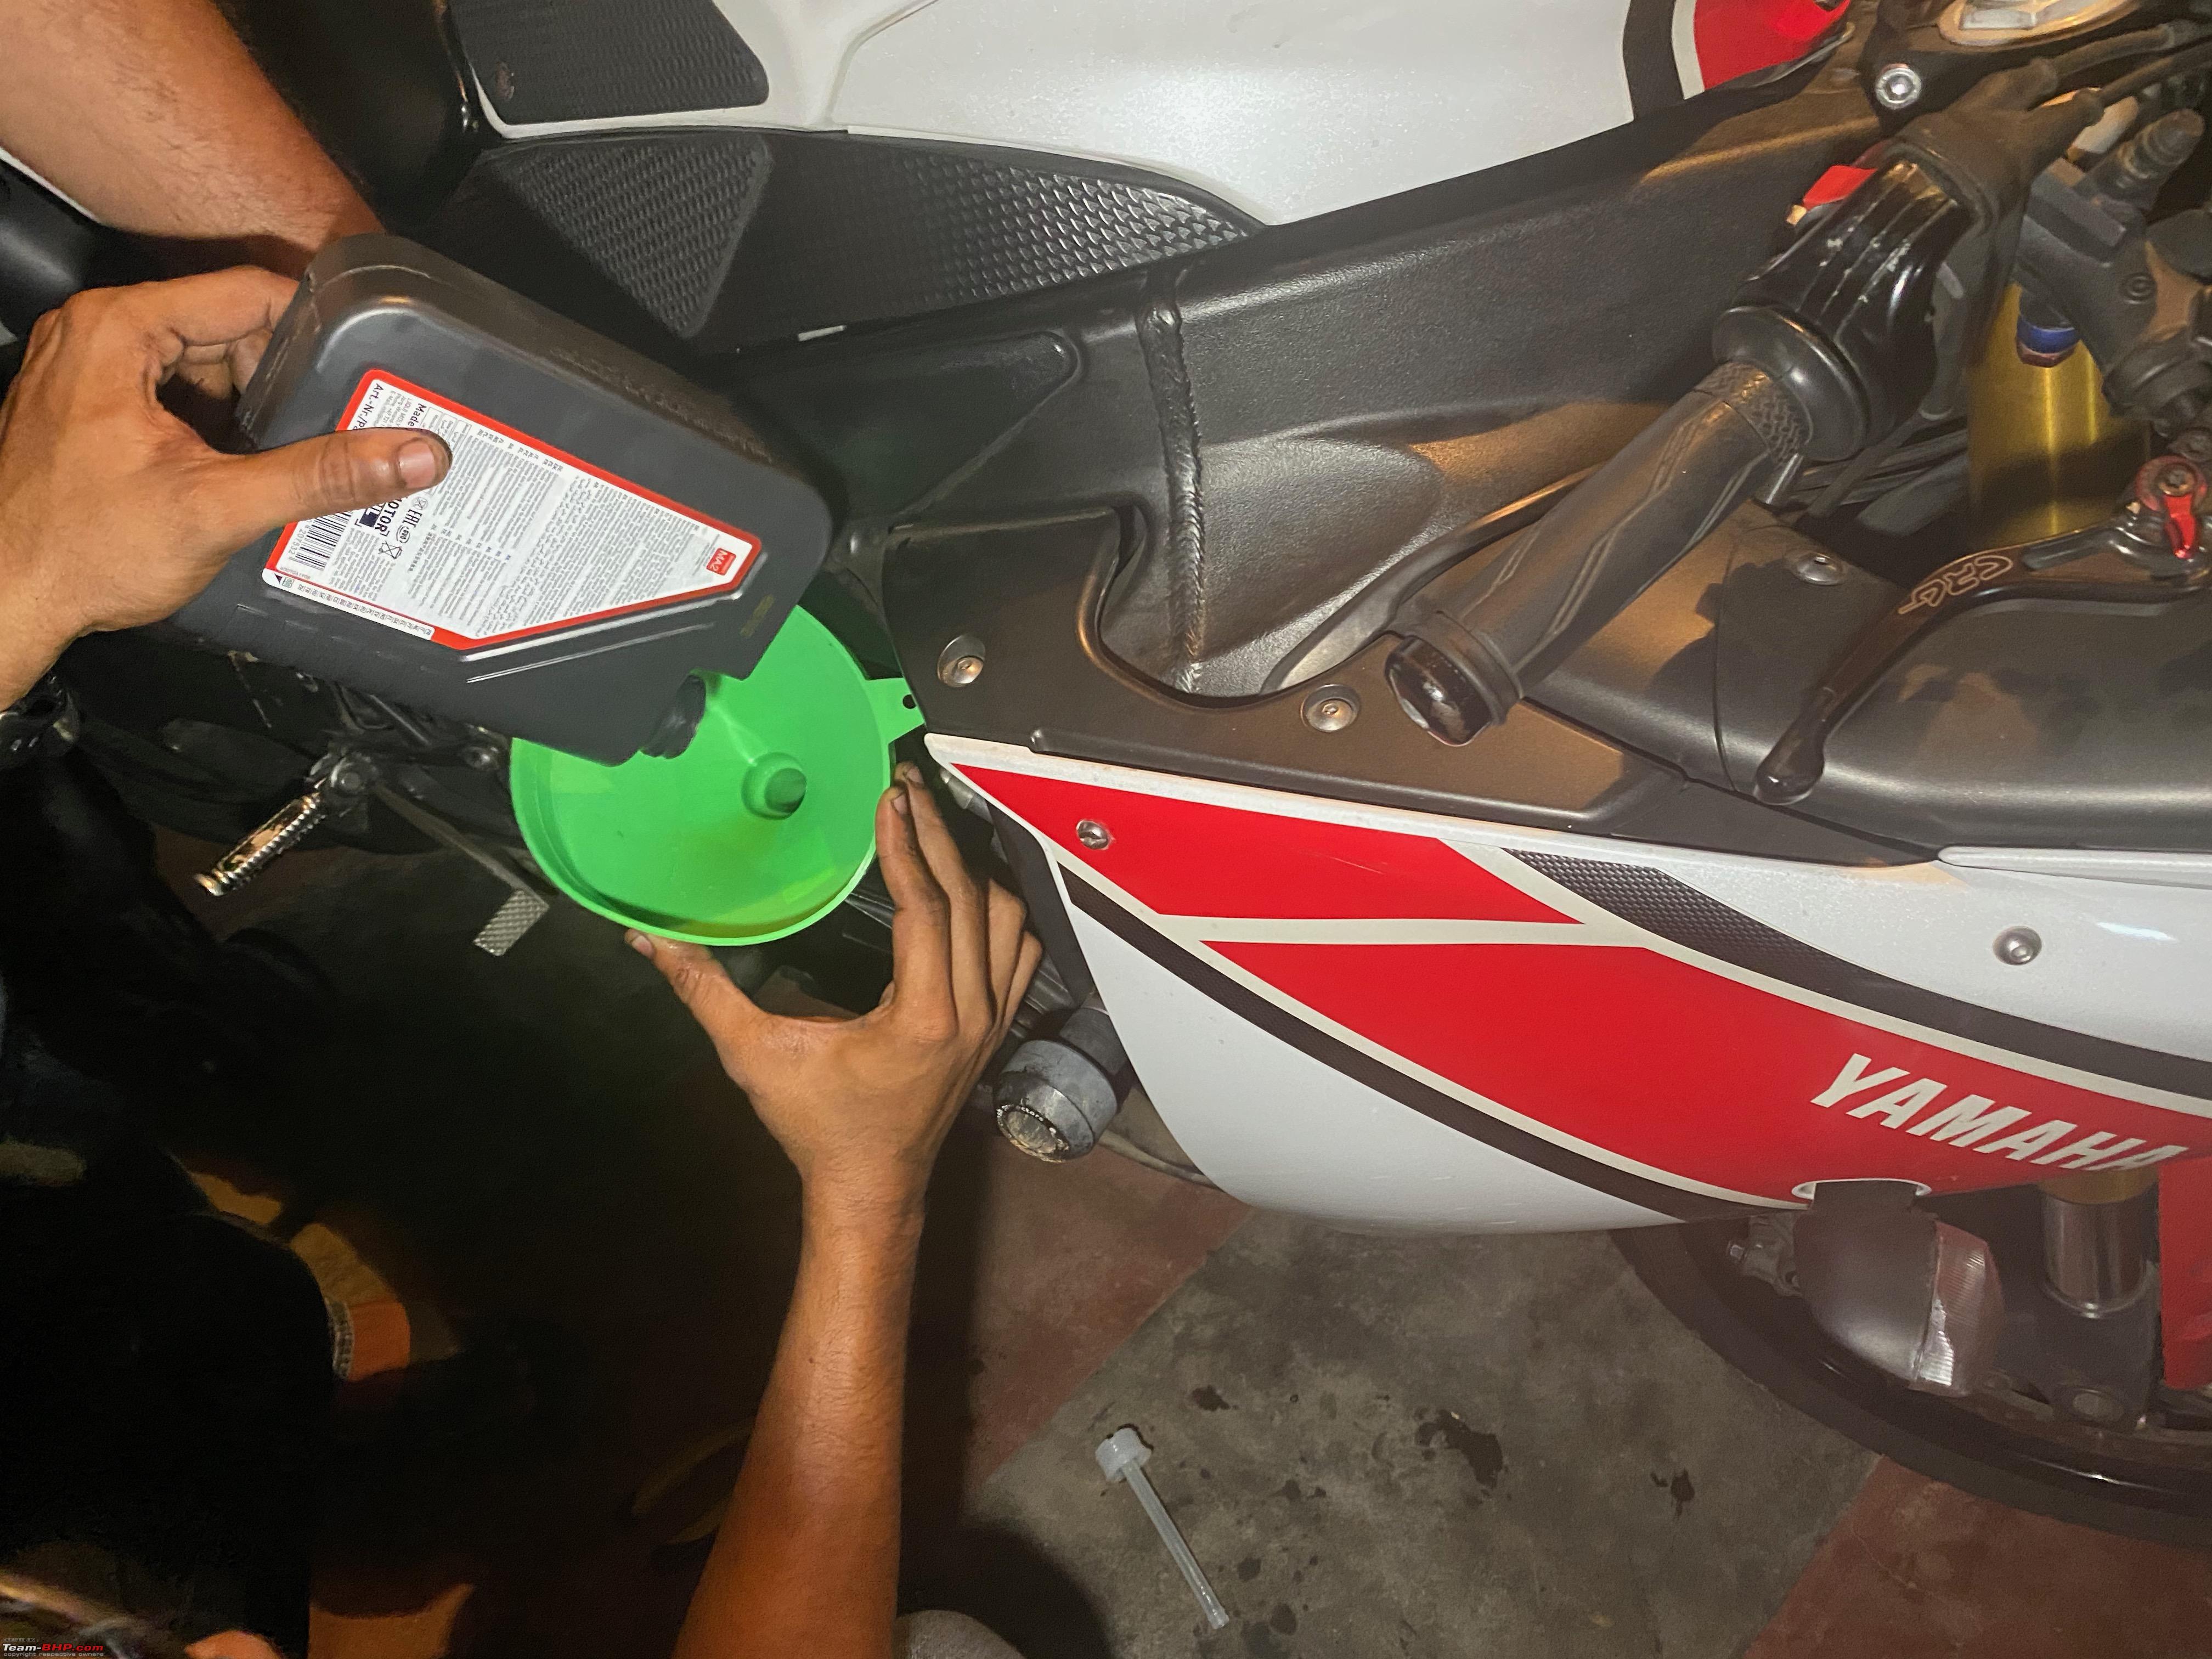 For the oil filter this time I went with the Hi-Flow Racing filter. Which has a much higher surface area for filtration is a direct OEM replacement fitment for the R1. The part number for the same is HF204 RC.  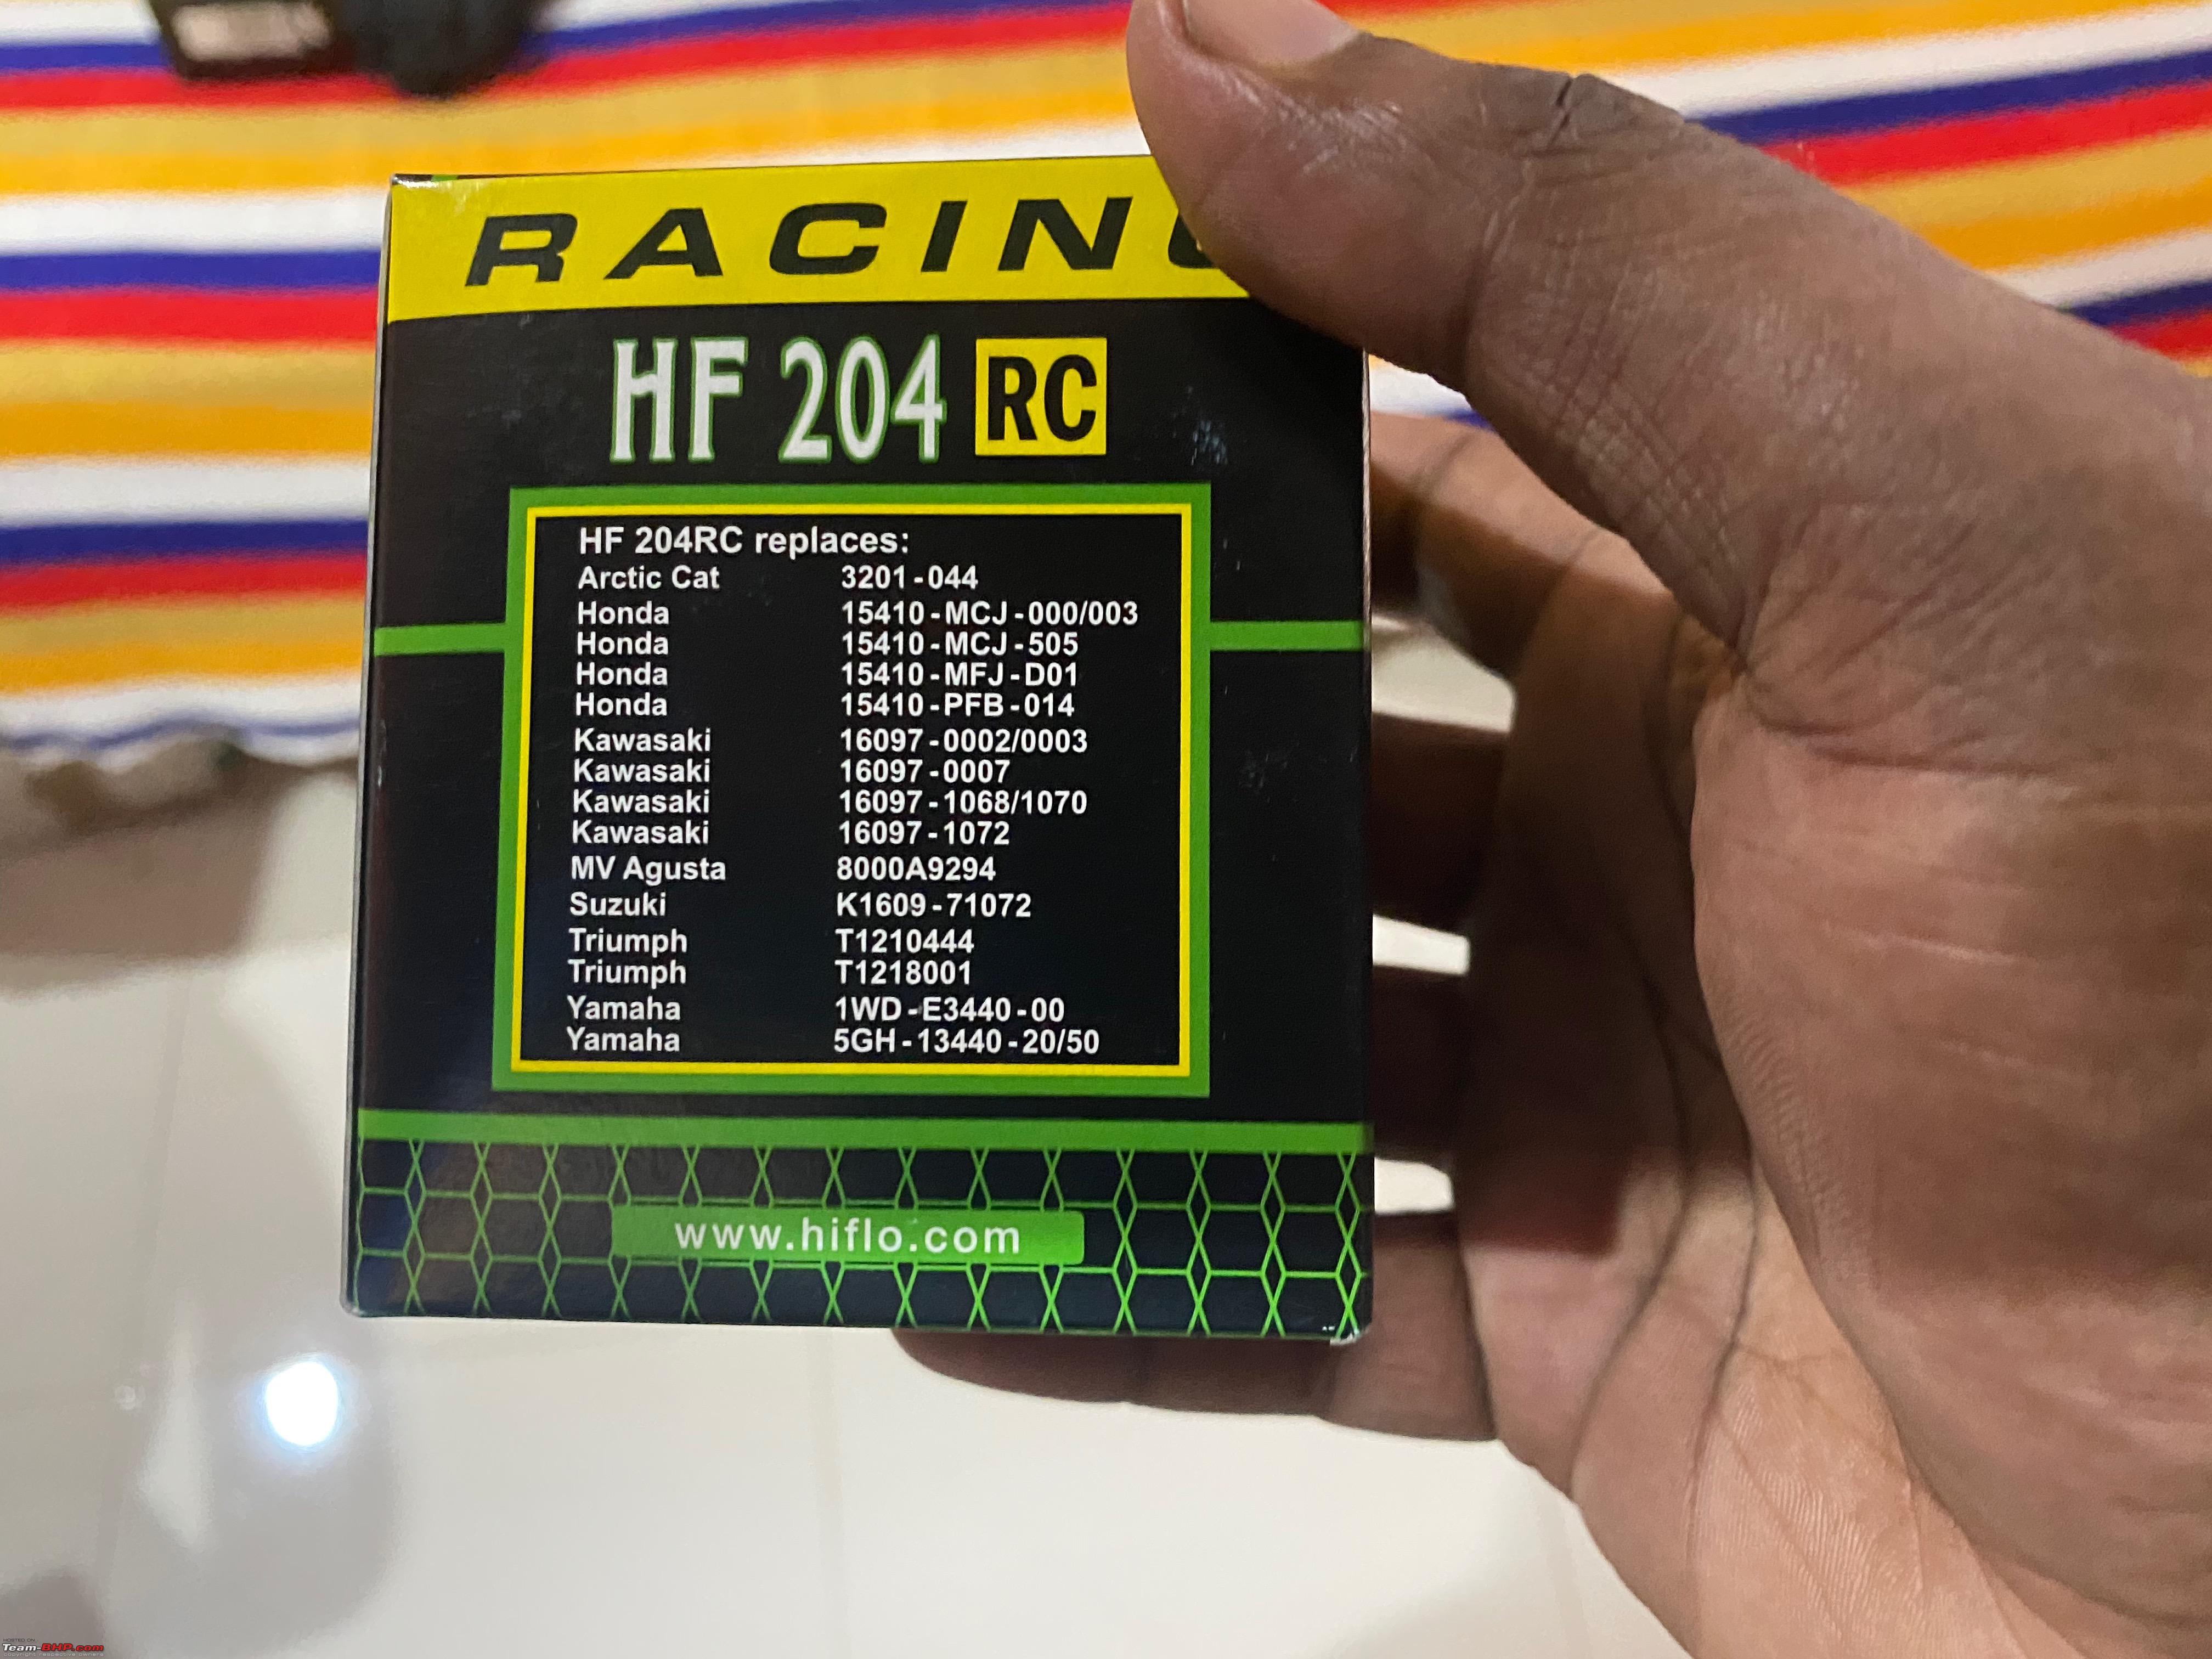 I went with this even when I had a few HF204(OEM replacement) because the RC having a higher surface area. By the time we were done with this, it was around 1.30 AM and none of us was in the mood for a Shakedown run. So instead we filled the bike up with 5 liters of the newly launched Indian Oil 100 Octane fuel we had bought when we went to grab food and stopped for the day. Early next morning at around 6 we woke up and took looked around the bike for any leaks of any sort, luckily the area was bone dry. So we started the bike up for warming up and the. oil to evaporate which was spilled on the headers when removing the oil filter post which we took the bike out for a shakedown run and everything was solid. The bike felt super smooth and the throttle response was insanely good. And with the 100 Octane, the bike felt even smoother with it running and pulling with no knocks at all. At this point, I decided to wrap things up and go back home. Filling her up with 100 Octane 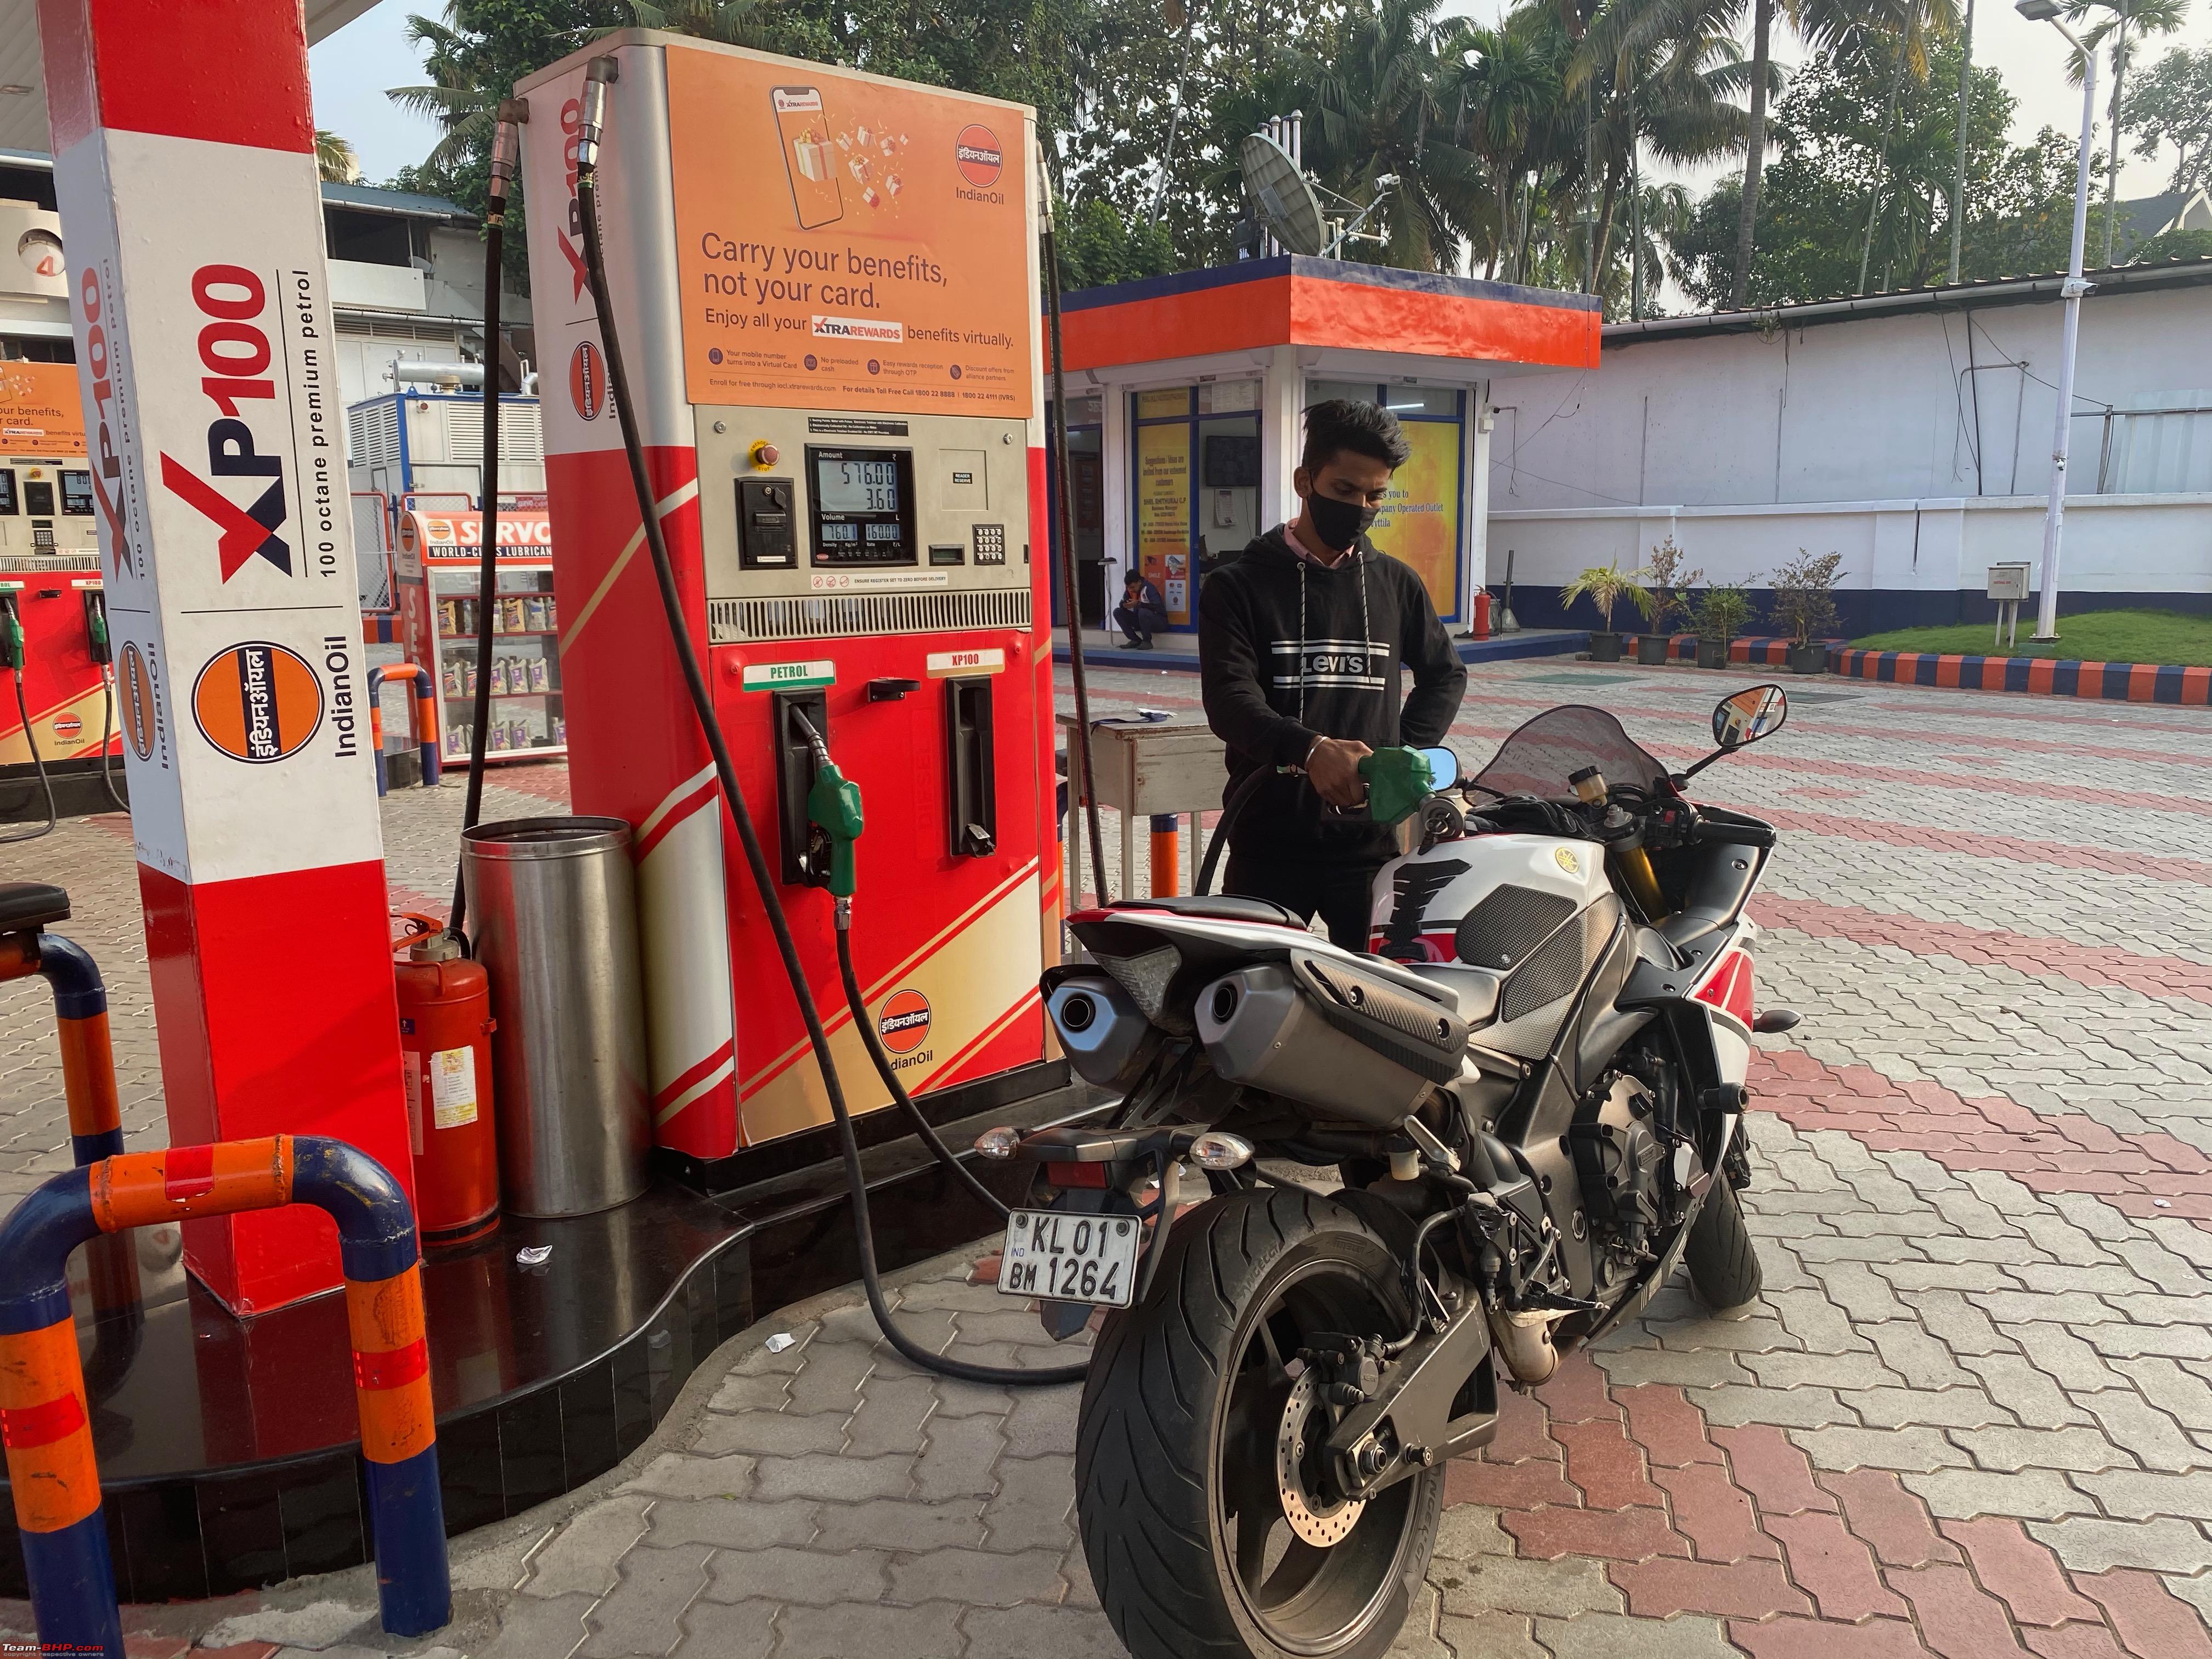 I went back to the pump and filled her up to the brim with 100 Octane and covered the 150 odd km back to my home. She performed beautifully during the return ride without giving me any issues at all. Heck, I even stopped en route a few times to test the hot idle issue just because I was somehow still paranoid about it but she was just perfect. Oh by the way the 100 Octane fuel. It comes at an eye-watering Rs.160 per L. But the good part is it is available at only a pump that's 150kms away from my house, so in a way, I won't have to be subjected to that cost very often.  So yeah to sum it up. Had a very productive weekend working on the bike and the satisfaction we got on fixing a problem ourselves is immense, even though we had a few snags here and there along the way. 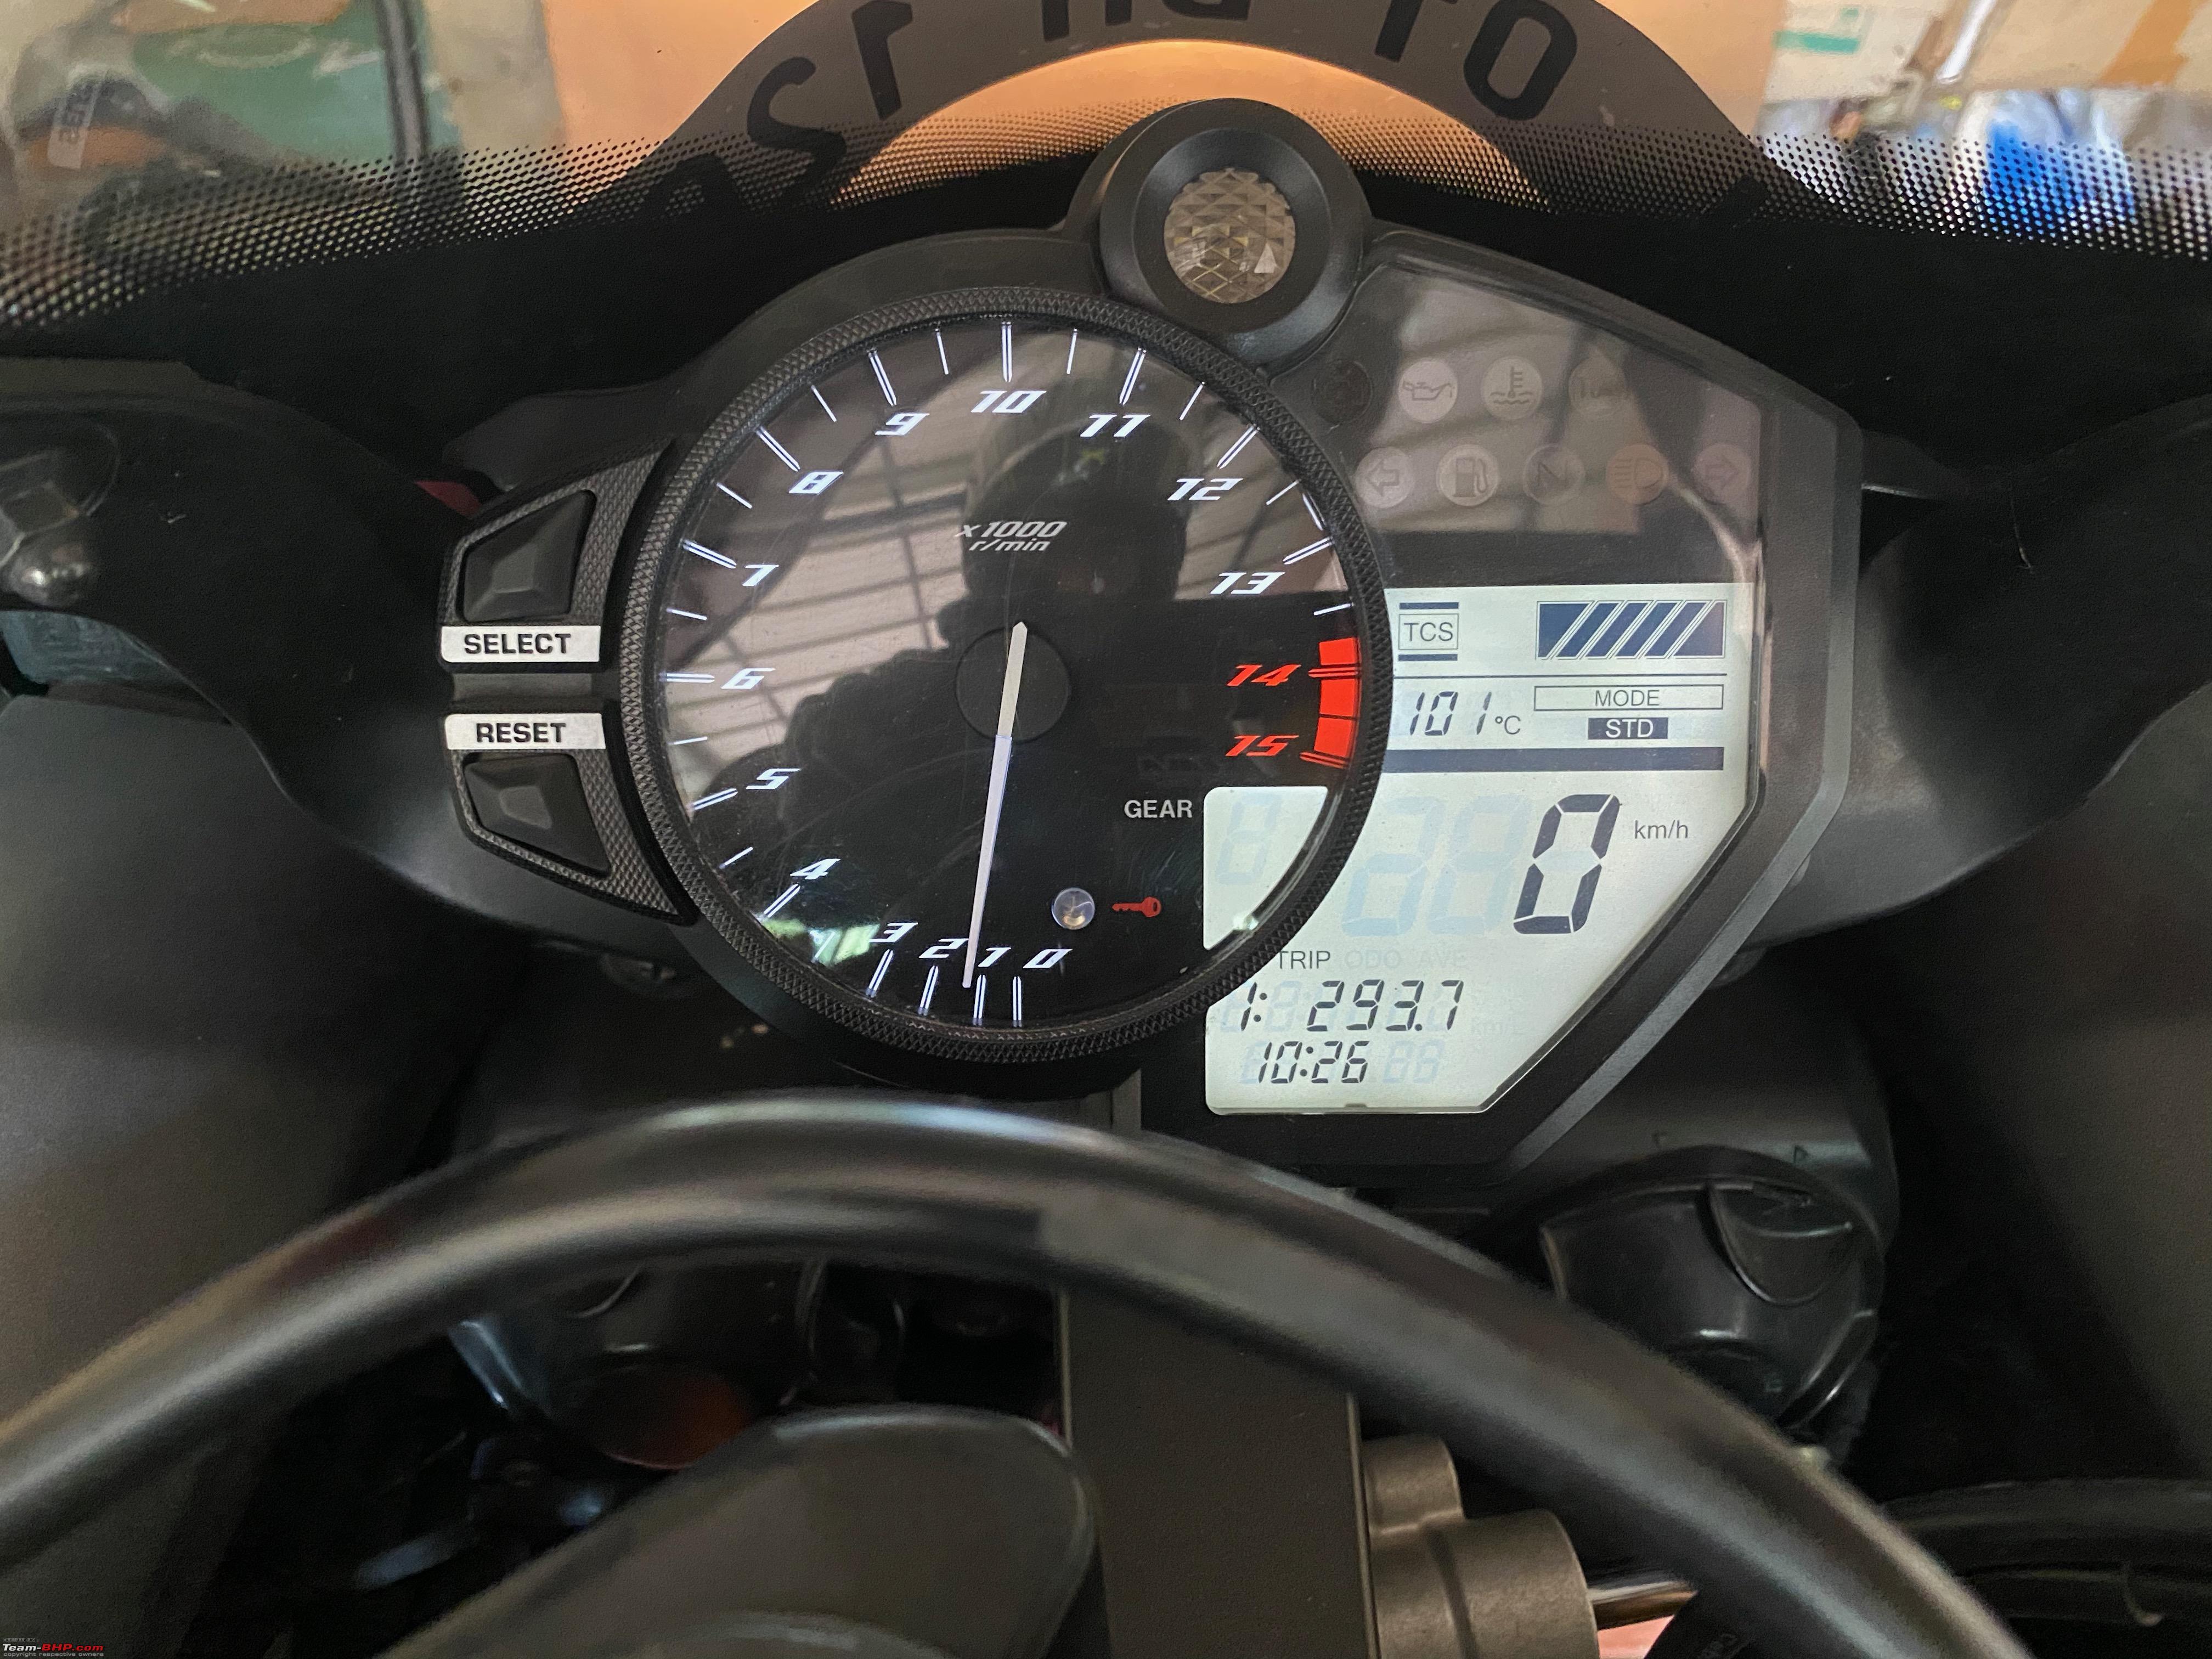 Hope you guys enjoyed the long post. Cheers Krishna |
|
| (28)
Thanks
|
| The following 28 BHPians Thank krishnaprasadgg for this useful post: | //M, abhi_tjet, akshayhonda, AmitRavi07, arjunsatheesh, Cyborg, deepfreak15, DevilzzzzOwn, Divya Sharan, gauravanekar, gururajrv, JoeTheWanderer, jomson13, JTM, KarthikK, Mr. Nobody, Naveen_0181, neil.jericho, nikhn, nitinkbhaskar, Researcher, SnS_12, tchsvy, Ultim8, vaasu, VijayAnand1, Xaos636, yesyeswe |
| |
|
31st January 2021, 17:19
| #192 |
| Senior - BHPian Join Date: Nov 2009 Location: Bombay
Posts: 1,694
Thanked: 3,856 Times
| Re: Review: My Yamaha R1 (WGP 50th Anniversary Edition) Krishna, amazing thread and smashing DIYs all along. Salute to both of you, your determination, hard work and technical knowledge is superb. Plus the detailed write up with photographs makes us feel we are also there with you. Keep riding and sharing your experiences, it makes great reading. Ride safe! Cheers |
|
| (2)
Thanks
|
| The following 2 BHPians Thank Cyborg for this useful post: | krishnaprasadgg, neil.jericho |
|
31st January 2021, 19:10
| #193 | |
| BHPian Join Date: Dec 2019 Location: KL52
Posts: 519
Thanked: 3,648 Times
| Re: Review: My Yamaha R1 (WGP 50th Anniversary Edition) Quote:
Cheers Krishna | |
|
| (4)
Thanks
|
| The following 4 BHPians Thank krishnaprasadgg for this useful post: | Cyborg, KarthikK, neil.jericho, SnS_12 |
|
31st January 2021, 19:53
| #194 |
| Distinguished - BHPian  Join Date: Aug 2009 Location: Cochin
Posts: 3,810
Thanked: 19,328 Times
| Re: Review: My Yamaha R1 (WGP 50th Anniversary Edition) My goodness! What a wonderful series of posts. I didnt understand all of it but I grasped enough to confirm my suspicion that this is probably the most technical and hands on ownership thread of a litre class machine by an Indian rider. Hats off to you and your friends (related post will come up in my thread soon) for getting all this work done yourselves and, equally importantly, sharing all this information with us. Once I learn more about these processes, I will be sure to come back to this thread and refer to these posts to validate my understanding. |
|
| (3)
Thanks
|
| The following 3 BHPians Thank neil.jericho for this useful post: | KarthikK, krishnaprasadgg, SnS_12 |
|
1st February 2021, 07:01
| #195 | |
| BHPian Join Date: Dec 2019 Location: KL52
Posts: 519
Thanked: 3,648 Times
| Re: Review: My Yamaha R1 (WGP 50th Anniversary Edition) Quote:
Like I said in the previous post, for the R1 the help I get from them is instrumental and would not be possible without them, while on the CBR I manage most of the stuff on my own, that reminds me, I have a big DIY thread still pending on the CBR  Cheers Krishna | |
|
| (3)
Thanks
|
| The following 3 BHPians Thank krishnaprasadgg for this useful post: | gauravanekar, KarthikK, SnS_12 |
|