Team-BHP > Shifting gears
Register New Topics New Posts Top Thanked Team-BHP FAQ


Reply
  Search this Thread
87,751 views
Old 18th March 2022, 19:09   #151
BHPian
 
Amrik Singh's Avatar
 
Join Date: Aug 2010
Location: New Delhi
Posts: 660
Thanked: 3,371 Times
Re: The Woodworking Thread

Quote:
Originally Posted by condor View Post
I dropped in at one place that buys these pallets. Not the SBK shipping pallets - but other stuff. They separate the pieces, and looking at the way they are stacked, looks like they do sell them. Price quoted - Rs 25 per kg.

A intact pallet of about 3' x 3' x 6" was quoted at about Rs 825

Amrik bhai - I did see lot of damaged stuff piled up there.
Do not know of now, but used to buy scrap wood off large shipments to Maruti and other industry in New Delhi in '95.
It seems you are indicating to pellets in India and honestly, I am not aware of their quality. I was referring to having worked on pellets in US recently.
Amrik Singh is offline   (1) Thanks
Old 18th March 2022, 23:51   #152
BHPian
 
GutsyGibbon's Avatar
 
Join Date: Mar 2008
Location: Southern Calif.
Posts: 756
Thanked: 4,556 Times
Re: The Woodworking Thread

Quote:
Originally Posted by condor View Post
A intact pallet of about 3' x 3' x 6" was quoted at about Rs 825
That is expensive more than $10. I just look on Craigslist or by the dumpsters of warehouses, to shipping and receiving dock of my employer. There is always a ton lying around, and they let people take it. It is common to see ads like this.
https://sandiego.craigslist.org/csd/...459639825.html
GutsyGibbon is offline  
Old 19th March 2022, 07:56   #153
Distinguished - BHPian
 
condor's Avatar
 
Join Date: Jun 2006
Location: Speed-brkr City
Posts: 15,867
Thanked: 16,023 Times
Re: The Woodworking Thread

Quote:
Originally Posted by GutsyGibbon View Post
That is expensive more than $10. I just look on Craigslist or by the dumpsters of warehouses, to shipping and receiving dock of my employer.
Yes, expensive. But he could be trying to make a buck while the opportunity is there (some one coming and asking for that).

I think I will check once at the warehouse of one large appliance store here.
condor is offline   (1) Thanks
Old 19th March 2022, 08:36   #154
Senior - BHPian
 
Latheesh's Avatar
 
Join Date: Dec 2007
Location: CNN/BLR
Posts: 4,243
Thanked: 10,091 Times
Re: The Woodworking Thread

Quote:
Originally Posted by condor View Post
Yes, expensive. But he could be trying to make a buck while the opportunity is there (some one coming and asking for that).
These pallets are used for making furnitures. I have seen some shops in area behind HAL market making cheap furnitures out of scrap pallets.

SBK and other pallets used for SKD/CKD kits are awesome. We (my last company) made many furnitures and donated to a school in north Karnataka.

Last edited by Latheesh : 19th March 2022 at 08:38.
Latheesh is online now   (2) Thanks
Old 20th March 2022, 14:15   #155
BHPian
 
Join Date: Jan 2021
Location: Bangalore
Posts: 57
Thanked: 197 Times
Re: The Woodworking Thread

Recently, I started some base level woodworking (the first project was enclosures for a home audio system). The tools started accumulating, lying scattered around in the balcony. Decided to make a tool box. Arrived at the dimensions for the tool box, got 13mm thick plywood from the neighborhood plywood shop, cut in to sizes in the attached carpentry shop.
Joined them together with 2 inch nails, and added hinges for the top cover. Covered the edges of the plywood with a filler, after drying, levelled with emery.
Searched in the hardware shops for teal colour paint, cold find 'firoze' colour which looked like teal. Painted the box, and added some patches of brown acrylic paint, and applied emery overy it.
Attached Thumbnails
The Woodworking Thread-img_20220320_133649.jpg  

The Woodworking Thread-img_20220320_133551.jpg  

The Woodworking Thread-img_20220320_133506.jpg  

jkrkrish is offline   (7) Thanks
Old 5th April 2022, 05:39   #156
BHPian
 
GutsyGibbon's Avatar
 
Join Date: Mar 2008
Location: Southern Calif.
Posts: 756
Thanked: 4,556 Times
Re: The Woodworking Thread

Quote:
Originally Posted by jkrkrish View Post
Decided to make a tool box. Arrived at the dimensions for the tool box, got 13mm thick plywood from the neighborhood plywood shop, cut in to sizes in the attached carpentry shop.
jkrkrish,
At your plywood shop, do you get pre glued edge banding strips? An iron box can be used to heat and stick the band to the plywood. When the band matches the plywood, it would look like a wooden plank instead of plywood.
GutsyGibbon is offline   (1) Thanks
Old 30th April 2022, 17:56   #157
BHPian
 
Join Date: Jan 2021
Location: Bangalore
Posts: 57
Thanked: 197 Times
Re: The Woodworking Thread

Wood Enclosure for SMPS:

The ac to dc converter/ SMPS connected my audio system was lying around ugly (!) and exposed to dust. I decided to dress it up with some wood pieces.

Joined and cut the pinewood pieces left over from my earlier project (see above in this thread), cut/sized them into six pieces suitable for making a box.

Joined the base pieces with wood glue, and drilled the openings for ac-inlet and DC-outlet connector, and some openings on the rear side for air/heat escape.

Fixed the SMPS inside the box with few washers to provide air gap at the base, and closed the top lid with screws.
Photos below:
Attached Thumbnails
The Woodworking Thread-img_20220423_135951.jpg  

The Woodworking Thread-img_20220423_141907.jpg  

The Woodworking Thread-img_20220430_152756__01.jpg  

The Woodworking Thread-img_20220424_130648__01.jpg  

The Woodworking Thread-img_20220424_135419__01.jpg  

jkrkrish is offline   (4) Thanks
Old 1st May 2022, 09:12   #158
BHPian
 
Amrik Singh's Avatar
 
Join Date: Aug 2010
Location: New Delhi
Posts: 660
Thanked: 3,371 Times
Re: The Woodworking Thread

I would drill some hole in the box to let any heat generated vent out.
Nice work done.
Amrik Singh is offline   (1) Thanks
Old 10th May 2022, 11:53   #159
BHPian
 
Join Date: Apr 2012
Location: MAS,BLR,PUN
Posts: 223
Thanked: 853 Times
Re: The Woodworking Thread

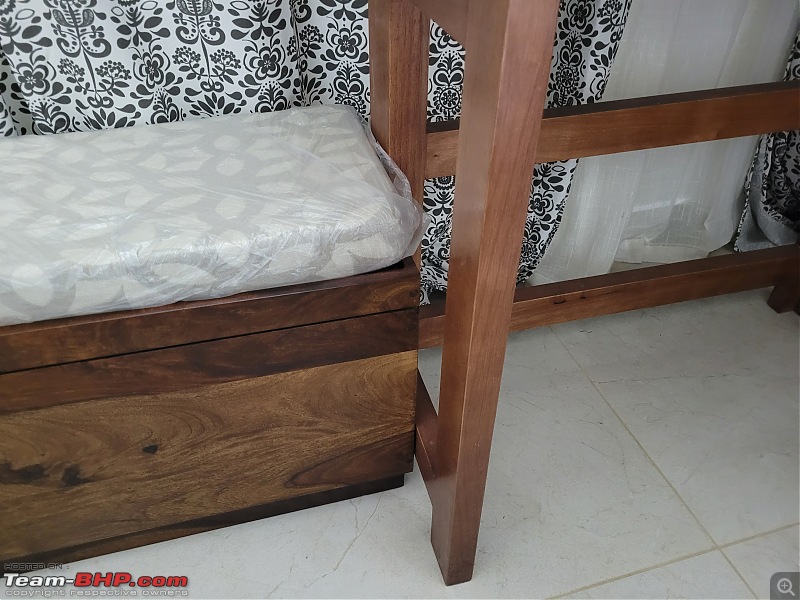
I have a foldable study table and this is of a light rosewood kind of shade currently. All other furniture are of provincial teak shade and made of sheesham wood. In the below pic you can see the table with the above mentioned shade and the a blanket box with teak shade. I want to change the study table to the shade of the blanket box in the pic to maintain a uniform shade for all furnitures. I would need to do wax polish/varnish on this but is there any way I can change the shade to the teak one?
The Woodworking Thread-20220510_111101.jpg
whencut86 is offline  
Old 11th May 2022, 19:59   #160
Senior - BHPian
 
Join Date: Apr 2008
Location: Dombivli
Posts: 3,056
Thanked: 2,139 Times
Re: The Woodworking Thread

Quote:
Originally Posted by whencut86 View Post
... I would need to do wax polish/varnish on this but is there any way I can change the shade to the teak one?
Attachment 2306416
See if you can get a matching veneer. You can then paste it on the study table.
honeybee is offline   (1) Thanks
Old 12th May 2022, 00:50   #161
BHPian
 
GutsyGibbon's Avatar
 
Join Date: Mar 2008
Location: Southern Calif.
Posts: 756
Thanked: 4,556 Times
Re: The Woodworking Thread

Quote:
Originally Posted by whencut86 View Post
I want to change the study table to the shade of the blanket box in the pic to maintain a uniform shade for all furnitures.
Personally, I prefer the real texture and color of wood, as opposed to colors/stains, and veneers. If you you really want uniformity, then I would suggest a darker stain. You would have to sand down all the surfaces, including nooks and crannies and stain the lighter furniture first. Then work on furniture that has darker shade. You need to make sure all the existing polish/coating comes off before you apply the new stain. The existing polish will stop the stain from being absorbed into the wood. You then apply the polish again to protect the wood.

Its a lot of work, for a fake look. Fake in the sense that this is not the color/texture of real wood, you are coloring it. It may be easier for you to paint all the furniture with some uniform color.

For any approach, please select a small area of 2" x 2" that is not visible in plain sight. I would use the bottom of the table surface, and try all the experiments there. Then multiply the effort to the entire project. Keep in mind that sanding the corners of furniture is a lot more harder than flat surfaces.

Please wear a mask when you sand.
GutsyGibbon is offline   (4) Thanks
Old 5th June 2022, 00:39   #162
BHPian
 
GutsyGibbon's Avatar
 
Join Date: Mar 2008
Location: Southern Calif.
Posts: 756
Thanked: 4,556 Times
Re: The Woodworking Thread

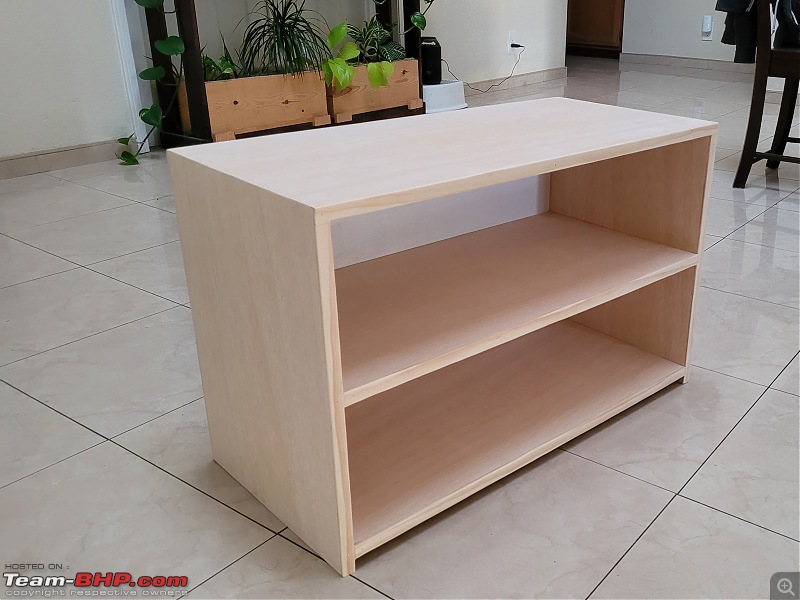
My daughter needed something to store her shoes and sturdy seating for the time she has friends hang out in her room. I wanted to add
cushions on the top but, she has other plush things she wants to have on top of this.

I did miter cuts on the plywood, and hardwood/pine strips to cover the plywood edges. Daughter wanted lighter colors, so I did a clearcoat.
The Woodworking Thread-20220529_185931.jpg
GutsyGibbon is offline   (9) Thanks
Old 29th August 2022, 12:21   #163
BHPian
 
Engine_Roars's Avatar
 
Join Date: Feb 2015
Location: Pune
Posts: 417
Thanked: 2,541 Times
Re: The Woodworking Thread

Hello Experts,

I have been meaning to start off my first wood working project & I think now is the time. This being my first such project, I would really appreciate all the advise/suggestions that I could get from this awesome community. Below are some facts & my requirements that might help:

1. I want to build a couple of floating shelves for my Office room.
2. I don't want to end up drilling too many holes in the wall as I live in a rented apartment.
3. The shelves will be used to hold some trophies, a couple of photo frames, Lego model, headphones etc. Nothing too heavy.
4. I am a big fan of solid woods so it has to be solid wood.
5. I have a drilling machine & hammer as of now, I know it is hardly anything. I am open to buy some tools if absolutely required.
6. I would even like to paint/polish the wood at home.
7. I will start with building one shelf first, and if it goes well, might build a couple more.
8. I live in Pune if that helps in terms of availability of tools/wood etc.

I would really appreciate if anyone could direct me to the starting point.

Thanks in advances.
A
Engine_Roars is offline  
Old 11th September 2022, 17:17   #164
BHPian
 
rajivr1612's Avatar
 
Join Date: Dec 2012
Location: Chennai
Posts: 618
Thanked: 768 Times
Re: The Woodworking Thread

Team,
Need some advice from the experts.

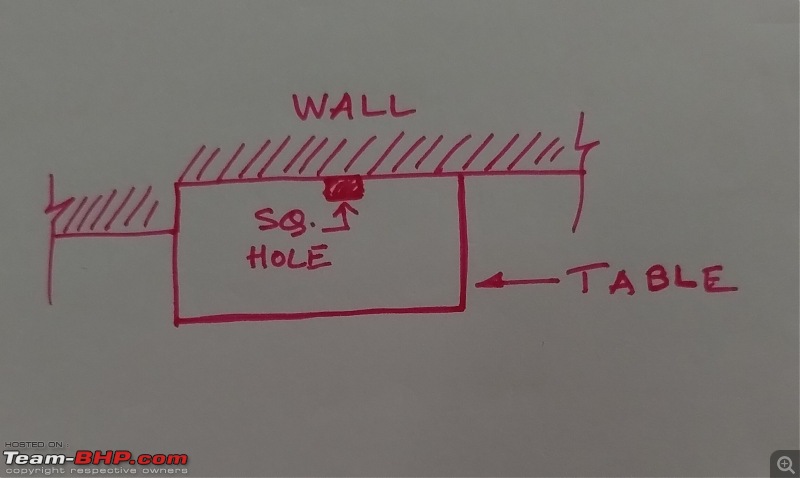
I want to drill a square hole on my work table to clamp a VESA mount for monitor. But the issue is as shown in the pic.

The table is screwed to the wall and floor which I can't remove. On the front is a wall and the sides of the table are flat with no extensions for clamping. I want to drill a square hole on the side touching the wall. What are my options?

I was thinking of making multiple holes by drilling and then finishing it off. Is this a good idea?

The Woodworking Thread-img_20220911_1707566242.jpg
rajivr1612 is offline  
Old 11th September 2022, 17:41   #165
Distinguished - BHPian
 
condor's Avatar
 
Join Date: Jun 2006
Location: Speed-brkr City
Posts: 15,867
Thanked: 16,023 Times
Re: The Woodworking Thread

Quote:
Originally Posted by rajivr1612 View Post
I was thinking of making multiple holes by drilling and then finishing it off. Is this a good idea?
Even carpenters use such an approach in situations. So go ahead. Draw the outline, drill holes inside this, and then use a file to smoothen the sides.

(We needed to fix additional switch boxes in our wall mount TV cabinet/panel. The carpenter did use a circular saw to cut the longer sides, and then used a drilling machine to drill holes along the shorter edges of the cutout. Once this was done, he used a file. If you are an expert with the drilling machine, you can use the same drill bit to do first level of smoothening.)
condor is offline   (3) Thanks
Reply

Most Viewed


Copyright ©2000 - 2024, Team-BHP.com
Proudly powered by E2E Networks