News
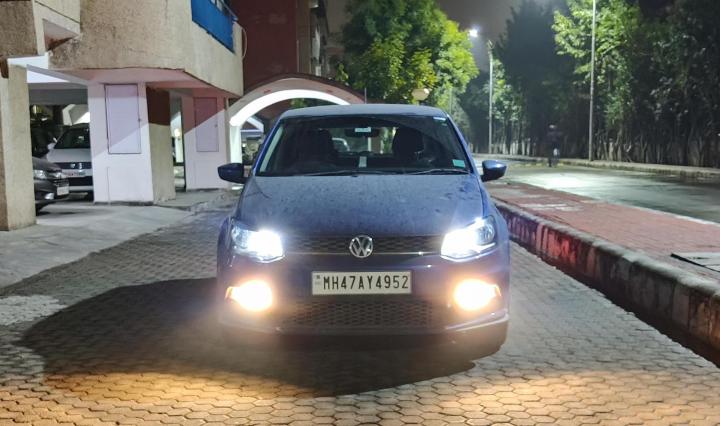
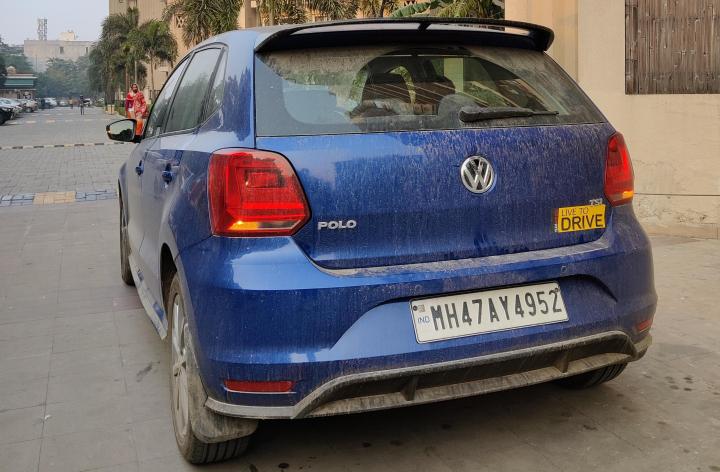
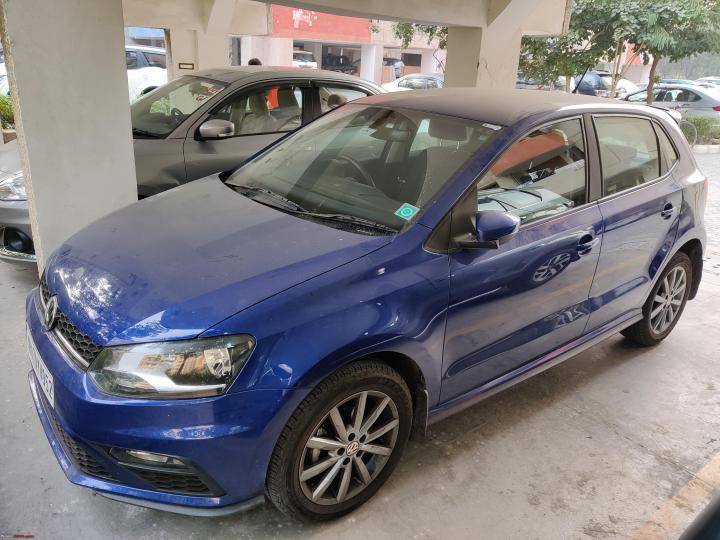
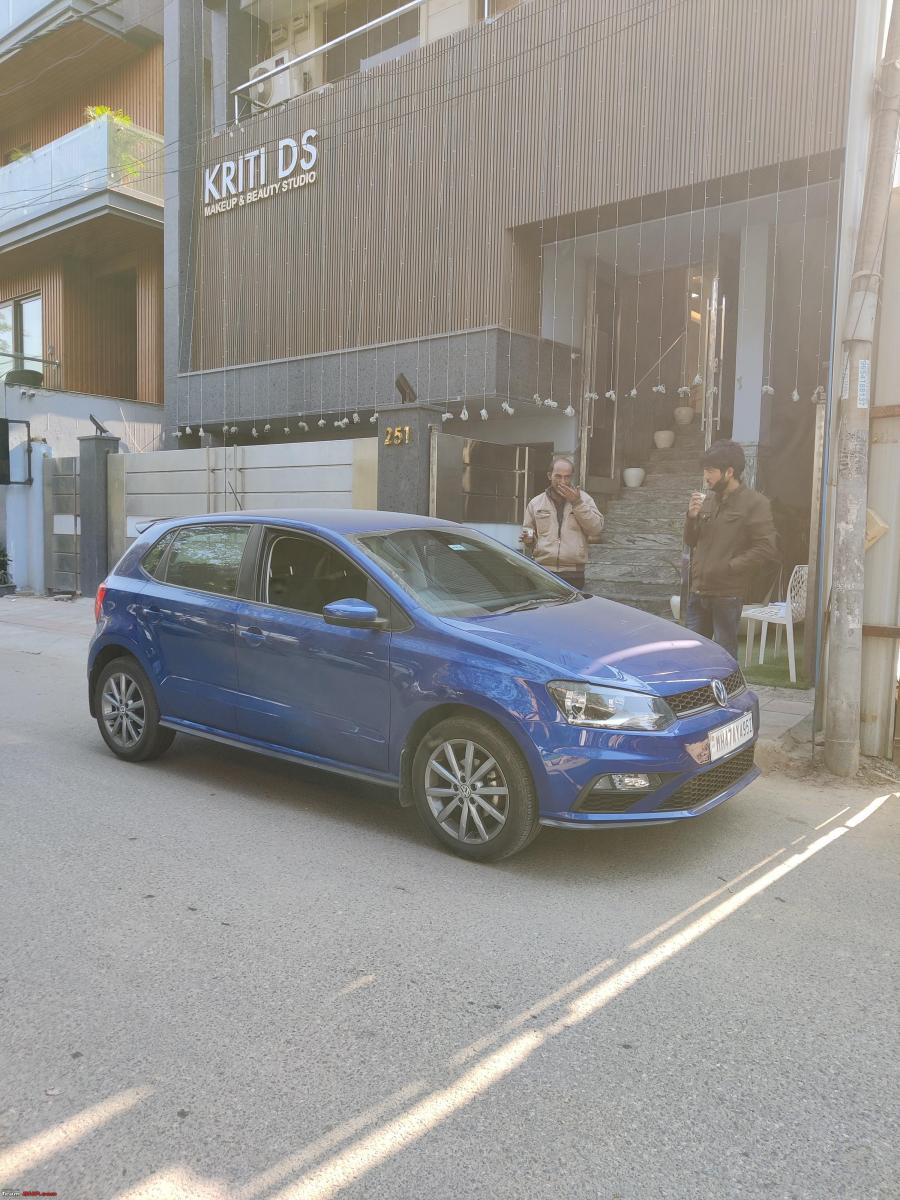
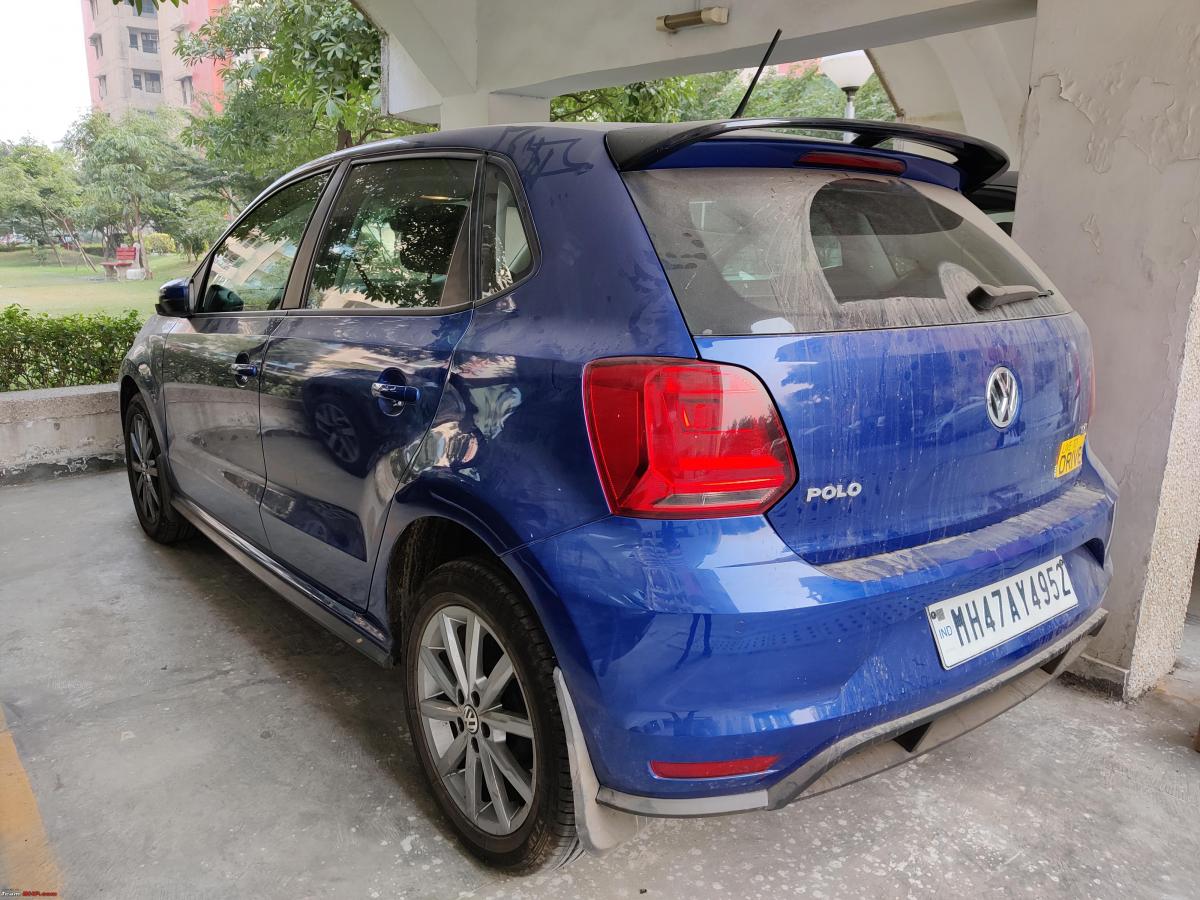
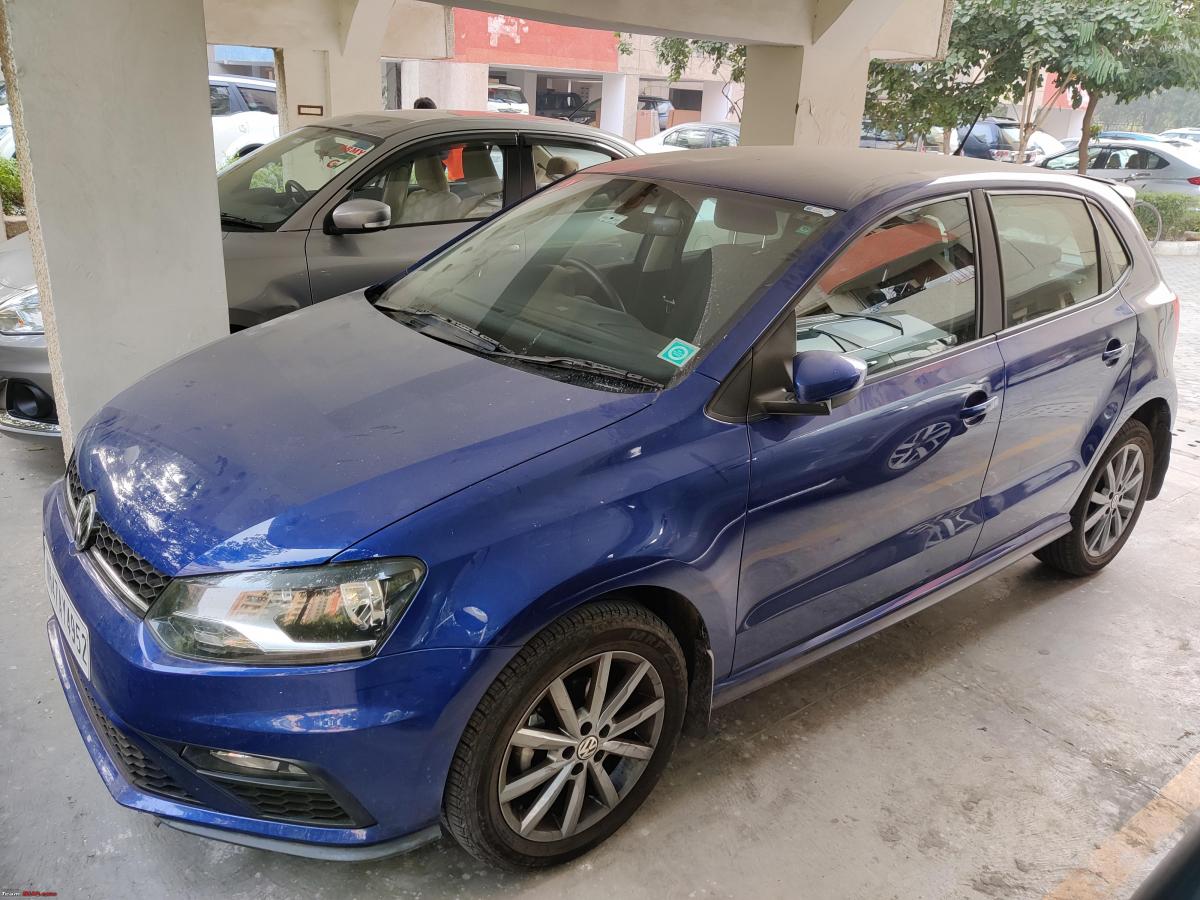
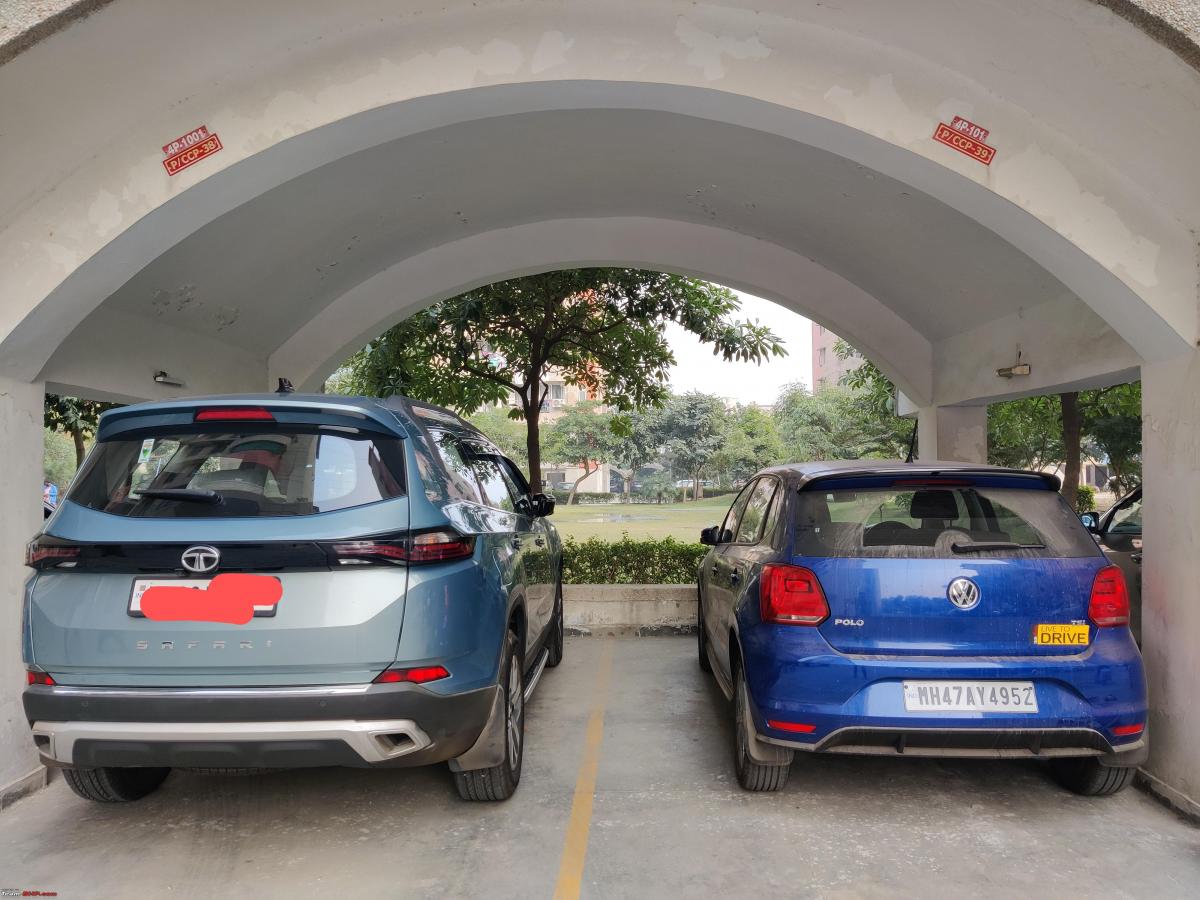
My blue Volkswagen Polo TSI: 10,000 km update


There are no issues with the car, however, I had to get a set of fresh tyres because of the tyre burst that happened on the Noida-Greater Noida expressway.
BHPian sinharishi recently shared this with other enthusiasts.
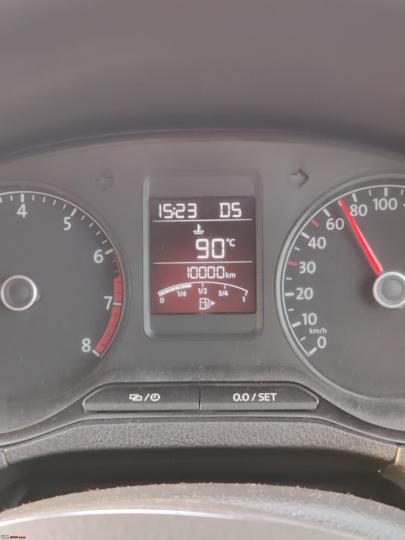
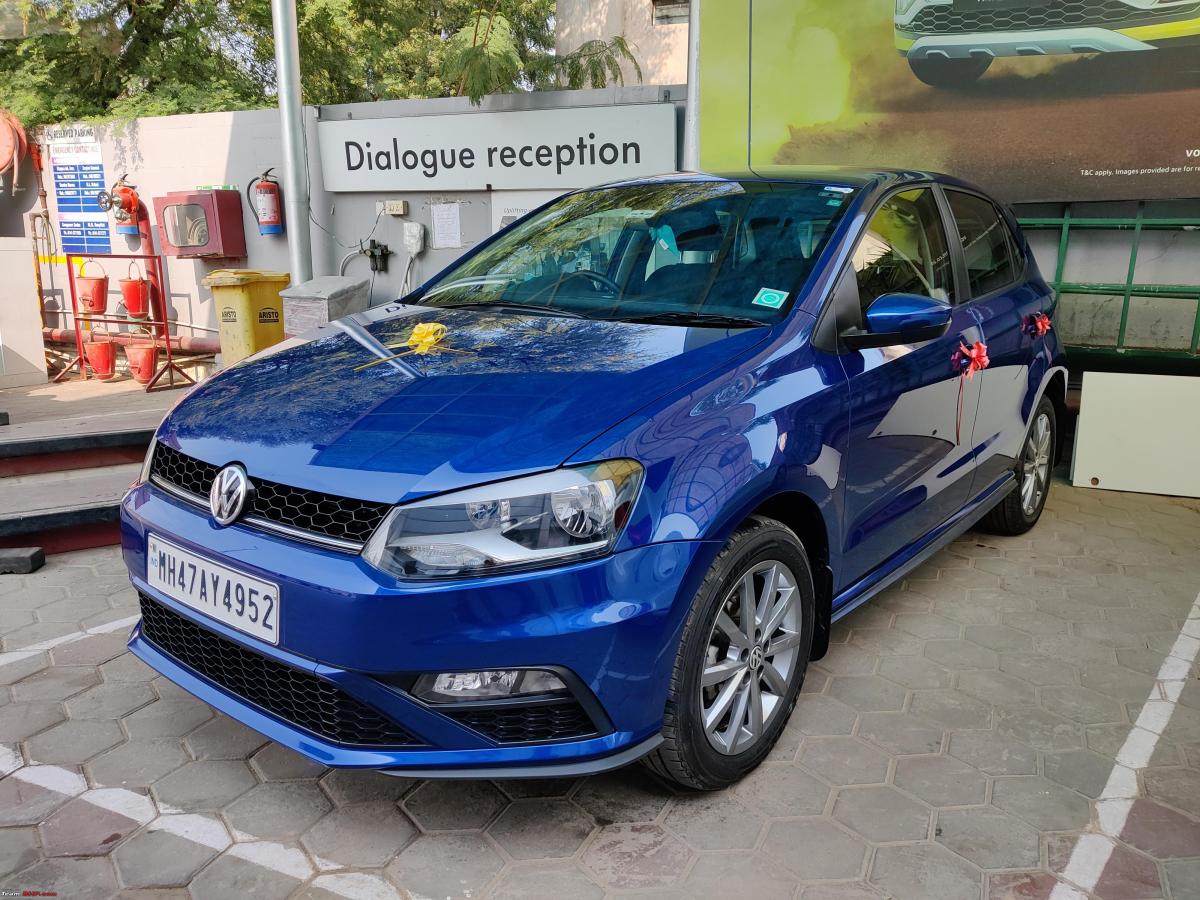
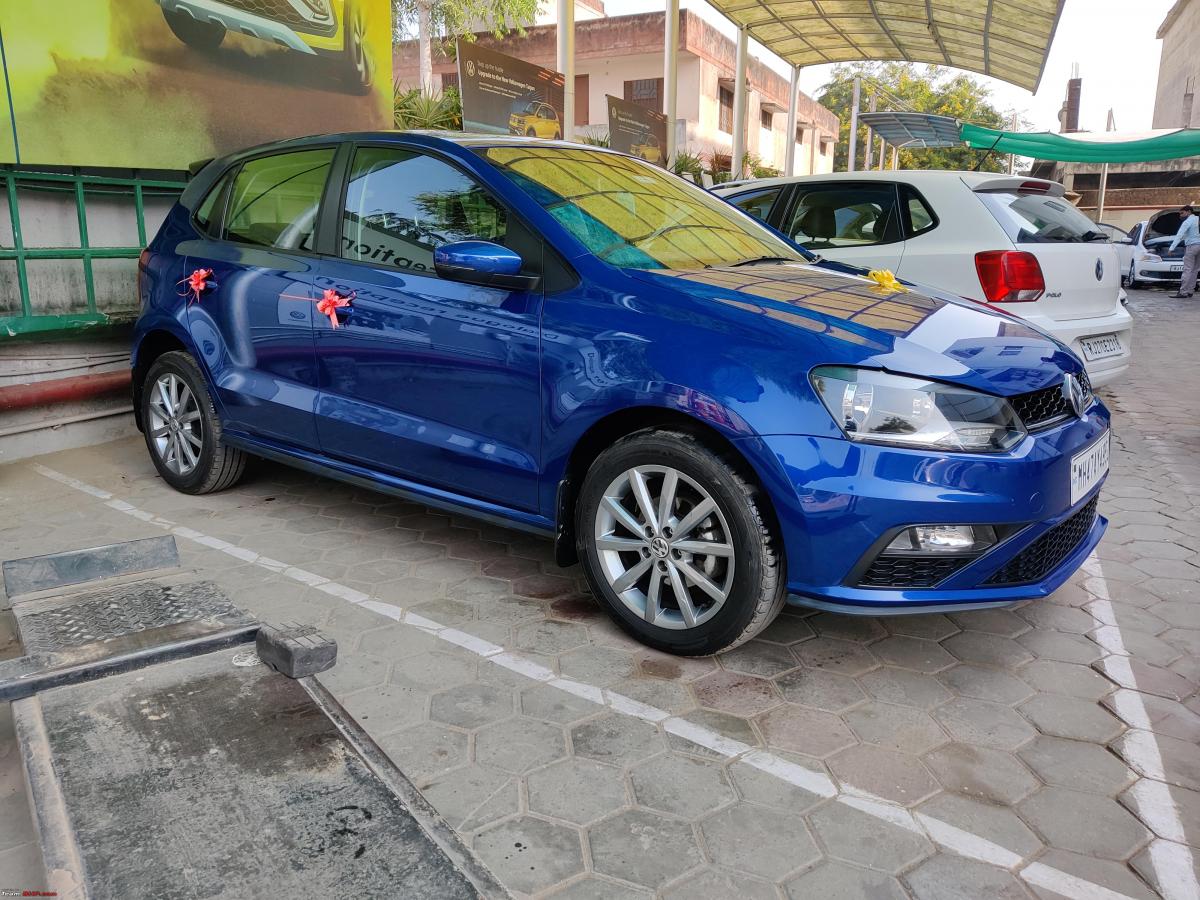
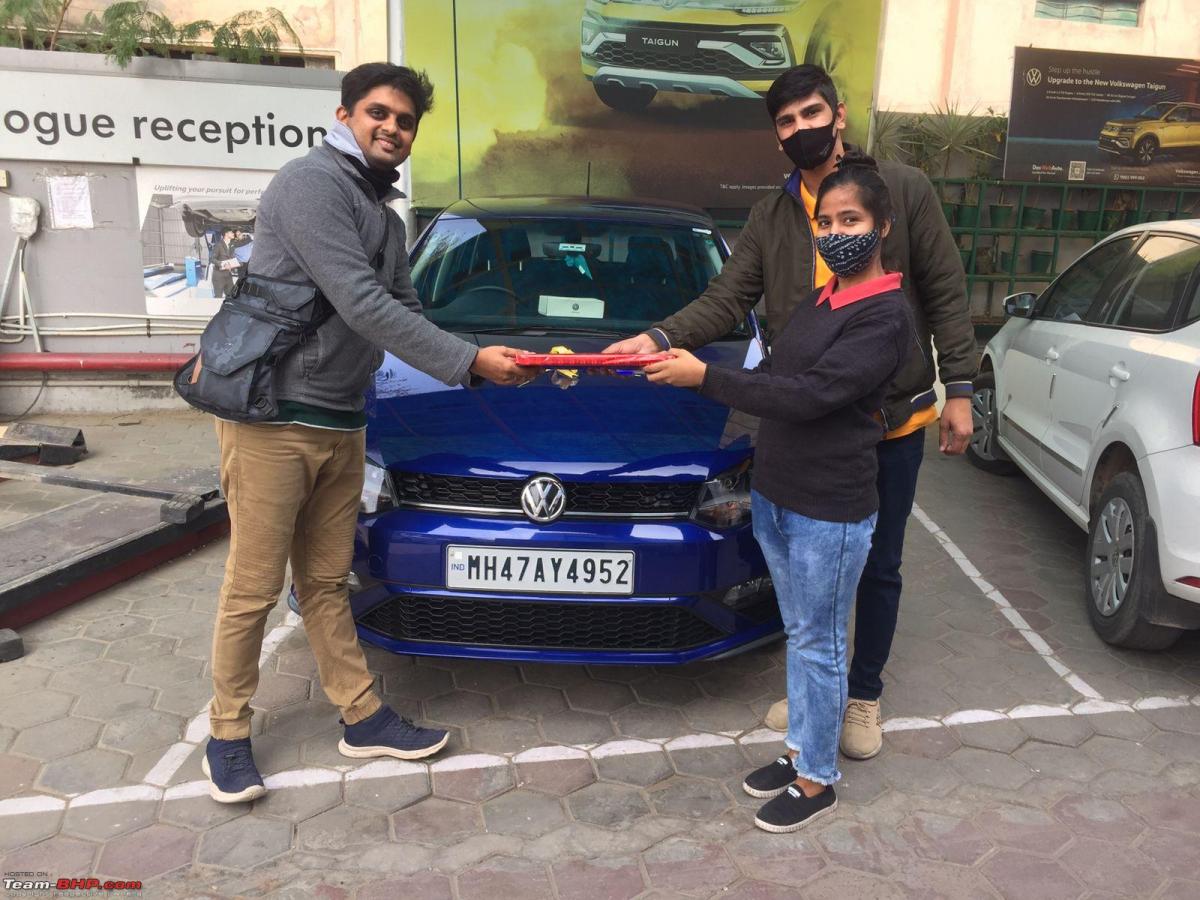
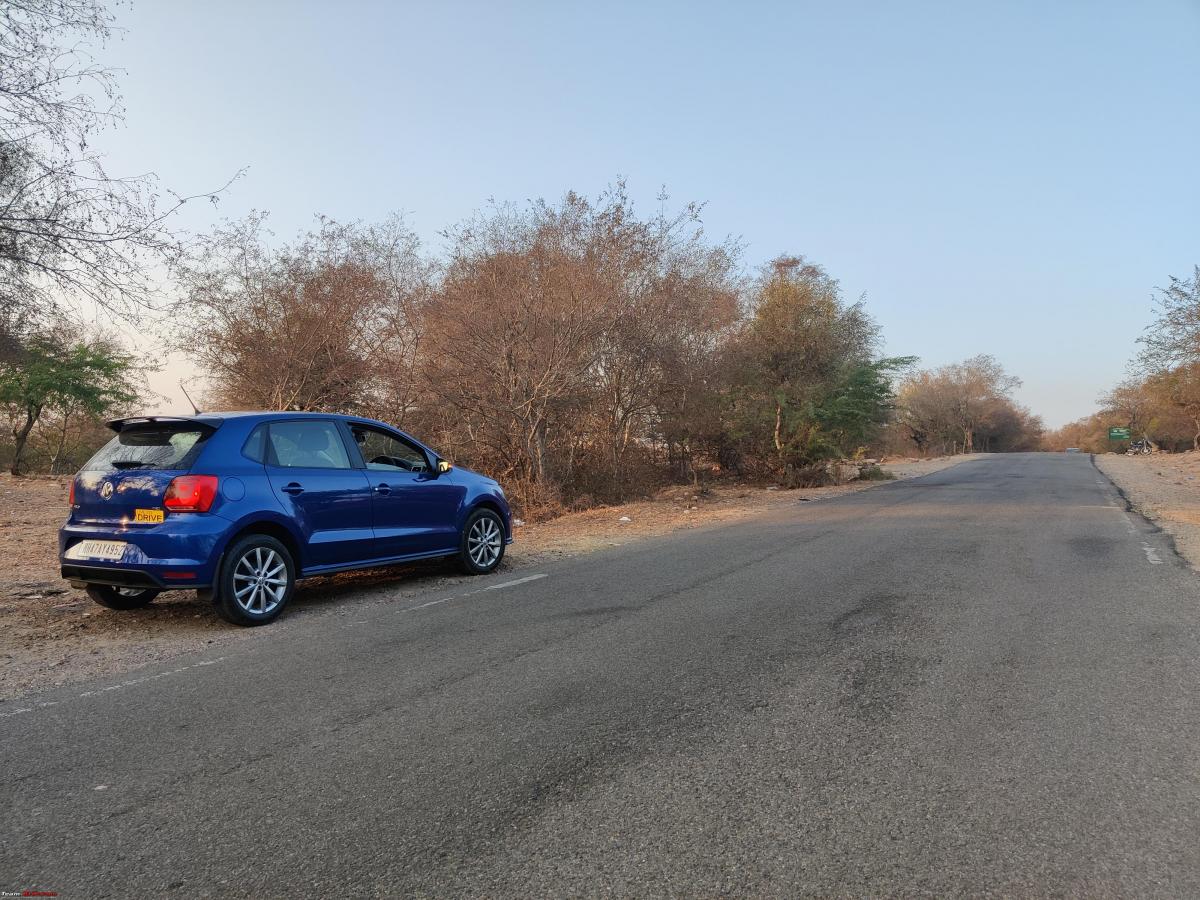
Sapphire completed the 10,000 km milestone on January 1st. My bad luck continues, took her out on a joy ride after 14 days and came back home on space saver on the front left after suffering a tyre burst on Noida-Greater Noida Expressway, I went into a pothole at high speed. Will be getting new tyres for all 4 wheels.
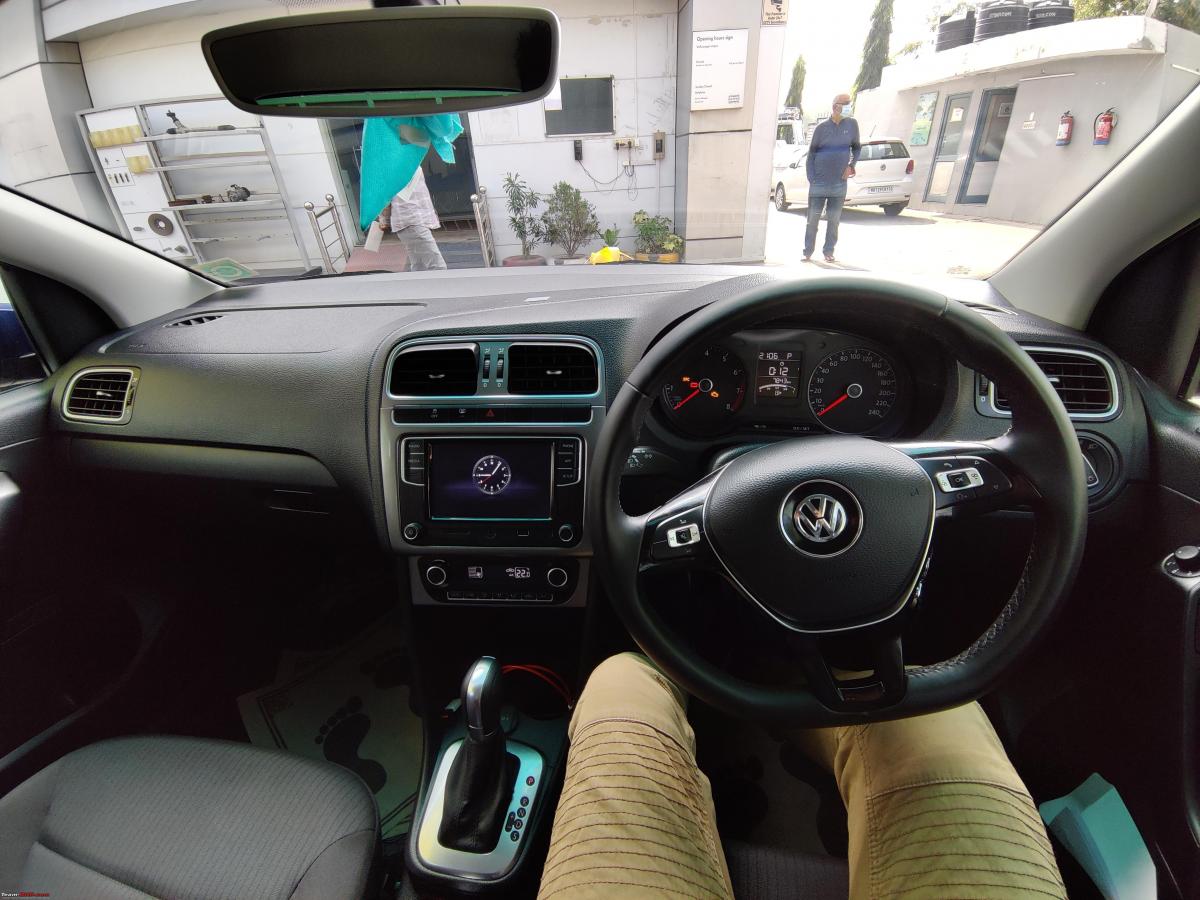
While the blue colour looks good on the Polo, it's a bit of a struggle to keep the car clean. No issues with the car after the major accident in Oct'21.


Update
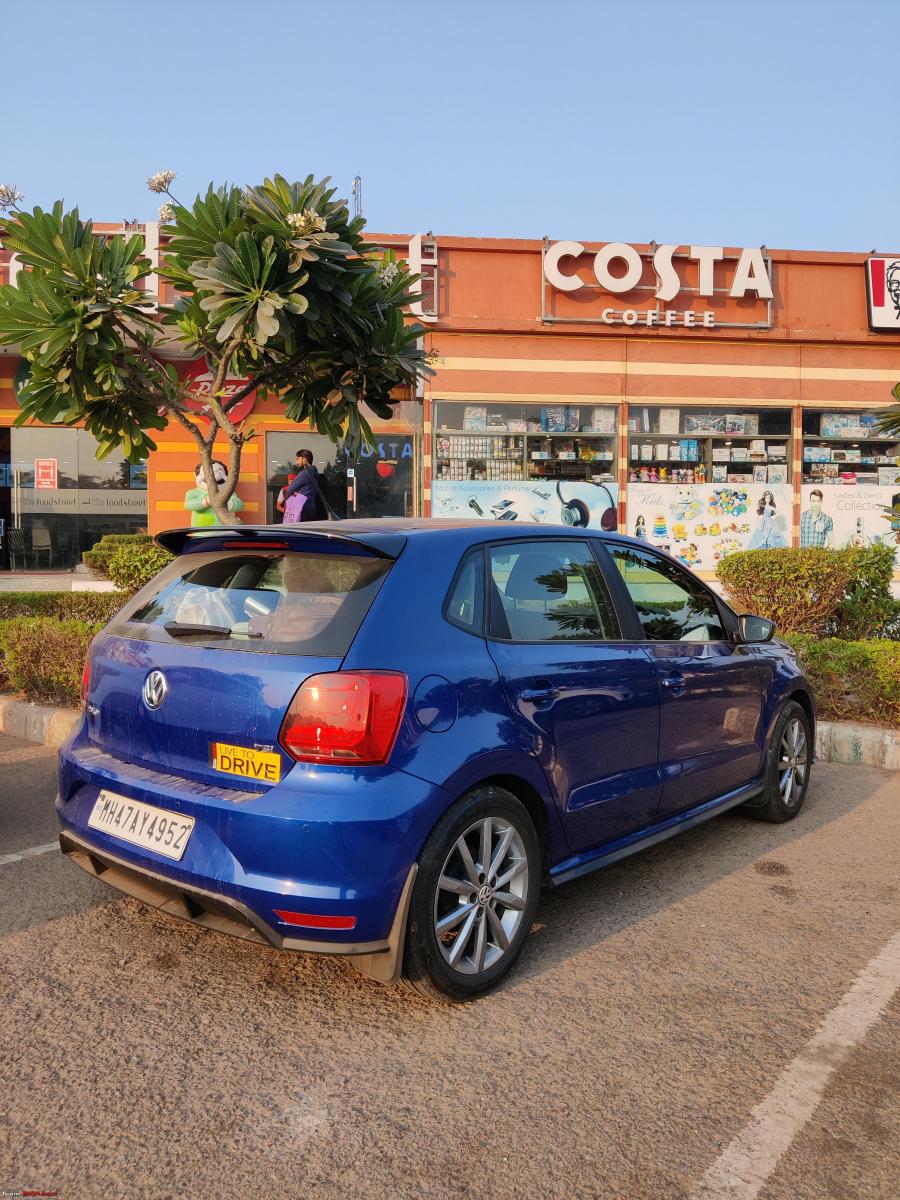
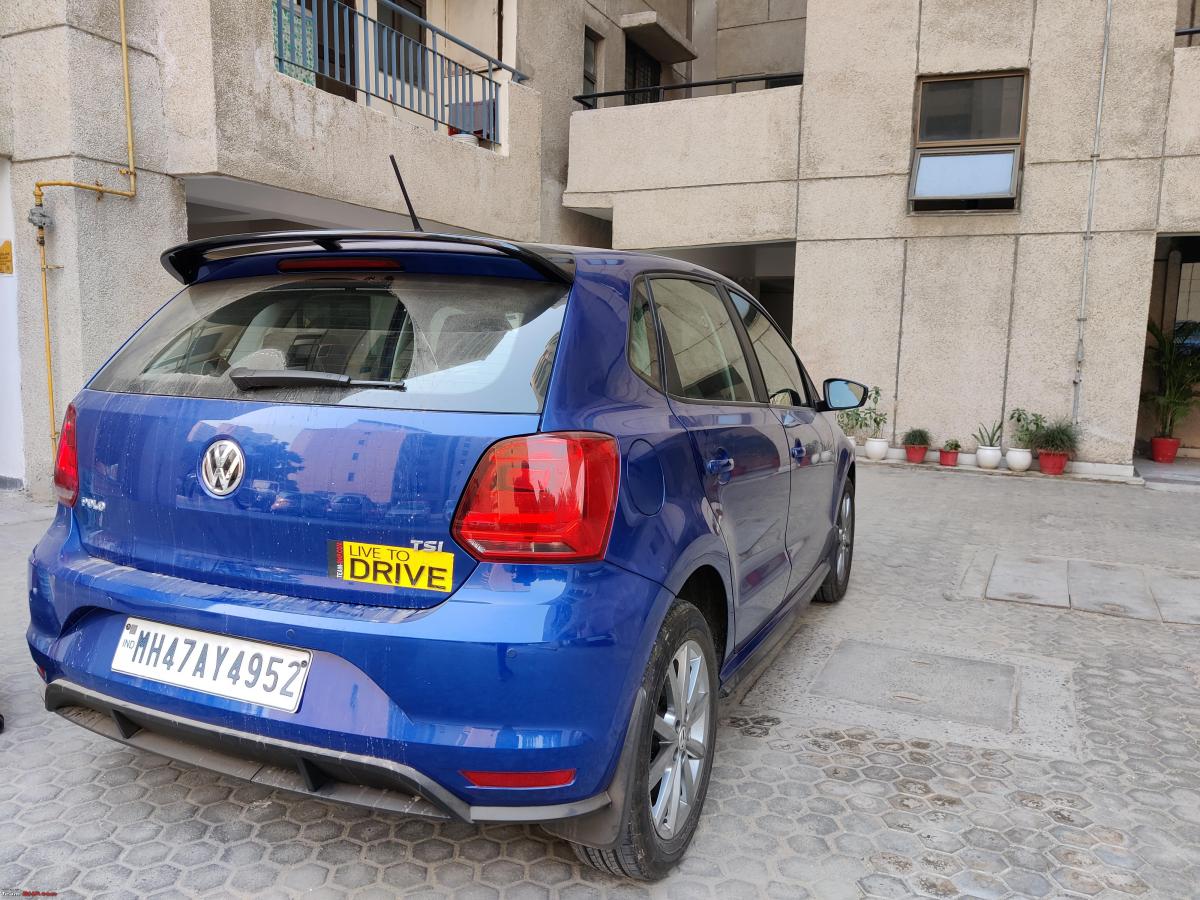
Got a new set of tyres, upgraded to 205/55/R16 Continental UC6. Also got LEDs installed on high and low beam + parking bulbs. Very happy with the output! All thanks to BHPian Viraat!
Parking + fog lamps

High + low beam

Low beam only

Steering has gone a bit heavy, loving this upgrade!


Here's what BHPian s4ch had to say about the matter:
Looks good! Would you mind sharing details about which bulbs you used and how the low beam is, especially in city driving? Thanks.
Check out BHPian comments for more insights and information.
- Tags:
- Indian
- Polo
- Volkswagen
- Volkswagen India
News
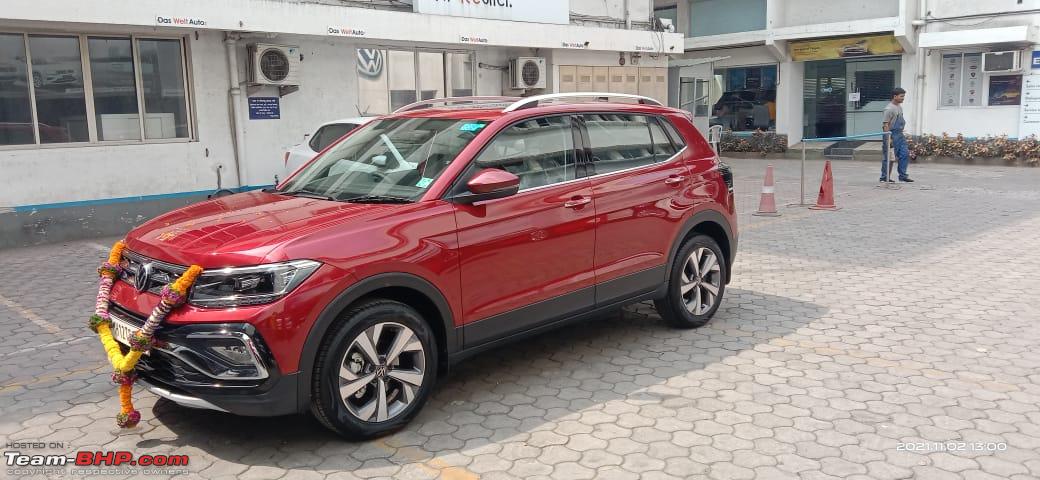
Replaced my VW Polo GT TSI with a new Skoda Octavia L&K


The dealership offered a fair exchange price for my over 7-year-old Polo that had 72,000 km on the odo. This played a key role in my buying decision.
BHPian GeeTee TSI recently shared this with other enthusiasts.
Happy to end 2021 on a high note – took delivery of my L&K Octavia on 30th December from TAFE Access Skoda, St Mark's Road.
I was looking for an upgrade without sacrificing whatever my GT TSI stood for and I have been selective in looking at options - started with Karoq which I checked out at the same TAFE Access in 2020, where I was acquainted with Mr Rakesh.
After more than a year, I resumed my search for a new car and warmed up to the Octavia (which started as a cursory visit only) at the same dealership and through the same contact, Mr Rakesh.
The trigger (which actually resulted in the booking rather suddenly) was the evaluation of my old car at the dealership, which was transparent and fair. A compliment on the good condition of my 7+-year-old, 72K kms run GT TSI and a fair exchange price without haggling greatly enhanced the buying experience.
TAFE Access were very accommodating and flexible with my priorities comprising.
- MY22 model/recent VIN
- My choice of Fastag (ICICI)
- Matching my rates for insurance (Royal Sundaram)
There was no stone left unturned in making the process easy and convenient, resulting this is within a month of when it all began.


Parked at my residence, had to get used to manoeuvring the Octavia after my GT TSI.

Went for a spin on the 31st and ended up covering 300+ kms till past Charmady ghats.

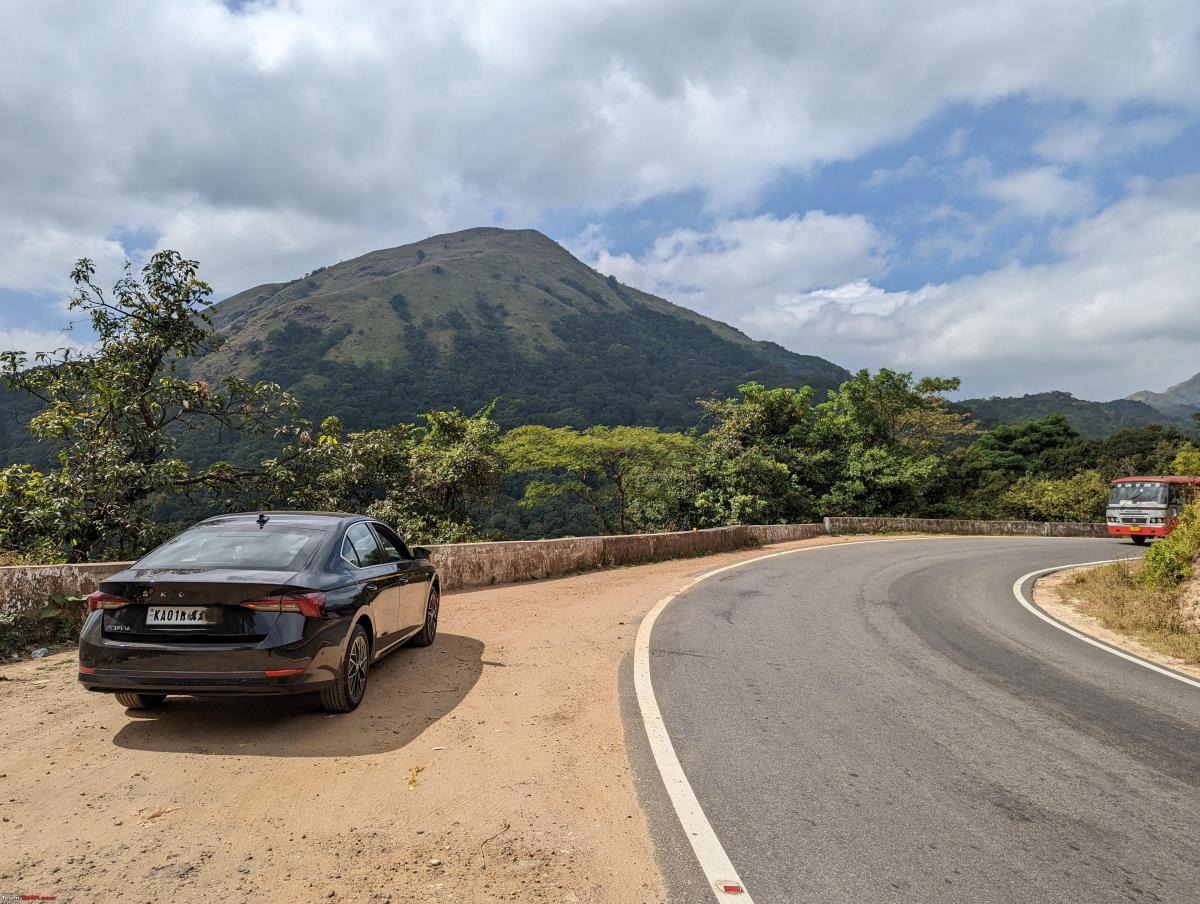
Stayed over at Dharmasthala and started new year's day at 6 am along Bisle ghats.
Closed day 2 of ownership with 670 kms on the odometer.

Pooja being performed (delayed due to some reasons) at a temple in my hometown Calicut (where I currently am spending my Pongal break).

I am still coming to terms with the sheer refinement and fit and finish, of what is head and shoulders a segment above my previous car. The way controls and the driving experience fall in place to a VAG owner is the other positive aspect. Looking forward to more experiences and sharing!
Check out BHPian comments for more insights and information.
- Tags:
- Indian
- Skoda Octavia
- Polo
- Volkswagen
News
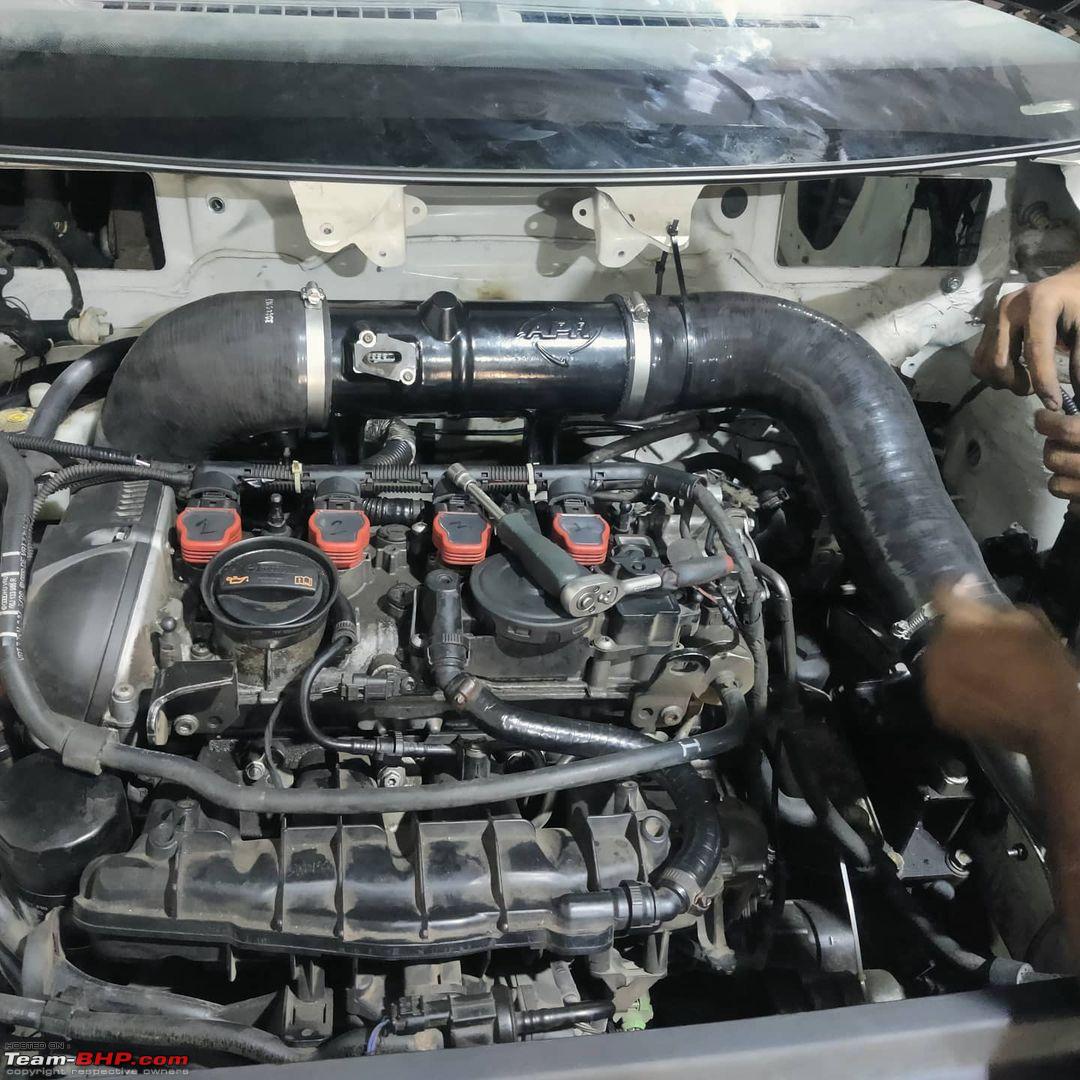
Modified VW Polo with 400 BHP can do 0-100 km/h in 4 seconds
With 403 BHP & 533 Nm on tap, it proved to be faster than cars like the BMW M2 & Mercedes E350 in 0-100 km/h sprint at the Valley Run Drag event.
BHPian soulreaper_20 recently shared this with other enthusiasts.
I consider myself lucky to have recently experienced this mad beast created by Nikunj Vagh from Surat Gujarat. While I was able to document the build on video, unfortunately, I couldn’t take many photos of it. Apart from a few photos, most are screenshots from the video itself.
As mentioned before, this car is developed by Nik_Trans Motorsport based in Surat, Gujarat. A run-of-the-mill stock petrol Polo body was chosen for the build before completely stripping it down for weight reduction. All of the car’s interior was removed along with the rear bench seat as well as the passenger seat. This has resulted in a car weight of about 1050kg with a smaller 35-litre fuel tank. Now is where the fun begins with the engine!
To increase the performance, Nikunj Vagh (Nik_trans) started by sourcing a 2.0-litre EA888 CCZ engine which is found in the Mk6 Golf R. The engine is installed in the engine bay using OEM spec mounts which means that there is no cutting or structural alteration to the body of the original car. The 2.0-litre engine received a compatible ECU while adding an APR GTX turbo system (I don’t know the exact boost it’s running), APR cold air intake along with a Pipercross filter that was added for induction.
All combined, these mods have resulted in total power output (dyno tested) of 403hp and 533Nm of torque, which obviously the front-wheel-drive system cannot handle. To combat loss of traction, Nik_trans sourced a Haldex type 4WD system for the Polo which would automatically split the power between all four wheels. A similar system is also found of transverse engine VW cars international which they brand as 4MOTION. To install the same he had to build a custom subframe which was derived from the original subframe found on the MK6 Golf R. With a thorough understanding of the modified subframe Nik_trans developed a custom frame in-house that suits the Polo chassis which he says will be used for all future Polo 4WD projects.

To ensure that the 2.0 Polo stops, he has also upgraded the braking system where there are now 345mm front rotors and 320mm rotors at the rear compared to the disc front/drum rear braking configuration of the stock Polo to provide optimal braking.
As a result of all these performance upgrades, the 2.0 Polo is now capable of achieving an incredibly fast 0-100kmph time in just 4 seconds! I actually witnessed this car’s full potential for the first time at this year’s Valley Run Drag event where it posted an impressive time of 12.6 seconds for a quarter-mile. It was faster than cars like BMW M2, Mercedes E 350 and was just 0.2 seconds behind a Ferrari 488 GTB!


Personal Experience
Now as much as I would have loved to get behind the wheel of this car and drive it myself, that wasn’t possible since it’s a one-of-a-kind which, as you can imagine, the owner would be reluctant to risk giving anyone. So instead, Nikunj was generous enough to bolt in a passenger seat and take me for a quick drive.
As we got rolling, the first thing that impressed me was the suspension. Nikunj has kept the suspension setup such that it’s incredibly comfortable to use on our roads (while it’s not a road-legal car by any means, it always helps when transporting the car between workshops and trucks). The KW suspension (as far as I remember, not entirely sure) is, of course, adjustable which was set up to softer settings for transport. When entering competitions they will retune to run a much stiffer setup.
Apart from its smooth road manners, what really impressed me was how linear the power delivery was. If it was road-legal, this setup could easily be used as a daily as the power delivery isn’t lumpy or concentrated between a specific rev range. It’s evenly distributed and very manageable. And when he finally put the foot down the surge was intense and explosive!
The 2.0-litre Polo just picks up the revs and starts accelerating like crazy. Thanks to the 4WD system there is absolutely no slippage at any speed and even after the 400+ HP and 530NM torque, the system puts down the power so effectively. As a result, you really do feel a solid kick when the car starts to pull. And the surge didn’t seem to stop or become any weaker even as we approached high speeds! If given complete freedom, I’m sure this machine can very quickly hit 250kmph and beyond.
According to Nikunj, this car took about 12-14 months to develop where the majority of the time was spent waiting for parts to arrive, I can imagine that a serious amount of tuning must have gone into setting and calibration. That said, since Nikunj is a transmission specialist who works on everything from Ferrari to specialising in VAG DSGs (including fixing Mechatronics) he was already quite aware of the intricacies of fine-tuning such a setup.
These guys are now preparing the car for the racetrack which would mean adding a lot of forged internals and probably adding even more powerful brakes and cooling. I’d love to be in touch with them and keep you guys updated on future developments.
Here's what BHPian agambhandari had to say about the matter:
It's a very cool project but it is hard to believe that there is no structural modification to the chassis. The PQ25 chassis doesn't have space for the rear drivetrain and the required subframe. The rear chassis needs to be modified to make space for it. That is one of the differences in the Audi S1 chassis.
The tracks are also wider in front and back, means most likely Golf/PQ35 axles are being used. Very ingenious solution but this car is pretty much a Golf underneath now.
Here's what BHPian 2000rpm had to say about the matter:
Wouldn't importing a Golf could have worked out for cheaper?
Can you share the broad estimate of the build cost?
Here's what BHPian dhanushs had to say about the matter:
Thanks for sharing a truly amazing build. I would appreciate it if you could go into more details about the technicalities involved, the problems faced, etc.
Check out BHPian comments for more insights and information.
- Tags:
- Indian
- Polo
- Volkswagen
- Modifications
News
VW car prices to be hiked by up to 5% from Jan 1, 2022
.jpg)
The price hike will not be applicable on the recently launched Tiguan.
Volkswagen cars are set to get more expensive from January 1, 2022.
The carmaker has announced that prices will go up by 2-5% depending on the model and the variant. The prices are being increased to offset the effect of rising input and operational costs.
While prices of the Polo, Vento and Taigun will be increased, the price hike will not be applicable on the recently launched Tiguan.
Volkswagen is also gearing up to launch a new mid-size sedan early next year. The car will be based on the MQB-A0-IN platform, which also underpins the Skoda Slavia.
- Tags:
- Indian
- Polo
- Vento
- Taigun
- Price Hike
News
Got my badly crashed Volkswagen Polo back: Looks almost new!
I will keep the car for a few months, if all is well, then I will keep her for 5 years. If there are issues, will take a financial hit and sell it off.
BHPian sinharishi recently shared this with other enthusiasts.
A week and 1050 km later:
- Took delivery on the 7th December, the day after DO was submitted to the dealer. Had planned to take delivery on the 9th but couldn't wait, so at 1 am on the 7th decided to board 6 am Shatabdi to Jaipur!
- Reached dealership at 12 pm. Met Mr X (Bodyshop Manager, VW Jaipur). Had called them up at 9 am informing them that I am on my way and have the car ready for delivery.
- I could spot my car from the entrance of the workshop, polished, decorated, all set for delivery.
- I have to write a line about the hospitality I received at the workshop. I was served tea, biscuits and snacks. They even offered lunch but I refused politely!
- Moving on, I met Mr Y (my SA). Completed all paperwork, reviewed the bill and paid the difference.
- Next up was the test drive, we drove the car around the Sitapura Industrial area and I came back fully satisfied!
- I had told Mr X to drive the car for as many KMs as possible till they wait for the DO. It took the insurance company a week to send the DO.
- Finally, it was time for me to leave. They gifted a box of sweets, clicked a few pictures and departed for the hotel.
- I told Mr X and Mr Y, I will visit again in a month if I face any issues with the car. Submitted the gate pass and off we went! Parked the car a few km ahead of the showroom and removed all the ribbons.
- Drove to Agra on the 8th and then to Delhi on the 9th early morning. Car was put on marriage duty till the 12th.
- Issues to report: Just one as of now, the LHS door has a paint mismatch which is visible under sunlight, apart from the door, they have succeeded in matching the colour of the rear damaged portion of the car with the factory colour.
- What next? I will keep the car for a few months, if all is well, then I will keep her for 5 years. If there are issues, will take a financial hit and sell it off. As of now, I am enjoying every bit of the drive!
I was worried about VW after-sales and leaving them away from me in a workshop in another city. Mr X was in constant touch with me from October 16th till the day of delivery, sharing regular updates and pictures on Whatsapp. They took their time but did a wonderful job in the end. Kudos to them!
Sharing some pictures:
Taking Delivery

Here's what BHPian sandeepmohan had to say on the matter:
I must say, that has turned out really well. Good on the garage who sorted out the car for you. It's one of those rare instances where you walk out pleased from a VW garage.
Personally; I'd be a little reluctant to keep the car, not knowing if structural integrity has been retained. Something for you to keep in mind.
Here's what BHPian tbppjpr had to say on the matter:
Congratulations on getting the car back in the shape, nice to know that you liked the hospitality at the workshop in our city.
This is a usual issue with the vibrant paint shades, though it happens with the lighter shades as well mostly it remains unnoticed. Report the workshop about the paint difference and wait for a month of time if some other panel also show the difference. Check the car for paint mismatch at different times of the day, like in the morning before sunrise, in the daylight, after sunset and in the night. Also, check the car paint when it's parked under the shade at different times of the day.
One cheat code to quickly spot the paint difference is to click the photographs covering the whole car from different angles in varied conditions as mentioned above and then see them in thumbnail size or small view size on the mobile screen, that way you can quickly spot the paint difference which you can not while seeing the car in person. Wherever you go and park, don't forget to click the photos of the car and then check them in your free time.
This trick I learned long back accidentally when I was checking the photos and found a mismatch in the paint shade of one of the repainted doors on my red car which was then rectified by the same workshop.
Here's what BHPian adisan had to say on the matter:
All's well that ends well!
Nice to read about the sensitive and warm approach of the service centre. Especially when it is in a different city.
Wishing you trouble-free motoring!
Check out BHPian comments for more insights and information.
News
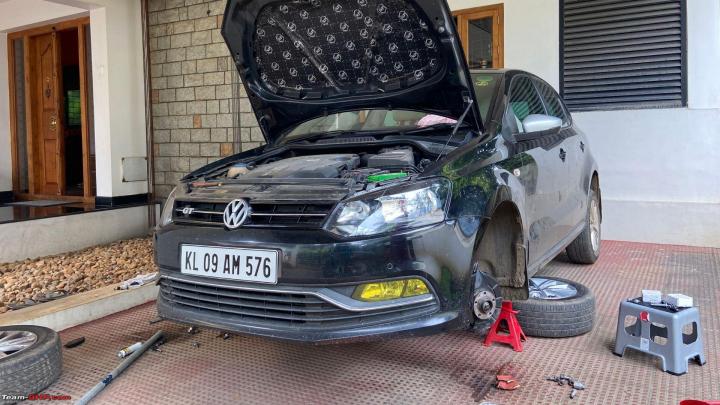
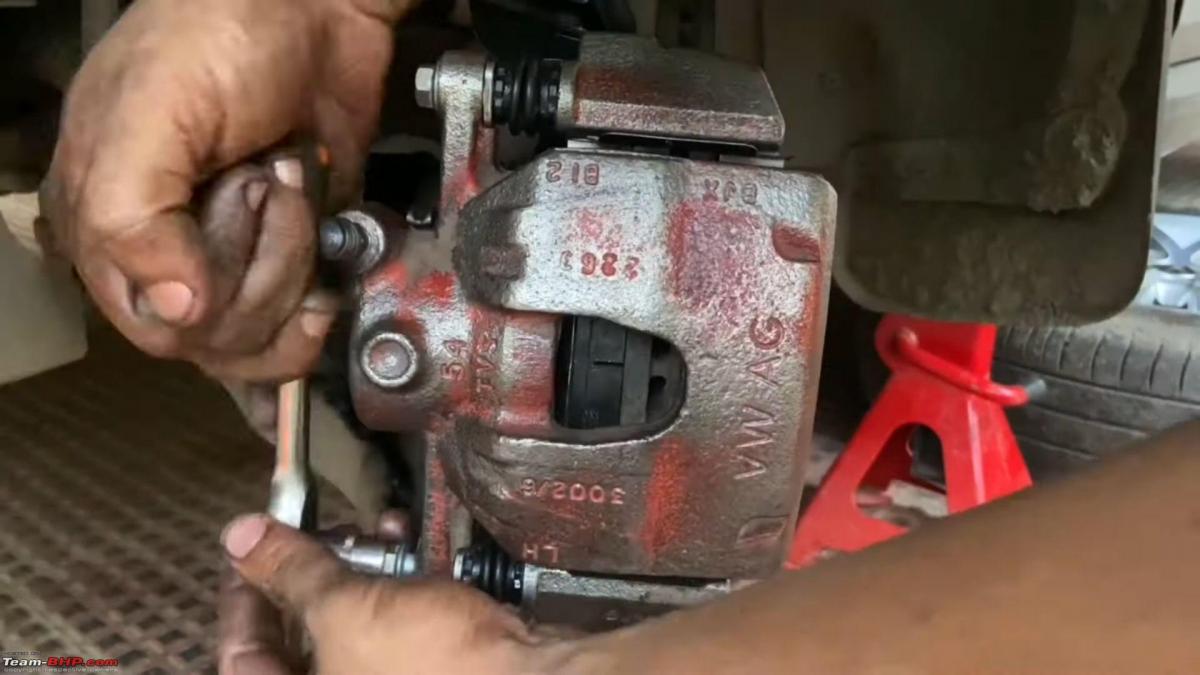
DIY: Servicing the front brakes on my Volkswagen Polo GT
The detailed DIY process is also applicable for Volkswagen Vento and Skoda Rapid models.
BHPian Gannu_1 recently shared this with other enthusiasts.
I did complete maintenance on the front brakes of my 2013 Polo GT at home. The work involved removing the brake pads, removing the rotors, resurfacing/machining the rotors at a lathe workshop, cleaning the entire assembly, replacing the caliper bolts, rubber caps and guide pins, greasing the relevant parts and reassembling everything back.

Putting up a dedicated, detailed DIY thread to our repository for reference. The front brakes on my Polo are based on the FN 3 brake system. This is also applicable for Vento and Rapid. If you wish to service the front brakes at home and have some spare time at your disposal, look no further! I’ll keep it short and simple.
Tools required:
- Floor jack
- Jack stands - 2 nos.
- 1/4" ratchet set
- 18 mm socket or 18-19 ring spanner
- S-type hook/hanger (or make one with a metal shirt hanger)
- C-clamp 150 mm/6”
- Wire brush (or a drill with a cup brush attachment)
- Straw cleaning brush
- Waste cotton clothes
- Magnetic screw tray (link on how to make one at home)
- Vernier caliper or screw gauge
Good to know:
My ETKA workshop manual does not specify the torque ratings for the FN 3 256 mm disc brakes. It mentions 256 mm discs for the 14” FS III system and 288 mm discs for the 15” FN3 system:

I have therefore hand-tightened all the bolts. I have mentioned the torque values for reference wherever available for those who prefer to use the torque wrench.
Parts required:
- Brake discs - 6RF 615 301A
- Brake pad set - 6RU 698 151B
- Brake pad service kit - 6RU 698 647A
Consumables required:
- Brake grease (also supplied with the service kit in a sachet)
- Brake cleaner spray
- WD40
- 220 grit dry sandpaper x 1
Procedure:
Slacken the lug bolts of the front wheels, jack up the front, place jack stands below the strong points and remove the wheels. Keep the wheels below the running boards for additional safety.
Wear a face mask. Clean the caliper assembly with the wire brush and brake cleaner spray.
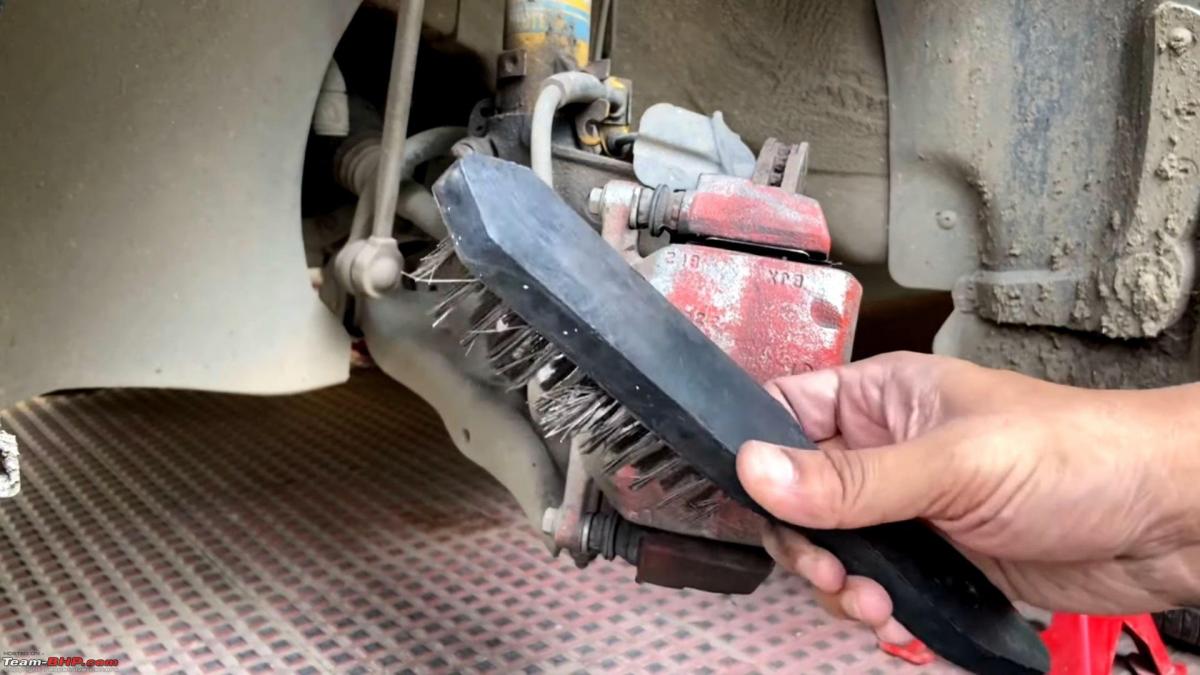
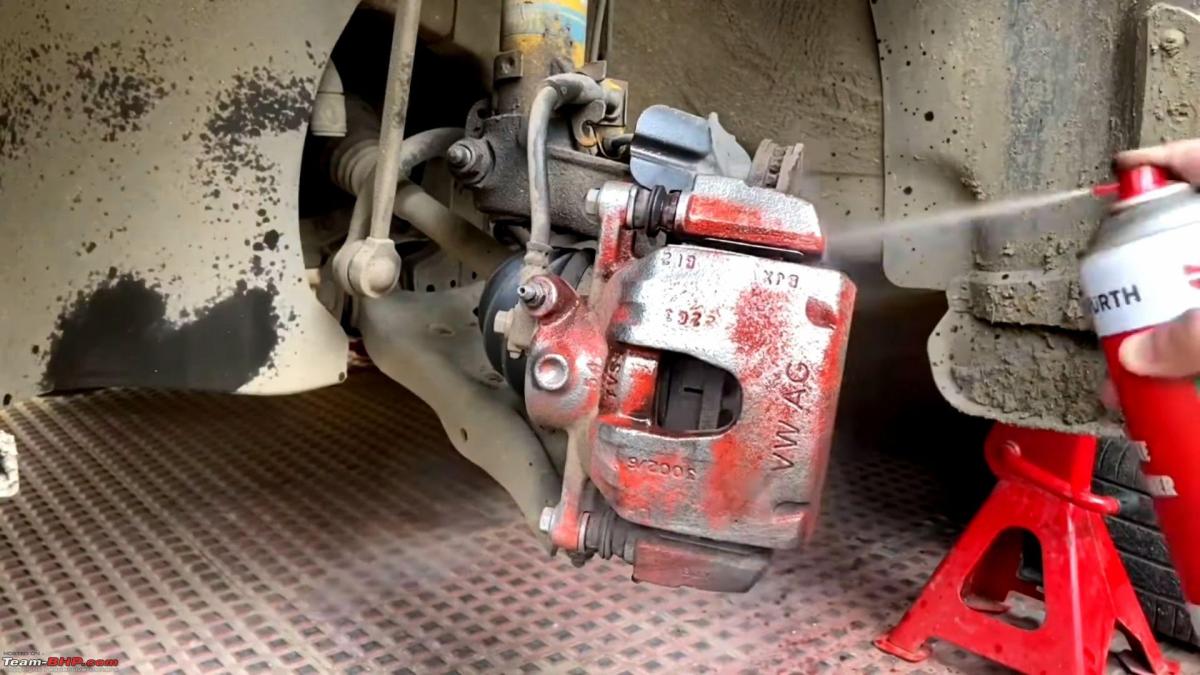
With a wire brush, this may take a while and can be a bit exhausting. If you have a drill, get a cup brush attachment and use it (in breaks/intervals to avoid the drill getting overheated).
Use the 12 mm socket to remove the two caliper holding down bolts.
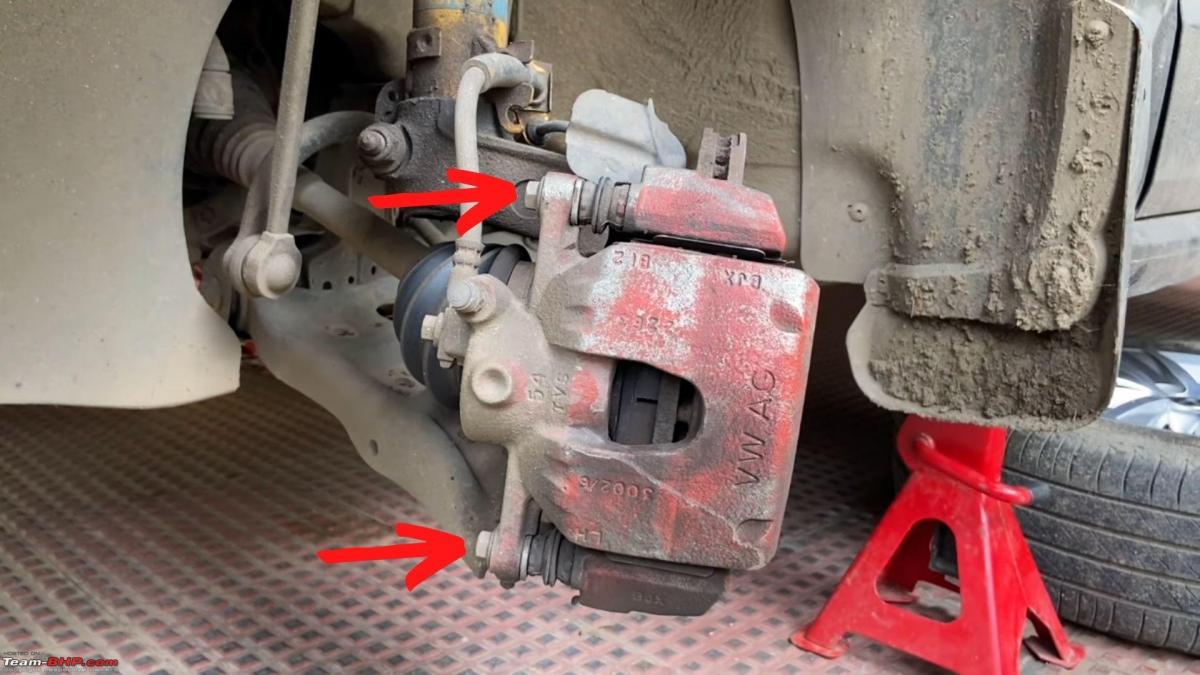
These bolts are to be discarded since we will be using new bolts from the service kit. For now, place the bolts in the magnetic screw tray. (I don’t throw away the old bolts unless the head is rounded or the threads are worn out).
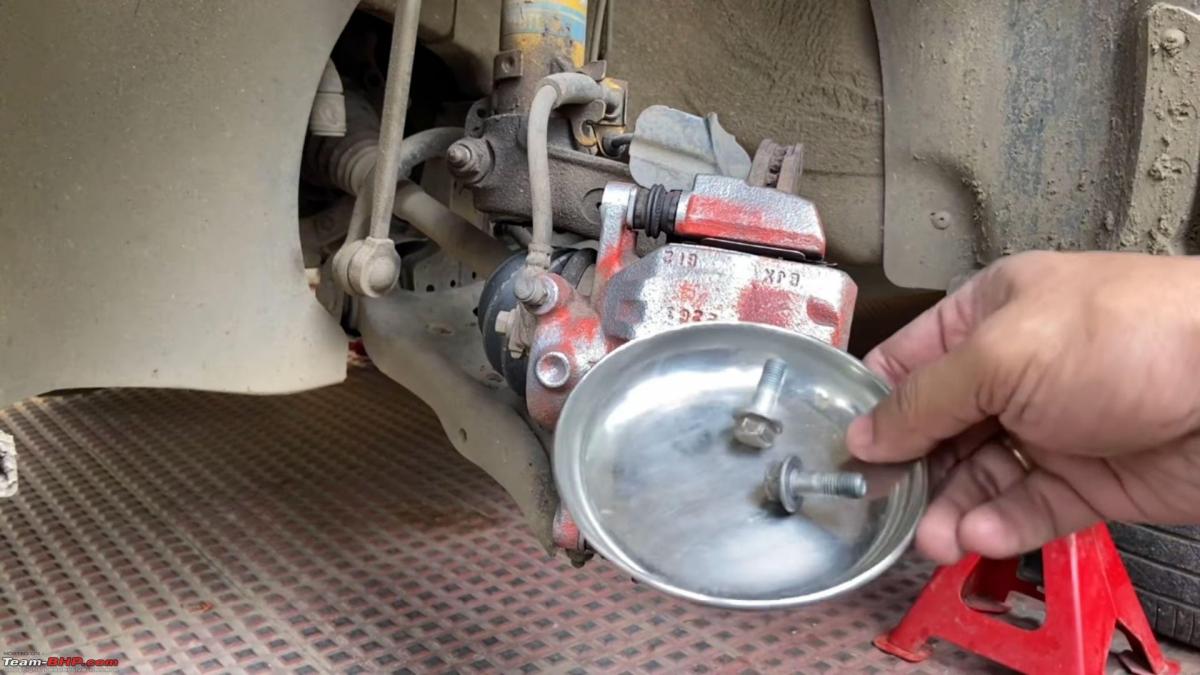
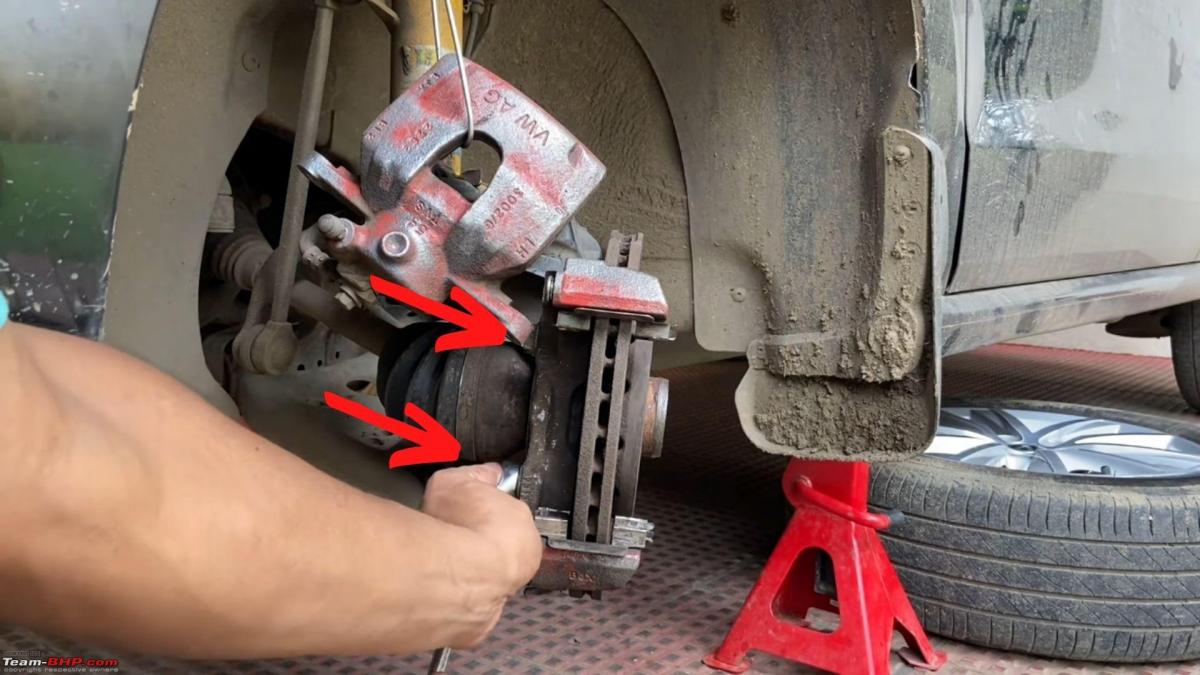
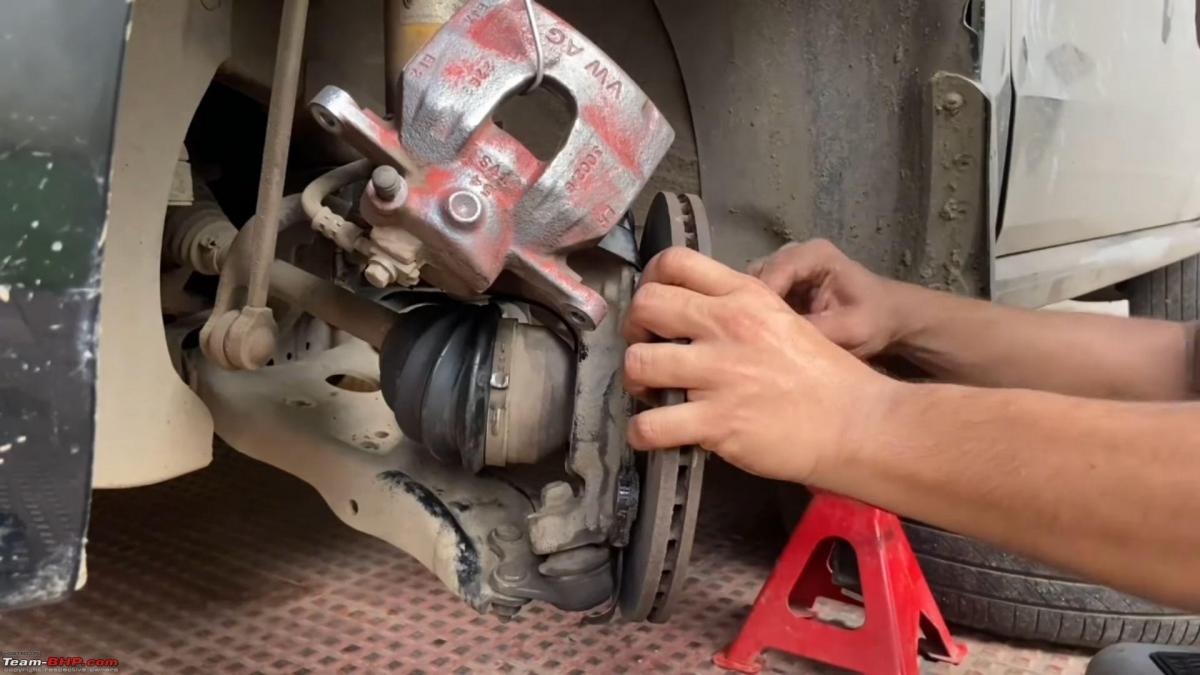
Remove the caliper and hang it using the S-hook/hanger taking support from the spring of the strut assembly.
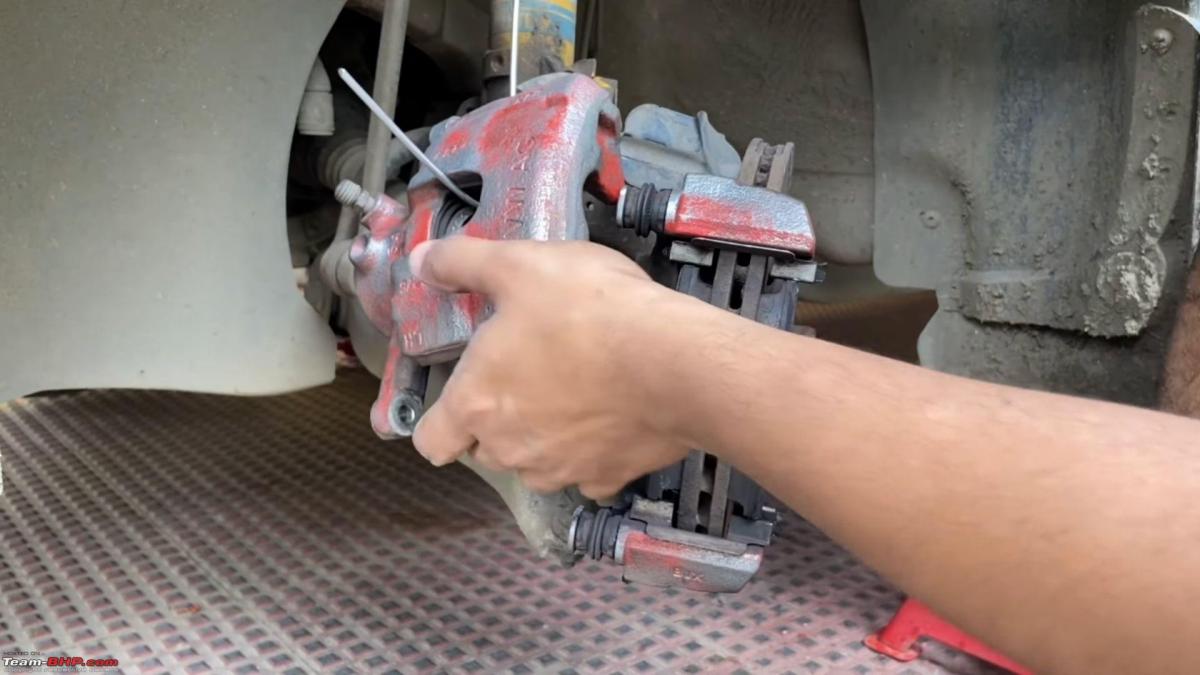
Never leave the caliper hanging under its own weight as it exerts undue pressure on the hydraulic brake hose.
Slide the brake pads out of the metal shims.
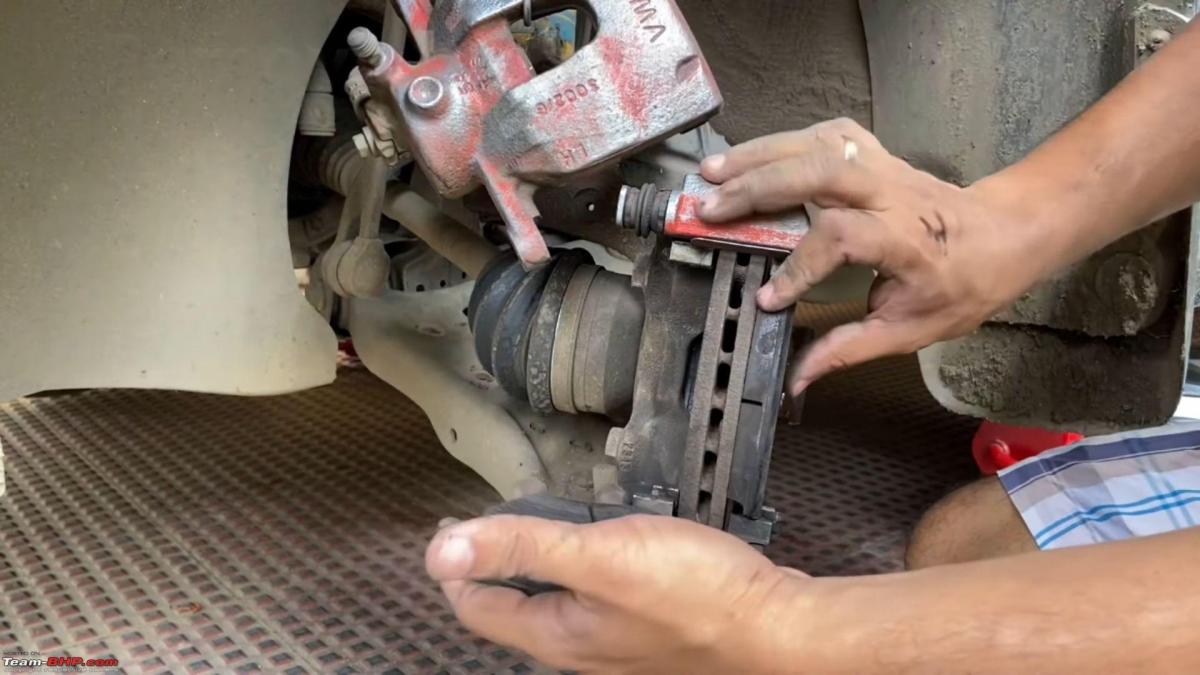
If they are old and worn out, they have to be replaced. If they have the sintered frictional material left (at least 4-6 mm; wear limit as per VW’s workshop manual is 2 mm), the pads can be reused (as I did during this service).
Pull the guide pins out of the caliper bracket assembly along with the rubber cap.
This can be a bit hard depending on the condition of the grease inside. If the grease has dried up or had become mucky, the pin would have become tight. In such cases, use a plier to pull the pinout. Older guide pins have to be discarded and renewed.
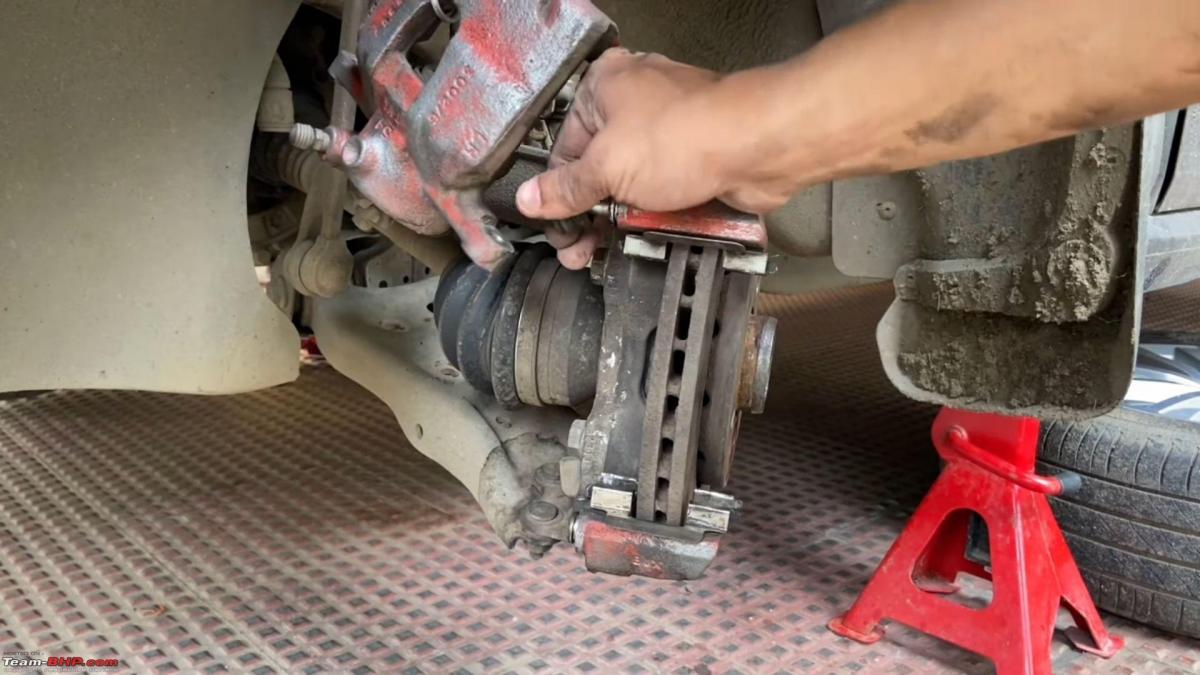
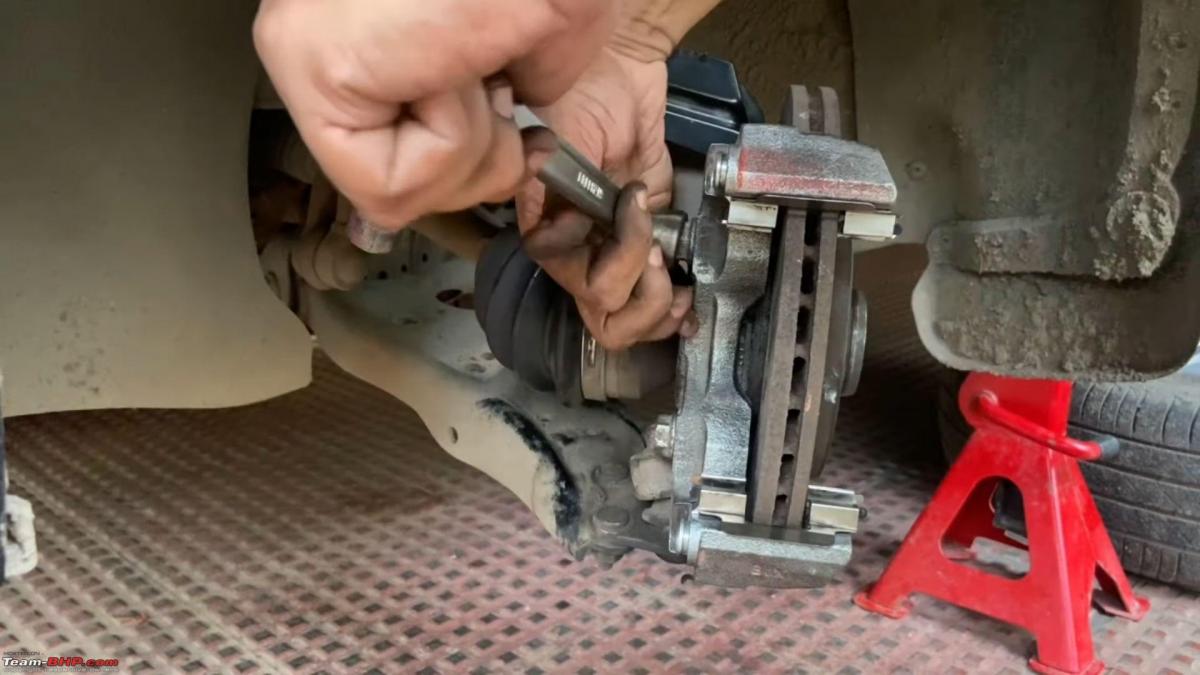
Use an 18 mm socket or 18-19 ring spanner to unscrew the two caliper bracket bolts.
Remove the caliper bracket from the assembly.
Keep these bolts safe as they will be reused.
Use a T30 Torx bit from the 1/4” ratchet kit to unscrew the rotor/disc from the hub:
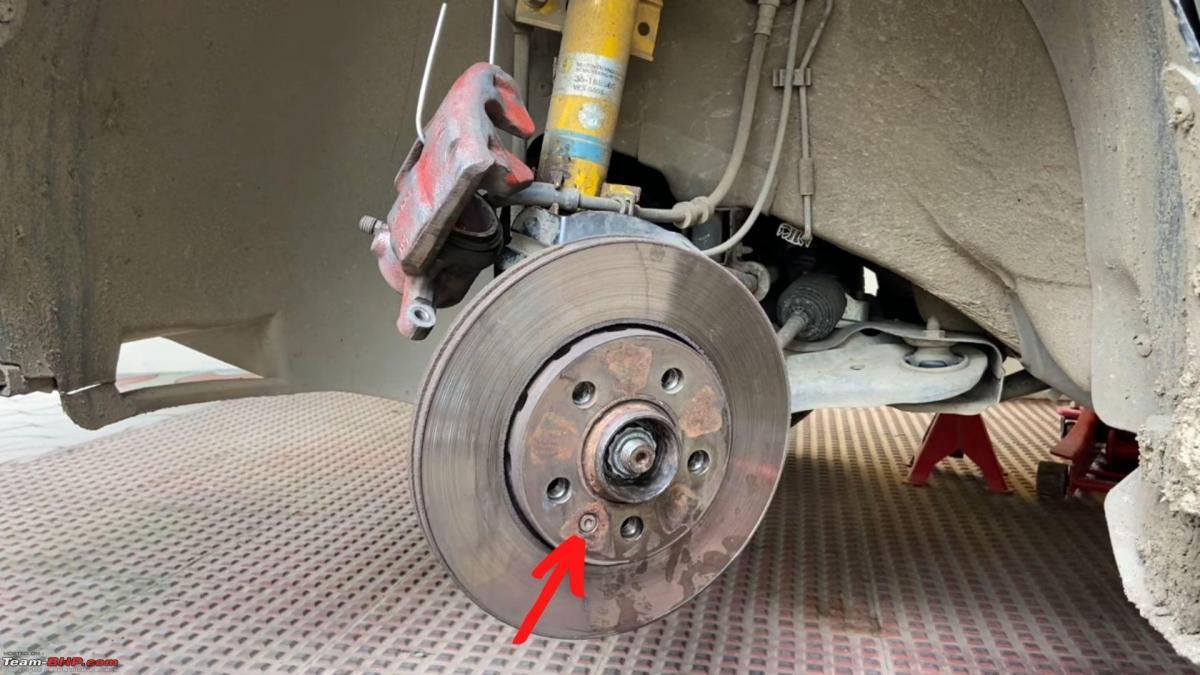
Keep the Torx screw safe.
Remove the two metal shims from the caliper bracket and clean the caliper bracket thoroughly using the wire brush (or the drill + cup brush attachment) and brake cleaner spray.

Clean the guide pin holes on the caliper bracket.
A straw cleaning brush works best. These brushes have smaller bristles and can access the smallest holes like the ones in lab pipettes.
Clean the two metal shims thoroughly for any grease/muck.
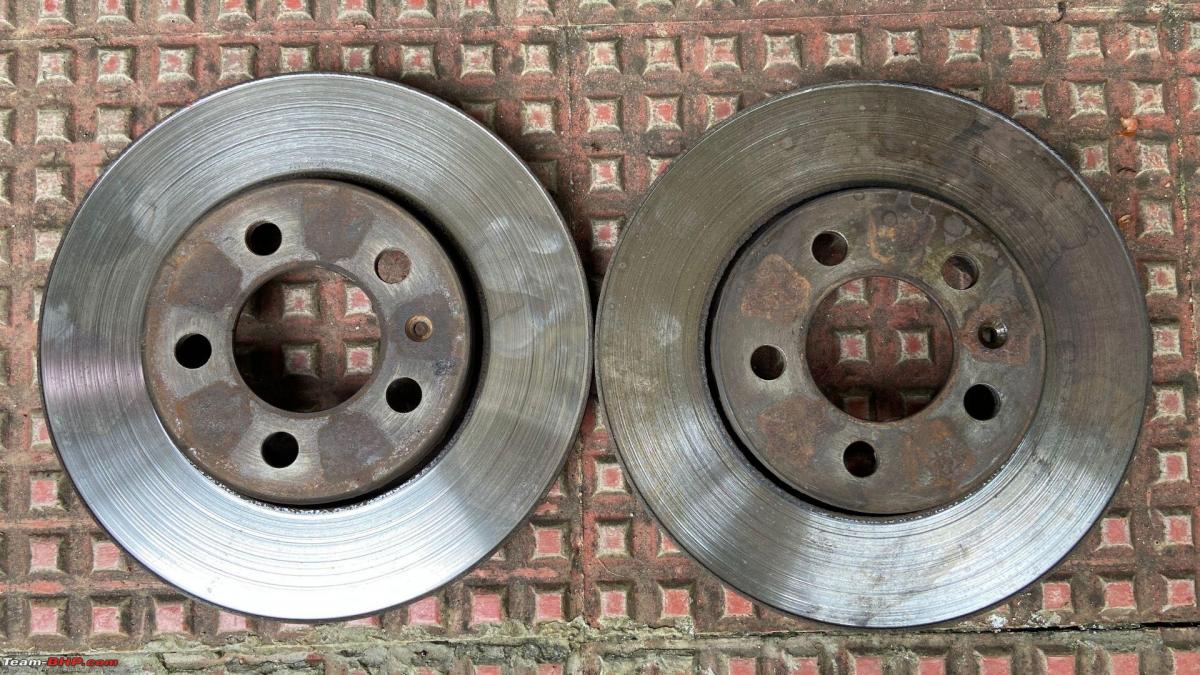
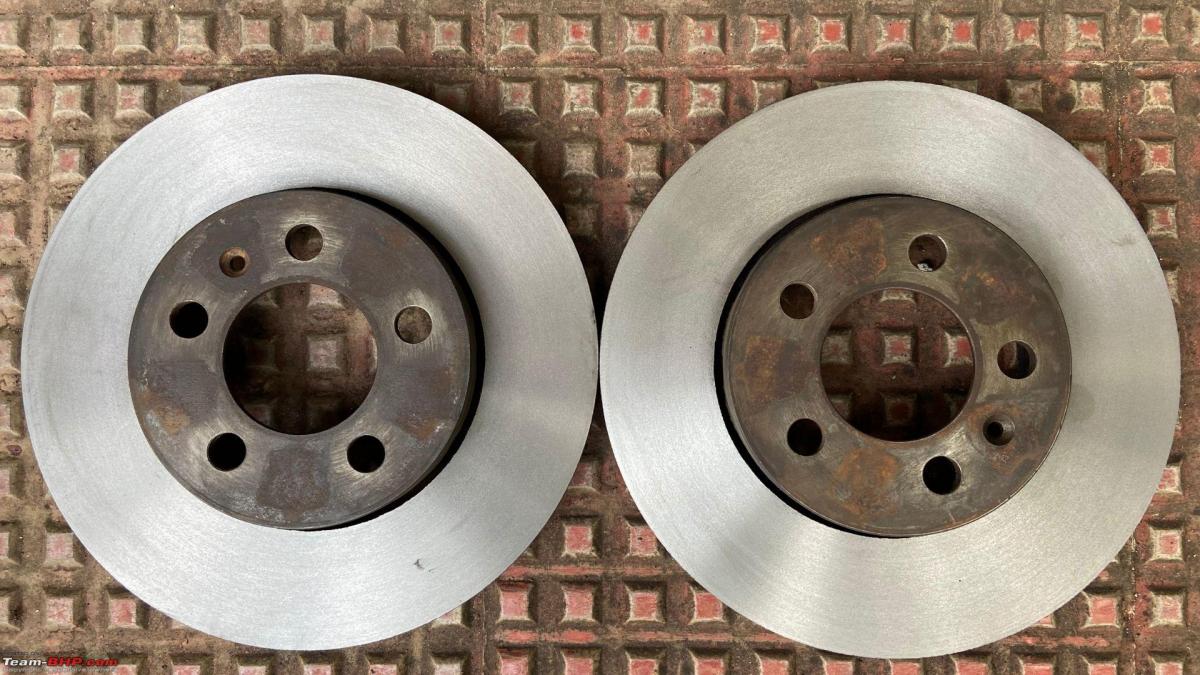
If the rotors have sufficient thickness of the cast iron material left, they can be reused. When the brake pads are renewed, it is advisable to have them resurfaced or machined to remove the scoring marks before reusing them. This prevents juddering and excessive vibrations while braking especially at high speeds.
Measure the thickness of the rotors using a vernier caliper or screw gauge.
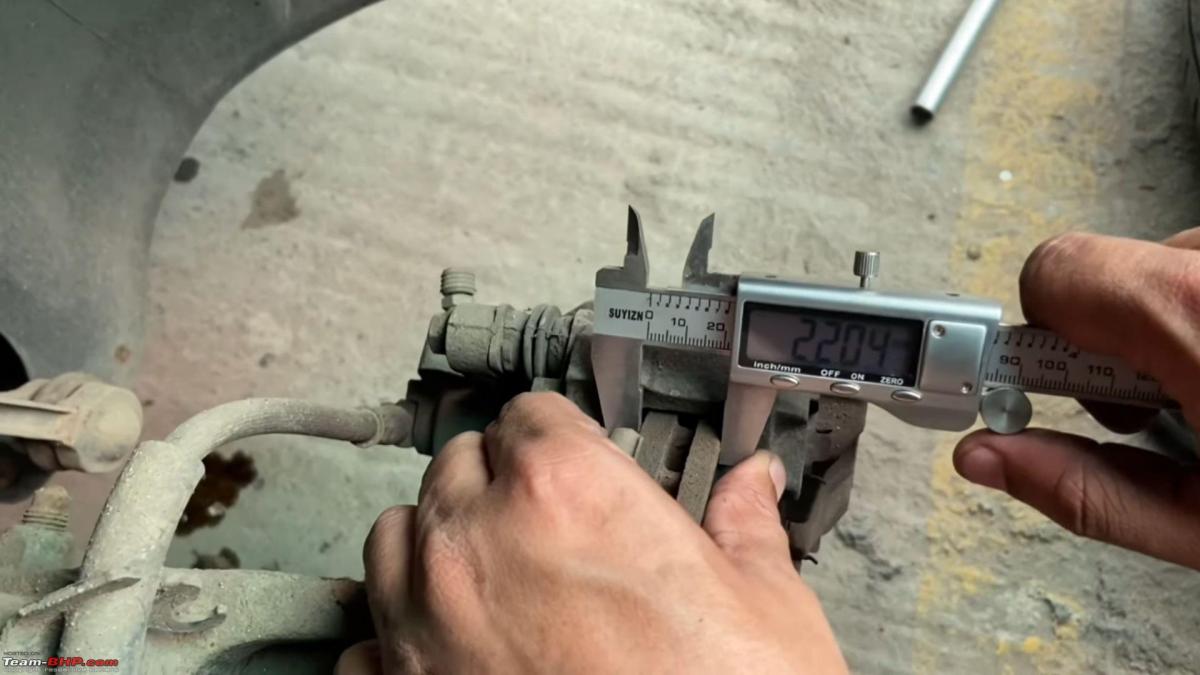
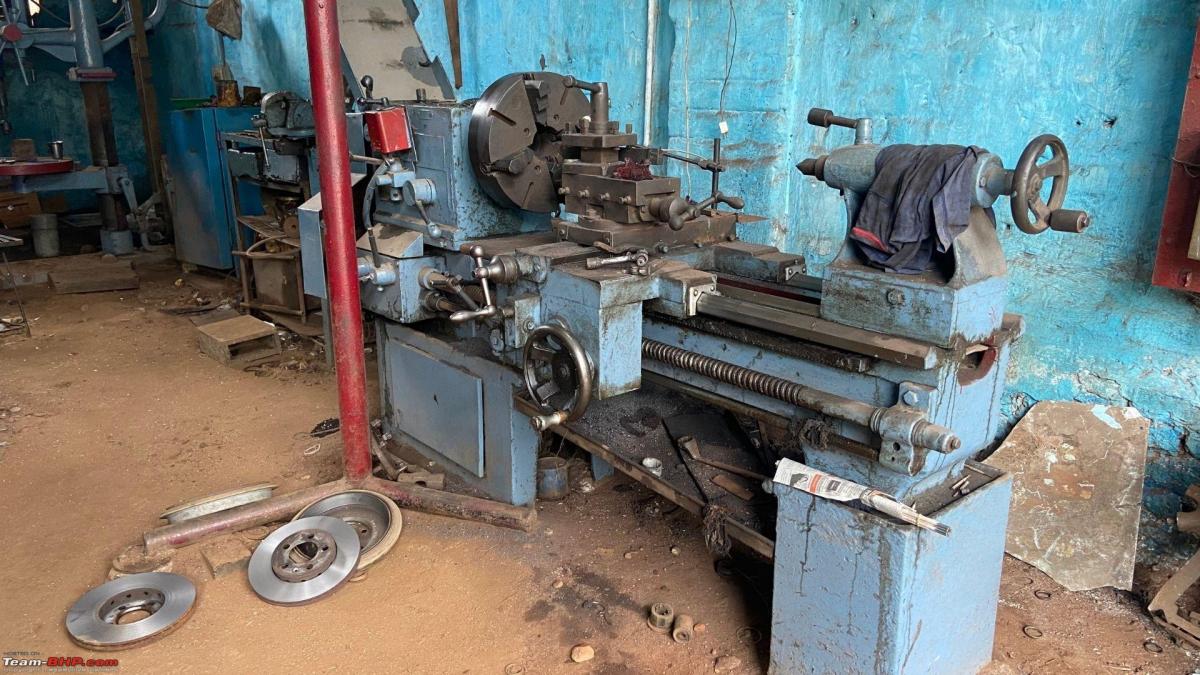
If the thickness is at least 20-21 mm, you can reuse the rotors after resurfacing or machining them on a lathe at a lathe workshop. There are special brake lathes meant for this purpose installed in some workshops which moves the tool post automatically from the inside to outside.
Here's one such brake lathe at an engineering workshop:

Some workshops may not however and the operator manually moves the tool post outwards after mounting the rotor on the chuck and centring it. Like the one below:
If the thickness of the rotors falls short of the limit (19 mm), it is advised not to renew them and must be replaced with new rotors.
The thickness of the rotors on my car measured 21.xx mm and I had them resurfaced at a lathe workshop.
Before:
After:
Clean the wheel hub for any surface rust.
I have seen anti-seize copper grease being applied on the hubs after they are cleaned. I prefer not to grease the hubs and keep it clean just like they were from the factory.

Clean the brake dust shield with brake cleaner spray and cloth.
Mount the resurfaced (or replacement) rotor to the hub and secure it with the Torx T30 screw.
The ETKA manual gives a tightening torque of 4.5 Nm. I have hand tightened it.
Mount the caliper bracket to the hub using the two hex bolts.
Use the 18 mm socket or 18-19 ring spanner to tighten the hex bolts.
124 Nm is the torque value indicated for the 288 mm discs meant for the 15” FN3 system. Since I couldn’t get the values for the 256 mm discs installed, I preferred to hand tighten them.
Open the cap of the brake fluid reservoir cap to permit the fluid to rise when the caliper piston is compressed. Spread some cloth around the mouth of the reservoir, just in case fluid overflows.
Next up, compress the caliper piston to its stock position to permit the brake pads to be set in place in the caliper. The easiest way to do this is to use a 150 mm/6” C-clamp along with the old brake pad to compress the caliper piston to its stock position.

During the last time, we had to resort to a screwdriver and use all our might to push the piston - this was clearly time consuming and exhausting!
Close the cap of the brake fluid reservoir after both the pistons are compressed. Clean any brake fluid which may have been overflown and check the level of the brake fluid in the reservoir. It should be above the minimum mark - top up if necessary with the correct grade of fluid (DOT 3/4 etc).
Clean the mating surface of the piston with a cloth and brake cleaner spray.
Grease the guideways in the metal shims.
Clean any grease from the rotors later with the brake cleaner spray and a cloth.
Insert the brake pads into the caliper bracket. Very important - pay attention to the INSIDE and OUTSIDE markings on the brake pads if the rivets on the backplate are located at different positions.
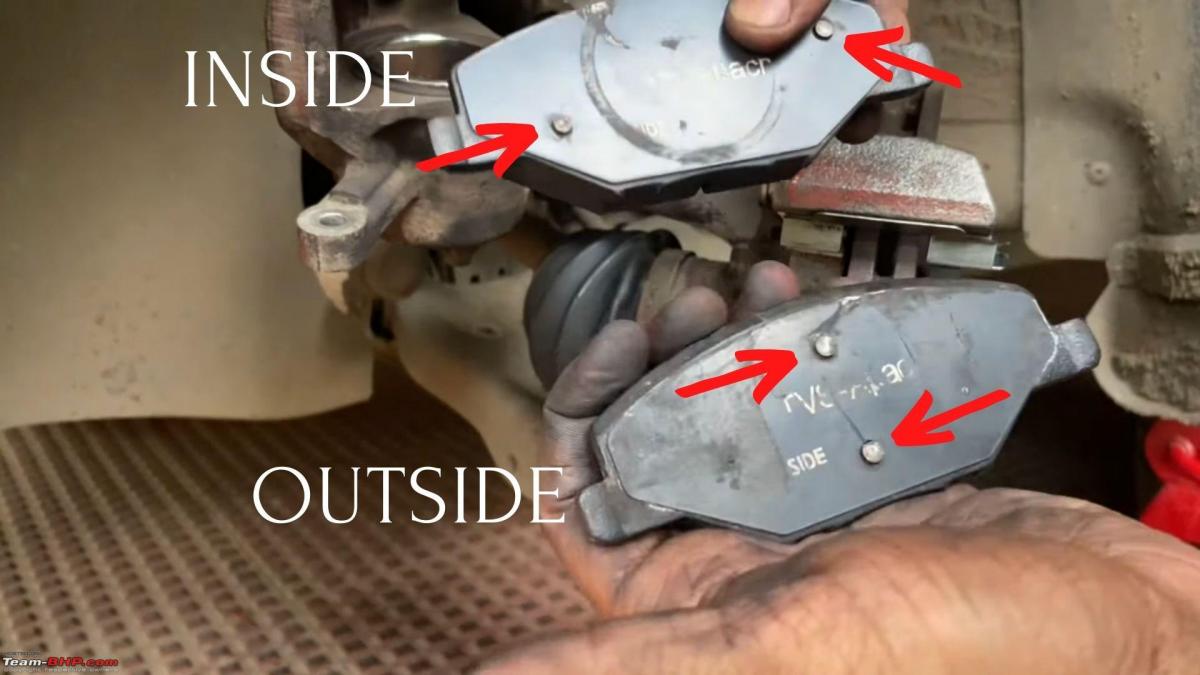
Some pads may not have it this way, however (as shown below) and will have the rivets located at the extreme outer ends. In such cases, the pads can be used in any side.
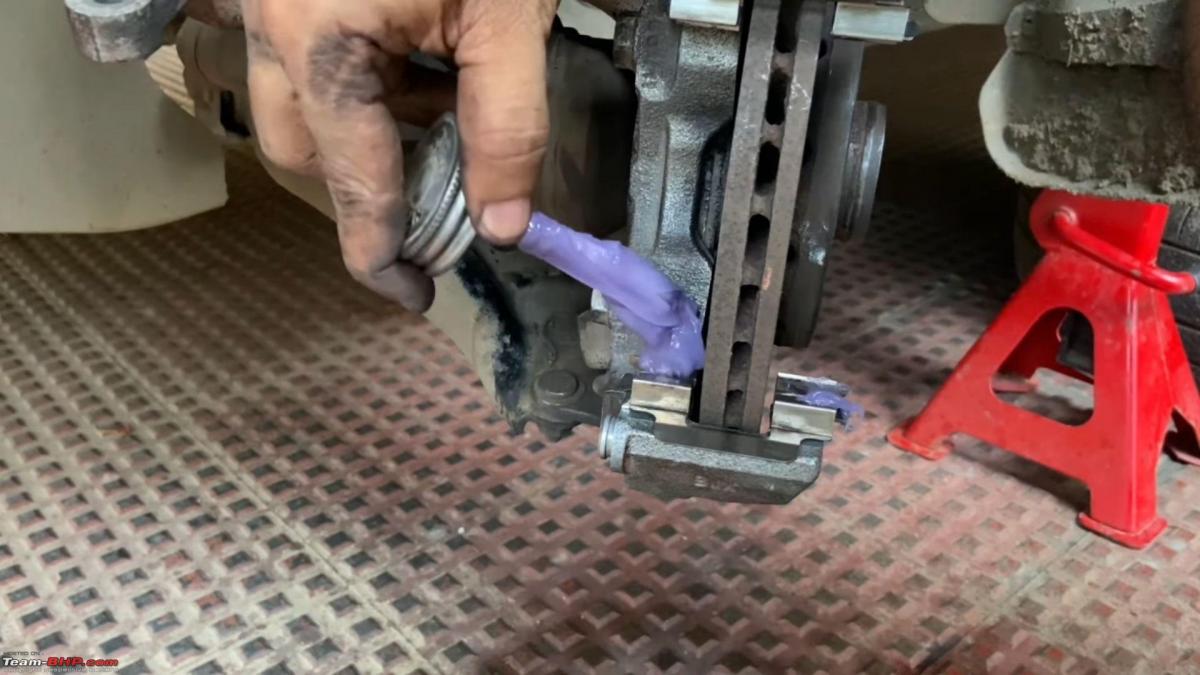
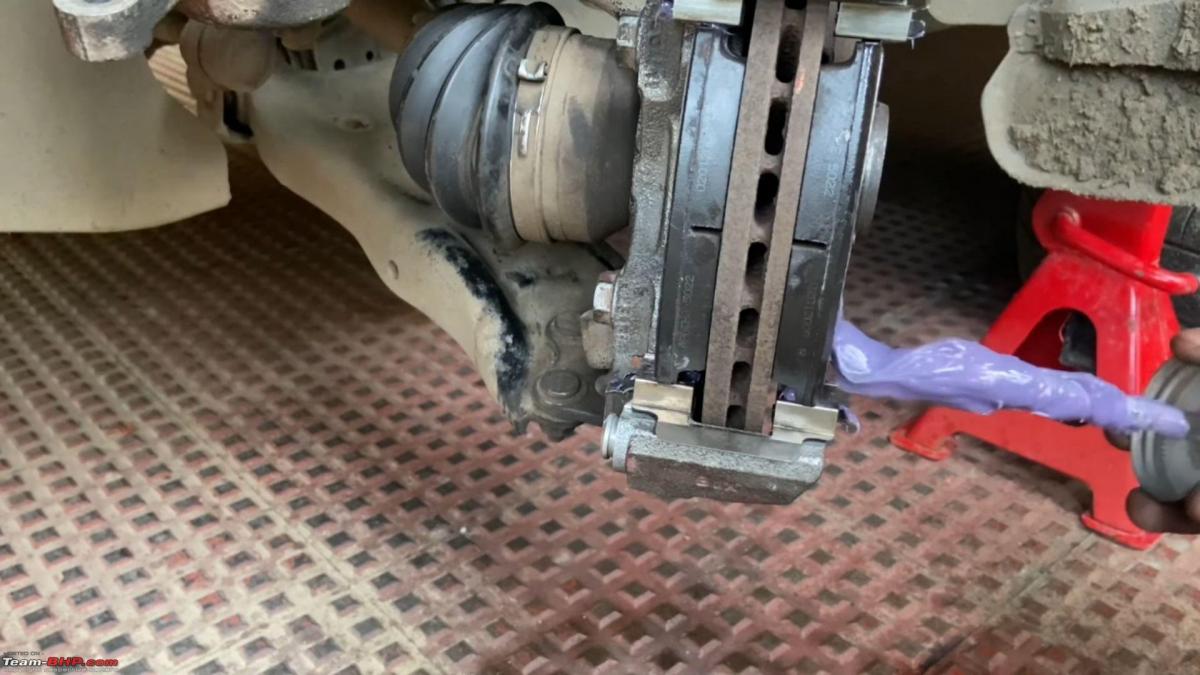
Apply some grease on the mating surface of the backplate of the pads.
Grease the new caliper pins and insert them into the guide pin holes of the caliper bracket.
Important - Pay attention to the pins as they are not interchangeable. One of them has a rubber sleeve and can be inserted only on the top guide pin hole of the bracket.
The pin should be able to slide in and out effortlessly - check this aspect. Remove any excess grease.
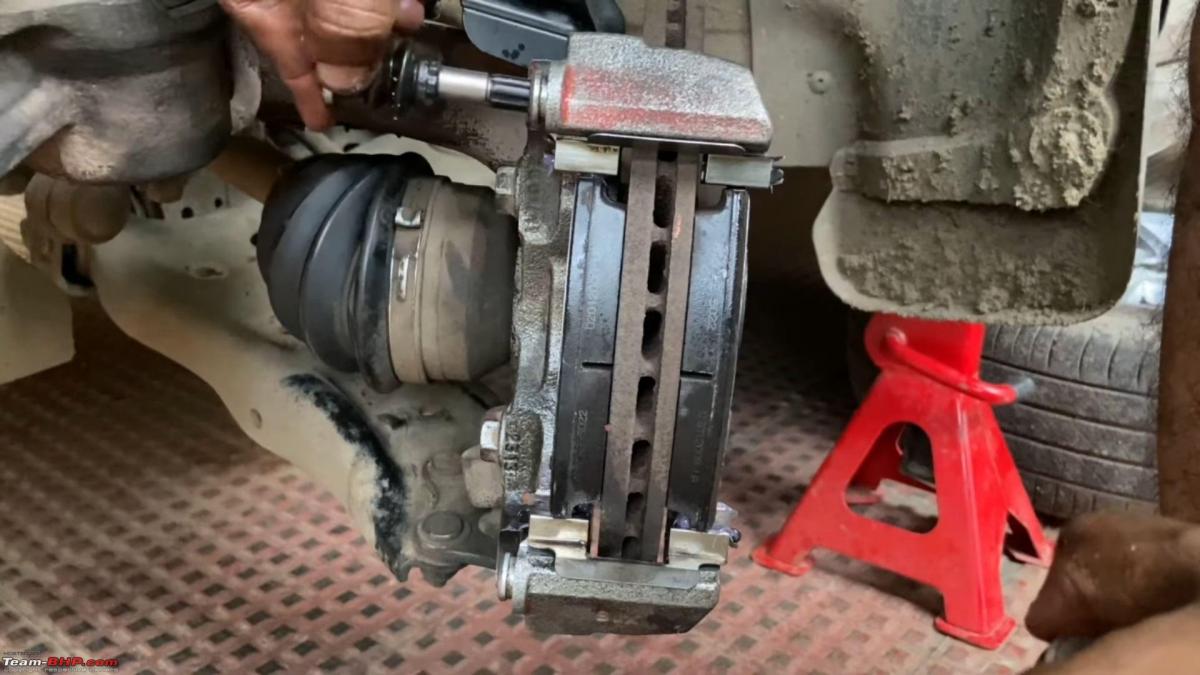
Insert the caliper in place and secure it using the new holding down bolts.
The job is complete

Replace the wheel back, secure the lug nuts, lower the car to the ground from the jack stands and tighten the lug nuts by hand.
Take a test drive to assess the braking performance. Important - Before driving off, depress the brake pedal several times to ensure that the piston presses against the brake pads. The pedal play decreases as you depress it 3-4 times.
For those who find videos convenient, here’s the link.
I’ll take up the 2-man brake bleeding job shortly and share the process and findings here.
Trust this was useful.
Check out BHPian comments for more insights and information.
- Tags:
- Indian
- Polo
- Disc Brake
News
Solution to the ABS sensor issues in my VW Vento & Polo


I've had to send the Vento to the workshop 6 times already and each time it has been in the workshop for nearly 6-7 days.
Thanks to the Team-BHP fan (he prefers to remain anonymous) who sent this in. Heartfelt gratitude for sharing it with other enthusiasts via this Team-BHP share page!
Hi Folks,
I own 2 Volkswagen Cars - Vento (Purchased in 2016) and Polo (Purchased in 2017). Both of these cars have excellent driveability and handling and I love the way these cars perform both for daily use and highway drives. But unfortunately, they have been creating lots of niggles lately. I am frustrated regarding the ABS Sensor issue which Volkswagen has to date not even addressed.
I have had 4 ABS Sensors replaced for my Vento Already, the latest replacement being in the month of October 2021. I had been assured by the workshop manager that, after 4 ABS Sensors are replaced no more sensors are likely to fail since these are connected in series and if one sensor fails then the rest 3 are bound to fail. Suddenly, the day before yesterday, while I was driving in the city, the speedometer needle started flickering on its own and the brake pedal went hard and was making sounds. I was driving at around speeds of 30-40 and there was a car ahead of me. Fortunately, after 1-2 secs the brakes came into force and saved me from getting involved in an accident. Soon I pulled to the side of the road and the ABS Light started glowing in the instrument cluster.
This is not the only time that this has happened to me. In the past as well I've had close calls just because of the ABS issue cropping up in the middle of driving. I had just sent my car 1 month back to the workshop for the 4th ABS Sensor replacement in my car and I was assured that no more sensors would go kaput but within a span of just 1 month or even less, the ABS issue has cropped up again. It is very disappointing to note that this year I've had to send the Vento to the workshop 6 times already and each time it has been in the workshop for nearly 6-7 days. I had also opted for the add on warranty (5th year) which is ending soon and now that the ABS problems have cropped up again, I'm scared that it will crop up again in the span of the next 1 year.
Also, Polo never had any issues related to the ABS in the past 4 years. I had never thought that along with the Vento, the Polo would also develop ABS issues and create hassles for me. In the last week of October, Polo started showing similar symptoms (Speedometer Needle Flickering, Brakes going Hard). Soon the ABS light started glowing as usual and I was shocked as this also happened just before the extended warranty (2+2 years)of the Polo ended.
I would request BHPians to guide me in this regard and assist me on what to do? I am tired of sending my car to the workshop almost every month.
Here's what GTO had to say on the matter:
VW owners, are there any other sensor brands in the after-market that fare better than the stuff VW is using? Clearly, what the workshop uses isn't durable.
Here's what BHPian Freerevvingguy had to say on the matter:
There is no way around this. The only way to reduce the pain is to give the car somewhere else to get the sensor replaced once the warranty is over. Look for a reputed garage like Bosch or in Kerala we have code6 and they will do the job for half of what Volkswagen dealers quote. This abs sensor issue is the only downside, the vento and polo are otherwise the best in terms of driver engagement.
Here's what BHPian VivekCherian had to say on the matter:
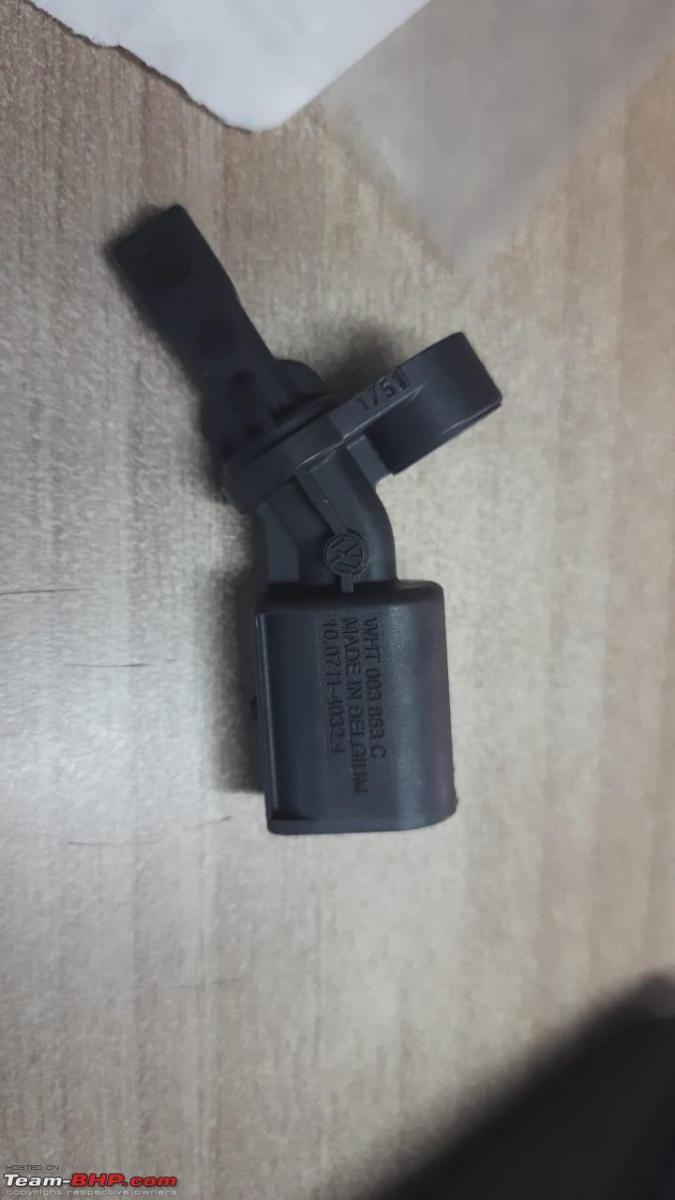
VW has released a new version of ABS sensors for the Polo / Vento / Ameo / Rapid recently. These ones, apparently, will fare better in our climatic conditions. However, only time will tell if that is indeed the case.
The new part numbers are:
- WHT003860B Front RH
- WHT003861B Front LH
- WHT003862C Rear RH
- WHT003863C Rear LH
The sensors seem to be made in Belgium.
Here's what BHPian anoop.u had to say on the matter:
Go for these Hitachi branded sensors if you can find them. Costs approximately Rs. 1500 per sensor. They are made in India (Pune).
After going through 11 or 12 sensors in 4 years I got these from a local shop here in Cochin. Have been running trouble-free for the past 2 years (touchwood). And I have driven through waterlogged roads, slush, dirt and a couple of pothole crashes as well.
Check out BHPian comments for more insights and information.
News
Replaced my Volkswagen Polo with a Taigun


Seat cooling although a feature I was not too keen on having is a boon when coming from direct sunlight in the afternoon.
BHPian tanmay2612 recently shared this with other enthusiasts.
Hello All,
This is my first post since joining. Would like to share my experience so far with the Taigun 1.0L MT Topline. Booked it during pre-booking and received delivery at a date of choice (2nd November) Upgraded from a Polo 1.2L Highline (Feb-2015). Images for both below.
Initial impressions from one week of ownership:
- Build quality is good but still it leaves room for improvement, and VW can take up improving certain alignments and interior fabrics and plastic to meet their classical standards.
- Drive and comfort are sorted, body roll is non-existent (especially at restrained driving for run-in period).
- Steering is light but responsive, both me and my wife liked the Polo's steering and found this light but still precise.
- Clutch travel is still longer but it needs lesser force and more manageable.
- Bumps are felt lesser than earlier as in the Polo, but still road feedback is present in appropriate quantity at front seats.
- Seats are more than adequate for 4 adults and 1 child (traveled 150 km over Diwali) and didn't find single challenge in accommodating all individuals seated in any position. Can travel for short drives for a single day with 5 adults without much difficulty. Once in a while long drive also would not be a challenge.
- Using it for grocery runs is not tedious, gets in and out of parking as easily as a hatchback.
- Rear view camera gives enough vision to cover incoming traffic from sides as well.
- Seat cooling although a feature I was not too keen on having is a boon when coming from direct sunlight in the afternoon.
- Sunroof serves the only purpose of getting it, to keep kids entertained.
- Virtual information cluster provides enough information and sometimes can be distracting (at least initially).
- VW Connect app seems to have issue as Jio dongle is not online since 3rd November, got to know from my SA it's a server issue. Not sure about it though.
- Tyre pressure warning system works as expected and provides alert on excessive pressure drops.
- Still trying to connect my Android Auto, but need to get correct cable first.
- Sygic maps works like a breeze, has updated information in offline mode and helps to navigate in both 2D and 3D views.
Overall liked the drive and cruise control was the cherry on the top (pun intended).
More details to follow.
Here's what BHPian antriksh had to say on the matter:
Welcome to Team-BHP Tanmay. Congrats on the Taigun and wish you many happy miles with it.
The Taigun comes with Wireless Android Auto and Apple Carplay, so you will not need a cable to connect it, please check again.
Check out BHPian comments for more insights and information.
News
DIY: Fitting Euro-spec DRL fog lights on my Volkswagen Polo
I always wanted to have a pair of DRLs on my car but I had no idea how to achieve it in the cleanest way possible.
BHPian fluidicjoy recently shared this with other enthusiasts.
Adding OE style DRLs on a Polo
I thought I’d pen down this really cool DRL DIY which was on my mind ever since I got our Polo. It’s well-known that the Highline+ Polo or the GT TSI is not offered with the fancy GTI LED headlights and hence there was no DRL on the car at all.

DRLs are good to have, a standard feature in most cars in 2021, and frankly, they’re not just for style, but they actually make for a decent safety feature if implemented perfectly. Even our Grand i10 came with a beautifully bright DRL which is controlled by the parking brake. So, getting a pair of DRLs was always on my to-do list, but I had no idea how I was going to achieve it in the cleanest way possible.

The OEM way to get DRLs in the Polo 6R without a new headlight assembly was to have the DRLs running in the foglight.

I had first seen this implementation in the European spec Polo 6R which had a halogen DRL in the foglight assembly itself. On the Indian spec car, the spot for the DRL is a blank. There is plastic moulding in the rear, but the reflector is solid with no provision for a DRL.
Disclaimer
This is a retrofit I did not complete myself since I eventually moved to DRLs integrated within the headlights. Most of the parts and connectors listed have been cross-referenced to be a straight fit. However, some minor elements could still be different when you start to do this on your car.
A friend of mine and a Polo enthusiast Prerak was successfully able to install these DRLs on his Polo with these guidelines and so I’m confident you can too.
This thread would not have been as vibrant and lucid without the photos and videos he has clicked while documenting his process workflow.
The discovery
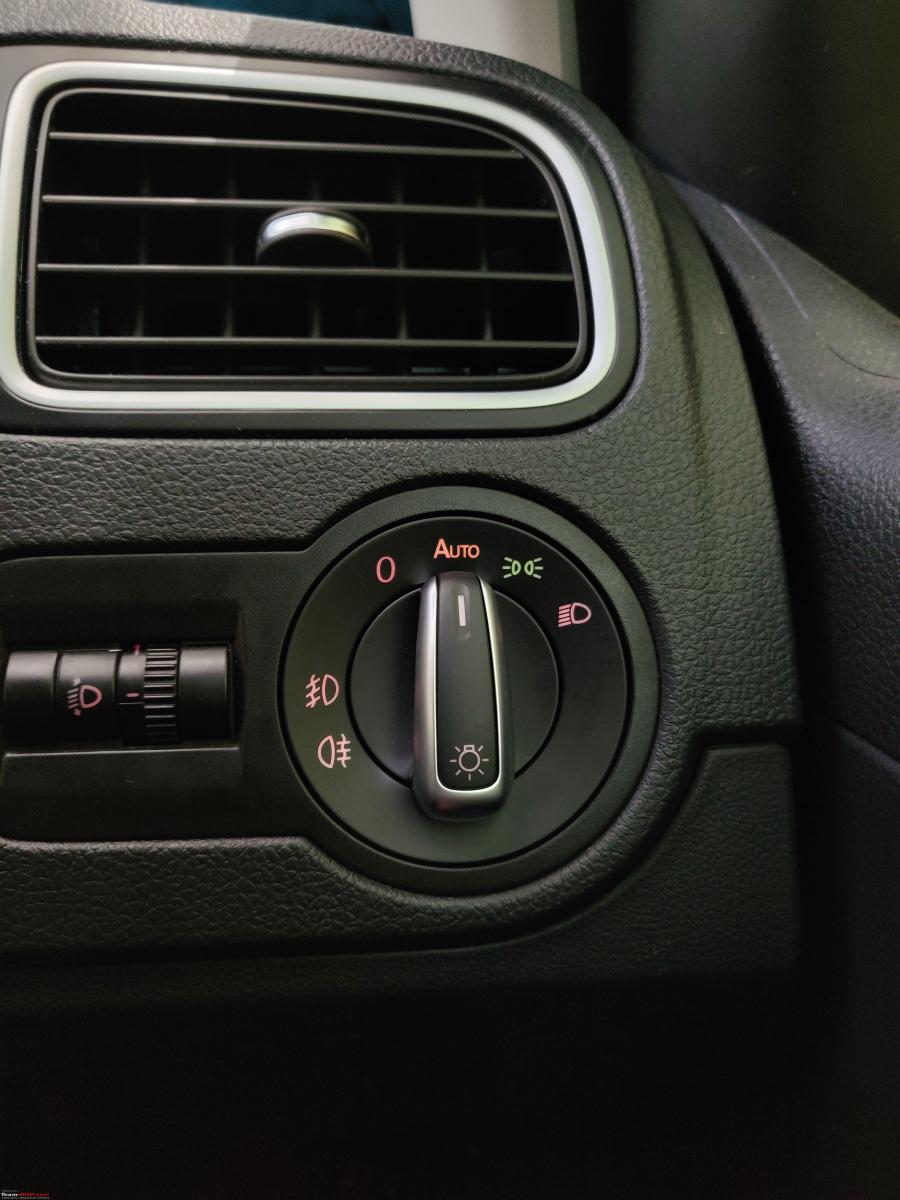
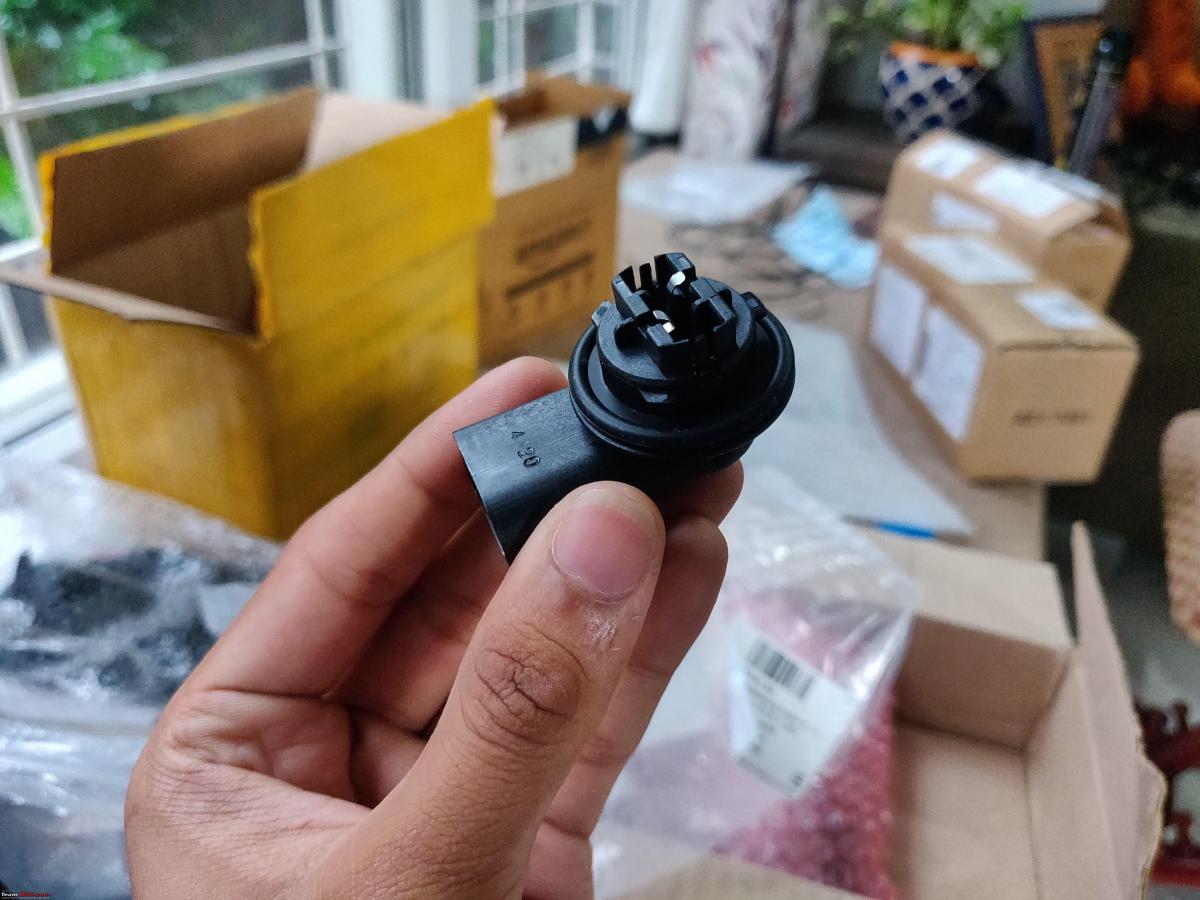
When I was installing the Chinese Automatic Headlight switch last year, I was curious to see the different notations on the T17 headlight pin connector. TFL, NSL, 56* were some of the notations I saw.
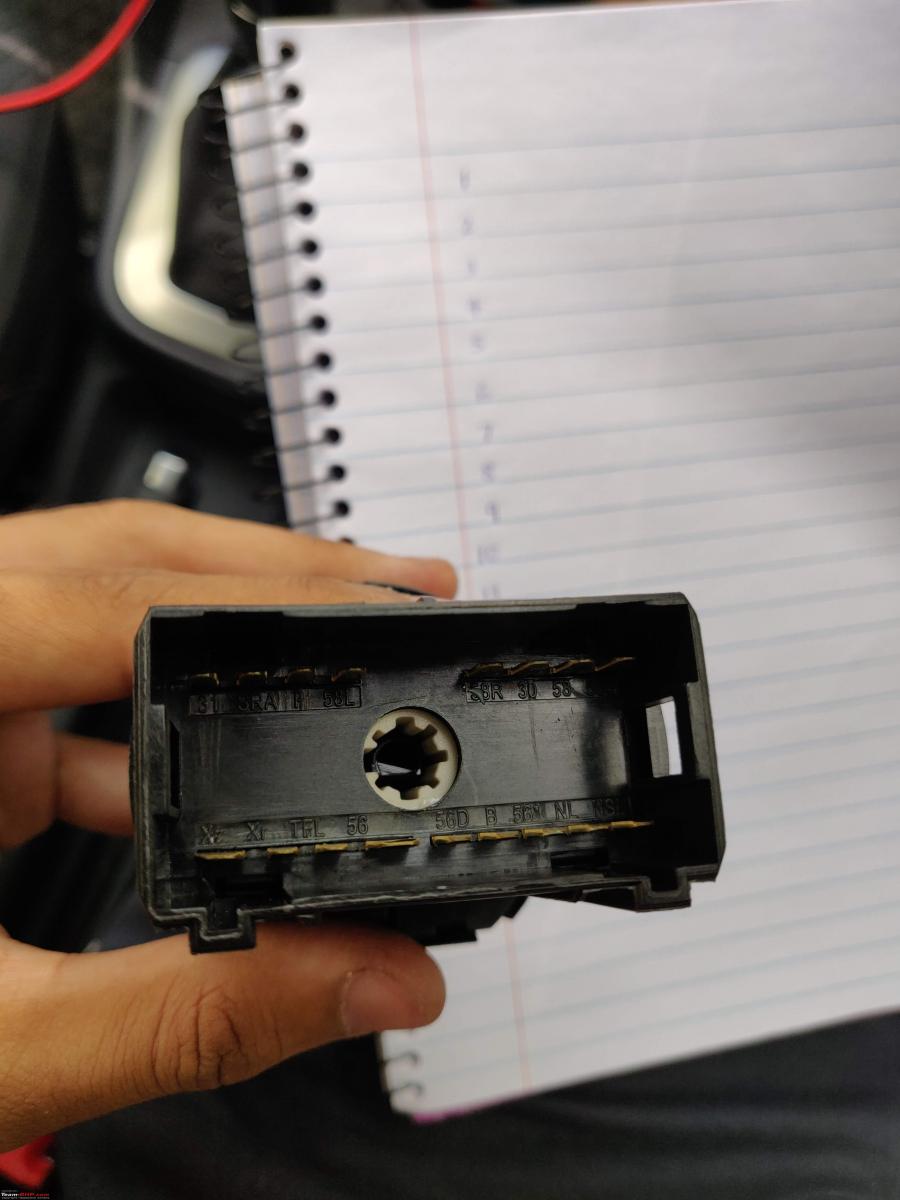
Turns out that these are short forms for different terminals and lights in VW’s lingo. Then, using a continuity tester, I found that the empty slot at T17/3 on the headlight switch was working as a proper DRL with voltage appearing and disappearing just like it should for DRL circuitry.
Some more scouting around helped me find references to VW’s own wiring diagram for a DRL which was being powered from T17/3 and thus was born the idea of wiring a DRL to the Polo using the OEM route.
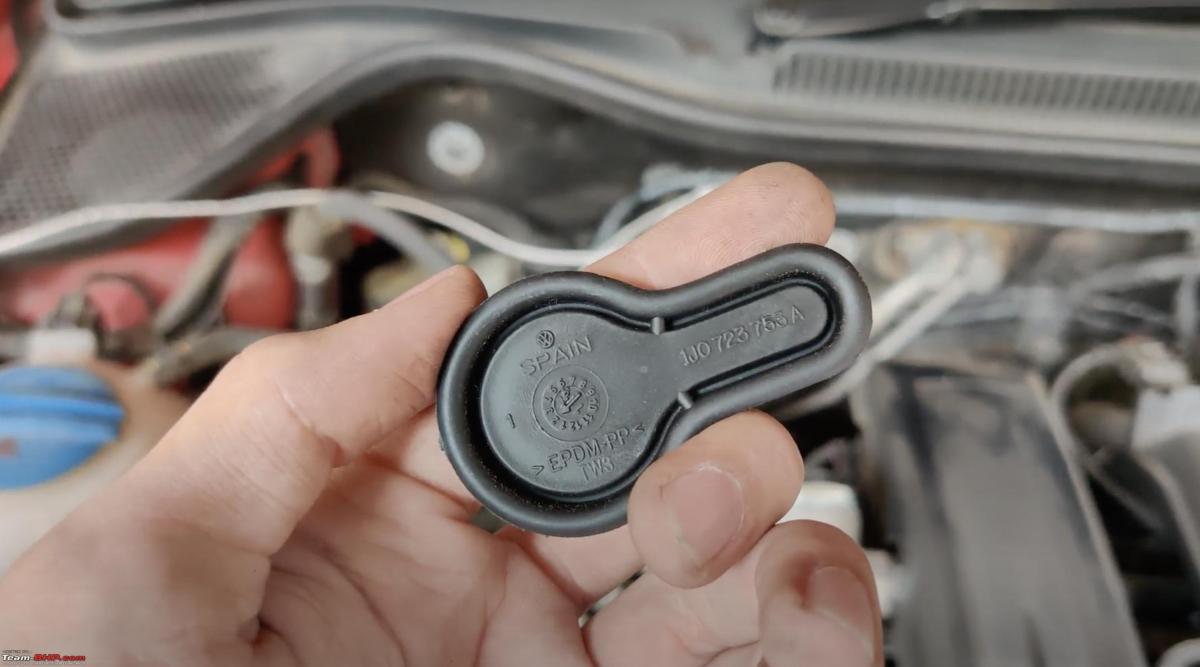
We began this discussion by saying that the stock foglight does not have a ready-made provision for throwing in a DRL bulb and so if you don’t want to modify any stock fixture, then your best bet is to buy a new pair of OEM GTI fog lights. As per my friend Sheethal’s experience (who is a passionate and highly knowledgable VAG master), these imported fog lights are a lot better than the India-made fog lights.
Buying this new part gives you a dedicated slot and bulb holder for this DRL and all you need to do now is to complete the wiring. The part numbers for this fog light with DRLs are 6C0 941 661 and 6C0 941 662.
The last time I checked, these were about Rs. 13-14k a pair. You can source OEM equivalents on eBay UK for lesser, but the net price does not turn out to be all that great once they pass through our unpredictable Indian customs who might send them to you duty-free or might even outrageously value them for 2x-2.5x more than what they’re really worth.
The DIYers out there would love to soil their hands and have this retrofitted on their car. The DIY route is the cheaper yet more fulfilling option and here’s a list of parts that you’d need.
Tools, parts & part numbers
- DRL Bulb Holder (Bulb Carrier) - 6C0 941 669 x2
- DRL Bulb Connector - 1J0 973 722
- DRL Bulbs - W21W
- DRL Output Wires: 1mm^2 for power, 1mm^2 for ground
- Headlight Switch to Fusebox Input Power Wire - 1mm^2 - N 906 844 05 - Headlight Switch T17/3
- Fuse : 15A (SB56), Fusebox Pins - N 907 327 03 if wiring from Fusebox
- TESSA Tape - Fabric Type, Soft type
- T20 Torx Screw to unscrew fog-lights

The bulb holders turned out to be slightly expensive for me since I imported them, but I heard it could be possible to procure these for about Rs. 3000 a pair locally. These holders might also be aboard a few older Skoda Superb and Passat cars, and if you’re someone who likes to search around for used parts, then this could work out to be incredibly cheap. I had procured holders for retrofitting DRLs on my car but ended up sending them to Prerak, who was undoubtedly more excited than I was to install these on his car.
Here’s another closer look at the bulb holder. This bulb holder can house W21W bulbs and you can also use an LED bulb. The holder twists and locks onto the foglight DRL section. It also has an O-ring for keeping water out, so make sure that’s not cut or damaged before installing. If you have doubts about the sealing, then I recommend small beading of silicon gasket to ensure even better waterproofing.
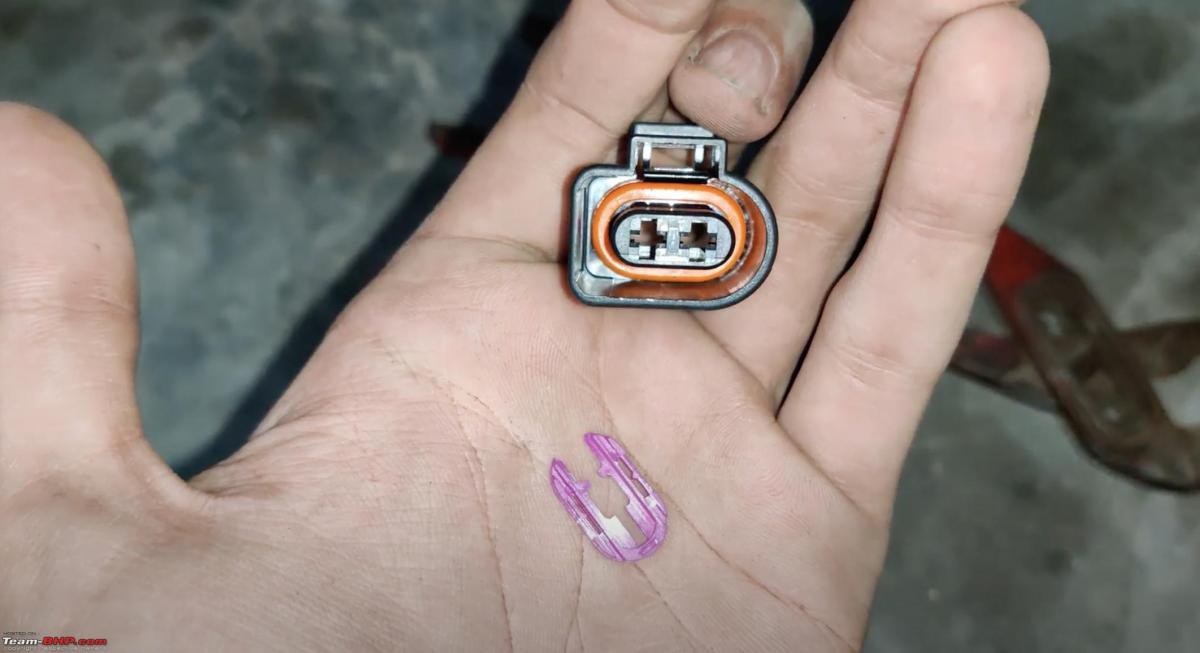
Next, to connect these DRL holders to power, you’ll need to find yourself some Bulb Connectors. 1J0 973 722 is the right connector for the bulb carrier we’ve used. I consulted and verified this part number with another Polo enthusiast Dr. Patil.

I hate to admit, Aliexpress was indeed a great place to source electrical connectors and crimps and if you look 1J0 973 722 up on Aliexpress, you’ll get a full connector kit along with waterproof seals and crimps which looks something like this.
If it’s possible, then I’d recommend sourcing the entire set, and crimping it with a fresh set of wires and crimps. If that doesn’t seem to work out, then try and source this connector from a scrap yard along with the wires too.
However, the one potential downside with sourcing from a scrap yard is that the stock wire gauge might not be sufficient or robust enough for your project. Not all appliances which may be using this same connector might require the same wiring gauge and so make sure your wires are of the right spec.

Smaller wires could particularly be more concerning if you plan to use power-hungry bulbs. Prerak had to reassemble each crimp and solder it since the wires on one of the connectors he procured were not as per the mark.
The VW wiring diagram suggests 1mm^2 gauge wires and you can buy these from a local automotive store. If you like to colour code your work, then buy a Red wire for power and a Brown one for the ground. Again, to err on the side of safety, you’re better off with having a larger core wire than a smaller one.
Simplified Circuit Diagram (Modified from VW’s Official DRL Wiring Diagram)

How does this work?
This is not a BCM controlled DRL for the BCM High. The DRL is powered by the light switch from slot T17/3 and is protected with a 15A fuse.
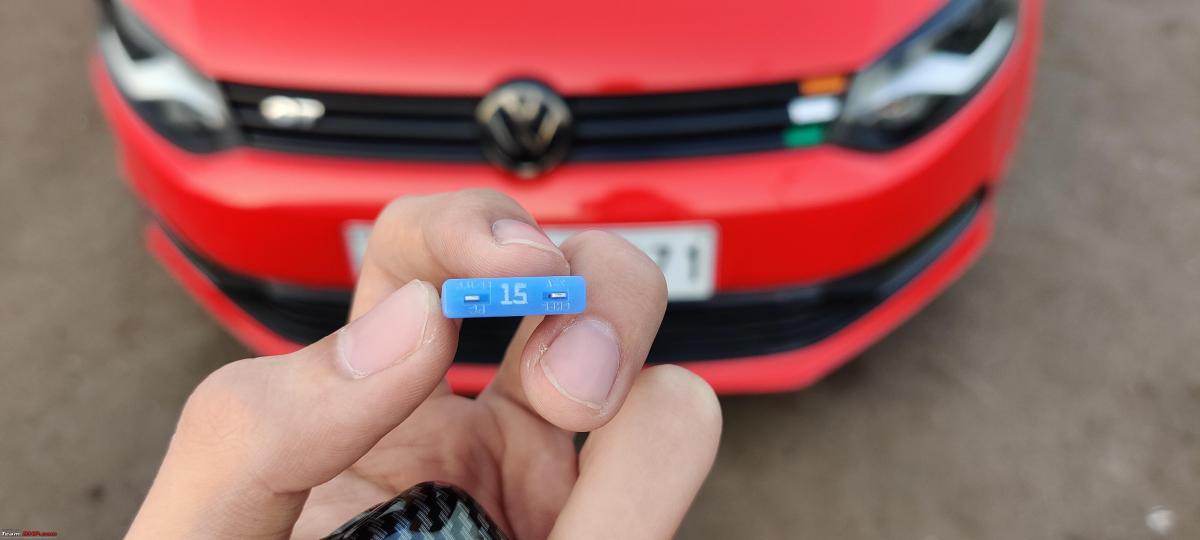
Depending on your comfort with working on the fusebox, you can choose to wire it in the stock fusebox or just connect an in-line fuse between the wires to complete the circuit. A 15A fuse was specified on the factory spec assuming 21W bulbs.
The OEM way to wire any accessory is to wire it in the fusebox, but it could be tricky for most folks who don’t have the right tools and haven’t worked on their car fuses before. Just to be clear, in this case, we are not tapping any power from another circuit and so a fuse tap is not really the right option. Prerak used a fuse which is housed in a plastic box and placed it in the engine bay. It's located along the fender and can be spotted by observing the two red wires.

Please note that unlike an electrical accessory like dash cams, reverse cameras, etc. which we connect to battery power, these DRLs are being powered from the headlight switch and hence we do not need to tap into any Fuse Power (+15 or +30). That is the beauty of this retrofit.
If anyone still wants to connect this to a fully empty slot in the fusebox, then you will need to procure two Fusebox Pins - N 907 327 03. This would be followed by procedures to take the driver footwell air vent out, fuse box out, remove the locking pin and insert wires, and put everything back without damaging the big wiring bundle which relates to everything on your car.
An inline fuse would be highly easy and convenient for this retrofit and you can buy one for as little as Rs. 50.
Quick Process Workflow
- Preparing Fog-light Assembly to mount new DRL Bulbs.
- Remove the foglight from the car.
- Drilling a hole into the blank reflector region to fit the bulb holder.
- Install the DRL bulb holder.
- Mounting the bulbs.
Wiring
- Making the wiring as per the schematic.
- Routing the wires to the fog lights and routing the wiring in the inside of the car.
- Connecting plug and play connectors to the headlight switch via a FUSE.
- Connecting appropriate ground points as per your wiring length and convenience.
Testing
Drilling into the reflector

To make way for the DRL, we need to finely trim along the blank cutout so the DRL holder can lock in place here. You might need to use multiple tools and will need plenty of patience to do this right. The holder will then twist in and be secured in place inside this new DRL space.

Once you have the holder secure, you still have to cut into the reflector bowl. I was personally paranoid about this step because it seemed like the most challenging part of this DIY.
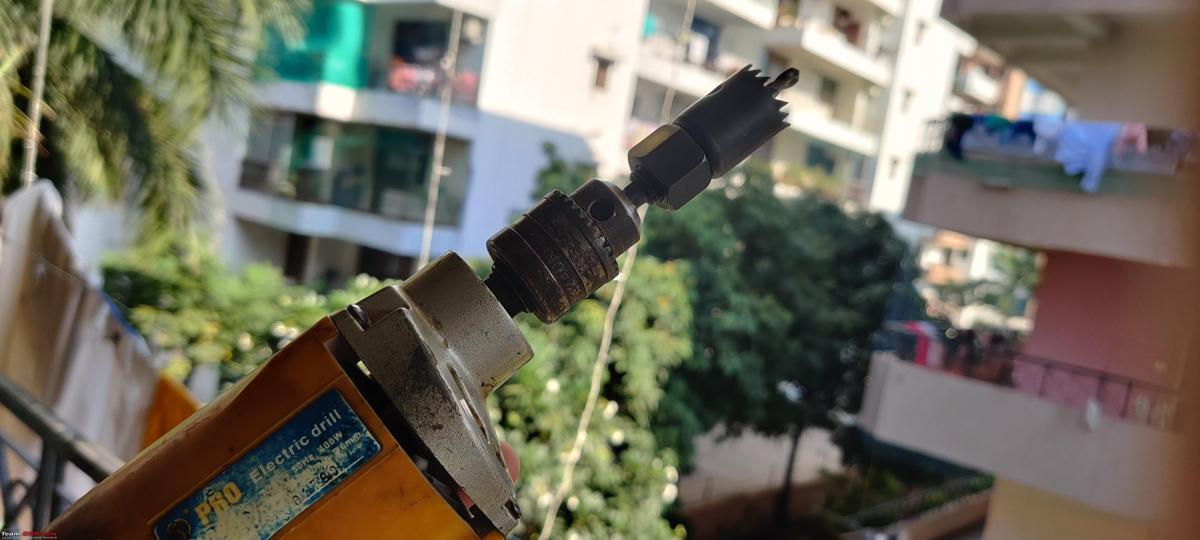
Using a drill, you can gently carve into this reflector bowl and make the right-size hole depending on what dimension bulb or LED you wish to use.
I was expecting a lot of debris to fall inside while drilling, but if you use an inverted workbench, then you can reduce the amount of debris that remains inside. If there’s any debris inside after drilling, then a flexible soft brush or a vacuum cleaner should be a good option to evacuate this DRL chamber and make it ready for housing your new bulb.
Preparing Wires and Routing
The schematic above is incredibly simple. We have one wire going into the headlight switch at T17/3 and you can find a crimp with part number N 906 844 05.

To access the headlight switch and the T17 connector, you will have to take the side panel on the driver side out along with the headlight switch, which can be twisted and turned to be pulled out elegantly. If you’re doing this on very early cars like 2012-2013, then it wouldn’t harm to check the switch once to see if it has a DRL pin at T17/3. Another way to double-check is using the multimeter and checking for power at T17/3.
This T17/3 wire splits into two wires which will go on either side of the DRL. This is the primary power wire which will run the DRLs and turn it off when the headlights are turned on. Just as they should.
Each DRL also needs a ground connection. You can also make a similar arrangement by making a long common ground wire, but I prefer to have two independent ground points for the two DRLs. There are plenty of ground points in the engine bay and if you have a Ring-Connector at the end of your ground wire, then you can loop your ground cable to any ground point nearest to you.
Joining & taping harnesses

Automotive wiring can be joined in quite a few ways depending on your preference. There are so many different techniques to join wires and I’ve seen at least 3-4 good ones on YouTube. Soldering, X-Splices (Western Union Joints) and Adhesive Heat Solder crimps are a few of the options I’ve used in the past.
Regardless of which one you use, make sure the joint is nice and tight and does not come off easily. A layer of insulating tape or shrink would make your joint corrosion resistant if you plan on keeping it in the engine bay, where it could have access to moisture during the monsoon or washing.

Prerak has used heat-shrinks to prepare his harnesses and taped wires with Tessa tape. There are two types of automotive tapes I’ve come across while working on VW cars. Softer ones which I’ve found in the interior and a slightly more resilient one that is more heat resistant and more suitable for wiring in the engine. So make sure you choose the one you need, as sellers on Amazon seem to be prescribing one type for both uses.
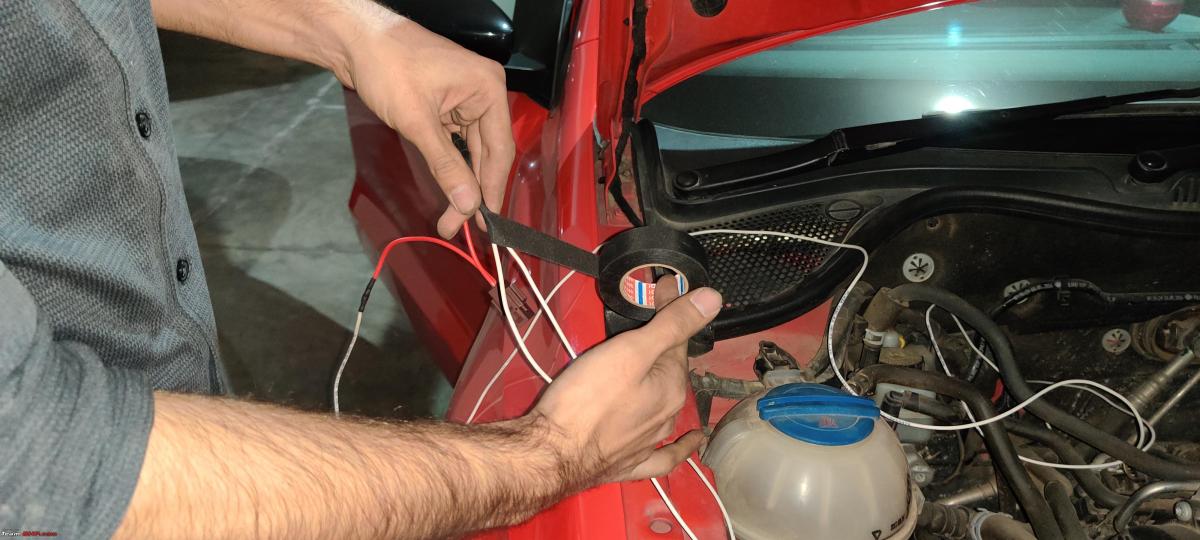
For automatic cars, the empty rubber grommet for the non-existent Manual Clutch Cylinder is one of the quickest ways to get wires from the engine bay into the cabin. This grommet should be removed to make a small hole to feed the wires and then should be reattached securely to the engine firewall.
For manual cars, you can use the door-fender grommet or the wiring grommet under the windshield covering plastic on the passenger side for feeding the wire inside to the light switch, but I would love to know if there are any more convenient routes for manual transmission cars, since I haven’t personally worked on one.
Connector breakup view
To insert crimps into the VAG connector, you need to pull out the pink locking tab which slides out when you pry it out gently with a flat blade screwdriver. Once you insert the crimps inside, reinsert the pin locking tab to secure the pins in the connector.
Once everything is connected, you can test the fruits of your labour by trying out all the positions in the headlight switch.

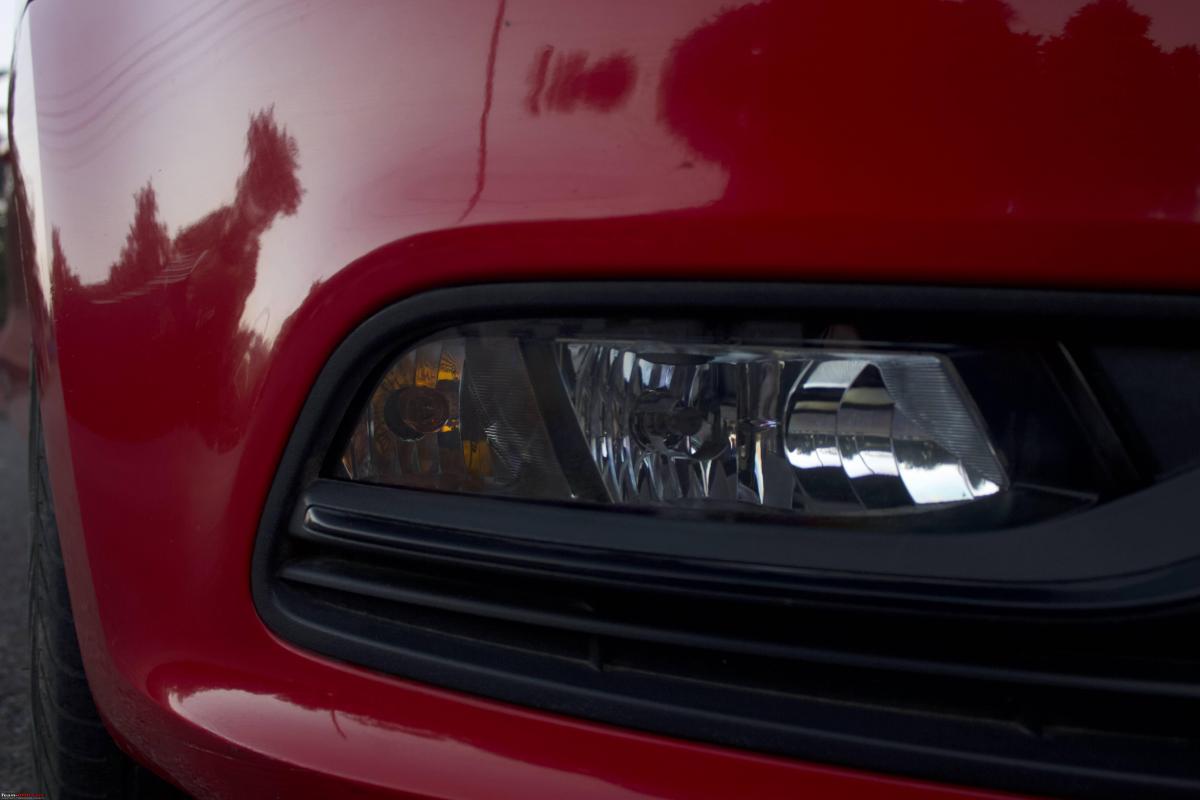
You have successfully installed some neat-looking DRLs on your car and you have full freedom to install whatever bulb and colour temperature you wish. I'm for sure a fan of White DRLs. The DRL will turn off when the headlights are turned on. The fog lights work as usual. Here is a click of the fog lights along with the DRLs.

Heartiest congratulations and a big thanks to Prerak for sharing pictures and videos of his efforts with me so they could be shared on Team-BHP. I hope this DIY helps many more passionate Polo Vento drivers.

Check out BHPian comments for more insights and information.
- Tags:
- Indian
- Volkswagen
- Polo
- DIY
- Fog lamps
News
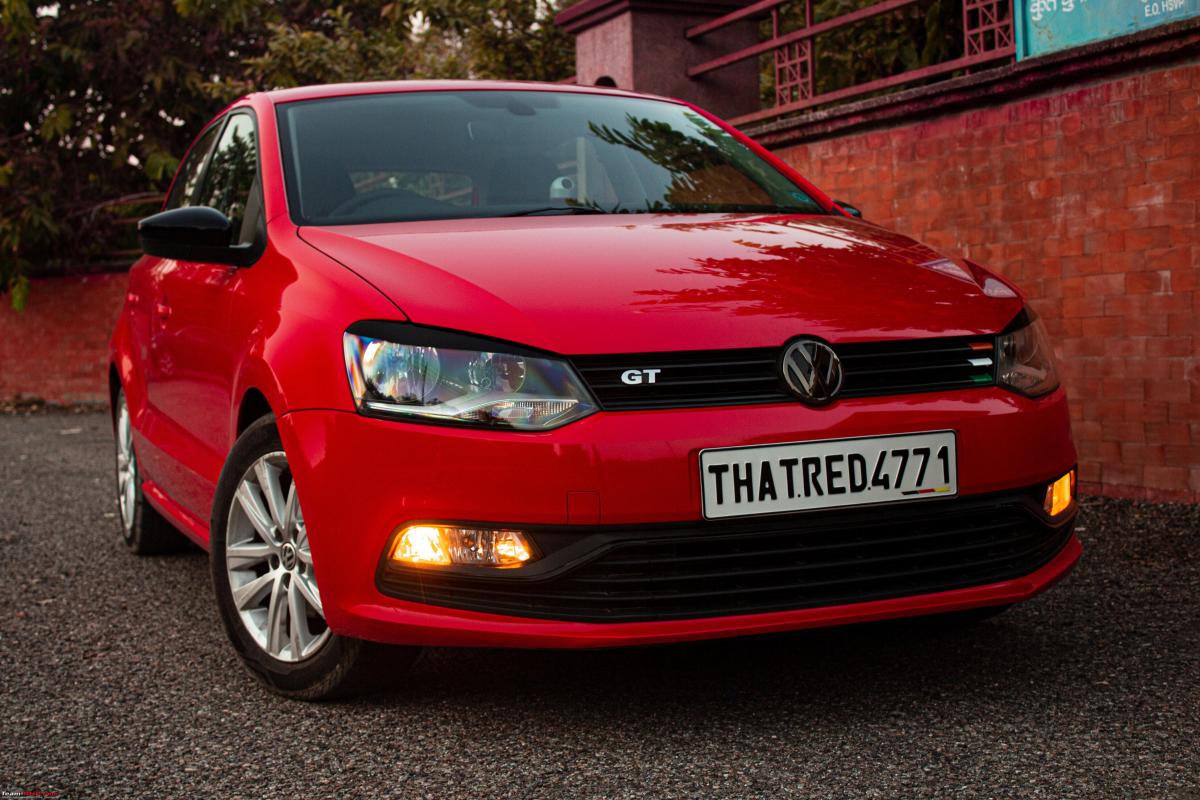
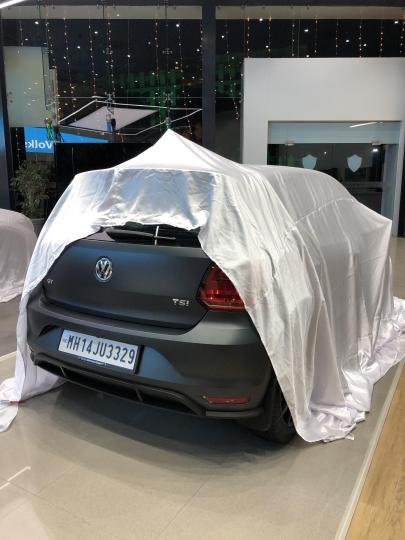
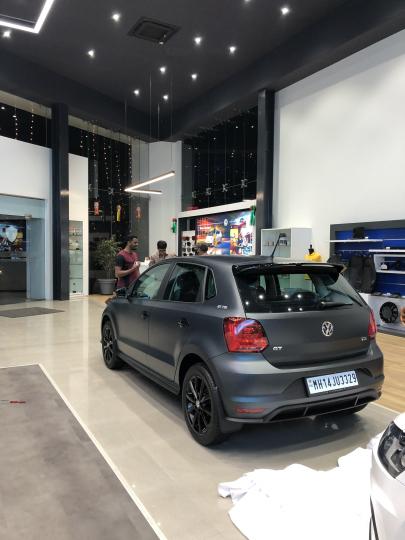
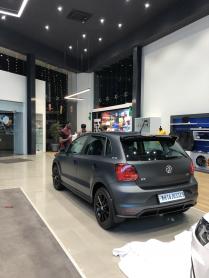
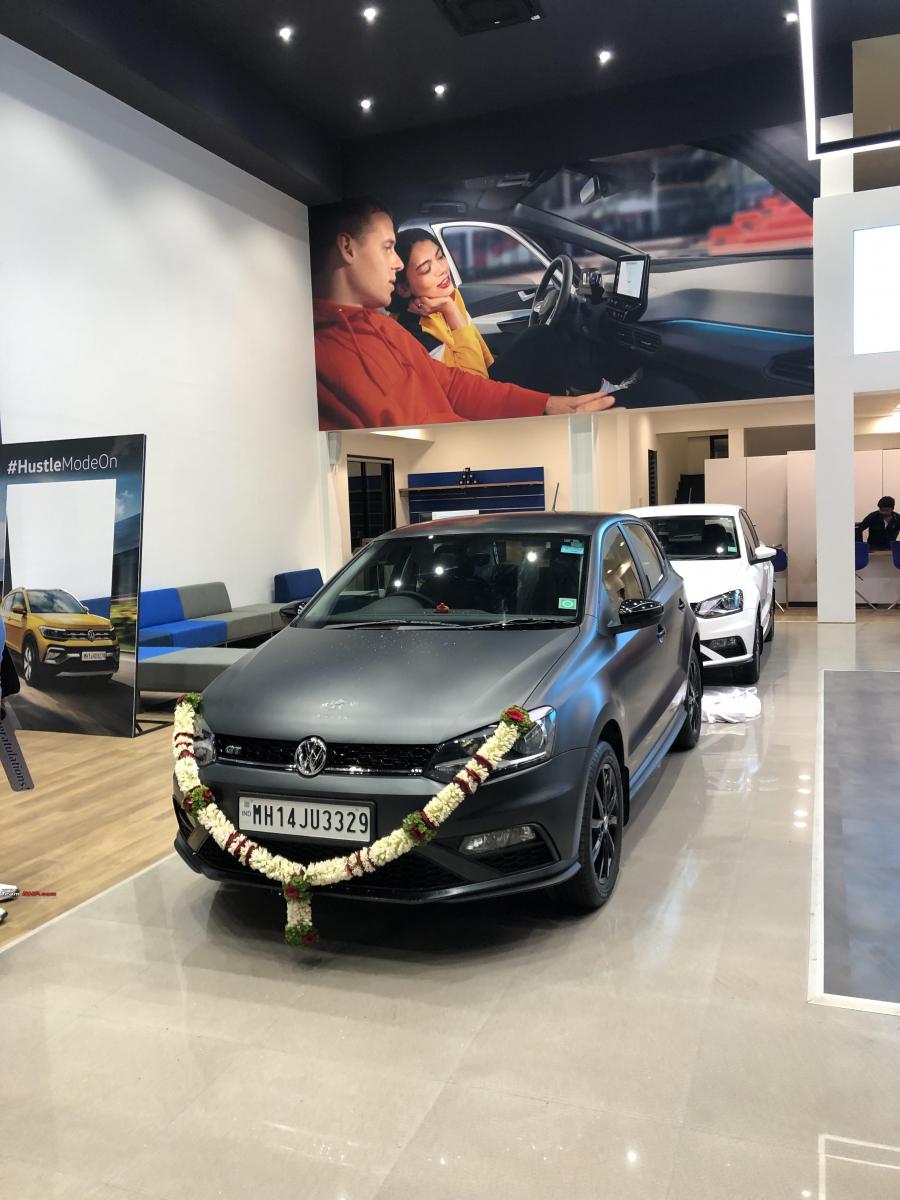
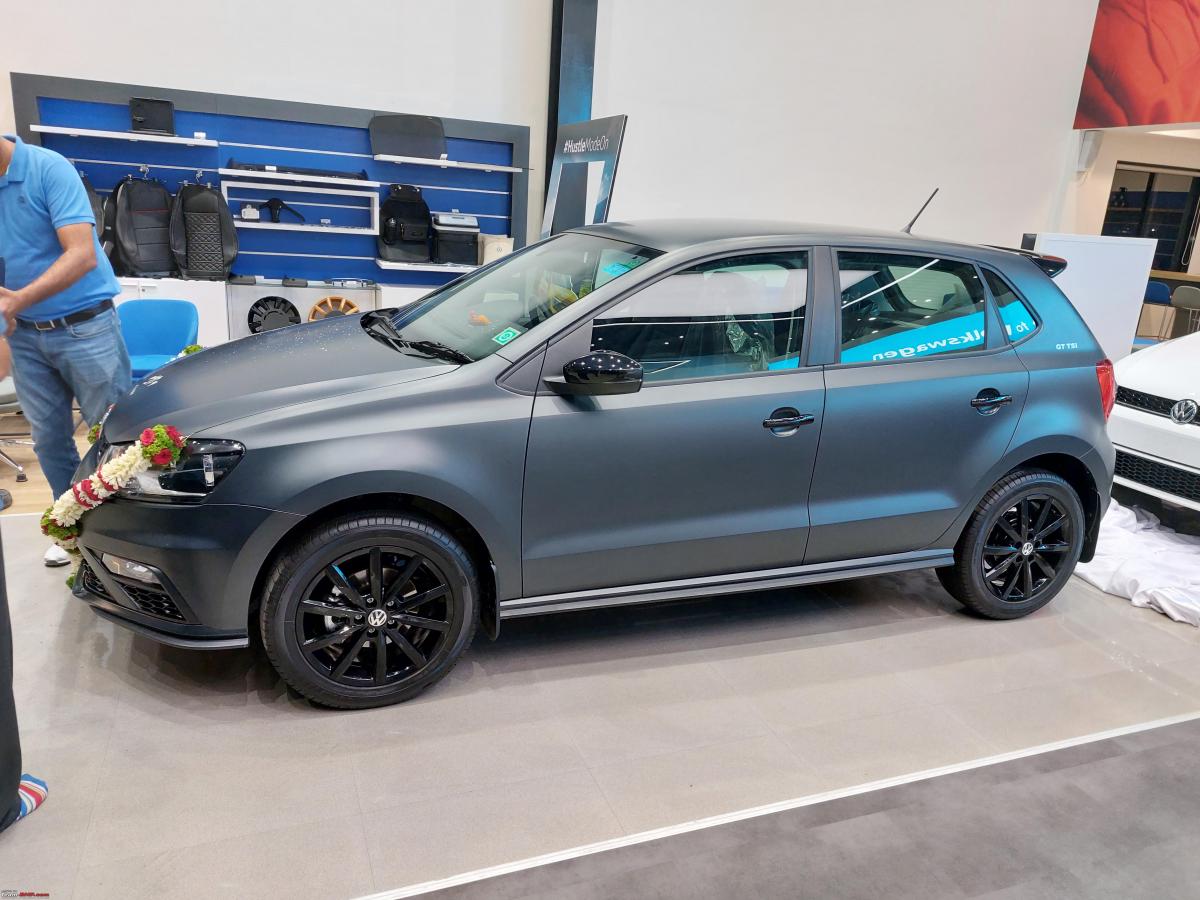
Taking delivery of my matte black Volkswagen Polo GT TSI


Before getting the Polo GT TSI, I had cancelled my bookings for the Toyota Innova MPV and Honda Jazz hatchback.
BHPian satya180 recently shared this with other enthusiasts.
Hi,
After cancelling the bookings for the Innova and Jazz, we finally took delivery of our first choice, a Volkswagen Polo GT TSI. We were lucky to get one in matte.
The car looks much better in the flesh than in pictures. SA has advised me against using any wax, polish, chemicals on the paint surface. Normal wash at a washing center/pressure spray is ok. Also to not use anything but a microfiber cloth to dry wipe the car.
The ACC unit display font is different in this GT TSI and the position of the temperature and blower speed has been interchanged. Will click a picture tomorrow and post it.
I got the wheels painted gloss black, an OE armrest and a reverse camera from the dealer. I'm not too happy with the guided lines of the camera, the perspective seems very off, for now, will speak to the SA about it.
Update
We had booked an Innova Crysta GX 8STR 2.4D AT but cancelled it reading about the BS6 DPF issues being faced and my usage would not exceed the 6 km one-way commute on most days. Did not want to live with an unreliable family car. I had agreed for the Innova because we have a 2-year-old kid now and I was willing to use it as a daily but the more I read, the more I realised how complex and new the tech is, and with norms getting stricter in 2023, I did not want to spend 25 big ones and live in uncertainty.
With the Innova cancelled I still needed a car. With an 8-seater car out of the equation, I decided to just get a small personal car. My first choice was always a GT TSI but with none available immediately (I needed a car asap), I decided to check my second favourite hatchback, the Jazz. The lack of magic seats and ISOFIX was a real bummer, but we still ended up booking a Jazz ZX CVT. The 1.2 NA did not excite me much, but then I needed a car and assumed I would be able to live with it. The LED headlamps and sunroof were slight pacifiers, but I was still miraculously hoping to get myself the GT TSI. I even sent my SA the Jazz and Innova booking receipts and told him to do whatever it takes.
In the meanwhile, reading a BHPian's Polo x Safari crash episode, and the Linea toppled loaded container episode, I was sure that I needed a Polo over the Jazz as I'm not sure how the Jazz would have fared in both the incidents.
I was letting out massive energy in the universe to get me a GT TSI, and just 3 days before delivery of the Jazz, I got a call from my SA that a matt GT TSI can be made available if I was willing to commit. I told him to book it without wasting even a second.
And here she is!


Check out BHPian comments for more insights and information.
- Tags:
- Indian
- Polo
- Volkswagen
- Volkswagen Polo
Pages
About Us