Team-BHP > Vintage Cars & Classics in India > Post-War
Register New Topics New Posts Top Thanked Team-BHP FAQ


Reply
  Search this Thread
400,805 views
Old 7th December 2009, 14:09   #316
BHPian
 
Sidman's Avatar
 
Join Date: May 2008
Location: Bangalore
Posts: 416
Thanked: 28 Times

Quote:
Originally Posted by starter View Post
Sorry, please forgive me.
@Sid: Were you in Cubbon Park on Sunday morning @ around 11:15AM in front of the library riding your blue lamby with a blue helmet? Spotted a neatly maintained lamby and thought it was yours. Please confirm if it was you.
Cheers,
Deepak
Hi Deepak, no that wasn't me! I use a white helmet. At the time you mention, I was headed towards Koramangala on my other bike. My scooter also has a Lambretta spare wheel cover on the spare tyre. So remember...white helmet and Lambretta spare wheel cover means it's my bike!
Sidman is offline  
Old 10th December 2009, 22:29   #317
Distinguished - BHPian
 
Stanher's Avatar
 
Join Date: Aug 2006
Location: Hyderabad, AP
Posts: 6,491
Thanked: 2,087 Times

Sorry again for my "disappearing act" but things have been going at a relatively slower pace this time, plus problems with my net at home has kept me cut-off for quite a while!

Anyways, update on MDS 4713: Scoot was washed for I think the first time since being restored and driven by the mech. back to his home in Secunderabad. To be reassembled and then bought back to the painters' for rubbing and polishing.

Meanwhile, proceeded with getting the engine sorted- on Saurabh (SA7VA5)'s kind advice, have proceeded with getting the cyl. head and bore faced at the places where they both come into contact with the packings. It was decided thus as an unfaced head and/or bore is often the reason for air to leak out! And come to think of it, my engine has gone to 2 different persons, including the present guy, for rebuilding and NEITHER of them ever suggested getting the head and bore squared!!

Incidentally, I was told that most mechanics, especially nowadays, would avoid doing this, as its a rather time-consuming and slightly strenuous job, but it sure is worth it!

Just FYI for those who may not know yet, this is how you face the head/bore if you'd have to DIY, as I've had to. 'hope it's found useful.

-First, take a FLAT, clean pieace of squarish glass, preferably around 1*1 ft. Either float or toughened. But make sure it's something you wouldn't need again.

-Then take some LAPPING COMPOUND, a.ka. Valve-grinding compound, as it is used commonly for engine-valve grinding for cars, but also keep adding kerosene in it, as it is known to be quite sticky and pasty. They come in coarse and fine variety, I was recommended to use the coarse type.

Lambretta scooters - Restoration & Maintenance-img_4147.jpg

-Smear the kerosene all over the glass. Then smear the lapping compound all over it. Try to spread it evenly, but the layer should be relatively thick.

Lambretta scooters - Restoration & Maintenance-img_4149.jpg

-Then place the head/bore sans the packing/gasket etc. with the gasket-side down onto the lapping compound covered glass and move it SLOWLY in circular motions, either in '0' or figure '8' shape, whatever convenient, clockwise or anti. Also hold the head/bore in the SAME position throughout, avoid turning/twisting it around while moving it, it does to tend to turn. Keep doing this for 1/2 an hour atleast. Then lift up the head/bore and you'll see parts of it appear scraped/dull compared to the original shinier parts. The dull parts indicate the area where it has been faced.
Also remove the excess lapping compound sticking onto it and smear it back onto the glass.

-Now complete the job so as to give the new appearance to the entire gasket area throughout. You may have to do it twice, or even thrice, depending on the outcomes. This will take another 1/2 hr atleast. Better to switch directions, ie. anti-clockwise or otherwise as opposed to your previous round, but maintain uniform SLOW speed throughout.

-Once done, lift the head/bore up again, you should find a thorough and 99% uniform facing done by now.

Here are pics. of my engine head, before, after 1st round of facing, and then the 2nd stage, then finally the last and final one completing the facing. The difference can be seen easily. Saurabh has certified that this will do and now to proceed with facing the bore similarly.

Lambretta scooters - Restoration & Maintenance-img_4119.jpg

Lambretta scooters - Restoration & Maintenance-img_4150.jpg

Lambretta scooters - Restoration & Maintenance-img_4153.jpg

Lambretta scooters - Restoration & Maintenance-img_4162.jpg
Stanher is offline  
Old 10th December 2009, 23:43   #318
Senior - BHPian
 
SuperSelect's Avatar
 
Join Date: May 2008
Location: Mumbai.
Posts: 1,806
Thanked: 247 Times

Wow Shyam... Labour of Love, truly.
This scoot is going to love her owner, for putting in his heart as much as his mind !!!
SuperSelect is offline  
Old 11th December 2009, 00:02   #319
Distinguished - BHPian
 
Stanher's Avatar
 
Join Date: Aug 2006
Location: Hyderabad, AP
Posts: 6,491
Thanked: 2,087 Times

Quote:
Originally Posted by SuperSelect View Post
Wow Shyam... Labour of Love, truly.
This scoot is going to love her owner, for putting in his heart as much as his mind !!!
Thanks ravi! 'hope the same! And hope she proves it too!
Stanher is offline  
Old 11th December 2009, 12:38   #320
Senior - BHPian
 
manishalive's Avatar
 
Join Date: Apr 2009
Location: Bangalore
Posts: 2,514
Thanked: 1,082 Times

Quote:
Originally Posted by Stanher View Post
Meanwhile, proceeded with getting the engine sorted- on Saurabh (SA7VA5)'s kind advice, have proceeded with getting the cyl. head and bore faced at the places where they both come into contact with the packings. It was decided thus as an unfaced head and/or bore is often the reason for air to leak out! And come to think of it, my engine has gone to 2 different persons, including the present guy, for rebuilding and NEITHER of them ever suggested getting the head and bore squared!!

Incidentally, I was told that most mechanics, especially nowadays, would avoid doing this, as its a rather time-consuming and slightly strenuous job, but it sure is worth it!

Just FYI for those who may not know yet, this is how you face the head/bore if you'd have to DIY, as I've had to. 'hope it's found useful.

-First, take a FLAT, clean pieace of squarish glass, preferably around 1*1 ft. Either float or toughened. But make sure it's something you wouldn't need again.

-Then take some LAPPING COMPOUND, a.ka. Valve-grinding compound, as it is used commonly for engine-valve grinding for cars, but also keep adding kerosene in it, as it is known to be quite sticky and pasty. They come in coarse and fine variety, I was recommended to use the coarse type.

Here are pics. of my engine head, before, after 1st round of facing, and then the 2nd stage, then finally the last and final one completing the facing. The difference can be seen easily. Saurabh has certified that this will do and now to proceed with facing the bore similarly.
Well In olden days this used to be a common practice for truing the surface. I remember doing this on Car Carburetors also. One good thing would be to shave of 1 thou (one thousand of an inch) of a surface on lathe machine. And then Facing on a Glass. this will give slightly better results. The increase in compression ratio will depend on the bore and stroke and the amount of material removed. However with today's high octane fuel, that should not be a problem.
manishalive is offline  
Old 11th December 2009, 22:16   #321
BHPian
 
LambyMan's Avatar
 
Join Date: Oct 2009
Location: Pune
Posts: 90
Thanked: 5 Times

Almost the projects gonna be over, but no current, Ilango's working on the same. I seriously have no clue why there's no current coming from Magnet.
Attached Thumbnails
Lambretta scooters - Restoration & Maintenance-lamby-341.jpg  

Lambretta scooters - Restoration & Maintenance-lamby-344.jpg  

LambyMan is offline  
Old 15th December 2009, 12:32   #322
BHPian
 
Join Date: Jul 2008
Location: DELHI
Posts: 297
Thanked: 154 Times

Reasons why there is no current is as follows- check it would be one of them:
  1. Condenser - try to replace and see
  2. Magnet in the flywheel is weak - re-charge
  3. The point gap setting is in-correct - check the points the faces should sit square and there should be no burn / spark marks - please use a fine sand paper / file to clean and re adjust gap
  4. Low tension coil may itself not be working
  5. THe wiring from the magnet to the terminal may be pinched - fix
Cheers!
SA7VA5 is offline  
Old 15th December 2009, 17:55   #323
Distinguished - BHPian
 
Stanher's Avatar
 
Join Date: Aug 2006
Location: Hyderabad, AP
Posts: 6,491
Thanked: 2,087 Times

Rakesh, good going! 'hope your current problem's sorted out soon!

BTW, are you able to get the horncast-mudguard rubber there? I see it fitted on your scoot. Could you get me one too

OK update on my project again:

After the head was done facing, I now did the same with the bore, again taking Saurabh's help. Here are the before and after pics. The bore, being a new one, 2 rounds of facing got it right, unlike in the case of the head:

Lambretta scooters - Restoration & Maintenance-img_4186.jpg

Lambretta scooters - Restoration & Maintenance-img_4187.jpg

Lambretta scooters - Restoration & Maintenance-img_4196.jpg

Lambretta scooters - Restoration & Maintenance-img_4197.jpg

Also, again taking a cue from Saurabh, decided to get the inside of the rear mudguard coated with anti-rust black (in my case, "WURTH") The painter said it being too thick, gets stuck all over the inside of the paint-gun reservoir, so had it done by brush. 'come out OK nevertheless.

Lambretta scooters - Restoration & Maintenance-img_4108.jpg

Lambretta scooters - Restoration & Maintenance-img_4207.jpg

Lambretta scooters - Restoration & Maintenance-img_4209.jpg

Last edited by Stanher : 15th December 2009 at 18:07.
Stanher is offline  
Old 16th December 2009, 15:42   #324
BHPian
 
LambyMan's Avatar
 
Join Date: Oct 2009
Location: Pune
Posts: 90
Thanked: 5 Times

Thanks a ton Stan and Saurav,

At last the Engine coughed on Sunday. Magnet was done by Ilango, Wanted to have just saddled seats but available in market, My dad asked me to get him a sheet of thick Leather around 5mm, and he would make a saddle for the seats with leather, however I was too desperate and just took the bajaj plastic molded seat saddles cut them as required and wrapped them in rexine, and finally revitted them I know does not look as good but I'm loving it, wat do you say folks?
Lambretta scooters - Restoration & Maintenance-lamby-359.jpg

Lambretta scooters - Restoration & Maintenance-lamby-360.jpg

Lambretta scooters - Restoration & Maintenance-lamby-361.jpg

Lambretta scooters - Restoration & Maintenance-lamby-363.jpg
LambyMan is offline  
Old 16th December 2009, 15:49   #325
BHPian
 
Mitch's Avatar
 
Join Date: Nov 2009
Location: Leeds, England
Posts: 104
Thanked: 5 Times

Hey Lambyman! That's great work. You guys are skilled!
Mitch is offline  
Old 16th December 2009, 20:26   #326
Senior - BHPian
 
the mole's Avatar
 
Join Date: Nov 2006
Location: Mumbai
Posts: 2,189
Thanked: 825 Times

Hey Lambyman, what are those gaps I see between your side panels and the body? Or is that just the side panel rubber trim?
the mole is offline  
Old 16th December 2009, 20:28   #327
BHPian
 
LambyMan's Avatar
 
Join Date: Oct 2009
Location: Pune
Posts: 90
Thanked: 5 Times

Yeah Mole,

Its the rubber, tried to bend it and all but still fits the same way :(
LambyMan is offline  
Old 18th December 2009, 13:39   #328
BHPian
 
Join Date: Jul 2008
Location: DELHI
Posts: 297
Thanked: 154 Times

Great Going !

Congratulations and good show.

What was wrong with the magnet finally - why no current and what did you do to fix it?

Cheers!

Saurabh
SA7VA5 is offline  
Old 18th December 2009, 15:20   #329
BHPian
 
ilangop's Avatar
 
Join Date: Jul 2008
Location: Chennai
Posts: 992
Thanked: 903 Times

Quote:
Originally Posted by SA7VA5 View Post
What was wrong with the magnet finally - why no current and what did you do to fix it?
Initially tried with a new contact breaker. Then a bitten (in between the stator plate and the backing plate since years) green wire and years old condensor were found to be the culprits. Both were replaced and all other joints were re-soldered. The coil came alive again
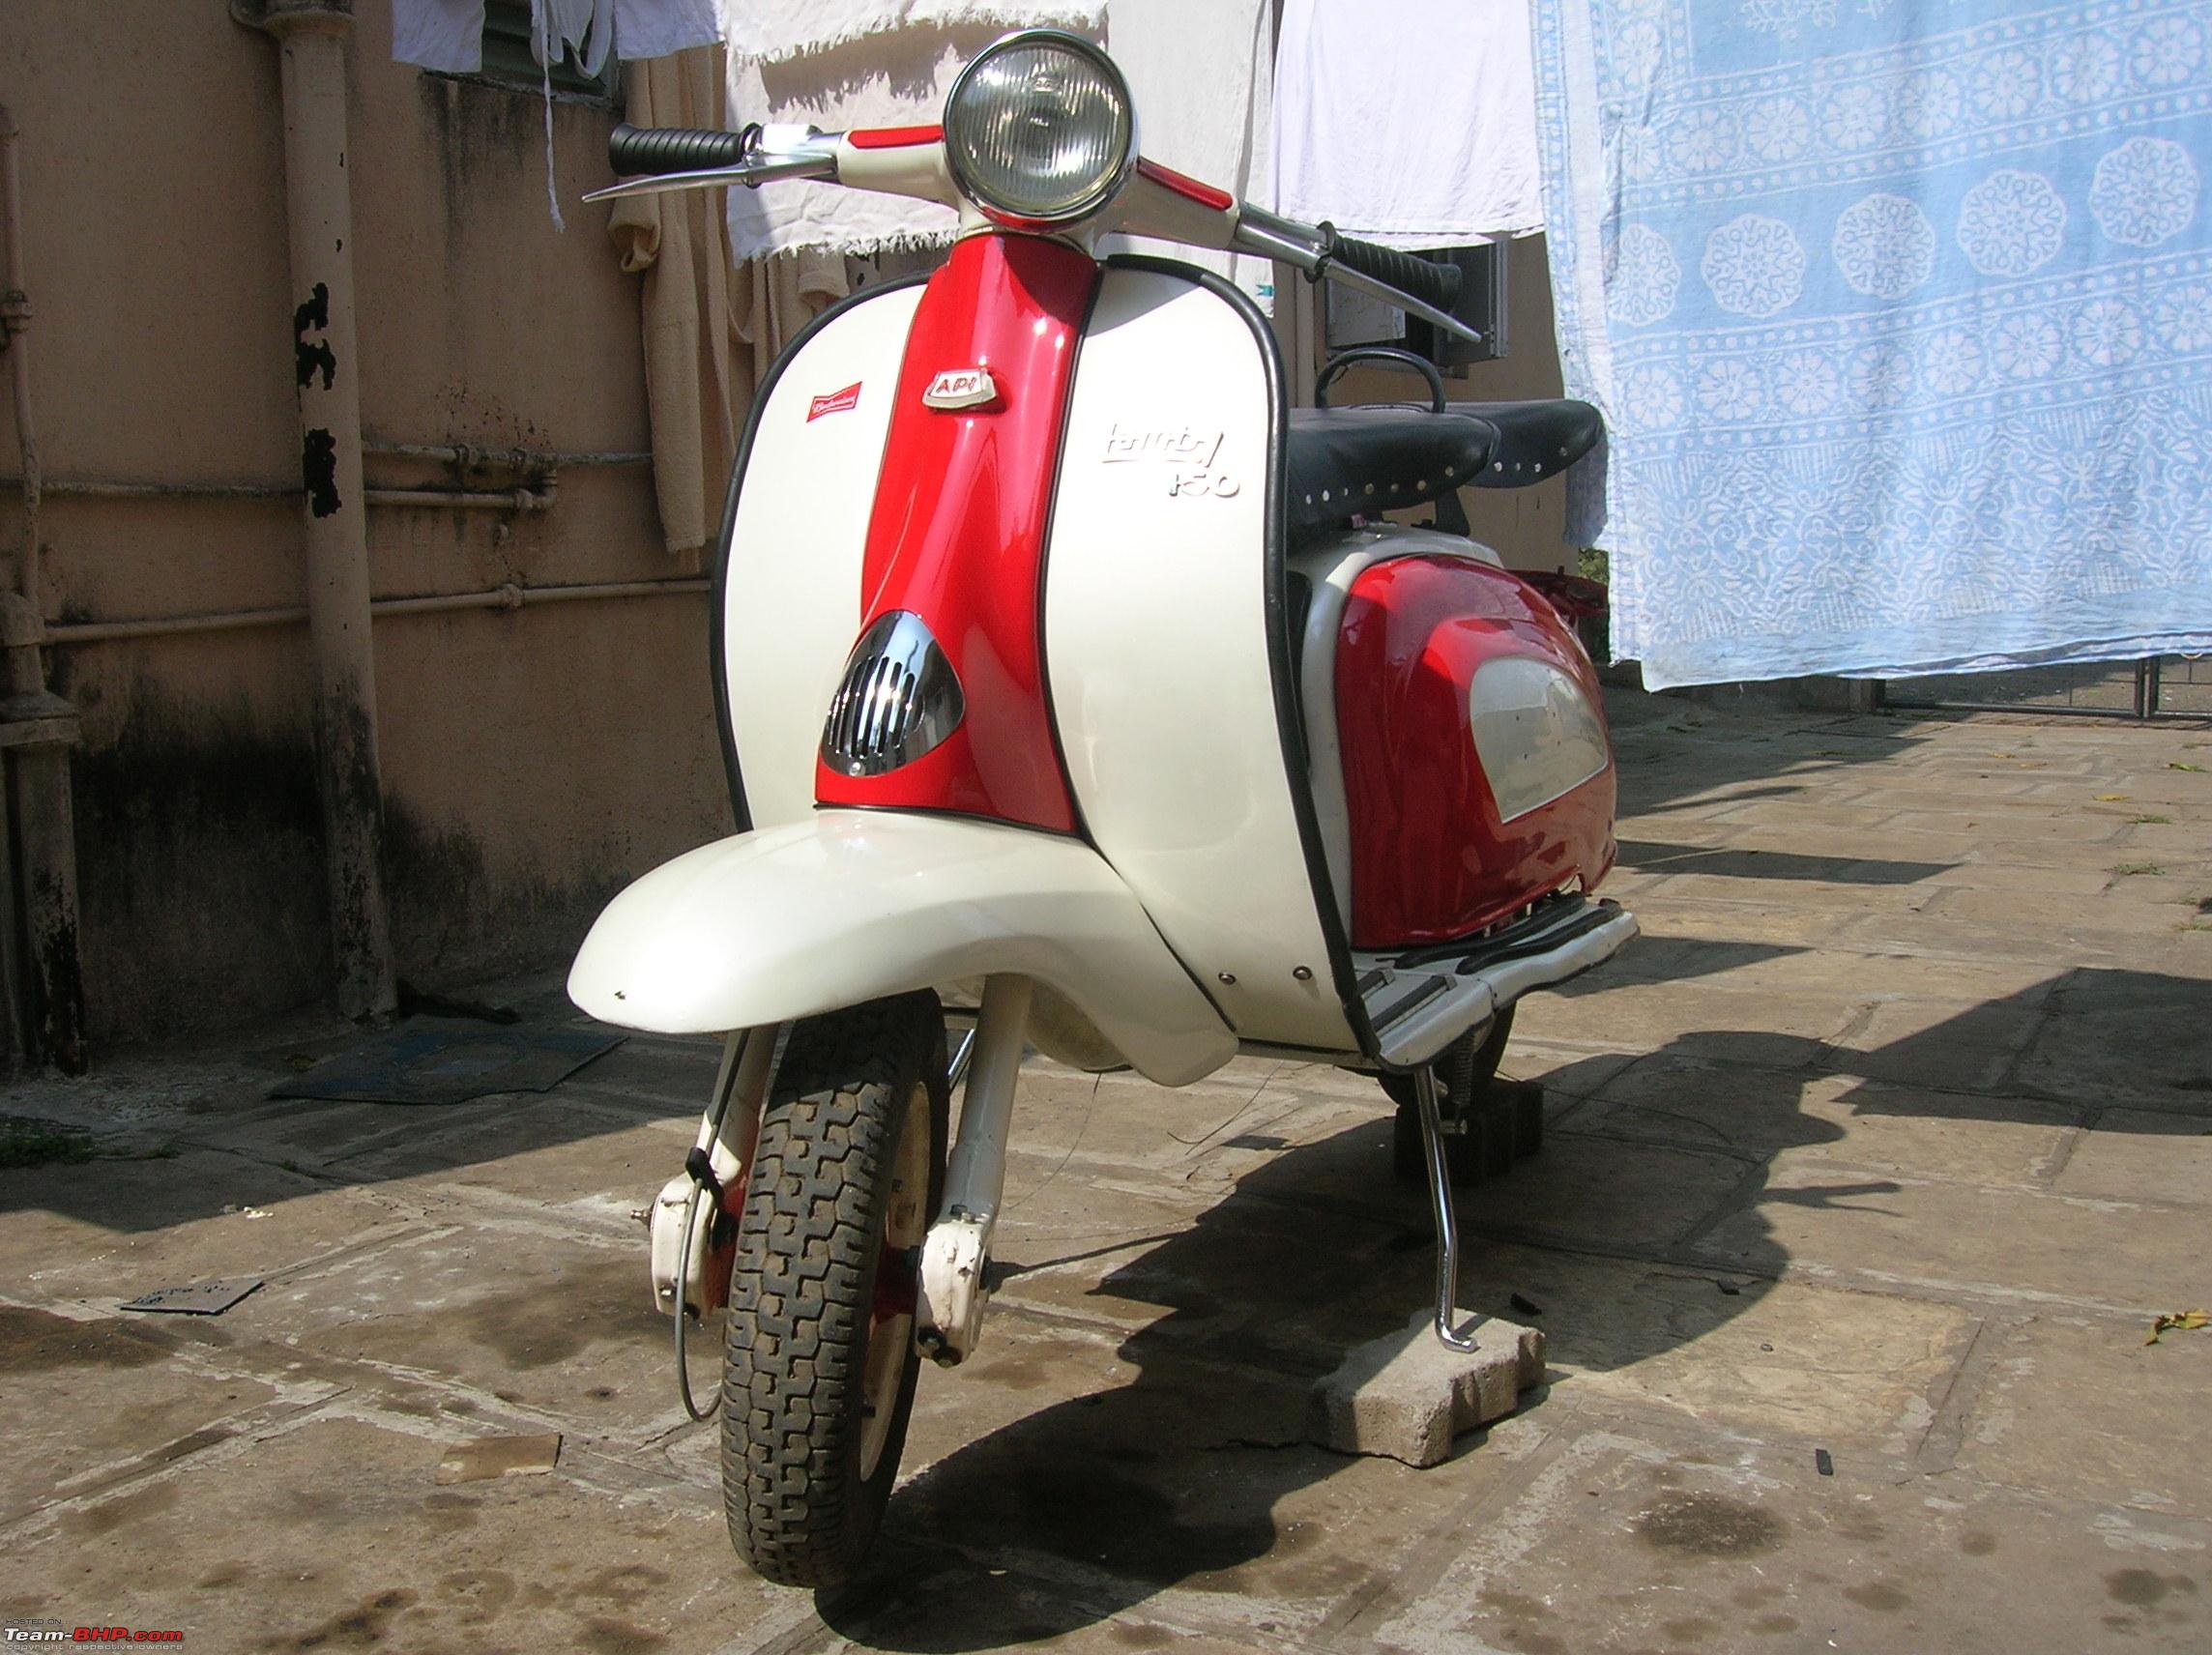
. Planned to fix the cables and the rest of the electricals tonight, and hopefully Rakesh may have the maiden drive on the scooter tonight. Letz see..
ilangop is offline  
Old 18th December 2009, 16:02   #330
BHPian
 
Sidman's Avatar
 
Join Date: May 2008
Location: Bangalore
Posts: 416
Thanked: 28 Times

Great to see all these beautiful scooters coming back to life! Some of you liked the mirrors fitted on my scooter, and wanted to know how it was done. I promised you pics, and finally here they are! These mirrors are of Autobird brand, and commonly fitted on Enfield Bullets. See the pics to understand how my mech has mounted them. It will need some welding at the headset to mount those clamps.
Attached Thumbnails
Lambretta scooters - Restoration & Maintenance-dsc00950.jpg  

Lambretta scooters - Restoration & Maintenance-dsc00951.jpg  

Lambretta scooters - Restoration & Maintenance-dsc00952.jpg  

Sidman is offline  
Reply

Most Viewed


Copyright ©2000 - 2024, Team-BHP.com
Proudly powered by E2E Networks