Team-BHP > Modifications & Accessories
Register New Topics New Posts Top Thanked Team-BHP FAQ


Reply
  Search this Thread
1,038,162 views
Old 15th September 2011, 15:00   #856
Senior - BHPian
 
rjstyles69's Avatar
 
Join Date: Sep 2006
Location: Bengalooru..
Posts: 4,343
Thanked: 842 Times
Re: Alloys for stock tyres

Rj, so you mean to say that in case I want to put these alloys, will have to change the PCD to 100. How hard and expensive is it any idea.

You cant change it my friend , its called conversion. Dig this thread here (PCD Conversion: How Safe and Availability), a few options have been discussed. However it aint advisable to do so.


Quote:
Originally Posted by prsnck View Post
Btw, can u just brief what is PCD and how do you measure it. Is it advisable to change the PCD for alloys fitment.

rgrds
prsn
Read here , very well explained. The 1st thing when you embark on this is that you should find the PCD adapters/spacers. Please don't confuse this with wheel spacers. This is something different, if you look up the 1st link in this post there are images on that thread.

Else you always have the option of drilling new holes in the hub at a 90 degree angle to ensure your new replacement studs are press fitted in properly. This is the last thing you would want to do if you cant find the spacers. Not worth the effort , think about it.

I don't know if anyone has done this here on the forum , a PCD conversion ..

Last edited by mobike008 : 18th January 2012 at 17:37. Reason: excluded incorrect quote tag
rjstyles69 is offline  
Old 15th September 2011, 16:16   #857
BHPian
 
Ushuaia's Avatar
 
Join Date: Oct 2009
Location: Gurgaon
Posts: 162
Thanked: 23 Times
Re: Alloys for stock tyres

[quote=rjstyles69;2506977]
Quote:
Originally Posted by prsnck View Post
Rj, so you mean to say that in case I want to put these alloys, will have to change the PCD to 100. How hard and expensive is it any idea.

You cant change it my friend , its called conversion. Dig this thread here (PCD Conversion: How Safe and Availability), a few options have been discussed. However it aint advisable to do so.


Read here , very well explained. The 1st thing when you embark on this is that you should find the PCD adapters/spacers. Please don't confuse this with wheel spacers. This is something different, if you look up the 1st link in this post there are images on that thread.

Else you always have the option of drilling new holes in the hub at a 90 degree angle to ensure your new replacement studs are press fitted in properly. This is the last thing you would want to do if you cant find the spacers. Not worth the effort , think about it.

I don't know if anyone has done this here on the forum , a PCD conversion ..
RJ, I have 2003 Zen which was running on 145/80 R 12 on rims, when I changed to alloys, didnt upsize kept R12 but went for Goodyear 145/80. Before this I changed my rear shocks. But ever since I changed the alloys, the tyres are jutting out by few mm and the rear outside scrape the body on undulating surfaces, the tyres are also carrying marks on them due to the drubbing. Rite now the situation is such that I cant seat anyone in rear as the rear dampening is soft and on a speed-breaker the rear is touching as described earlier.

Could you help advice, how I can fix this.

Thanks in advance!
Ushuaia is offline  
Old 15th September 2011, 17:33   #858
Senior - BHPian
 
Join Date: Sep 2005
Location: Adelaide
Posts: 1,159
Thanked: 318 Times
Re: The Zen Modifications Thread

i used to run 165/65/13 on plati rims and they worksamazing
desideep is offline  
Old 15th September 2011, 18:02   #859
Senior - BHPian
 
rjstyles69's Avatar
 
Join Date: Sep 2006
Location: Bengalooru..
Posts: 4,343
Thanked: 842 Times
Re: Alloys for stock tyres

[quote=Ushuaia;2507113]
Quote:
Originally Posted by rjstyles69 View Post

RJ, I have 2003 Zen which was running on 145/80 R 12 on rims, when I changed to alloys, didnt upsize kept R12 but went for Goodyear 145/80. Before this I changed my rear shocks. But ever since I changed the alloys, the tyres are jutting out by few mm and the rear outside scrape the body on undulating surfaces, the tyres are also carrying marks on them due to the drubbing. Rite now the situation is such that I cant seat anyone in rear as the rear dampening is soft and on a speed-breaker the rear is touching as described earlier.
An easy way is to get stiffer suspension installed, but that aint cheap. Else you can install spacers which would increase the height by an inch or more , but it's compromise on the handling of the car.

145/80/12 is the right upsize for the car, however it has to do with the offset of the alloys which is causing it to stick out a few mm. 3 options
  • Change the alloys to one's with the right offset.
  • Get stiffer suspension.
  • Install spacers.
The 3rd one should be your last resort. Drive safe.
rjstyles69 is offline  
Old 17th January 2012, 19:25   #860
BHPian
 
chethan25's Avatar
 
Join Date: Jul 2007
Location: bangalore
Posts: 48
Thanked: 24 Times
Re: The Zen Modifications Thread

Hello All,

I have been a silent reader of the website for a while now since 2007 and i havent posted much. I have a 2006 zen running on 175/60/R13( Potenza G3) with league R13 and 5.5JJ rims. I generally drive alone or my wife accompanies me rare cases i have 4 ppl at the max in my car. 5 ppl in the car travel is 1 in 10 times may be. I have not had any issues with the tyre touching the wheel arch. The only modification done to stop it is the edge where the wheel archs end on the inside has been tapped back to be attached to the body apart from this there has been no cutting of the arch or spacers or suspension stiffenning. The car has done only 40k kms from the factory and may be after abt 20k kms when i suspension becomes weak i may have issues but not sure.

The Pros to this upgrade:
* Better handling in corners
* Better braking
* Good looks of the car over all

Cons:
* Drop in overall FE by 1kmpl( used to get consitant 16kmpl on the stock tyres n rim after upgrade came down to 15kmpl)
* Slight drop in pick up is wat i felt but that was immediatly compensated with the Green cotton CAI.
* Damage of 28k to my pocket

Here is the pic of my car after the upgrade
Attached Thumbnails
The Zen Modifications Thread-dsc_0005.jpg  

The Zen Modifications Thread-dsc_0011.jpg  

chethan25 is offline  
Old 17th January 2012, 23:31   #861
BHPian
 
Join Date: Mar 2010
Location: Chennai
Posts: 103
Thanked: 46 Times
Re: The Zen Modifications Thread

Chethan,

Your car looks amazing. The alloys compliment the color of the car well.
Maxwell Arthur is offline  
Old 18th January 2012, 10:50   #862
BHPian
 
chethan25's Avatar
 
Join Date: Jul 2007
Location: bangalore
Posts: 48
Thanked: 24 Times
Re: The Zen Modifications Thread

Quote:
Originally Posted by Maxwell Arthur View Post
Chethan,

Your car looks amazing. The alloys compliment the color of the car well.
Thank you Maxwell yea i took a long time deciding on the color of the mag and didnt find the rite ones. most of them were either in the hyper silver or machine finish silver and white ones but i wanted a little gun metal finish. Then after 2 months of search gave up on that and then brought the league alloys and got them painted to my choice of light gun metal finish. Here is the close up of the alloys showing the light shade of some what gun metal finish. The inner walls are painted and the out side spoke area is left with the normal mirror finish.
Attached Thumbnails
The Zen Modifications Thread-20110713-09.53.02.jpg  

chethan25 is offline  
Old 18th January 2012, 12:50   #863
Senior - BHPian
 
Schoudhury's Avatar
 
Join Date: Jan 2010
Location: Blore/Dallas-TX
Posts: 1,066
Thanked: 478 Times
Re: The Zen Modifications Thread

Quote:
Originally Posted by chethan25 View Post
Thank you Maxwell yea i took a long time deciding on the color of the mag and didnt find the rite ones. most of them were either in the hyper silver or machine finish silver and white ones but i wanted a little gun metal finish. Then after 2 months of search gave up on that and then brought the league alloys and got them painted to my choice of light gun metal finish. Here is the close up of the alloys showing the light shade of some what gun metal finish. The inner walls are painted and the out side spoke area is left with the normal mirror finish.
Chethan.
Your Zen looks neat . I will suggest if you can de-badge the rear hatch it will give the car an awesome look.
Also i feel as long as you don't drive on really bad roads, the suspension should be fine .
How much did you pay to get the drum painted ?
I checked with a local garage in HSR layout , he quoted Rs 1600 for the painting the front brake calliper and rear drum .

Cheers.
Schoudhury is offline  
Old 18th January 2012, 12:57   #864
BHPian
 
chethan25's Avatar
 
Join Date: Jul 2007
Location: bangalore
Posts: 48
Thanked: 24 Times
Re: The Zen Modifications Thread

Quote:
Originally Posted by Schoudhury View Post
Chethan.
Your Zen looks neat . I will suggest if you can de-badge the rear hatch it will give the car an awesome look.
Also i feel as long as you don't drive on really bad roads, the suspension should be fine .
How much did you pay to get the drum painted ?
I checked with a local garage in HSR layout , he quoted Rs 1600 for the painting the front brake calliper and rear drum .

Cheers.
Hello Choudhury,

Tried the de-badging mate at the 3M car spa in HSR but when we removed the "Maruthi Suzuki" badge there was a very small amount of paint clear coat removed(the 3m double side adeshive was so strong i guess) like a 1mm thick which was noticeable only when we observe it closely hence went back and got a badge replaced. The only badge i was able to get ride of was the old "Suzuki S" on the rear and got a new S logo like the new cars have.

The brake callipers painting was done at the tyre shop it self they charged some 500 bucks for it since i got the tyres and alloys from their store they offered it at a discounted price.
chethan25 is offline  
Old 18th January 2012, 13:54   #865
BHPian
 
chethan25's Avatar
 
Join Date: Jul 2007
Location: bangalore
Posts: 48
Thanked: 24 Times
Re: Carbon finish head-lights on Zen!

Quote:
Originally Posted by k_shanz View Post
I got my headlights smoked to carbon finish.
Hello Shanz,

I wanted to get my headlight done the way you had done for your Zen. could you please PM the exact details on how you did this. My understanding is that this was done to the existing one by removing the glass. If thats the case what adesive was used to fix the front glass back. Details on this would help a lot

Cheers,
Chethan
chethan25 is offline  
Old 18th January 2012, 14:08   #866
Senior - BHPian
 
Schoudhury's Avatar
 
Join Date: Jan 2010
Location: Blore/Dallas-TX
Posts: 1,066
Thanked: 478 Times
Re: The Zen Modifications Thread

Quote:
Originally Posted by chethan25 View Post
Hello Choudhury,

Tried the de-badging mate at the 3M car spa in HSR but when we removed the "Maruthi Suzuki" badge there was a very small amount of paint clear coat removed(the 3m double side adeshive was so strong i guess) like a 1mm thick which was noticeable only when we observe it closely hence went back and got a badge replaced. The only badge i was able to get ride of was the old "Suzuki S" on the rear and got a new S logo like the new cars have.

The brake callipers painting was done at the tyre shop it self they charged some 500 bucks for it since i got the tyres and alloys from their store they offered it at a discounted price.
Hmmm, is it .
I debadged those myself with nail polish remover and that glue came out fine. Not sure why clear paint got removed in your case.

500 bucks sound perfect, which shop you bought the tyres from .


Quote:
Originally Posted by chethan25 View Post
Hello Shanz,

I wanted to get my headlight done the way you had done for your Zen. could you please PM the exact details on how you did this. My understanding is that this was done to the existing one by removing the glass. If thats the case what adesive was used to fix the front glass back. Details on this would help a lot

Cheers,
Chethan
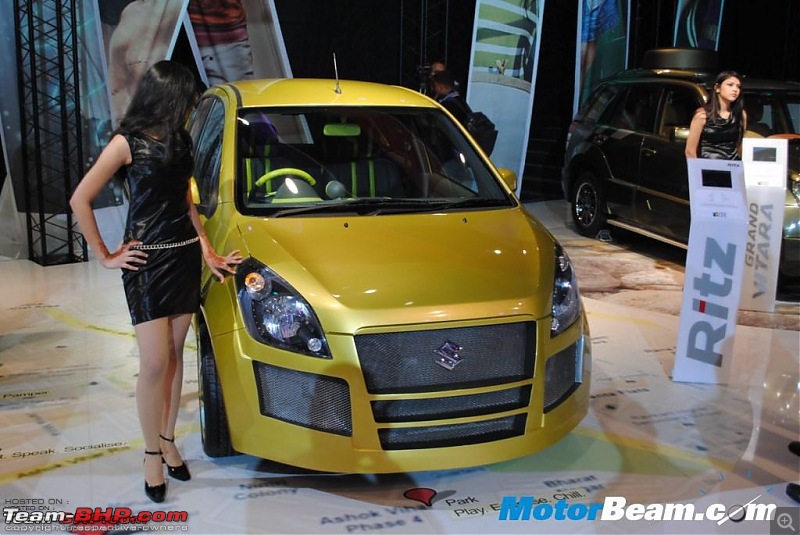
Im also planing to get the headlight of the Ritz painted something like this .
The Zen Modifications Thread-modified_maruti_ritz_2010_auto_expo.jpg

They will need to open the glass and then paint the inner part of the reflector. I have checked with sai colorium ( RKRamesh) and they said they can get it done, but the problem is , they dont have the equipment to open the glass cover and fit it back, so they take help from someone from the JC road to get that done .So its kinda long process.
Moreover we can get it done @ JC road itself, but not sure how will be the paint quaility .

Let me know if you find any place where we can get it done, we can both go together ( hope you are in blore only ).
Schoudhury is offline  
Old 18th January 2012, 14:19   #867
BHPian
 
chethan25's Avatar
 
Join Date: Jul 2007
Location: bangalore
Posts: 48
Thanked: 24 Times
Re: The Zen Modifications Thread

Hey Choudhury, the alloys and tyres were from Shiva shakti tyres in JC road bang opp to the JC multi level parking.

Looks like we both almost have the same next quest to accuire (headlights). Yeap will keep you posted if i find some one about the headlights.

Apart from that i will shortly be getting the mesh for the front grill as the car is in the stock look for more than 5 years now ..

Yes i stay in JP nagar.
chethan25 is offline  
Old 18th January 2012, 14:35   #868
BHPian
 
k_shanz's Avatar
 
Join Date: Oct 2006
Location: KL - TEN
Posts: 353
Thanked: 74 Times
Re: Carbon finish head-lights on Zen!

Quote:
Originally Posted by chethan25 View Post
Hello Shanz,

I wanted to get my headlight done the way you had done for your Zen. could you please PM the exact details on how you did this. My understanding is that this was done to the existing one by removing the glass. If thats the case what adesive was used to fix the front glass back. Details on this would help a lot

Cheers,
Chethan
HI,
You are not mistaken, thats the same way i did it to my car. I stripped the lights, smoked them black and fixed the glass back on it with silicon paste. The same one which is used for industrial purpose for fixing float glasses. You can get them in 2 types, black and clear. I used clear, and would suggest you the same.
Apply silicon in the edges of the glass where it go into the seats on the headlight back-cover before fixing. Heat the joints with the heating gun, it will help in melting the glue(grey paste) that came with the headlight and will get you the right-bond.
Make sure it is properly sealed, and for a safety apply some more silicon through the gaps(if there is)

Hope this will be useful to you

Cheers mate!
k_shanz is offline   (1) Thanks
Old 18th January 2012, 14:42   #869
BHPian
 
chethan25's Avatar
 
Join Date: Jul 2007
Location: bangalore
Posts: 48
Thanked: 24 Times
Re: Carbon finish head-lights on Zen!

Quote:
Originally Posted by k_shanz View Post
HI,
You are not mistaken, thats the same way i did it to my car. I stripped the lights, smoked them black and fixed the glass back on it with silicon paste. The same one which is used for industrial purpose for fixing float glasses. You can get them in 2 types, black and clear. I used clear, and would suggest you the same.
Apply silicon in the edges of the glass where it go into the seats on the headlight back-cover before fixing. Heat the joints with the heating gun, it will help in melting the glue(grey paste) that came with the headlight and will get you the right-bond.
Make sure it is properly sealed, and for a safety apply some more silicon through the gaps(if there is)

Hope this will be useful to you

Cheers mate!
Thanks Mate
That info helps off course !!
One last doubt i had was while removing the glass is there any precautions or procedures that are involved so that we dont end up breaking the outer glass ? and what paint was used so that it doesnt peel off, reason for asking this is can i use those after market spray can which are available in the store and paint it?

And if you could share the cost that would be great !!

Cheers.

Last edited by chethan25 : 18th January 2012 at 14:51. Reason: added "And if you could share the cost that would be great !!"
chethan25 is offline  
Old 18th January 2012, 15:08   #870
BHPian
 
k_shanz's Avatar
 
Join Date: Oct 2006
Location: KL - TEN
Posts: 353
Thanked: 74 Times
Re: Carbon finish head-lights on Zen!

Quote:
Originally Posted by chethan25 View Post
Thanks Mate
That info helps off course !!
One last doubt i had was while removing the glass is there any precautions or procedures that are involved so that we dont end up breaking the outer glass ? and what paint was used so that it doesnt peel off, reason for asking this is can i use those after market spray can which are available in the store and paint it?

Cheers.
There are many precautions that you should take care of.
1. Do not Over hear, this can cause your back cover use its shape and difficult to fix the glass back on it. Do not over heat the glass also, especially the side which is visible form outside as that will make your glass fade out.
2. The care while up-clipping the glass from the headlight.

I used the the regular matte paint on it over a coat of sealer for a better hold.

Good Luck!
k_shanz is offline   (1) Thanks
Reply

Most Viewed


Copyright ©2000 - 2024, Team-BHP.com
Proudly powered by E2E Networks